

Supplies
1 tube of choice - I used the artwork of Jennifer Janesko which can be purchased from CDO. You must have a license to use.
Font of choice - I used Respective here
Weescotlass Mask 236 here
Plug Ins:
Brush Strokes - Sprayed Strokes
“Reflections of Yesteryear” is a tagger size scrap kit created by Karen of Sweet Occasion Designs and can be purchased from Butterfly Blush Designs. You can visit her blog here.
Thank you Karen for a gorgeous classy kit!
This tutorial was written assuming you have a working knowledge of PSP.
~♥~ Let’s get started ~♥~
Open up a 700 x 700 blank canvas.
Flood Fill white.
Copy and paste fetedesperes_17 as a new layer.
Resize 50%
Free rotate Left 90 degrees
Move to the left side of your canvas.
Make your Selection Tool active set on Ellipse.
Make an oval approximately 300 x 425 pixels.
New Raster layer.
Copy and paste Paper 5 Into Selection.
Selection/Modify/Contract by 14.
Tap the delete key.
Deselect.
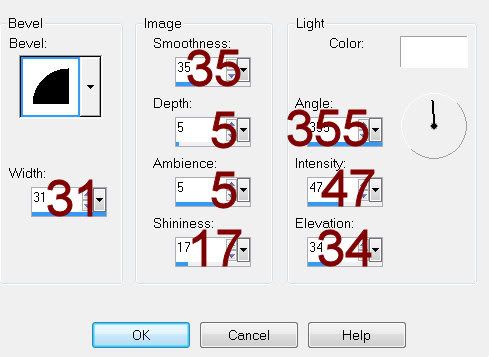
Give it a slight Inner Bevel:
Move the element frame and the oval frame into position - see my tag for reference.
Highlight the element frame.
Click inside of it with your Magic Wand.
Selections/Modify/Expand by 4.
New Raster layer below the frame.
Copy and paste Paper 11 Into Selection.
Deselect.
Open up Paper 8.
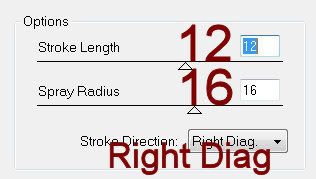
Apply Brush Strokes - Sprayed Strokes:
Copy.
Highlight the Oval Frame.
Click inside of it with your Magic Wand.
Selections/Modify/Expand by 4.
New Raster layer below the frame.
Paste the paper Into Selection.
Deselect.
Open up Hanging Ribbon 3 and 4.
Section out a large area on each of them.
Make your Selection Tool active again set on Rectangle.
New Raster layer.
Make a rectangle approximately 40 x 475 pixels
New Raster layer.
In your layers pallet, set on Pattern, look for Hanging Ribbon 3.
Set the scale to 50.
Flood fill the layer with the pattern.
New Raster layer.
Flood fill with Hanging Ribbon 4.
Deselect.
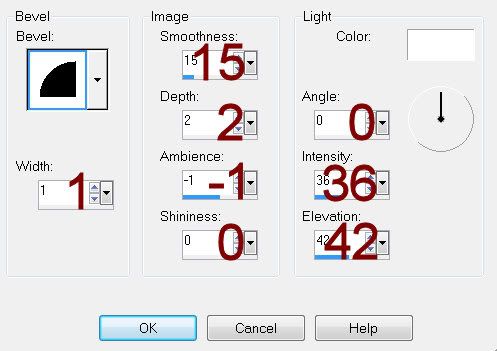
Give each rectangle a slight Inner Bevel:
Move both rectangle into position - see my tag for reference.
Make your Selection Tool active again, still set on Rectangle.
Make a rectangle approximately 540 x 75 pixels.
New Raster layer.
Copy and paste Paper 1 Into Selection.
Deselect.
Give it the same slight Inner Bevel.
If you’re using the same tube I did, I used the Target Tool and changed the rose to green.
Copy and paste your tube as a new layer.
Position it on the right side of your canvas - see my tag for reference.
Duplicate
Mirror
Move the duplicated layer below the frame in your layers pallet.
Erase whatever part of the tube that might overhang the frame.
Change the Properties to Soft Light.
Open up the Gold Vintage Accessories_Vanity element.
Using your Selection tool, section off from the bottom of the mirror up.
Copy.
Make your working canvas active.
Paste
Position behind the left side of the frame.
Add your embellishments. I used:
From the Reflectons of Yesteryear folder -
Mon 4: Resize 70%
Cout.8: Resize 25% and 80%
Tel 1: Resize 35%
Faradisers 15: Resize 25% and 50%
From Reflections of Yesteryear 2 folder -
Button 1: Resize 40%/Free rotate Right 30 degrees
Tag 4: Resize 30%
Highlight your white canvas.
New Raster layer.
Select All.
Copy and paste Paper 6 Into Selection.
Deselect.
Apply the mask.
Resize 105%
Merge Group.
Add your copyrights.
Add your name:
In your color pallet:
Foreground and Background: #22180c
Type your name out.
Convert to Raster layer.
Foreground and Background: #c2a36d
Type your name out again.
Convert to Raster layer.
Move the tan colored name below the Dark brown name.
Match both layer names up and move the dark brown one slight up and to the left.
Merge Down.
Give it a drop shadow.
Resize all layers 80%.
I hope you enjoyed this tutorial.
I’d love to see your results and show it off in my gallery.
Email me!
Hugs,
Bev
1 tube of choice - I used the artwork of Jennifer Janesko which can be purchased from CDO. You must have a license to use.
Font of choice - I used Respective here
Weescotlass Mask 236 here
Plug Ins:
Brush Strokes - Sprayed Strokes
“Reflections of Yesteryear” is a tagger size scrap kit created by Karen of Sweet Occasion Designs and can be purchased from Butterfly Blush Designs. You can visit her blog here.
Thank you Karen for a gorgeous classy kit!
This tutorial was written assuming you have a working knowledge of PSP.
~♥~ Let’s get started ~♥~
Open up a 700 x 700 blank canvas.
Flood Fill white.
Copy and paste fetedesperes_17 as a new layer.
Resize 50%
Free rotate Left 90 degrees
Move to the left side of your canvas.
Make your Selection Tool active set on Ellipse.
Make an oval approximately 300 x 425 pixels.
New Raster layer.
Copy and paste Paper 5 Into Selection.
Selection/Modify/Contract by 14.
Tap the delete key.
Deselect.
Give it a slight Inner Bevel:
Move the element frame and the oval frame into position - see my tag for reference.
Highlight the element frame.
Click inside of it with your Magic Wand.
Selections/Modify/Expand by 4.
New Raster layer below the frame.
Copy and paste Paper 11 Into Selection.
Deselect.
Open up Paper 8.
Apply Brush Strokes - Sprayed Strokes:
Copy.
Highlight the Oval Frame.
Click inside of it with your Magic Wand.
Selections/Modify/Expand by 4.
New Raster layer below the frame.
Paste the paper Into Selection.
Deselect.
Open up Hanging Ribbon 3 and 4.
Section out a large area on each of them.
Make your Selection Tool active again set on Rectangle.
New Raster layer.
Make a rectangle approximately 40 x 475 pixels
New Raster layer.
In your layers pallet, set on Pattern, look for Hanging Ribbon 3.
Set the scale to 50.
Flood fill the layer with the pattern.
New Raster layer.
Flood fill with Hanging Ribbon 4.
Deselect.
Give each rectangle a slight Inner Bevel:
Move both rectangle into position - see my tag for reference.
Make your Selection Tool active again, still set on Rectangle.
Make a rectangle approximately 540 x 75 pixels.
New Raster layer.
Copy and paste Paper 1 Into Selection.
Deselect.
Give it the same slight Inner Bevel.
If you’re using the same tube I did, I used the Target Tool and changed the rose to green.
Copy and paste your tube as a new layer.
Position it on the right side of your canvas - see my tag for reference.
Duplicate
Mirror
Move the duplicated layer below the frame in your layers pallet.
Erase whatever part of the tube that might overhang the frame.
Change the Properties to Soft Light.
Open up the Gold Vintage Accessories_Vanity element.
Using your Selection tool, section off from the bottom of the mirror up.
Copy.
Make your working canvas active.
Paste
Position behind the left side of the frame.
Add your embellishments. I used:
From the Reflectons of Yesteryear folder -
Mon 4: Resize 70%
Cout.8: Resize 25% and 80%
Tel 1: Resize 35%
Faradisers 15: Resize 25% and 50%
From Reflections of Yesteryear 2 folder -
Button 1: Resize 40%/Free rotate Right 30 degrees
Tag 4: Resize 30%
Highlight your white canvas.
New Raster layer.
Select All.
Copy and paste Paper 6 Into Selection.
Deselect.
Apply the mask.
Resize 105%
Merge Group.
Add your copyrights.
Add your name:
In your color pallet:
Foreground and Background: #22180c
Type your name out.
Convert to Raster layer.
Foreground and Background: #c2a36d
Type your name out again.
Convert to Raster layer.
Move the tan colored name below the Dark brown name.
Match both layer names up and move the dark brown one slight up and to the left.
Merge Down.
Give it a drop shadow.
Resize all layers 80%.
I hope you enjoyed this tutorial.
I’d love to see your results and show it off in my gallery.
Email me!
Hugs,
Bev
No comments:
Post a Comment