Saturday, January 18, 2014

Winter in the Tropics


Supplies Needed  

1 tube of choice – I used the wonderful artwork of Renee Lavoie which can be purchased from PSP Tube Stop.  You must have a license to use. 

Font of choice – I Freeze here

Vix Mask 451 here

Scraps of Enchantment template 127 here
Please note:  It can be found under Sunday 16, January 2011
When you download the zip will contain the template but the file name is Template 125.

 "On a Tropical Breeze" is a tagger size scrap kit created by me, Bev of HorsePlay's Pasture Designs and can be purchased from Scraps from the Heart.  

~♥~ Let’s get started ~♥~

Open up the template.
Shift + D.
Close out the original.
Resize all layers 80%
Image/Canvas Size
700 x 600
OK
Highlight Raster 1 layer.
Flood fill white.
Delete the top 4 layers.

Highlight Circle Frame layer.
Copy and paste E34 as a new layer.
Resize 80% and move into positin over the Circle Frame template layer.
Delete Circle Frame and Circle Background template layers.
Highlight the element layer.
Click inside of it with your Magic Wand.  Be sure to zoom in and click inside of 

all the loops that are within the frame.
Selections/Modify/Expand by 4.
New Raster layer below the frame.
Copy and paste Paper 1 Into Selection.
Copy and paste your tube as a new layer over the paper layer.
Change the Properties to Luminance (Legacy).
Selections/Invert
Tap the delete key.
Deselect.

Highlight Rectangle Background.
Click on it with your Magic Wand.
New Raster layer.
Copy and paste Paper 3 Into Selection.
Copy and paste E53 as a new layer - see my tag for placement.
Selections/Invert
Tap the delete key.
Deselect.
Delete the template layer.

Highlight Rectangle Frame layer.
Select All/Float/Defloat
New Raster layer.
Copy and paste Paper 2 Into Selection.
Adjust/Add Remove Noise/Add Noise:
Uniform checked
Noise: 48%
OK
Deselect.
Delete the template layer.

Repeat the above step with Large Rectangle Frame.

Highlght Square Frame layer.
Select All/Float/Defloat
New Raster layer.
Paste Paper 2 Into Selection.
Deselect.
Delete the template layer.
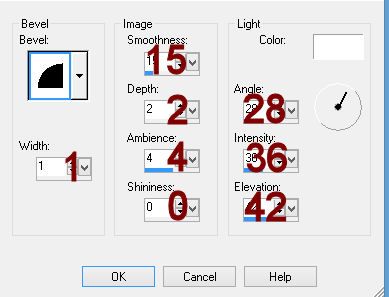
Give the frame a slight Inner Bevel:

Highlight Large Rectangle Background layer.
Click on it with your Magic Wand.
New Raster layer.
Copy and paste Paper 7 Into Selection.
Copy and paste your tube as a new layer above the paper layer.
Change the Properties to Overlayer.
Selections/Invert
Tap the delete key.
Deselect.
Delete the template layer.

Highlight Square Background layer.
Click on it with your Magic Wand.
New Raster layer.
Copy and paste Paper 3 Into Selection.
Copy and paste your tube as a new layer above the paper layer.
Selections/Invert
Tap the delete key.
Deselect.
Delete the template layer.

Add the elements.  I used:
E44:  Reszie 85%/Free rotate Right 35 degrees
E76:  Resize 80%/Duplicate
E50
E36:  Resize 30%
E36 again:  REsize 25%/Mirror
E7:  Resize 30%/Mirror
E7 again:  Resize 25%/Duplicate
E18;  Resize 70%
E6:  Resize 75%
E2:  Resize 50%
E29:  Resize 30%
E15:  Resize 65%
E26:  Resize 40%/Duplicate/Mirror/Resize 70%
E72:  Use your Pick Tool to flatten a little/Duplicate

Highlight the background layer.
New Raster layer.
Select All.
Copy and paste Paper 4 Into Selection.
Deselect.
Apply the mask.
Resize 115%
Merge Group.

Add your credits.

Add your name:
Color Pallet:
Foreground: #4b0503
Background: #24415f
Stroke: 1.00

Type your name.
Convert to Raster layer.
Make your Freehand Selection Tool active.
Section off the top of each letter in your name:

Press Ctrl + H - your Feather Selection Box will open:
Number of Pixels: 7
OK
Press Shift + B - Brightness/Contrast Box will appear:
Brightness: 63
Contrast: 11
OK
Selections/Invert - (the dotted lines will be an oval above your name)
Press Shift + B again.
Change the Brightness number to -41
OK
Deselect.
Effects/Edge Effects/Enhance

If you're happy with your tag then resize and save.

I’d love to see your results.
Email me!
Hugs,
Bev 

Friday, January 17, 2014

My Valentine 2014

Supplies Needed  

1 tube of choice - I used the beautiful artwork of Bits n Bobs which can be purchased from Pics for Designs.  

Font of choice – I used Great Vibes here

Plug Ins used:
Mura's Meister - Copies
Eyecandy 4000 - Gradient Glow

 "Valentine" is a FTU full size scrap kit created by Scraps n Stuff and can be downloaded here.  

~♥~ Let’s get started ~♥~

Open up a 700 x 700 blank canvas.
Flood fill white.

Copy and paste Element 45 as a new layer.
Resize 5%
Apply Mura's Meister - Copies:
Choose Encircle
Change the top 3 numbers to:
Number: 32
Shift X: 70
Shift Y: 70
OK

Click inside the ring of flowers with your Magic Wand.
Selections/Modify/Expand by 4.
New Raster layer below the flower ring.
Copy and paste Paper 5 Into Selection.
Deselect.

Copy and paste Frame 5 as a new layer.
Resize 10%
Duplicate twice and line them across your canvas - see my tag for reference.
Merge Visible the 3 frame layers.
Click inside of each one with your Magic Wand.
Selections/Modify/Expand by 4.
New Raster layer below the frame.
Copy and paste Paper 17 Into Selection.
Copy and paste Element 15 as a new layer above the paper layer.
Resize 10% 
Duplicate
Move both elements into a position you like.
Selections/Invert
Highlight each element layer and tap the delete key.
Deselect.
Copy and paste Element 12 as a new layer below the merged frame layer.
Resize 6%
Duplicate 2x's for a total of 3 element layers and move each position - see my tag for reference.

Copy and paste Element 10 as a new layer.
Resize 75%
Copy and paste your tube as a new layer and move into position over the heart.  Be sure to give the tube a drop shadow at this time.
Change the Properties of the tube to Luminance (Legacy) and lower the Opacity to about 61.
Highlight the heart layer.
Click anywhere outside of it with your Magic Wand.
Highlight the tube layer.
Tap the delete key.
Press Ctrl + H on your keyboard.
The Feather Selection Box should appear.
Number of Pixels: 36
OK
Highlight the tube layer.
Tap the delete key until you have the feathered look you want.
Deselect.
Merge Visible the tube and heart layer.
Move into position - see my tag for reference.

Copy and paste Element 11 as a new layer.
Resize 70%
Repeat the above step.

Copy and paste your tube as a new layer.
If you're using the same tube as I did, resize 45%.

Add your elements.  I used:
Elements 23, 25, & 27:  Resize 13%
67:  Resize 10%/Make your Pick Tool active and flatten it just a little/Duplicate/Mirror
Element 17:  Resize 15%/Duplicate
Element 63:  Resize 6%/Duplicate/Mirror
Element 40:  REsize 15%
Element 7:  Resize 10%/Free rotate Left 15 dewgrees

Highlight your white background.
New Raster layer.
Select All
Copy and paste Paper 19 Into Selection.
Deselect.
Apply the mask.
Merge Group.
Duplicate
Change the Properties to Soft Light.

Add your copyright.

Add your name:
Color Pallet: 
Foreground & Background: #894846
Stroke: 1.00

Type your name.
Convert to Raster layer.
Apply Eyecandy 4000 - Gradient Glow -
Basic Tab:
Glow: 3.00
Soft Corners: 25
Overall Opacity: 100
Draw Only Outside Selection checked

Color Tab:
Choose Medium
Click on the color in the box and change to #ffffff
OK

I hope you enjoyed this tutorial.

I’d love to see your results.
Email me!
Hugs,
Bev 

Thursday, January 16, 2014

L'amour

Supplies Needed  

1 tube of choice - I used the beautiful artwork of Bits n Bobs which can be purchased from Pics for Designs.  

Font of choice – I used Despair here

DeesSign Post Mask 5 here

 "L'amour" is a tagger size scrap kit created by Julie of Bits n Bobs and can be purchased from her store here.  You can visit her blog here

~♥~ Let’s get started ~♥~

Open up a 700 x 700 blank canvas.
Flood fill white.

Copy and paste Element 50 as a new layer.
Click inside of it with your Magic Wand.  Zoom in and be sure to click in the 

little areas within the string bow that's inside he frame.
Selections/Modify/Expand by 4.
Copy and paste Paper 10 as a new layer below the frame.
Resize 60% and move into a position you like.
Selections/Invert
Tap the delete key.
Copy and paste your tube as a new layer below the frame.
Tap the delete key.
Deselect.

Add your elements.  I used:
El 1:  Resize 60%/Duplicate/Mirror/Flip
El 58:  Resize 70%
El 35:  Resize 60%/Duplicate
El 22:  Resize 50%/Duplicate/Resize 70% and 80%
El 21:  Resize 50%/Mirror/Duplicate/Resize 70% and 80%
El 62

Highlight your white background.
New Raster layer.
Select All
Copy and paste Paper 6 Into Selection.
Deselect.
Adjust/Blur/Gaussian Blur:
Radius: 10.00
OK
Apply the mask.
Merge Group.

Add your copyright.

Add your name:
Color Pallet: 
Foreground: #870000
Background: #f59d9b
Stroke: 1.00

Type your name.
Give it a slight Inner Bevel:

I’d love to see your results.
Email me!
Hugs,
Bev 

Wednesday, January 15, 2014

Love You to the Moon and Back


Supplies

1 tube of choice - I used the wonderful Rachel Anderson which can be purchased from CDO.  You must have a license to use.

Font of choice - I used Dragonfly here

My Mask 9 here

Divine Intentionz template 296 here

Plug Ins used:
Brush Strokes - Crosshatch

"Love You to the Moon and Back" is a tagger size scrap kit created by Deb of Deb's Designs and can be purchased from her store here.  Thank you Deb for a wonderful kit!

This tutorial assumes you have a working knowledge of PSP.

~♥~ Let's get started ~♥~

Open up the template.
Shift + D.
Close out the original.
Image/Canvas Size 700 x 650
OK
Highlight the background layer and flood fill white.
Delete the top 4 layers, and Touch layer.

Highlight Oval layer.
Click anywhere outside of it with your Magic Wand.
Selections/Invert
New Raster layer.
Copy and paste Paper 8 Into Selection.
Deselect.
Delete the template layer.
Give the paper a slight Inner Bevel:

Color Pallet:
Foreground: #ffffff
Background: #6659ae

Highlight Dotted Line layer.
Make your Color Replacer Tool active and double right click on the dotted line.
It should change to your background color.

Color Pallet: 
Foreground: #ff5fae 
Background: #f2a9ea

Highlight Dotted Line 2 layer.
Make your Color Replacer Tool active and double right click on the dotted line.
It should change to your background color.

Highlight Frame Background layer.
Click anywhere outside of it with your Magic Wand.
Copy and paste Paper 6 as a new layer.
Resize 70% and move into a position you like over the template.
Tap the delete key.
Deselect.
Delete the template layer.

Highlight Thin Rectangle layer.
Click on it with your Magic Wand.
New Raster layer.
Copy and paste Paper 7 Into Selection.
Apply Brush Strokes - Crosshatch:
Stroke length: 49
Sharpness: 6
Strength: 2
OK
Deselect.
Delete the template layer.

Highlight Glittered Frame layer.
Select All/Float/Defloat
New Raster layer.
Copy and paste Paper 5 Into Selection.
Adjust/Add Remove Noise/Add Noise:
Random checked
Noise: 24%
OK
Deselect.
Delete the template layer.

Repeat the above step with:
Glittered Circle, Small Glittered Circle, and Glittered Rectangle.

Highlight Circle 1 layer.
Click anywhere outside of it with your Magic Wand.
Selections/Invert
New Raster layer.
Copy and paste Paper 12 Into Selection.
Click on the lock at the top of the layers pallet to lock the layer.
Adjust/Blur/Gaussian Blur:
Radius: 20
OK
New Raster layer.
Copy and pate Paper 4 Into Selection.
Adjust/Blur/Gaussian Blur:
Same settings
OK
Deselect.
Delete the template layer.

Highlight Circle 2 layer.
Click anywhere outside of it with your Magic Wand.
Selections/Invert.
New Raster layer.
Copy and paste Paper 8 Into Selection.
Deselect.
Delete the template layer.

Highlight Rectangle layer.
Click anywhere outside of it with your Magic Wand.
Copy and paste Paper 7 as a new layer.
Resize 70%
Tap the delete key.
Deselect.
Delete the template layer.

Highlight Rectangle 2 layer.
Click on it with your Magic Wand.
New Raster layer.
Copy and paste Paper 4 Into Selection.
Lock the layer.
Adjust/Blur/Gaussian blur:
Same settings
OK
New Raster layer.
Copy and paste Paper 8 Into Selection.
Change the Properties to Soft Light.
Deselect.
Delete the template layer.

Copy and paste your tube as a new layer.

Add your elements.  I used:
Moon Star Dangle: Resize 40%
Rose:  Resize 25%/Free rotate Right 90 degrees
Cupcake:  Resize 15%/Duplicate
Cherry Blossom:  Resize 80%/Mirror
Calendar:  Resize 15%
Bow 02:  Resize 25%
Bubbles 02:  Duplicate
Cloud
Feather 02: Resize 40%
Feather 01: Resize 40%/Free rotate Left 30 degrees
Swirl:  Resize 70%/Duplicate/Mirror/Flip
Envelope:  Resize 30%/Free rotate Left 55 degrees
Enevelope again:  Resize 30%/Free rotate Right 100 degrees
Butterfly: Resize 20%/Free rotate Right 20 degrees/Duplicate/Mirror/Resize 70%

Highlight your white canvas.
New Raster layer.
Select All.
Copy and paste Paper 9 Into Selection.
Deselect.
Apply the mask.
Merge Group.

Add your Copyright.

Add your name.
Foreground: #0e050b
Background: #6066b8
Stroke: 1.0

Type your name.
Give it a slight Inner Bevel:

Adjust/Add Remove Noise/Add Noise:
Random checked
Noise: 24%
OK

Merge Visible.
Resize to 500 x 500 pixels.
Save.

I hope you enjoyed this tutorial.

Hugs,
Bev

Sunday, January 12, 2014

Promises

Supplies Needed  

1 tube of choice – I used the wonderful artwork of VeryMany which can be purchased from their site here.  You must have a license to use. 

Font of choice – I used Coneria Script Demo here

Weescotlass Mask 236 here

Dangerously Delicious Christmas Template 8 Santa Clause here
It can be found under Wednesday, December 4, 2013

"Promises" is a tagger size scrap kit created by me, Bev of HorsePlay's Pasture Designs and can be purchased from any of my stores here.  

~♥~ Let’s get started ~♥~

Open up the template.
Shift + D.
Close out the original.
Resize all layers 90%
Image/Canvas Size:
700 x 650
OK
Highlight Raster 1 layer.
Flood fill white.
Delete the top 6 layers and Dark Green Circle, Dashed Circle, Red Circle.

Highlight Dark Green Oval layer.
Click on it with your Magic Wand.
New Raster layer.
Copy and paste Paper 15 Into Selection.
Deselect.
Delete the template layer.

Highlight Red Large Square layer.
Click on it with your Magic Wand.
New Raster layer.
Copy and paste Paper 2 Into Selection.
Deselect.
Delete the template layer.

Highlight Green Large Square layer.
Click on it with your Magic Wand.
New Raster layer.
Paste Paper 2 (should still be in memory) Into Selection.
Copy and paste your tube as a new layer over the paper layer.
Move into a position you like.
Selection/Invert
Tap the delete key.
Deselect.
Change the Properties of the tube layer to Luminance and lower the Opacity to about 24.
Delete the template layer.
Give the paper layer a slight Inner Bevel:

Copy and paste Element 43 as a new layer.
Resize 30%
Free rotate Right 96 degrees
Duplicate 2x's and move all 3 layers to form a straight light.
Merge Visible the 3 element layers.
Free rotate Right 1 degrees.
Move it into position over the Dotted Square layer.
Use your Freehand Selection Tool and section off what overhangs the square.
Tap the delete key.
Deselect.
Duplicate the element layer.
Free rotate Right 90 degrees.
Duplicate
Move both of these element layers over the Dotted Square layer.
Merge Visible all 3 element layer.
Delete the Dotted Square layer.

Highlight White Circle layer.
Click on it with your Magic Wand.
New Raster layer.
Copy and paste Paper 10 Into Selection.
Copy and paste your tube as a new layer over the paper layer.
Selection/Invert
Tap the delete key.
Deselect.
Delete the template layer.
Lower the Opacity of the tube layer to about 24.

Highlight Center Light Green Shape layer.
Click on it with your Magic Wand.
New Raster layer.
Copy and paste Paper 16 Into Selection.
Deselect.
Delete the template layer.
Give it a slight Inner Bevel.

Highlight Center Red Squares layer.
Click on each one with your Magic Wand.
New Raster layer.
Copy and paste Paper 8 Into Selection.
Deselect.
Delete the template layer.

Highlight Center White Frames layer.
Select All/Float/Defloat
New Raster layer.
Copy and paste Paper 7 Into Selection.
Deselect.
Delete the template layer.

Highlight Center Green Frames layer.
Select All/Float/Defloat
New Raster layer.
Copy and paste Paper 14 Into Selection.
Deselect.
Delete the template layer.

Copy and paste your tube as a new layer.
See my tag for placement.

Add your elements.  I used:
El 55:  Resize 60%
El 56:  Resize 50%
El 45:  Place behind the tag, behind the large tilted squares and erase what you don't want to overhand the tag/Duplicate/Flip/Mirror
El 45 again:  Resize 70%
El 37:  Resize 50%
El 42:  Resize 65%/Duplicate/Mirror
El 66:  Resize 25%/Mirror
El 9:  Resize 10%/Duplicate/Duplicate/Resize 70%/Merge Visible all 3 hearts/Duplicate/Mirror
El 73:  Resize 40%
El 68:  Resize 35%/Mirror
El 28:  Resize 35%
El 51:  Resize 70%
El 50:  Resize 70%/Mirror
El 74:  Resize 40%/Duplicate/Mirror/Flip
El 72:  Resize 15%

Highlight your white background.
New Raster layer.
Select All.
Copy and paste Paper 18 Into Selection.
Deselect.
Apply the mask.
Resize 115%
Merge Group.

Add your copyright.

Add your Name:
Color Pallet - 
Foreground: #5a452f
Background: #dad0c6
Stroke: 1.0
Type your name.
Give it a slight Inner Bevel 2x's:

I’d love to see your results.
Email me!
Hugs,
Bev