Saturday, December 12, 2009

Desert Beauty

Clicking on the image will enlarge to full view.

Supplies
1 tube of choice - I used the beautiful artwork of Tom Fleming here
Font of choice - I used Viking here
Weescotlass Mask 249 here
“Morraccan Sunset” is a PTU tagger size scrap kit created by Lynne of Baby Cakes Scraps and can be purchased at Creative Scraps Store. You can visit her blog here.
Thank you Lynne for such a stunning kit!

This tutorial was written assuming you have a working knowledge of PSP.

~♥~ Let’s get started ~♥~
Open up a 700 x 700 blank canvas.
Flood fill white.

Copy and paste Deco Frame as a new layer.
Resize 75%
Use your Magic Wand and click inside of it.
Selections/Modify/Expand by 3.
New Raster layer below the frame.
Copy and paste a paper of choice Into Selection.
DO NOT DESELECT.

Copy and paste your tube below the frame.
Selections/Invert
Tap the delete key.
Deselect.

Add your embellishments. I used:
Canna: Resize 50%
Water Lilly: Resize 50%
Blossom: Resize 60%
Butterfly Two: Resize 25% Free rotate right 20 degrees. Duplicate/Resize 80%
Hummer: Resize 30%
Sparkle

Highlight your white background.
New Raster layer.
Select All.
Copy and paste a paper of choice Into Selection.
Deselect.
Apply the mask.
Resize 115%
Merge Group.

Add your copyrights.

Add your name.
I hope you enjoyed this tutorial.
I’d love to see your results.
Email me!
Hugs,
Bev


No Peeking


Supplies

Font of choice - I used Santa’s Sleigh here
Becky Mask 23 I’ve supplied here
Essence of Creativity Template 1 here
Animation Shop
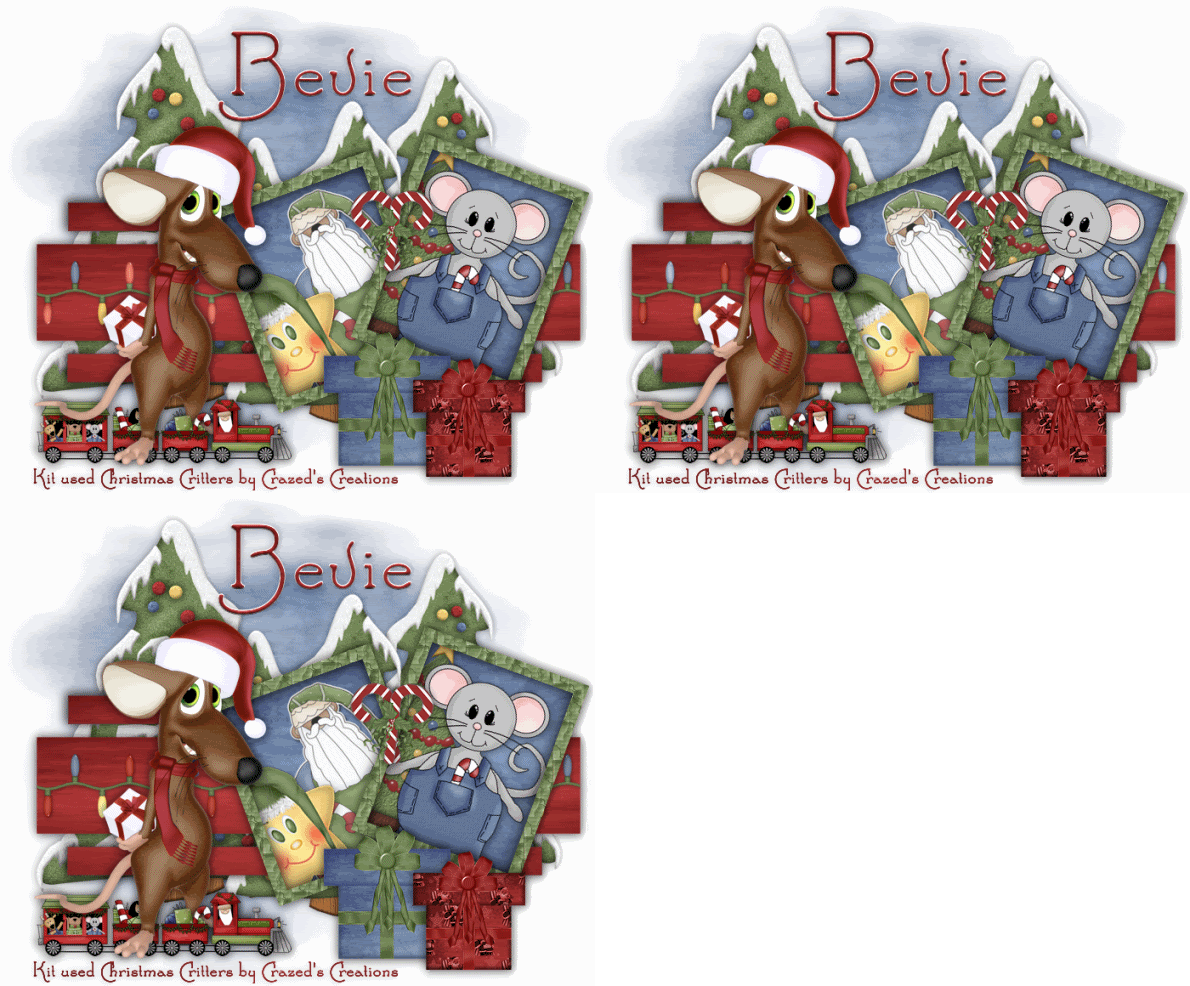
“Christmas Critters” is a PTU tagger size scrap kit created by Katie of Crazed’s Creations and can be purchased at Twilight Scraps. You can visit her blog here.
Thank you Katie for such a fun kit!

This tutorial was written assuming you have a working knowledge of PSP.

~♥~ Let’s get started ~♥~

Open up the template.
Delete the credit layer.

Open up Frame 6.
Using your Selection Tool select an area of the frame.
Set your foreground to Pattern using the selection of the frame.
Make your template active.
Highlight Frame 1 layer.
Select All/Float/Defloat
New Raster Layer.
Flood fill with the pattern.
Deselect.
Delete the template layer.

Repeat the above step with Frame 2 layer.

Highlight Photo 1 layer.
Select All/Float/Defloat
Copy and paste a paper of choice as a new layer.
Selections/Invert
Tap the delete key.
Deselect.

Copy and paste Sticker 4 as a new layer.
Resize 60%
Free rotate left 20 degrees.
Move into position below the frame.
We’ll take care of what’s overhanging the frame in a bit.

Copy and paste Star 1 as a new layer.
Resize 50%
Free rotate left 20 degrees.
Move into position below the frame.

Highlight the frame.
Use your Magic Wand and click inside of it.
Selections/Modify/Expand by 6.
Highlight each of the elements you moved below the frame and tap the delete key.
Deselect.

Highlight Photo 2 Layer.
Select All/Float/Defloat
Copy and paste the same paper you already used as a new layer.
Selections/Invert
Tap the delete key.
Deselect.

Copy and paste Tree 2 as a new layer.
Resize 80%
Free rotate right 20 degrees
Move into position below the frame.
We’ll take care of what’s overhanging the frame in a bit.

Copy and paste Mouse 1 as a new layer.
Resize 60%
Free rotate right 20 degrees

Highlight the frame.
Use your Magic Wand and click inside of it.
Selections/Modify/Expand by 6.
Highlight each of the elements you moved below the frame and tap the delete key.
Deselect.

Highlight Rectangle 1 layer.
Select All/Float/Defloat
New Raster Layer.
Copy and paste a paper of choice Into Selection.
Deselect.
Delete the template layer.

Copy and paste Lights 1 as a new layer.
Resize 50%.
Duplicate/Mirror
Overlap them to create one long string of lights.
Merge down.

Highlight the Rectangle layer.
Select All/Float/Defloat
Highlight the merged string of lights layer.
Selections/Invert
Tap the delete key.
Deselect.

Duplicate the string of lights twice for a total of 3 light layers.
Rename them Lights 1, 2, and 3.
Highlight Light 1 layer.
Using your Light/Darken Tool, run it over each of the red light bulbs 3 times.

Highlight Light 2 layer.
Again, using your Light/Darken tool, run it over each of the blue light bulbs 3 times.

Highlight Light 3 layer.
Run the Light/Darken tool over each of the yellow light bulbs 3 times.

Close out Light 2 & 3 layers.

Highlight Rectangle 2 layer.
Select All/Float/Defloat
Copy and paste a paper of choice as a new layer.
Selections/Invert
Tap the delete key.
Deselect.
Delete the template layer.

Add your embellishments. I used:
Tree 3
Mouse 2
Train: Resize 50%
Present 1: Resize 40%
Present 6: Resize 50%
Candy Cane 2: Resize 25% Free rotate Left 20 degrees

Highlight your white background.
New Raster layer.
Select All.
Copy and paste a paper of choice Into Selection.
Deselect.
Apply the mask.
Merge Group.
Add your copyrights.
If you didn’t use an artists tubes and only used the kit, please give credit to the designer of the kit.

Add your name.

~Time to Animate~

Copy Merge and carry into Animation Shop.
Edit/Paste/As New Animation.

Back into PSP.
Close out Lights 1
Open up Lights 2.
Copy Merge.

Carry into AS
Edit/Paste/After Current Frame.

Back into PSP.
Close out Lights 2.
Open up Lights 3.
Copy Merge
.
Carry into AS.
Edit/Paste/After Current Frame.

Shift + A to highlight all frames.
Animation/Frame Properties
Change the number to 20.

View your animation.
If you’re happy then save.

I hope you enjoyed this tutorial.
I’d love to see your results.
Email me!
Hugs,
Bev

Thursday, December 10, 2009

Desire


Clicking on the image will enlarge to full view.
Supplies
1 tube of choice - I used the wonderful artwork of Ismael Rac here
Font of choice - I used Happy Days here
Weescotlass Mask 62 here
Blissfully Beth’s Template 32 here
“Autumn Sunset” is a PTU tagger size scrap kit created by Julie of Bits N Bobs and can be purchased at Exquisite Scraps. You can visit her blog here.
Thank you Julie for an amazing kit!

This tutorial was written assuming you have a working knowledge of PSP.
~♥~ Let’s get started ~♥~

Open up the template.
Delete the credit layer.
Highlight the background layer.
Flood fill white.
Highlight Gray Rectangle layer.
Select All/Float/Defloat
New Raster Layer.
Flood fill with a dark color.
Selections/Modify/Contract by 10
New Raster layer.
Flood fill with a gradient of your choice.
Deselect.
Delete the template layer.
Highlight White Circle layer.
Select All/Float/Defloat
New Raster Layer.
Copy and paste a paper of choice Into Selection.
DO NOT DESELECT.

Copy and paste your tube as a new layer.
If you want any part of your tube to stick out further than the circle then duplicate and close the copy layer out.
Selections/Modify/Feather
Number of Pixels:
53
OK
Tap the delete key until you have the feathered look you want.
Deselect.
Delete the template layer.
Reopen the copy of the tube.
Using your Eraser Tool erase all of the tube accept what you want to stick out beyond the circle.

Highlight Dotted Circle layer.
Select All/Float/Defloat
New Raster layer.
Flood fill with the dark color you already used.
Deselect.
Delete the template layer.
Give it a slight inner bevel:


Highlight Raster One layer.
Select All/Float/Defloat
New Raster Layer.
Flood fill with the dark color.
Selections/Modify/Contract by 2
New Raster Layer.
Flood fill with a light color.
Deselect.
Give it the same inner bevel.
Merge down.
Delete the template layer.

Add your embellishments. I used:
Element 34: Resize 25% and 50%
Element 14: Resize 25%
Element 33: Resize 40%
Element 45: Resize 40% Free rotate right 45 degrees
Element 20: Resize 30%
Element 21: Resize 30%

Highlight your white background.
New Raster layer.
Select All.
Copy and paste a paper of choice Into Selection.
Deselect.
Apply the mask.
Merge Group.

Add your copyrights.

Add your name.
Give it the same inner bevel:
Adjust/Add Remove Noise/Add Noise
Gaussian and Monochrome checked
Noise: 55%
OK
I hope you enjoyed this tutorial.
I’d love to see your results.
Email me!
Hugs,
Bev


Wednesday, December 9, 2009

Yearning

Clicking on the image will enlarge to full view.

Supplies
1 tube or image of choice - I used the beautiful artwork of Michael Calandra here
Font of choice - I used Stonehenge here
Weescotlass Mask 167 here
Babes Designz Template 10 here
“Natural” is a PTU tagger size scrap kit created by Lisa of Frosted Illusions and can be purchased at Aussie Scrap Designs. You can visit her blog here.
Thank you Lisa for such a beautiful kit!

This tutorial was written assuming you have a working knowledge of PSP.

~♥~ Let’s get started ~♥~

Open up the template.
Delete the credit layer.

Highlight Rectangle 1 layer.
Select All/Float/Defloat
New Raster Layer.
Copy and paste a paper of choice Into Selection.
Deselect.
Delete the template layer.

Highlight Rectangle 2 layer.
Select All/Float/Defloat
Copy and paste a paper of choice as a new layer.
Resize 65%
Selections/Invert
Tap the delete key.
Deselect.
Delete the template layer.
Highlight the Circle layer.
Select All/Float/Defloat
New Raster layer.
Copy and paste a paper of choice Into Selection.
DO NOT DESELECT.

Copy and paste your tube or image as a new layer.
Position it over the circle.
Selections/Modify/Feather
Number of Pixels:
53
Ok
Selections/Invert
Tap the delete key until you have the feathered look you want.
Deselect.
Delete the template layer.
Highlight the Stitches layer.
Select All/Float/Defloat
New Raster Layer.
Flood fill with a dark color that will match your tag.
Deselect.
Delete the template layer.
Repeat the above step with the Dot Circle layer.
Add your embellishments. I used:
Bow 4: Resize 35%
Tag 4: Resize 50%
Butterfly 3: Resize 25% Free rotate right 25 degrees
Flower 8: Resize 25%
Flower 5: Resize 25% and 75%
Glittered Heart: Resize 35% Free rotate left 10 degrees
Highlight your white background.
New Raster layer.
Select All.
Copy and paste a paper of choice Into Selection.
Deselect.
Apply the mask.
Resize 110%
Merge Group.
Crop you image.

Add your copyrights.
Add your name.
I hope you enjoyed this tutorial.
I’d love to see your results.
Email me!
Hugs,
Bev

Dreaming of a White Christmas


Supplies
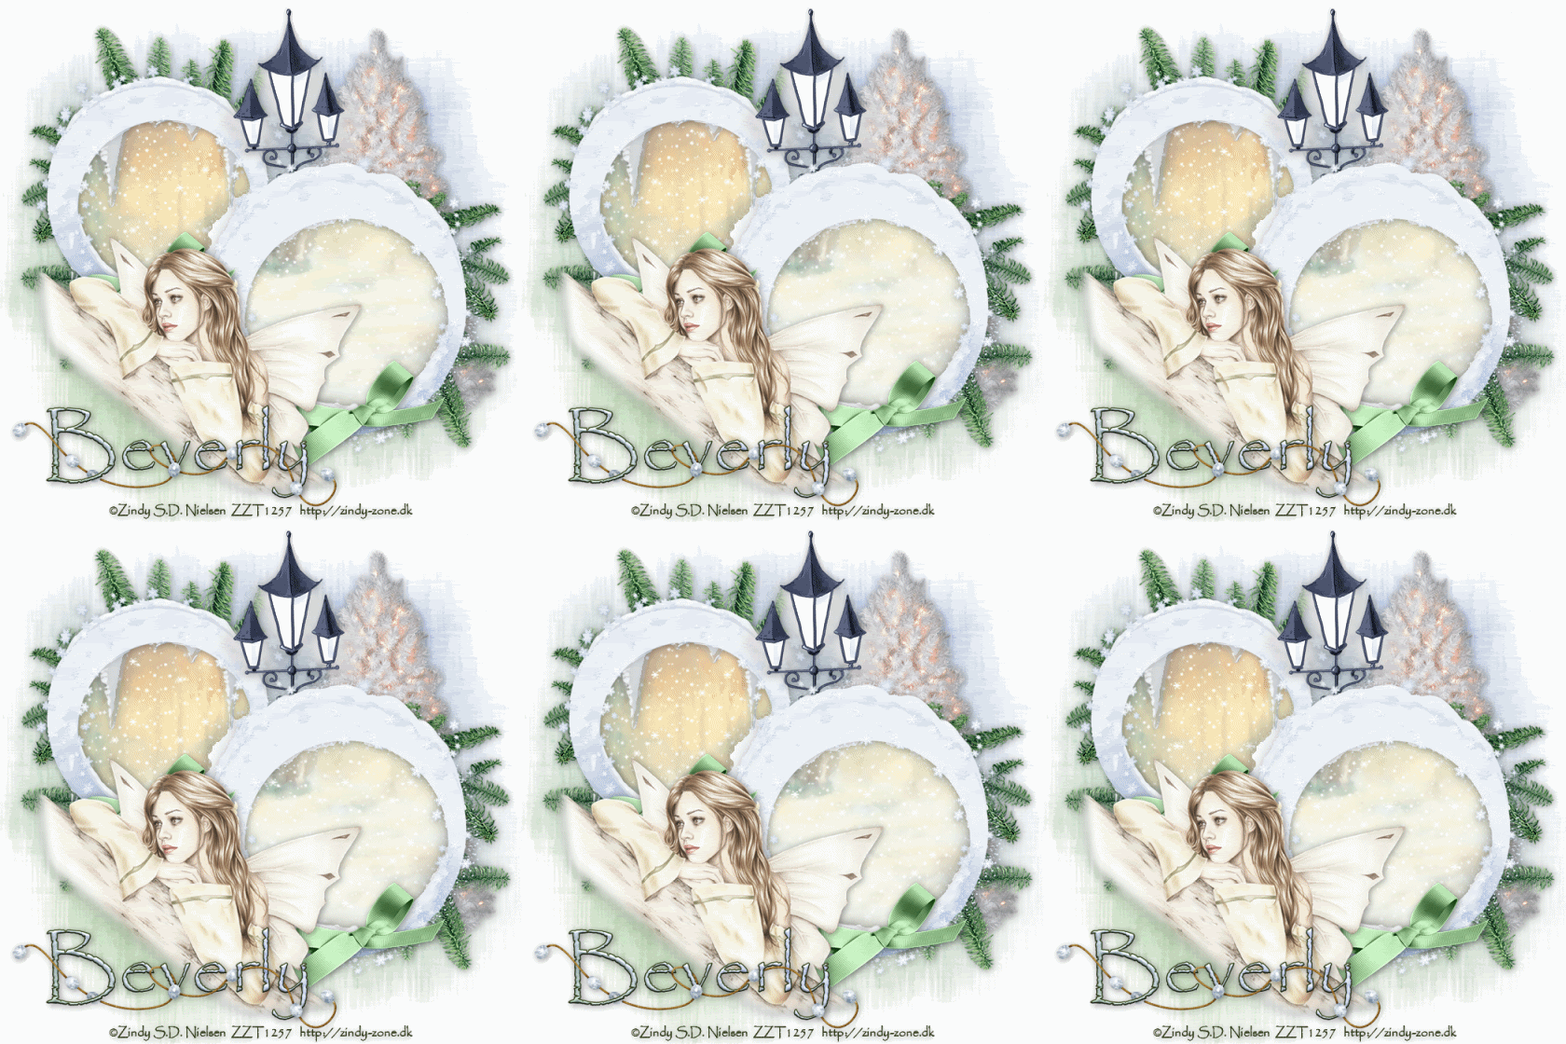
1 tube of choice - I used the beautiful artwork of Zindy S.D. Nielsen here
Font of choice - I used Papyrus which came with my pc.
Weescotlass Mask 39 here
Snow which I’ve supplied here
Animation Shop
“Winter Day” is a PTU tagger size scrap kit created by Rikiche of Scrappin Dsigns and can be purchased at Scraps with Attitude. You can visit Rikiche’s blog here.
Thank you Rikiche for a very brrrrrr-illiant kit!

This tutorial was written assuming you have a working knowledge of PSP.

~♥~ Let’s get started ~♥~

Open up a 700 X 700 transparent image.
Flood Fill white.

Copy and paste Snow Frame as a new layer.
Resize 70%
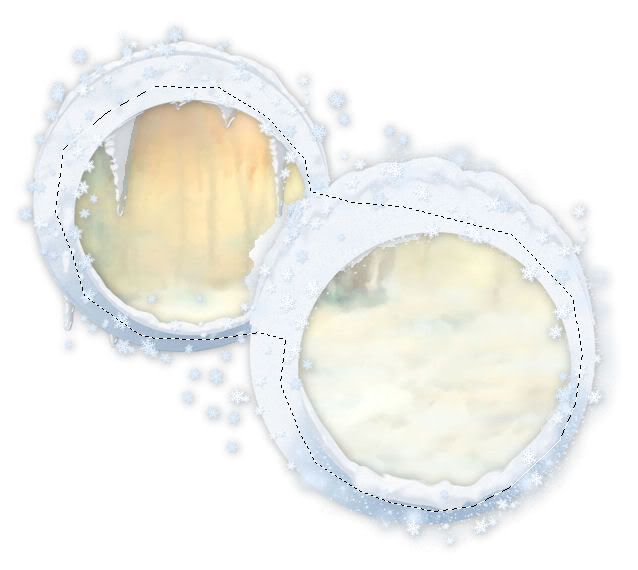
Use your Magic Wand and click inside both of the frames. Be sure to click in between the icicles and the frame in spots as well.
New Raster layer below the frame. Rename Paper layer.
Copy and paste a paper of choice Into Selection.
Deselect.

Now using your Freehand Selection Tool outline both of the circles.


New Raster layer below the Paper layer. Rename flood fill.
Flood fill with the color white.
Deselect.

Copy and paste your tube as a new layer.

Add your embellishments. I used:
Mistletoe: Resize 50%
Street Lamp: Resize 70%
Xmas Tree 2: Resize 70%
Bow: Resize 40%

Highlight your white background.
New Raster layer.
Select All.
Copy and paste a paper of choice Into Selection.
Deselect.
Apply the mask.
Resize 130%
I used my Pick Tool to pull the sides out a bit.
Merge Group.

Add your copyrights.

Add your name.
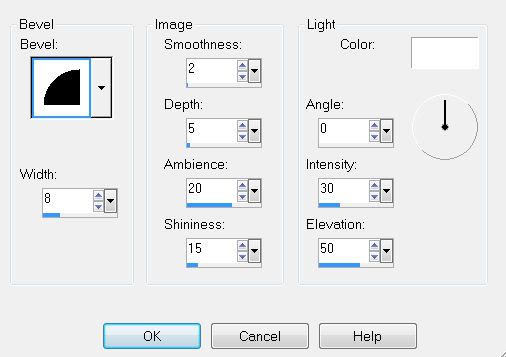
Give it a slight inner bevel:


Highlight your Paper layer.
Open up the snow that I’ve supplied.
Be sure Frame 10 is highlighted.
Copy.


Now make your working canvas active.
Paste as a new layer.
Rename Snow 10

Go back to the Snow Frame.
Copy Frame 9.

Make your working canvas active again.
Paste as a new layer.
Rename Snow 9.

Repeat the above steps until you have all 10 snow layers pasted onto your working canvas.

Highlight the Flood Fill layer.
Select All/Float/Defloat
Selections/Invert
Highlight each of the snow layers and tap the delete key.
Deselect.

Close out all the snow layers accept for Snow 1.
Copy Merge

~ Time to Animate ~

Open up Animation Shop.
Edit/Paste/as a New Animation

Go back into PSP
Close out Snow 1
Open up Snow 2
Copy Merge

Go back into AS
Edit/Paste/After Current Frame.

Go back into PSP
Close out Snow 2
Open up Snow 3.
Copy Merge.

Go back into AS
Edit/Paste After Current Frame.

Go back into PSP
Close out Snow 3
Open up Snow 4.
Copy Merge.

Go back into AS
Edit/Paste After Current Frame.

Go back into PSP
Close out Snow 4
Open up Snow 5.
Copy Merge.

Go back into AS
Edit/Paste After Current Frame

Go back into PSP
Close out Snow 5
Open up Snow 6.
Copy Merge.

Go back into AS
Edit/Paste After Current Frame

Go back into PSP
Close out Snow 6
Open up Snow 7.
Copy Merge.

Go back into AS
Edit/Paste After Current Frame

Go back into PSP
Close out Snow 7
Open up Snow 8.
Copy Merge.

Go back into AS
Edit/Paste After Current Frame

Go back into PSP
Close out Snow 8
Open up Snow 9.
Copy Merge.

Go back into AS
Edit/Paste After Current Frame

Go back into PSP
Close out Snow 9
Open up Snow 10.
Copy Merge.

Go back into AS
Edit/Paste After Current Frame.

View your animation.
If you’re happy then save.

I hope you enjoyed this tutorial.
I’d love to see your results.
Email me!
Hugs,
Bev

Monday, December 7, 2009

Season of Joyfulness

Clicking on the image will enlarge to full view.

Supplies
1 tube of choice - I used the beautiful artwork of Zindy S.D. Nielsen here
Font of choice - I used Oh Lara. It’s a pay font and can be found here.
Weescotlass Mask 241 here
Babe’s Designz Template 31 here
DSB Flux - Bright Noise
Eyecandy 5: Impact - Glass
“White Christmas” is a PTU tagger size scrap kit created by Julie of Bits ’n Bobs and can be purchased at AMI. You can visit Julie’s blog here.
Thank you Julie for a very beautiful kit!

This tutorial was written assuming you have a working knowledge of PSP.

~♥~ Let’s get started ~♥~

Open up the template.
Delete the credit and circle layer.

Highlight Large Rectangle layer.
Select All/Float/Defloat
Copy and paste a paper of choice as a new layer.
Selections/Invert
Tap the delete key.
Deselect.
Delete the template layer.
Highlight Frame Inner layer.
Select All/Float/Defloat
New Raster layer.
Copy and paste a paper of choice Into Selection.
Deselect.
Delete the template layer.
Highlight Fancy Frame layer.
Select All/Float/Defloat
New Raster Layer.
Flood fill with a color of your choice.
Deselect.
Delete the template layer.
Apply DSB Flux - Bright Noise


Highlight Small Rectangle layer.
Select All/Float/Defloat
New Raster Layer.
Flood fill with a gradient of choice.
Deselect.
Delete the template layer.

Highlight Small Dots layer.
Select All/Float/Defloat
New Raster Layer.
Flood will with the same color you used on the fancy frame.
Deselect.
Delete the template layer.

Highlight Large Dots layer.
Select All/Float/Defloat
New Raster layer.
Flood fill with the same color you used for the fancy frame.
DO NOT DESELECT.
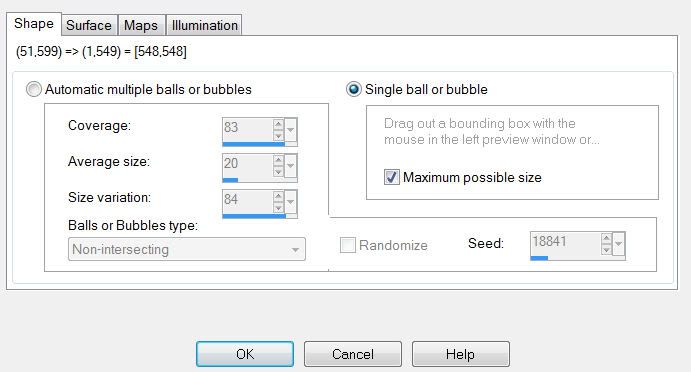
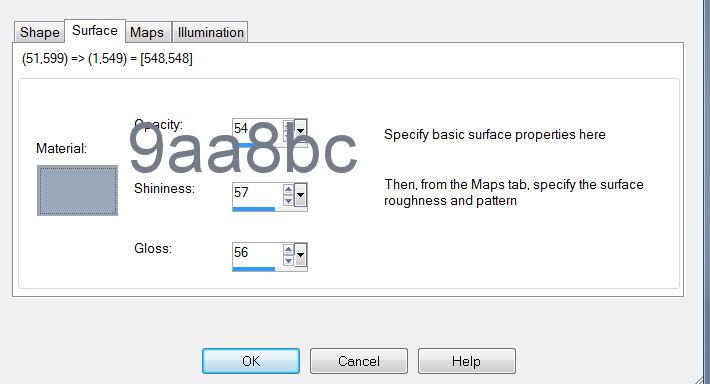
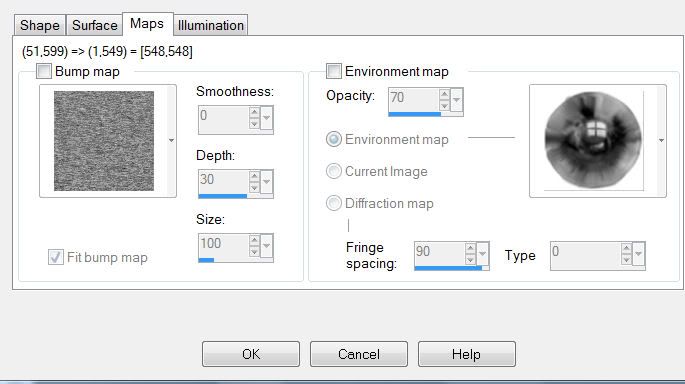
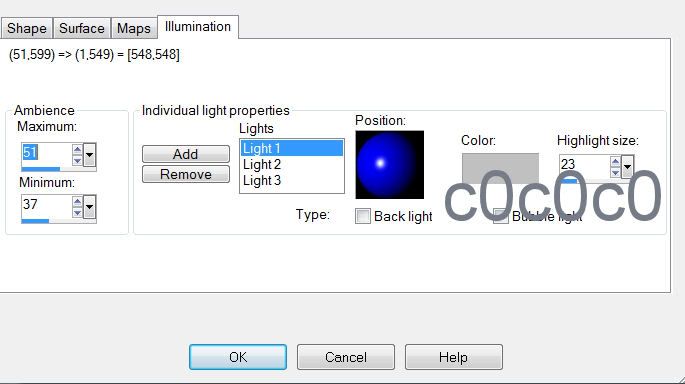
Effects/Artistic Effects/Balls and Bubbles
On the Shape tab:

On the Surface Tab:

On the Maps tab:


On the Illumination tab:

Deselect

Apply Eyecandy 5: Impact - Glass


Add your embellishments. I used:
Element 2: Resize 50%. Duplicate/Mirror as you like and use your Pick Tool to angle differently.
Element 13: Resize 80%
Element 12: Resize 50%
Element 15
Element 5: Resize 70%

Highlight your white background.
New Raster layer.
Select All.
Copy and paste the BNB White Christmas Preview Into Selection.
Deselect.
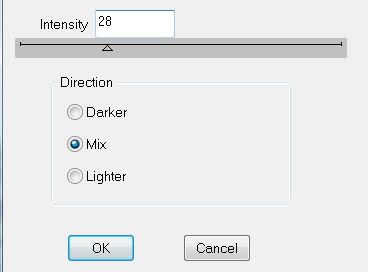
Adjust/Blur/Gaussian Blur:
Radius: 20
OK
Apply the mask.
Merge Group.

Add your copyrights.

Add your name.
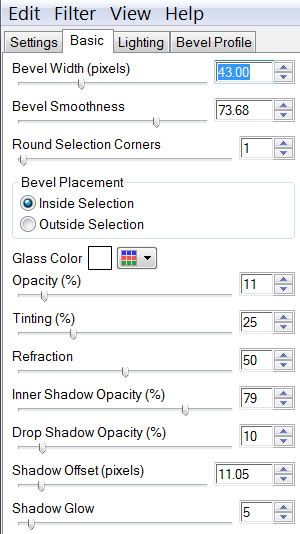
Give it a slight inner bevel:


I hope you enjoyed this tutorial.
I’d love to see your results.
Email me!
Hugs,
Bev