Supplies
1 tube and 1 close up of choice – I used the beautiful artwork of
Barbara Jensen which can be purchased here. You must have
a license to use.
Font of choice - I used Aquarelle here
Becky Mask here
Plug Ins:
Greg’s Factory Output Vol. II – Pool Shadow.
“A Christmas Teal” is a tagger size scrap kit created by Lorraine of Artlor
Designs and can be purchased from Country Corner Creations. You can visit her blog here.
Thank you Lorraine for a truly beautiful kit.
Thank you Lorraine for a truly beautiful kit.
This tutorial was written assuming you have a working knowledge of PSP.
~♥~ Let’s get started ~♥~
Open up a 700 x 700 blank canvas.
Flood fill white.
New Raster layer.
Use your Selection Tool set on Rectangle and make a rectangle
approximately 300 x 375 pixels.
Copy and paste Paper5 Into Selection.
Apply Greg’s Factory Output Vol. II – Pool Shadow:
Use Default settings accept lower the Intensity bar to about 41.
Deselect.
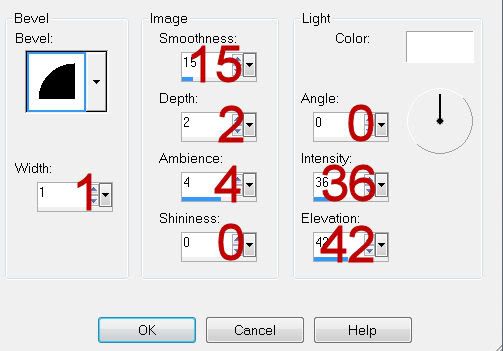
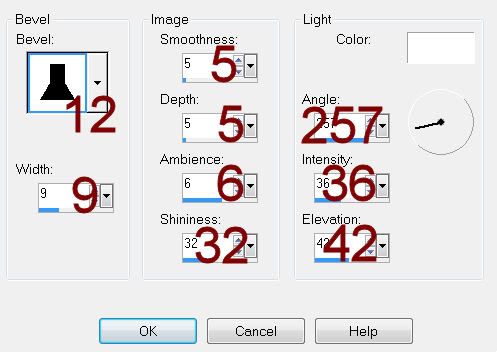
Give it a slight Inner Bevel:
Duplicate.
Close it out for now.
Highlight the original rectangle.
Use your Selection Tool again and trace just inside of what now looks
like the frame of the rectangle.
Copy and paste your close up image over the rectangle.
Selections/Invert
Tap the delete key.
Selections/Modify/Inside Outside Feather
Both checked
Feather amount: 43
OK
Tap the delete key twice.
Deselect.
Change the Properties to Luminance (Legacy)
Merge Down.
Tube and rectangle should be on the same layer now.
Close out the merged layer.
Open up the other rectangle layer.
Repeat the above step accept position the tube over the rectangle.
Once you have both merged rectangles move them into position – see my
tag for reference.
New Raster layer.
Use your Selection Tool set on Rectangle and create a rectangle
approximately 625 x 475 pixels.
Copy and paste Paper 4 Into Selection.
Duplicate
Adjust/Blur/Gaussian Blur:
Radius: 4
OK
Merge Down.
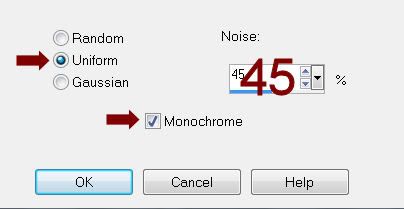
Adjust/Add Remove Noise/Add Noise:
Gaussian and Monochrome checked:
Noise: 30%
OK
Selections/Modify/Contract by 8.
New Raster layer.
Copy and paste 5 Into Selection.
Deselect.
Give it a drop shadow.
Merge down.
Move into position behind the two smaller merged rectangles.
Copy and paste your tube as a new layer.
Add your elements. I used:
Doodle: Resize
35%/Duplicate/Mirror
Snowman: Resize 25%
Snowflake 1: Resize 25% and 50%
Snowflake 3: Resize 25% and 50%
Snowflake 2: Resize
25%/Duplicate/Resize 70%
Highlight your white canvas.
New Raster layer.
Select All.
Copy and paste the Preview Into Selection.
Deselect.
Adjust/Blur/Gaussian Blur:
Use same settings.
OK
Blur 2 more times.
Apply the mask.
Merge Group.
Add your name.
Convert to Raster layer.
Select All/Float/Defloat
Selections/Modify/Contract by 1.
Adjust/Add Remove Noise/Add Noise:
Apply the same Noise effect.
Deselect.
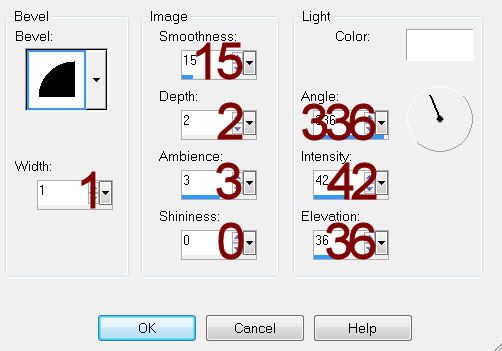
Give it a slight Inner Bevel:
Choose items of your choice and give a thrown drop shadow.
To do that give it a drop shadow on its own layer.
At the top of the layers pallet Click on Layer Link Toggle until it
says “None”
Make your Pick Tool active and move the drop shadow slight to the
position you like.
Resize all layers 80%