
Thursday, April 1, 2010

Intellectual Moments


Clicking on the image will enlarge to fuller view.

Supplies
1 Tube of choice - I used the beautiful artwork of Gary George here
Font of choice - I used Delikatessen here
Gems Mask 166 here
“New Beginnings” is a PTU tagger size scrap kit created by Cindy of Puddicat Creations and can be purchased at Scraps with Attitude. You can visit her blog here.

This tutorial was written assuming you have a working knowledge of PSP.

~♥~ Let’s get started ~♥~

Open up a 700 X 700 blank canvas.
Flood fill white.

Copy and paste Frame 3 as a new layer.
Resize 80%
Use your Magic Wand and click inside of it.
New Raster layer below the frame.
Copy and paste a paper of choice Into Selection.
Deselect.

Copy and paste your tube as a new layer beside the frame.
Move it into the exact position where you want it.
Duplicate/Mirror
Move the duplicate layer below the frame layer.
Highlight the frame layer and click inside of it with your Magic Wand.
Selections/Invert
Highlight the duplicated tube layer.
Tap the delete key.
Deselect.
Change the Properties to Soft Light.
Duplicate.

Add your embellishments. I used:
Flowers 1: Resize 70%
Books: Resize 25%
Flower basket: Resize 50%
Candle 1& 2: Resize 25%
Element 1: Resize 80% - Use your Target Tool to change to any color of your choice
Curtain 1: Mirror - Move up into the corner - see my tag for reference.

Highlight your white background.
New Raster layer.
Select All.
Copy and paste a paper of choice Into Selection.
Deselect.
Apply the Mask.
Merge Group.

To get the feathered look to your curtain and the leaf vine:
Use your Freehand Selection Tool and outline the element but let the outline only touch the part of the element you want to have the feathered effect.
Selections/Modify/Feather
Number of Pixels:
43
OK
Selections/Invert
Tap the delete key until you have the effect you want.

Add your copyrights.

Add your name.
Give it a slight inner bevel:
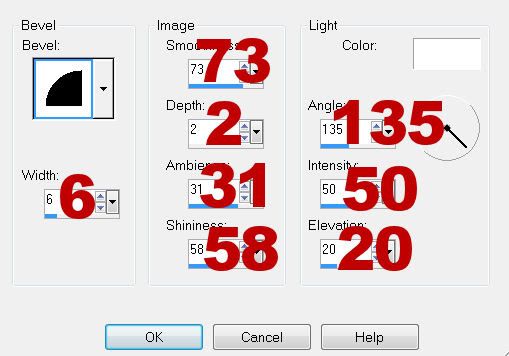

Resize all layers 80%.

I hope you enjoyed this tutorial.
I’d love to see your results and show it off in my gallery.
Email me!
Hugs,
Bev

Tuesday, March 30, 2010

Awaiting Easter

Clicking on the image will enlarge to full view.

Supplies
Font of choice - I used Angelina here
Gems Mask 21 here
“Memories” is a FTU (this week only) full size scrap kit created by Noshay Design. You can find the kit here and visit her blog here.

This tutorial was written assuming you have a working knowledge of PSP.

~♥~ Let’s get started ~♥~

Open up a 700 X 700 blank canvas.
Flood fill white.

Copy and paste Element 49 as a new layer.
Resize 25% and 50%
Using your Selection Tool set on Rectangle outline just inside the stitching.
New Raster layer below the stitching layer.
Copy and paste a paper of choice Into Selection.
(It looks horrid now but don’t worry, we’ll take care of that in a bit)

Copy and paste Element 56 as a new layer.
Resize 45 degrees.
Move into position - see my tag for reference.
(Again, it looks awful but we’ll take care of all of this mess in a while)

Copy and paste Element 23 as a new layer.
Resize 25%.
Move into position.
Duplicate/Resize 80%/Mirror
Move into position.
Merge Down.

Copy and paste Element 8 as a new layer.
Resize 30%
Mirror
Move into position.

Be sure all of your elements are where you want them.
Highlight the paper rectangle layer.
Select All/Float/Defloat
Selections/Modify/Feather
Number of Pixels:
43
OK
Selections/Invert
Tap the delete key until you have a nice feathered image to your paper.

Highlight each of the the element layers (NOT THE STITCHING LAYER!!) and tap the delete key to give each of the elements a nice feathered look as well.
Deselect.

Add your embellishments. I used:
El 8: Resize 50%
El again: Resize 25%/Mirror
El’s 67 & 68: Resize 25%
El 50: Resize 25%
El 54: Resize 25% and 70%. Duplicate/Flip Highlight the original/Duplicate/Free rotate right 90 degrees. Duplicate/Mirror
El 26: Resize 25% and 60%
El 71: Resize 25%

Highlight your white background.
New Raster layer.
Select All.
Copy and paste a paper of choice Into Selection.
Deselect.
Apply the Mask.
Merge Group.

Add your copyrights.

Add your name.

Resize all layers 80%.

I hope you enjoyed this tutorial.
I’d love to see your results and show it off in my gallery.
Email me!
Hugs,
Bev

Who Doesn't Like Spring?


Clicking on the image will enlarge to full view.

Supplies
2 tubes of choice - I used the wonderful artwork of PinUpToons here
Font of choice - I used Arctic 2 here
Gems Mask 160 here
“Color Di Premadera” is a PTU tagger size scrap kit created by Lis of PSP Girl Design and can be purchased at Scraps with Attitude. You can visit her blog here.
Thank you Lis for such a wonderful spring kit!

This tutorial was written assuming you have a working knowledge of PSP.

~♥~ Let’s get started ~♥~

Open up a 700 X 700 blank canvas.
Flood fill white.

Copy and paste Element 45 as a new layer.
Resize 60%
Free rotate left 10 degrees
Duplicate/Mirror
Close out the duplicate.

Highlight the original.
Use your Magic Wand and click inside.
Selections/Modify/Expand by 3.
New Raster layer below the frame.
Copy and paste a paper of choice Into Selection.
Copy and paste your tube as a new layer below the frame.
Selections/Invert
Tap the delete key.
Deselect.

Close out your white canvas.
Merge Visible.
Close the merge layer out.
Open the Duplicate layer.
Repeat the above step.

Add your embellishments. I used:
Element 9: Resize 70%
Element 36
Element 14
Element 37: Resize 70% Duplicate/Mirror
Elementw 23 & 24: Resize 50%
Element 42: Resize 70%
Element 49: Resize 25% Position over the flower pot.
Highlight the flower pot.
Select All/Float/Defloat
Selections/Invert
Highlight the beads.
Tap the delete key.
Deselect.
Merge down.

Highlight your white background.
New Raster layer.
Select All.
Copy and paste a paper of choice Into Selection.
Deselect.
Apply the Mask.
Merge Group.
Add your copyrights.

Add your name.

Resize all layers 80%.

I hope you enjoyed this tutorial.
I’d love to see your results and show it off in my gallery.
Email me!
Hugs,
Bev