Saturday, August 28, 2010

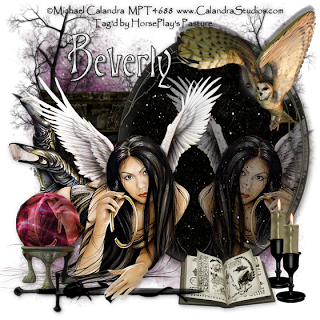
A Bit Batty

Clicking on the image will allow you to enlarge for bigger view.

Supplies

1 tube of choice - I’m using the artwork of Michael Calandra at MPT
Font of Choice - I’m using Chocolate Box here
Vix Mask 452 here
Creative by Nature Template 37 here
Greg’s Factory Output Vol. II - Pool Shadow
“A Bit Batty” is a PTU tagger size scrap kit created by Julie of Bits n Bobs and can be purchased at Exquisite Scraps. You can visit her blog here.

This tutorial was written assuming you have a working knowledge of PSP.

~♥~ Let’s get started ~♥~

Open up the template.
Shift + D.
Close out the original.
Image/Canvas Size
700 X 700
OK
Flood fill the background layer white.
Delete the top 6 layers, Copy of Vector 1 (the light pink circle just above Raster 5), and Raster 5.

Highlight Raster 2 layer.
Use your Magic Wand and click on it.
New Raster layer.
Copy and paste Paper 6 Into Selection.
Deselect.
Delete the template layer.

Highlight Copy of Vector 1 layer.
Use your Magic Wand and click on it.
New Raster layer.
Copy and paste Paper 10 Into Selection.
Deselect.
Delete the template layer.

Copy and paste ABB-50 as a new layer.
Resize 70%
Move into position over the oval paper.
NOTE: Don’t worry about anything that overhangs the oval. We’ll come back to that.
Copy and paste ABB-54 as a new layer.
Move into position behind the bench so that you can see sprigs of grass sticking up from the back of the bench. Move it off to the side a bit.
Duplicate/Mirror
Move both grass layers into the position you want.
Merge Down.
Highlight the Oval paper layer.
Click on it with your Magic Wand.
Selections/Invert
Highlight each of the element layers and tap the delete key.
Deselect.

Highlight Raster 6 Layer.
Copy and paste Paper 9 as a new layer.
Resize 80%
Move into position over the rectangle.
Selections/Invert
Tap the delete key.
Deselect.
Delete the template layer.

Highlight Raster 4 layer.
Repeat the above step.
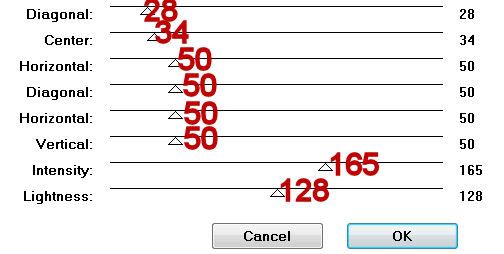
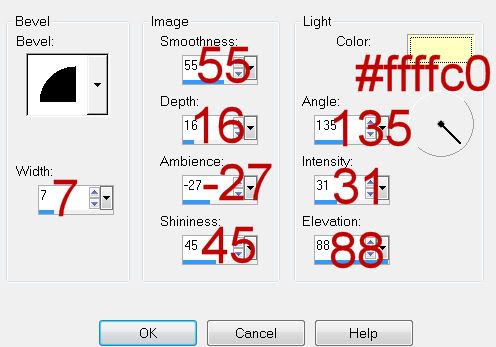
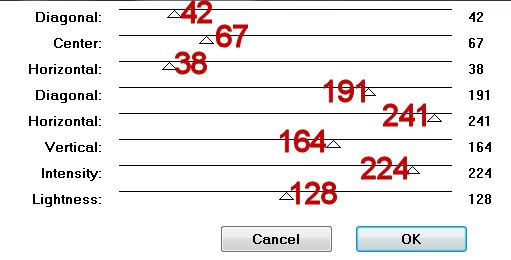
To this paper layer apply Greg’s Factory Output Vol. II - Pool Shadow:

Copy and paste your tube as a new layer.
Duplicate/Mirror
Click on the duplicate with your mouse. Use your arrow key to move the tube over the vertical rectangle. Once it’s in position highlight the rectangle layer. Use your Magic Wand and click anywhere outside of it.
Selections/Invert
Highlight the tube layer.
Tap the delete key.
Deselect.
Change the Properties to Luminance Legacy.

Add your embellishments. I used:
ABB 51: Resize 60%/Flip/Mirror
ABB 57: Resize 40%
ABB 1: Resize 40%
ABB 84: Resize 60%
ABB 4 & 6: Resize 25%
ABB 4: Resize 25% and 70%/Duplicate/Resize 70%
ABB 47: Resize 50%/Mirror

Highlight your white background.
New Raster layer.
Select All.
Copy and paste a paper of choice Into Selection.
Deselect.
Apply the Mask.
Merge Group.
Duplicate

Add your copyrights.

Add your name.
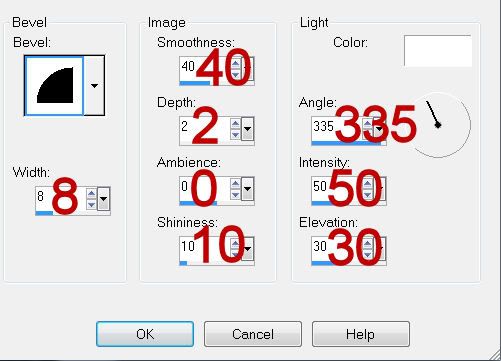
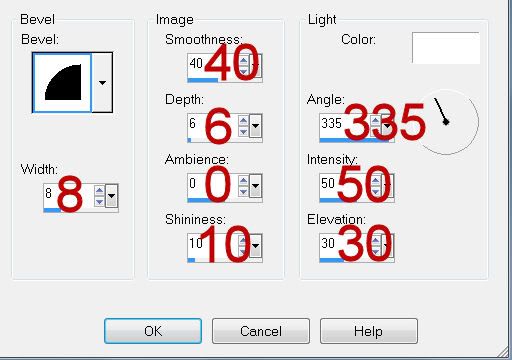
Give it a slight inner bevel:

Resize all layers 80%

I hope you enjoyed this tutorial.
I’d love to see your results and show it off in my gallery.
Email me!
Hugs,
Bev

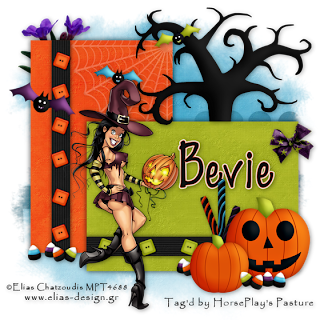
Tricks and Treats


Clicking on the image will allow you to enlarge for bigger view.

Supplies

1 tube of your choice - I used the artwork of Elias Chatzoudis at MPT
Font of Choice - I used Fabulous 50’s here
Gem’s Mask 192 here
Eyecandy 4000 - Gradient Glow
“Tricky Honey” is a PTU scrap kit created by Krissy’s Scraps and can be purchased from her store Exquisite Scraps. You can visit her blog here.
Thank you Krissy for such a fun kit!

~♥~ Let’s get started ~♥~

Open up a 700 X 700 blank canvas.
Flood fill white.

In your color pallet:
Foreground: Null
Background: Set to pattern/Paper 9

Make a rectangle approximately 310 X 455
Convert to Raster layer.

In your color pallet change the pattern to Paper 12.
Create a rectangle approximately 460 X 350.
Convert to Raster layer.

Move the rectangles into position - see my tag for reference.

In your color pallet change the pattern to Paper 8.
Highlight the orange rectangle layer.
Draw out a thin strip on your orange rectangle - see my tag for reference.
Effects/Text Effects/Blinds:
Width: 5
Opacity: 10
Color: White
Light from left/top checked
OK

Highlight your Green Rectangle layer.
Draw out a thin strip on your green rectangle - see my tag for reference.
Effects/Text Effects/Blinds:
Width: 5
Opacity: 10
Color: White
Horizontal checked
OK

Add your embellishments. I used:
Square Button 1 & 4: Resize 25% and 60%/Free rotate right 20
Flower 2: Resize 70%
Bow 3: Resize 25%
Pumpkin 2: Resize 5/0%
Pumpkin 1: Resize 35%
Bat 4: Resize 25%/Free rotate left 20 degrees
Bat 3: Resize 35%/Free rotate right 20 degrees
Bat 2: Resize 25%/Free rotate right 10 degrees
Candy Stick 1: Resize 60%/Free rotate left 110 degrees
Candy Stick 2: Resize 60%/Free rotate left 90 degrees
Candy Stick 3: Resize 60%/Free rotate left 70 degrees
Spider Web 1: Resize 70%/Lower the Opacity to about 24
Candy Corn: Resize 25% and 50%/Free rotate and duplicate as you like.

Copy and paste your tube as a new layer.

Highlight your white background.
Select All
New Raster layer.
Copy and paste Paper 10 Into Selection.
Deselect.
Apply the mask.
Merge Group.

Copy and paste Fence as a new layer.
Apply the mask.
Merge Group.
Move below the mask in your layers pallet.

Add your credits.

Add your name.
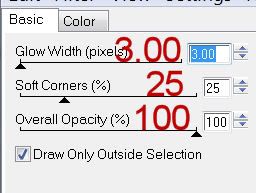
Apply Eyecandy 4000 - Gradient Glow
INSERT PIC HERE

Resize all layers 80%.

I hope you enjoyed this tutorial.
I’d love to see your results and show it off in my gallery.
Email me!
Hugs,
Bev
Thursday, August 26, 2010

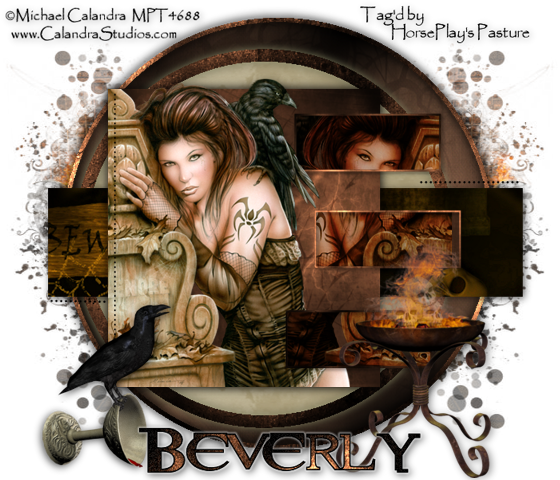
Dance of the Dead


Clicking on the image will allow you to enlarge for a bigger view.

Supplies

1 tube of your choice - I used the artwork of Michael Calandra at MPT
Font of Choice - I used Resident Evil here
Vix Mask 431 here
Scrapity Scrap and More Template 40 here
Eyecandy 4000 - Gradient Glow
Greg’s Factory Output Vol. II - Pool Shadow
DSB Flux - Bright Noise
“Dance of the Dead” is a PTU scrap kit created by Athena of Athena Designs and can be purchased from TKO Scraps. You can visit her blog here.
Thank you Athena for a terrific seasonal kit!

~♥~ Let’s get started ~♥~

Open up the template.
Shift + D.
Close out the original.
Delete the credit layer and Line Square layer.
Image/Canvas Size 700 X 600
OK
Flood fill the background layer white.

Highlight Big Circle layer.
Click on it with your Magic Wand.
New Raster layer.
Copy and paste Paper 13 Into Selection.
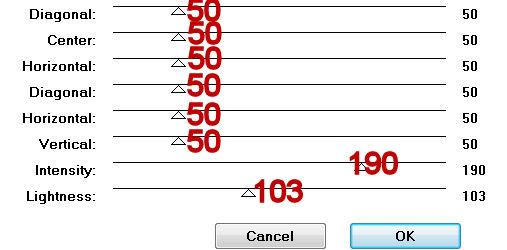
Apply Greg’s Factory Output Vol. II - Pool Shadow:


Deselect.
Delete the template layer.

Highlight Border Big Circle.
Click on it with your Magic Wand.
New Raster layer.
Copy and paste Paper 9 Into Selection.
Apply Pool Shadow effect using these settings:

Apply it once again.
Deselect.
Delete the template layer.

Highlight Border Smaller Circle layer.
Repeat the above step.

Highlight Smaller Circle layer.
Click on it with your Magic Wand.
New Raster layer.
Copy and paste Paper 10 Into Selection.
Deselect.
Delete the template layer.

Highlight Big Rectangle layer.
Click on it with your Magic Wand.
Copy and paste Paper 7 as a new layer.
Move it into position however you choose.
Selections/Invert
Tap the delete key.
Apply Pool Shadow - same settings.
Deselect.
Delete the template layer.

Highlight Square layer.
Click on it with your Magic Wand.
New Raster layer.
Copy and paste Paper 9 Into Selection.
Apply the same Pool Shadow effect.
Copy and paste your tube as a new layer.
Selections/Invert
Tap the delete key.
Deselect.

Highlight Mid Rectangle layer.
Move it in your layers pallet so that it’s just above Top Rectangle layer.
Highlight Bottom Rectangle layer.
Move it in your layers pallet so that it’s just above Mid Rectangle layer.
Merge Down.
Merge Down.
All 3 rectangles should be on the same layer.
Click on each one with your Magic Wand.
New Raster layer.
Copy and paste Paper 9 Into Selection.
Deselect.
Highlight your tube layer.
Duplicate/Mirror
Move it into position over the merged 3 rectangles layer.
Highlight the merged rectangles layer.
Click on each one with your Magic Wand.
Selections/Invert
Highlight the tube layer.
Tap the delete key.
Deselect.
Change the Properties to Soft Light
Duplicate.
Delete the template layer.

Highlight Border Mid Rectangle layer.
Move it in your layers pallet so that it’s just above Border Top Rectangle layer.
Highlight Border Bottom Rectangle layer.
Move it in your layers pallet so that it’s just above Mid Rectangle layer.
Merge down.
Merge down again.
All 3 should be on one layer now.
Select All/Float/Defloat
New Raster layer.
Copy and paste paper 9 Into Selection.
Apply Pool Shadow effect.
Apply the effect once more.
Deselect.
Delete the template layer.

Give all border layers a slight Inner Bevel:


Add your embellishments. I used:
Fire Stand 1: Resize 80%
Chalice: Resize 40%
Crow 2: Resize 40%
Skull 2: Resize 25% and 70%/Lower the Opacity to about 38 or so

Highlight your white background.
Select All
New Raster layer.
Copy and paste Paper 1 Into Selection.
Deselect.
Apply the mask.
Merge Group.

Add your credits.

Add your name.
In your color pallet:
Foreground: Black
Background: color or paper of your choice
Stroke set to 1.5
Type out your name.
Convert to Raster layer.
Selections All/Float/Defloat
Selections/Modify/Contract by 1
OK
Apply Pool Shadow effect twice.
Apply DSB Flux - Bright Noise:
Intensity: 21
Mix
OK
Deselect.
Apply Eyecandy 4000 - Gradient Glow


Resize all layers 80%.

I hope you enjoyed this tutorial.
I’d love to see your results and show it off in my gallery.
Email me!
Hugs,
Bev
Wednesday, August 25, 2010

Wicken Rituals


Clicking on the image will allow you to enlarge.

Supplies

1 tube of your choice - I used the artwork of Michael Calandra at MPT
Font of Choice - I used Burton’s Nightmare here
Gem’s Mask 161 here
“Misty Night” is a PTU scrap kit created by Conchi of Disenando Scraps and can be purchased from Butterfly Blush Designs. You can visit her blog here.
Thank you Conchi for a really wicked kit!

~♥~ Let’s get started ~♥~

Open up a 700 X 700 blank canvas.
Flood fill white.

Copy and paste Frame 7 as a new layer.
Resize 80%.
Move it to the left side of your canvas - see my tag for reference.
Use your Freehand Selection Tool and outline the frame.
New Raster layer below the frame.
Copy and paste Paper 11 Into Selection.
Deselect for now.

Copy and paste your tube as a new layer.
Move it into position on the right side of the frame.
Duplicate/Mirror
Change the Properties to Difference
Lower the Opacity to about 65 or so.
I realize the tube is overhanging the side of the frame. It’s ok. We’ll take care of that in a bit.

Copy and paste Moon as a new layer.
Resize 30%
Move into position below the frame.

Highlight the paper layer.
Click anywhere outside of the paper.
Highlight the moon layer - tap the delete key.
Highlight the tube layer that’s just below the frame - tap the delete key.
DO NOT DESELECT.

New Raster layer just below the frame layer.
Effects/3D Effects/Cutout
Vertical: -10
Horizontal: -10
Opacity: 15
Blur: 35
Color: #ffffff

Repeat the above step accept change the Vertical and Horizontal numbers to 10.
Deselect.

I’ll tell you how to get the tube reflection in the ball in just a bit.

Add your embellishments. I used:
Support: Resize 70%
Book 3: Resize 40%
Light 3: Resize 30%
Owl 4: Resize 40%
Black Rose: Resize 60%
Ball: Resize 50%
Tree: Duplicate/Mirror

Duplicate your tube.
Mirror
Move it over the ball in your layers pallet.
Change the Properties to Soft Light
Highlight the ball layer.
Use your Freehand Selection Tool and outline the globe part only.
Selections/Invert
Highlight the tube layer.
Tap the delete key.
Deselect.

Highlight your white background.
Select All
New Raster layer.
Copy and paste a paper of choice Into Selection.
Deselect.
Apply the mask.
Merge Group.

Add your credits.

Add your name.
Give it a slight inner bevel:


Add a touch of Noise.

Resize all layers 80%.

I hope you enjoyed this tutorial.
I’d love to see your results and show it off in my gallery.
Email me!
Hugs,
Bev
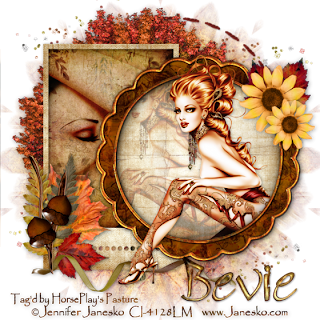
And Autumn Comes


Clicking on the image will allow you to enlarge.

Supplies

2 tubes of your choice - I used the artwork of Jennifer Janesko at CILM
Font of Choice - I used Bambino here
Weescotlass Mask 259 here
“Autumn Wind” is a PTU scrap kit created by
Artmama Made and can be purchased at Exquisite Scraps. You can visit her blog here.
Thank you Artmama for an amazing seasonal kit!

~♥~ Let’s get started ~♥~

Open up a 700 X 700 blank canvas.
Flood fill white.

Copy and paste Embellie 5 as a new layer.
Resize 80%
Use your Magic Wand and click inside of it.
Selections/Modify/Expand by 6.
New Raster layer below the frame.
Copy and paste Autumn Wind 16 Into Selection.
Copy and paste your tube as a new layer.
Move into position.
Selection/Invert
Tap the delete key.
Paste your tube again - keep it larger in size - move into position behind the other tube. See my tag for reference.
Tap the delete key.
Change the Properties to Multiply.
Lower the Opacity to about 38 or so.

Close out your white background.
Merge Visible.
Reopen your white background.

Copy and paste Embellie 7 as a new layer.
Free rotate left 90 degrees.
Resize 80%.
Click inside with your Magic Wand.
Selections/Modify/Expand by 4.
New Raster layer below the frame.
Copy and paste Autumn Wind 5 Into Selection.
Copy and paste your tube above the paper.
Selections/Invert
Tap the delete key.
Deselect.
Change the Properties to Multiply.

Close out the merged layer and background layer.
Merge Visible.
Reopen all layers.
Move merged layers into position - See my tag for reference.

Add your embellishments. I used:
Embellie 54: Resize 50%/Duplicate/Resize 70%/Mirror
Embellie 8: Resize 70%
Embellie 42
Embellie 41: Resize 60%
Embellie 40
Embellie 32: Resize 70%/Mirror
Embellie 22: Resize 80%
Embellie 34
Embellie 37: Resize 90%

Highlight your white background.
Select All
New Raster layer.
Copy and paste a of choice Into Selection.
Deselect.
Apply the mask.
Resize 110%
Merge Group.

Crop your image.

Add your credits.

Add your name.
Give it a slight inner bevel:


Resize all layers 85%.

I hope you enjoyed this tutorial.
I’d love to see your results and show it off in my gallery.
Email me!
Hugs,
Bev