Thursday, July 14, 2011

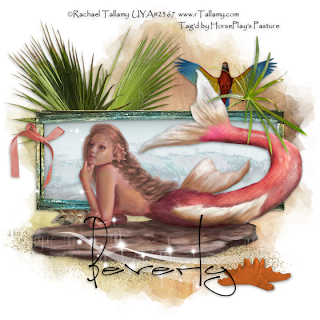
Day Dreaming


Supplies

1 tube of choice - I used the beautiful artwork of Rachael Tallamy which can be purchased from Up Your Art. You must have a license to use.

Font of choice - I used Lyrics Movement here

Weescotlass Mask 220 here

“Catch a Wave Sampler” is a FTU tagger size scrap kit created by Jessica of Gothic Creations and can be found on her blog here. Please leave a thank you when downloading as it’s a small gesture for hard work given freely.
Thank you Jessica for another kit that leaves me to wonder just how you do it!!

This tutorial was written assuming you have a working knowledge of PSP.

~♥~ Let’s get started ~♥~

Open up a 700 x 700 blank canvas.
Flood fill white.

Copy and paste Frame 1 as a new layer.
Resize 75%
Click inside of it with your Magic Wand.
New Raster layer below the frame.
Copy and paste Paper 4 Into Selection.
Copy and paste Ocean as a new layer below the frame.
Move into position.
Selections/Invert
Tap the delete key.
Deselect.

Copy and paste your tube as a new layer.

Copy and paste Bow 2 as a new layer.
Resize 25%
In your color pallet change the foreground to #f49c90.
Make your Target Tool active and change the color of the bow.
Adjust/Brightness and Contrast/Brightness Contrast
Brightness: 27
Contrast -38
OK

Add your embellishments. I used:
Palm: Resize 70%
Greenery: Resize 70%/Mirror
Parrot: Resize 40%
Sand
Sea Life: Resize 25%
Sparkles: Resize 80%

Highlight your white canvas.
New Raster layer.
Select All.
Copy and paste Paper 2 Into Selection.
Deselect.
Apply the mask.
Resize 105%
Merge Group.

Add your copyrights.

Add your name.

Resize all layers 80%.

I hope you enjoyed this tutorial.
I’d love to see your results and show it off in my gallery.
Email me!
Hugs,
Bev

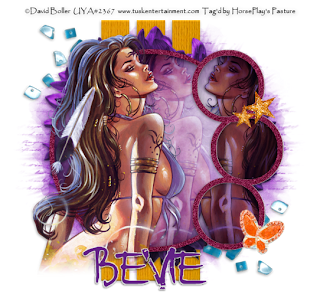
Star Shine


Supplies

1 tube of choice - I used the gorgeous artwork of David Boller which can be purchased from Up Your Art. You must have a license to use.

Font of choice - I used Rat Infested Mailbox here

Weescotlass Mask 236 here

Hugahav’s Haven Template 6 here

Plug-Ins:
Eyecandy 3.1 - Glow
Xero-Porcelain

“Star Shine” is a tagger size scrap kit created by Shelly of Karainakat Kreations and can be purchased from Twilight Scraps. You can visit her blog here.
Thank you Shelly for such a fabulous kit!

This tutorial was written assuming you have a working knowledge of PSP.

~♥~ Let’s get started ~♥~

Open up the template.
Shift + D.
Close out the original.
Delete the top 2 layers and Effect layer.

Highlight Small Rectangles layer.
Click anywhere outside of it with your Magic Wand.
New Raster layer.
Copy and paste Paper 1 Into Selection.
Deselect.
Delete the template layer.
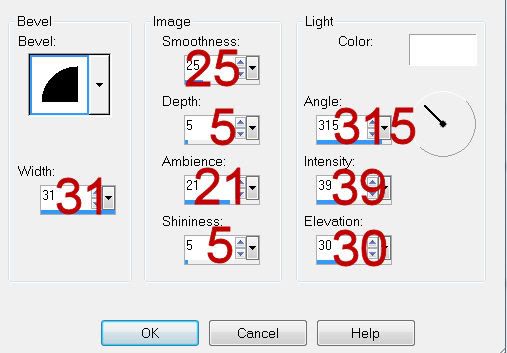
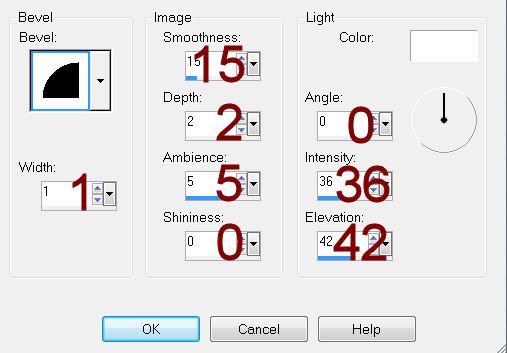
Give it a slight Inner Bevel:


Highlight Large Circle layer.
Click anywhere outside of it with your Magic Wand.
New Raster layer.
Copy and paste Paper 7 Into Selection.
Deselect.
Delete the template layer.

Highlight Bottom Circle layer.
In your layers pallet move it just above Middle Circle layer.
Merge Down.
Both circles should be on one layer now.
In your layers pallet move this layer just above Top Circle layer.
Merge down.
All 3 circles should be on one layer.

Click on each circle with your Magic Wand.
New Raster layer.
Mirror Paper 7/Copy
Make your working canvas active.
Paste Into Selection.
Deselect.
Delete the template layer.

Highlight Bottom Circle Frame layer.
Merge Down.
Merge Down again.
All 3 frames should now be on one layer.

Select All/Float/Defloat
New Raster layer.
Copy and paste StarShine paper Into Selection.
Adjust/Add Remove Noise/Add Noise
Gaussian and Monochrome checked
Noise: 43%
OK
Deselect.
Delete the template layer.

Highlight Large Circle Frame layer.
Repeat the above step.

Copy and paste your tube as a new layer.
Move it into position in front of the large circle frame.
Duplicate/Move to the right just a little and move just above the large circle paper in your layers pallet.
Highlight the large circle paper layer.
Click anywhere outside of it with your Magic Wand.
Highlight the duplicated tube layer.
Tap the delete key.
Deselect.
Change the Properties to Soft Light.

Highlight the original tube layer.
Duplicate/Mirror
Move this tube just above the 3 small circle paper layer.
Get it into the exact position.
Highlight the 3 circle paper layer and click anywhere outside of it with your Magic Wand.
Highlight the tube layer just above the paper.
Tap the delete key.
Deselect.
Change the Properties to Multiply.
Apply Xero-Porcelain:
Use Default Settings.

Add your embellishments. I used:
24: Resize 40%
1: Resize 95%
14: Resize 40%/Duplicate/Resize 70%/Free rotate Right 20 degrees
8: Resize 40%/Free rotate Right 20 degrees

Highlight your white canvas.
New Raster layer.
Select All.
Copy and paste Paper 11 Into Selection.
Deselect.
Apply the mask.
Resize 105%
Merge Group.

Add your copyrights.

Add your name.
Apply Eyecandy 3.1 - Glow:
Width: 3
Opacity: 100
Opacity Drop off: Fat
Color: white

Resize all layers 80%.

I hope you enjoyed this tutorial.
I’d love to see your results and show it off in my gallery.
Email me!
Hugs,
Bev
Wednesday, July 13, 2011

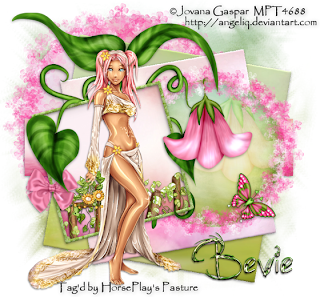
Summer's Day


Supplies

1 tube of choice - I used the artwork of Jovana Gaspar which can be purchased from MPT. You must have a license to use.

Font of choice - I used Jellyka Castle’s Queen here

Weescotlass Mask 249 here

Creative by Nature Template 122 here

Eyecandy 3.1 - Glow

“Fun with Sprite” is a tagger size scrap kit created by Cindy of Puddicat Creations and can be purchased from Heartbeatz Creationz. You can visit her blog here.
Thank you Cindy for another beautiful kit!

This tutorial was written assuming you have a working knowledge of PSP.

~♥~ Let’s get started ~♥~

Open up the template.
Shift + D.
Close out the original.
Delete the top 4 layers.
Resize all layers 80%.
Image/Canvas Size
700 x 650
OK
New Raster layer.
Send to bottom.
Flood fill white.

Highlight 10 layer.
Click anywhere outside of it with your Magic Wand.
Copy and paste Paper 11 as anew layer.
Resize 60%.
Position over the circle.
Selections/Invert
Tap the delete key.
Deselect.
Delete the template layer.
Apply Eyecandy 3.1 - Glow:
Width: 3
Opacity: 100
Opacity Drop off: Fat
Color: white
OK

Highlight 9 layer.
Click on it with your Magic Wand.
New Raster layer.
Copy and paste Paper 1 Into Selection.
Deselect.
Delete the template layer.
Give it a slight Inner Bevel:


Highlight 8 layer.
Click on it with your Magic Wand.
New Raster layer.
Copy and paste Paper 13 Into Selection.
Deselect.
Delete the template layer.
Give it the same slight Inner Bevel.

Highlight 7 layer.
Click on it with your Magic Wand.
New Raster layer.
Copy and paste Paper 10 Into Selection.
Deselect.
Delete the template layer.
Give it the same slight Inner Bevel.

Highlight 6 layer.
Click on it with your Magic Wand.
New Raster layer.
Copy and paste Paper 2 Into Selection.
Deselect.
Delete the template layer.

Highlight 5 layer.
Click on it with your Magic Wand.
New Raster layer.
Copy and Paste Paper 5 Into Selection.
Deselect.
Delete the template layer.
Give it a slight Inner Bevel.

Highlight 3 layer.
Repeat the above step.

Highlight 4 layer.
Click on it with your Magic Wand.
New Raster layer.
Copy and Paste Paper 9 Into Selection.
Copy and paste Fence 1 as a new layer.
Resize 50%
Move into position - see my tag for reference.
Selections/Invert
Tap the delete key.
Deselect.
Delete the template layer.

Copy and paste Flower 1 as a new layer.
Resize 40%
Move into position over the circle paper layer - see my tag for reference.
Duplicate/Resize 120
Move to the right slightly and just above the circle paper in your layers pallet.
Highlight the paper layer.
Click anywhere outside of it with your Magic Wand.
Highlight the flower just above the paper layer.
Tap the delete key.
Deselect.
Change the Properties to Soft Light.

Add your embellishments. I used:
Bow 2: Resize 25%
Leaves 1: Resize 85%
Bling 3: Resize 50%/Position over the smaller circle.
Bling 3 again: Resize 65%/Position over the large circle.
Butterfly 3: Resize 25%

Copy and paste your tube as a new layer.

Highlight your white canvas.
New Raster layer.
Select All.
Copy and paste Paper 2 Into Selection.
Deselect.
Apply the mask.
Resize 115%
Merge Group.

Add your copyrights.

Add your name.
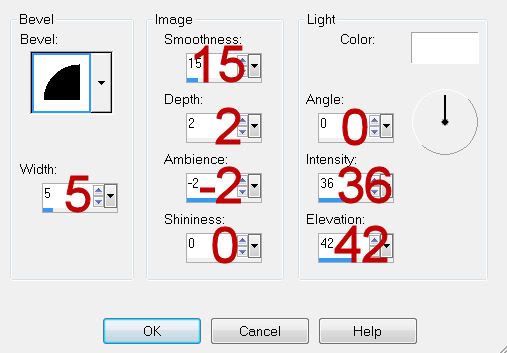
Give it a slight Inner Bevel:


Resize all layers 80%.

I hope you enjoyed this tutorial.
I’d love to see your results and show it off in my gallery.
Email me!
Hugs,
Bev
Tuesday, July 12, 2011

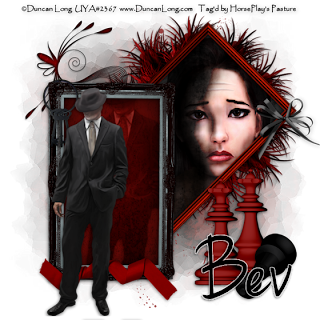
Betrayed


Supplies

2 tubes of choice - I used the awesome artwork of Duncan Long which can be purchased from Up Your Art. You must have a license to use.

Font of choice - I used Jenna Sue here

My mask 27 here

Eyecandy 3.1 - Glow

“Betrayed” is a tagger size scrap kit created by Jen of Sleek n Sassy Designz and can be purchased from her store Scrappin’ Dollar. You can visit her blog here.

This tutorial was written assuming you have a working knowledge of PSP.

~♥~ Let’s get started ~♥~

Open up a 700 x 700 blank canvas.
Flood fill white.

Copy and paste Frame 3 as a new layer.
Resize 65%%
Free rotate Left 90 degrees.

Copy and paste Frame 2 as a new layer.
Resize 50%
Free rotate Right 45 degrees.

Move both frames into position - see my tag for reference.

Highlight the black frame.
Click inside of it with your Magic Wand.
Selections/Modify/Expand by 4.
New Raster layer below the frame.
Copy and paste Paper 7 Into Selection.
Deselect.

Copy and paste your tube as a new layer.
Position it in front of the frame.
Duplicate
Resize 120%
Move this tube into position below the black frame.
Highlight the paper layer.
Click anywhere outside of it with your Magic Wand.
Highlight the tube layer.
Tap the delete key.
Deselect.
Change the Properties to Soft Light.

Highlight the red frame.
Click inside of it with your Magic Wand.
Selections/Modify/Expand by 4.
New Raster layer below the frame.
Copy and paste Paper 13 Into Selection.
Copy and paste your other tube as a new layer below the frame.
Selections/Invert
Tap the delete key.
Deselect.
Change the Properties to Hard Light.

Add your embellishments. I used:
Embellishment 2
Flower 2
Splatter: Resize 90%
Keys: Resize 25%
Bow: Resize 30%
Curled Ribbon: Resize 35%/Free rotate Left 15 degrees
Pawn: Resize 40%/Duplicate
Fallen Pawn: Resize 30%/Mirror

Highlight your white canvas.
New Raster layer.
Select All.
Copy and paste Paper 10 Into Selection.
Deselect.
Apply the mask.
Merge Group.

Add your copyrights.

Add your name.
Apply Eyecandy 3.1 - Glow:
Width: 3
Opacity: 100
Opacity Drop off: Fat
Color: White
OK

Resize all layers 80%.

I hope you enjoyed this tutorial.
I’d love to see your results and show it off in my gallery.
Email me!
Hugs,
Bev
Monday, July 11, 2011

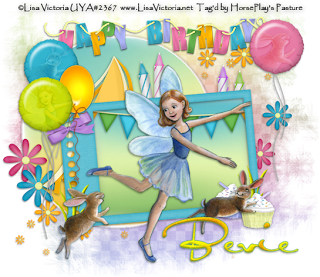
That Special Day


Supplies

1 tube of choice - I used the adorable artwork of Lisa Victoria which can be purchased from Up Your Art. You must have a license to use.

Font of choice - I used Al Sandra here

Weescotlass mask 297 here

Eyecandy 3.1 - Glow

“That Special Day” is a tagger size scrap kit created by me, HorsePlay’s Pasture and can be purchased from my store at Lollipops n Gumdrops. You can visit my designing blog here.

This tutorial was written assuming you have a working knowledge of PSP.

~♥~ Let’s get started ~♥~

Open up a 700 x 700 blank canvas.
Flood fill white.

Copy and paste 38 as a new layer.
Resize 70%
Free rotate Left 15 degrees.
Click inside of it with your Magic Wand.
Selections/Modify/Expand by 4.
New Raster layer below the frame.
Copy and paste Paper 7 Into Selection.
Copy and paste 48 as a new layer below the frame.
Resize 80%
Move into position.
Selections/Invert
Tap the delete key.
Deselect.

Make your Selection Tool active set on Circle.
Make a circle approximately 400 pixels.
New Raster layer.
Copy and paste Paper 9 Into Selection.
Deselect.
Apply Eyecandy 3.1 - Glow:
Width: 3
Opacity: 100
Opacity Drop off: Fat
Color: White
OK
Move into position - see my tag for reference.

Copy and paste your tube as a new layer.

Copy and paste 3 as a new layer.
Copy and paste your tube over the balloon.
Resize as needed.
Highlight the balloon layer.
Use your Magic Wand and click anywhere outside of it.
Highlight the tube layer.
Tap the delete key.
Selections/Modify/Inside Outside Feather:
Both checked
Feather Amount: 43
OK
Tap the delete key until you have a nice feathered effect to the tube.
Deselect.
Change the Properties to Soft Light
Merge Down.
Resize 60%

Repeat the above step with balloons 1 and 2.

Add your embellishments. I used:
57: Resize 85%
46: Resize 50%
31: Resize 40% and 90%/Duplicate/Resize 70%
32: Resize 35%
21: Resize 40%/Free rotate Left 15 degrees
11: Resize 40%
10: Resize 40%/Mirror
5: Resize 60%
25, 26, 27: Resize 40%
24; Resize 40%/Free rotate Left 10 degrees
35: Resize 85%

Copy and paste 45 as a new layer.
Resize 70%
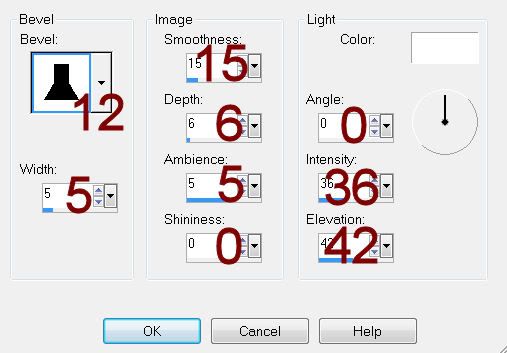
Give it a slight Inner Bevel:


Highlight your white canvas.
New Raster layer.
Select All.
Copy and paste Paper 3 Into Selection.
Deselect.
Apply the mask.
Merge Group.
Duplicate/Flip
Use your Selection Tool set on Rectangle and section off the bottom half of the mask.
Tap the delete key.
Deselect.
Look closely at the sides of the mask and you’ll see a sharp cutoff to the mask where it was sectioned off. Make your Eraser Tool active and click your mouse over the blunt edge to make the layers blend.

Add your copyrights.

Add your name.
Give it a slight Inner Bevel:


Resize all layers 80%.

I hope you enjoyed this tutorial.
I’d love to see your results and show it off in my gallery.
Email me!
Hugs,
Bev