Thursday, March 29, 2012

Abundance

Supplies

1 tube of choice – I used the amazing artwork of Katerina Koukiotis which can be purchased from PSP Tube Stop.  You must have a license to use. 

Font of choice - I used Intima Script Two

Divine Intentionz Template 293 here

Supplies here which I have supplied.
These elements are to be used for this tutorial only.

Plug Ins used:
Xenofex 1.0 – Shower Door
Eyecandy 5 – Textures:  Stone Wall

This tutorial was written assuming you have a working knowledge of PSP.

~~ Lets get started ~~

Open up the template.
Shift + D.
Close out the original.
Resize all layers 85%
Image/Canvas Size
700 x 600
OK
Open up the background layer.
Flood fill white.
Delete the top 6 layers.

Highlight Glittered Oval Half 2 layer.
Merge Down.
Purple and white glittered halves should be on the same layer now.
Click anywhere outside of it with your Magic Wand.
Selections/Invert
New Raster layer.
Flood fill with #212121.
Adjust/Add Remove Noise/Add Noise:
Uniform and Monochrome checked
Noise: 64%
OK
Deselect.
Duplicate
Highlight the original layer.
Adjust/Blur/Gaussian Blur:
Radius: 20
OK
Apply Xenofex 1.0 – Shower Door:
Use Default settings.
OK
Delete the template layer.

Highlight Oval layer.
Click anywhere outside of it with your Magic Wand.
Selections/Invert
New Raster layer.
Copy and paste Paper 2 Into Selection.
Deselect.
Delete the template layer.

Make a new canvas – 500 x 500 pixels.
Flood fill with #212121
Copy

Make your working canvas active.
Highlight Dotted Line 2 layer.
Merge Down.
Both dotted line layers should now be on one layer.
Click anywhere outside of it with your Magic Wand.
New Raster layer.
Paste the dark color you just copied Into Selection.
Deselect.
Delete the template layer.

Highlight Rectangle 2 layer.
Click on it with your Magic Wand.
New Raster layer.
Copy and paste Paper 1 Into Selection.
Duplicate/Change the Properties to Multiply.
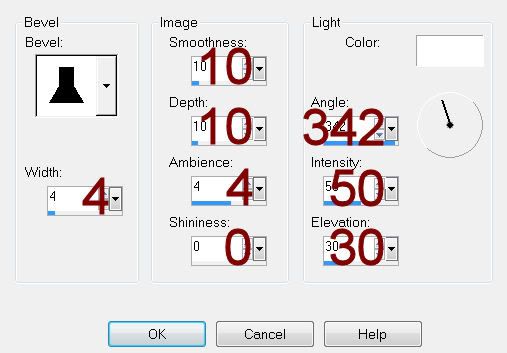
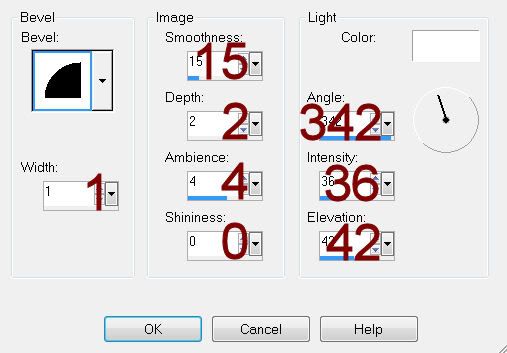
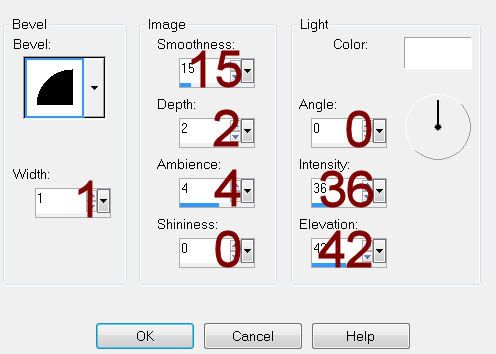
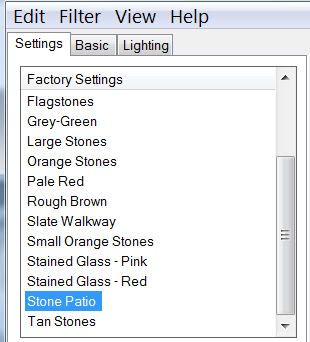
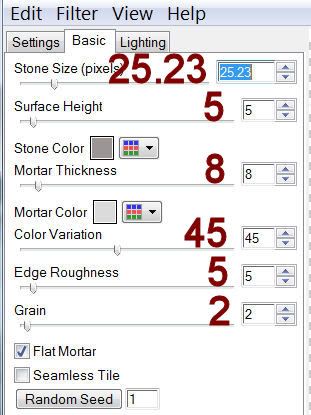
Apply Eyecandy 5 – Textures: Stone Wall
Match your settings to mine:
Settings Tab:

Basic Tab:

Deselect.
Give the template layer the drop shadow.

Highlight Circle 3 layer.
Adjust/Brightness Contrast/Brightness Contrast:
Brightness: -190
Contrast:  15
OK

Highlight Circle 4 layer.
Click on it with your Magic Wand.
New Raster layer.
Copy and paste Paper 1 Into Selection.
Copy and paste your tube as a new layer.
Change the Properties to Soft Light.
Selections/Invert
Tap the delete key.
Deselect.
Delete the template layer.

Copy and paste your tube as a new layer.

Add the elements I provided:
Butterfly:  Free rotate Right 20 degrees/Duplicate/Mirror/Resize 70%
Doodle:  Duplicate/Mirror

Add your name.

Resize all layers 80%

I’d love to see your results.
Email me!
Hugs,
Bev

Wednesday, March 28, 2012

The Right Reasons

Supplies

1 tube of choice – I used the artwork of Jennifer Janesko which can be purchased from CDO.  You must have a license to use. 

Font of choice - I used Before the Rain here

Weescotlass Mask 297 here

Plug Ins Used:
Greg’s Factory Output Vol. II – Pool Shadow
Eyecandy 3.1 - Glow

“Letters from Home” is a tagger size scrap kit created by Barbie of A Cowgirl’s Creations and can be purchased from her store Scrappin Naturally.  You can visit her blog here
Thank you Barbie for a truly beautiful kit.
This tutorial was written assuming you have a working knowledge of PSP.

~~ Lets get started ~~

Open up a 700 x 700 blank canvas.
Flood fill white.

Color Pallet:
Foreground: Null
Background: #000000

Make your Rectangle Tool active.
Create a rectangle approximately 500 x 275 pixels.
Objects/Align/Center in Canvas
Convert to Raster layer.
Click on it with your Magic Wand.
Selections/Modify/Contract by 7.
Tap the delete key.
Deselect.

Open up Paper 7.
Make your Selection Tool active set on Rectangle.
Section off the bottom right corner of the paper.
In your Color Pallet set the foreground to Pattern
Angle: 0
Scale: 150

Use your Magic Wand and click on the new frame you just made.
New Raster layer.
Flood fill with the pattern.
Give it a slight Inner Bevel:

Deselect.
Delete the template you made.

Click inside the frame with your Magic Wand.
Selections/Modify/Expand by 4.
New Raster layer below the frame.
Copy and paste Paper 5 Into Selection.
Apply Greg’s Factory Output Vol. II – Pool Shadow:
Use Default Settings accept lower the Intensity to 43 and lower the Lightness to 91.
OK

Color Pallet:
Close out your foreground.
Background: #000000

Make your Rectangle Tool active again.
Create a rectangle approximately 260 x 190 pixels – it doesn’t matter where it is on your canvas.
Convert to Raster layer.
Click on it with your Magic Wand.
New Raster layer.
Copy and paste Paper 8 Into Selection.
Deselect.
Move it into position – see my tag for reference.
Delete the template you made.

Click anywhere outside of the small rectangle you just made with your Magic Wand.
Copy and paste your tube as a new layer.
Position over the small rectangle paper.
Paste your tube again – in your layers pallet move below the other tube layer.
Change the Properties of this tube to Soft Light.
Move both tubes into their position.
Highlight each tube layer and tap the delete key.
Deselect.
Give the paper a slight Inner Bevel:

Color Pallet:
Foreground: Null
Background: Set it back to Pattern – still using the same pattern made from Paper 7.

Make your Selection Tool active again.
.Create a rectangle approximately 625 x 25 pixels.
Convert to Raster layer.
Duplicate
Move both thin rectangles into position – see my tag for reference.
Merge Visible both rectangles.
Click anywhere outside of them with your Magic Wand.
Selections/Invert
Apply Greg’s Factory Output Vol. II – Pool Shadow:
Move the Intensity and Lightness Bar back to 128
OK
Deselect.
Give it the same slight Inner Bevel.

Open up the Heart Pin element.
Shift + D.
Close out the original.
Use your Eraser Tool and erase the pin part of the element being careful not to erase any of the heart.
Copy
Make your working canvas active.
Paste as new layer.
Resize 35%/Duplicate 3x’s for a total of 4.
Move into position – see my tag for reference.

Copy and paste Laces as a new layer.
Resize 35%/Duplicate 3 x’s.
Make a line of cross stitches across the top thin rectangle layer.
Merge Visible all lace layers.
Use your Eraser Tool and erase what overhangs.
Duplicate/Position over the bottom thin rectangle.

Add your elements.  I used:
Flower 1:  Resize 15%/Duplicate/Resize 70%/Duplicate/Duplicate all 3 flowers.
Ribbon Bow:  Resize 70%
Wire Leaves:  Resize 40%/Free rotate Right 90 degrees
Bow:  Resize 30%
Butterfly:  Resize 30%/Free rotate Right 15 degrees/Duplicate/Mirror/Resize 70%
Candle:  Resize 45%

Highlight your white canvas.
New Raster layer.
Select All.
Copy and paste the Paper 2 Into Selection.
Deselect.
Apply the mask.
Merge Group.
Duplicate/Change the Properties to Multiply.

Crop your image.

Add your credits.

Add your name.
Apply Eyecandy 3.1 – Glow:
Width: 3
Opacity: 100%
Opacity Drop Off:  Fat
Color: #fdf6d9
OK

Resize all layers 90%

I’d love to see your results.
Email me!
Hugs,
Bev

Monday, March 26, 2012

One Moment in Time

Supplies

1 tube of choice – I used the awesome artwork of Ronnie Werner which can be purchased from Up Your Art.  You must have a license to use. 

Font of choice - I used Oh Lara – a pay font

Monti Circular Mask here

Dee’s Sign Post “Expensive Template” here  -
Scroll down the page under Monday April 25, 2011

Plug Ins Used:
Eyecandy 3.1 - Glow

“One Moment in Time” is a tagger size scrap kit created by Stephanie of Stef’s Scrap Kits and can be purchased from Twilight Scraps.  You can visit her blog here
Thank you Stef for a really beautiful kit.
This tutorial was written assuming you have a working knowledge of PSP.

~~ Lets get started ~~

Open up the template.
Shift + D.
Close the original.
Resize all layers 85%
Image/Canvas Size:
700 x 600
Highlight bg layer.
New Raster layer.
Flood fill white.
Delete the following layers:
Top 4 layers, Glittered Grunge layer, Small White Circle, and bg layer.

Color Pallet:
Foreground: #000000
Background: #ae2a68

Highlight Dotted Circle layer.
Make your Color Replacer Tool active.
Double Right click over the dotted line layer.

Repeat the above step with Dotted Square layer.

Highlight White Rectangle layer.
Click on it with your Magic Wand.
Copy and paste Paper 1 Into Selection.
Deselect.
Delete the template layer.
Give it a slight Inner Bevel:

Highlight Gradient Rectangle layer.
Click anywhere outside of it with your Magic Wand.
Selections/Invert
New Raster layer.
Copy and paste Paper 2 Into Selection.
Deselect.
Delete the template layer.
Give it the same slight Inner Bevel.

Highlight Yellow Rectangle layer.
Click on it with your Magic Wand.
New Raster layer.
Copy and paste Paper 12 Into Selection.
Deselect.
Delete the template layer.
Give it the same slight Inner Bevel.

Highlight Gradient Strips layer.
Click anywhere outside of it with your Magic Wand.
Selections/Invert
New Raster layer.
Copy and paste Paper 2 Into Selection.
Deselect.
Delete the template layer.
Give it the same slight Inner Bevel.

Highlight Orange Matt layer.
Click on it with your Magic Wand.
New Raster layer.
Copy and paste Paper 11 Into Selection.
Deselect.
Delete the template layer.
Give it the same slight Inner Bevel.

Highlight White Circle layer.
Adjust/Add Remove Noise/Add Noise:
Uniform and Monochrome checked
Noise: 20%
OK

Highlight Yellow Circle layer.
Click on it with your Magic Wand.
New Raster layer.
Copy and paste Paper 6 Into Selection.
Copy and paste Element 21 as a new layer over the paper layer.
Resize 50%
Move into position.
Selections/Invert
Tap the delete key.
Deselect.
Delete the template layer.
Change the Properties of the element to Lighten.

Highlight Small Orange Circle layer.
Click on it with your Magic Wand.
New Raster layer.
Copy and paste Paper 12 Into Selection.
Copy and paste your tube as a new layer.
Position within the circle.
Duplicate/Resize just a bit larger.
Change the Properties to Overlay.
Move below the original tube layer in your layers pallet.
Position slightly to the right a bit.
Selections/Invert
Tap the delete key.
Highlight the original tube layer.
Tap the delete key.
Deselect.
Highlight the Paper layer.
Apply Eyecandy 3.1 – Glow:
Width: 3
Opacity: 100%
Opacity Drop Off:  Fat
Color: #ffffff
OK
Delete the template layer.

Highlight Frames bg layer.
Click on each square with your Magic Wand.
New Raster layer.
Copy and paste Paper 6 Into Selection.
Deselect.
Delete the template layer.

Highlight Yellow Frames layer.
Click on it with your Magic Wand.
New Raster layer.
Copy and paste Paper 1 Into Selection.
Deselect.
Delete the template layer.
Give it the same slight Inner Bevel.
Apply the same Noise effect.

Add your elements.  I used:
2:  Resize 20%/Duplicate/Mirror
3:  Resize 15%/Duplicate/Mirror
2 again:  Resize 25% and 50%/Duplicate/Resize 70%/Duplicate
3 again:  Resize 25% and 50%
39
38:  Duplicate
40:  Duplicate
30:  Resize 60%
22:  Resize 25%
8:  Resize 20%/duplicate/Mirror
6:  Resize 20%/Duplicate/Resize 70%/Mirror
45:  Resize 80%

Highlight your white canvas.
New Raster layer.
Select All.
Copy and paste the Paper 1 Into Selection.
Deselect.
Apply the mask.
Merge Group.

Add your credits.

Add your name.
Give it the same Glow effect.

Resize all layers 80%

I’d love to see your results.
Email me!
Hugs,
Bev