Saturday, August 17, 2013

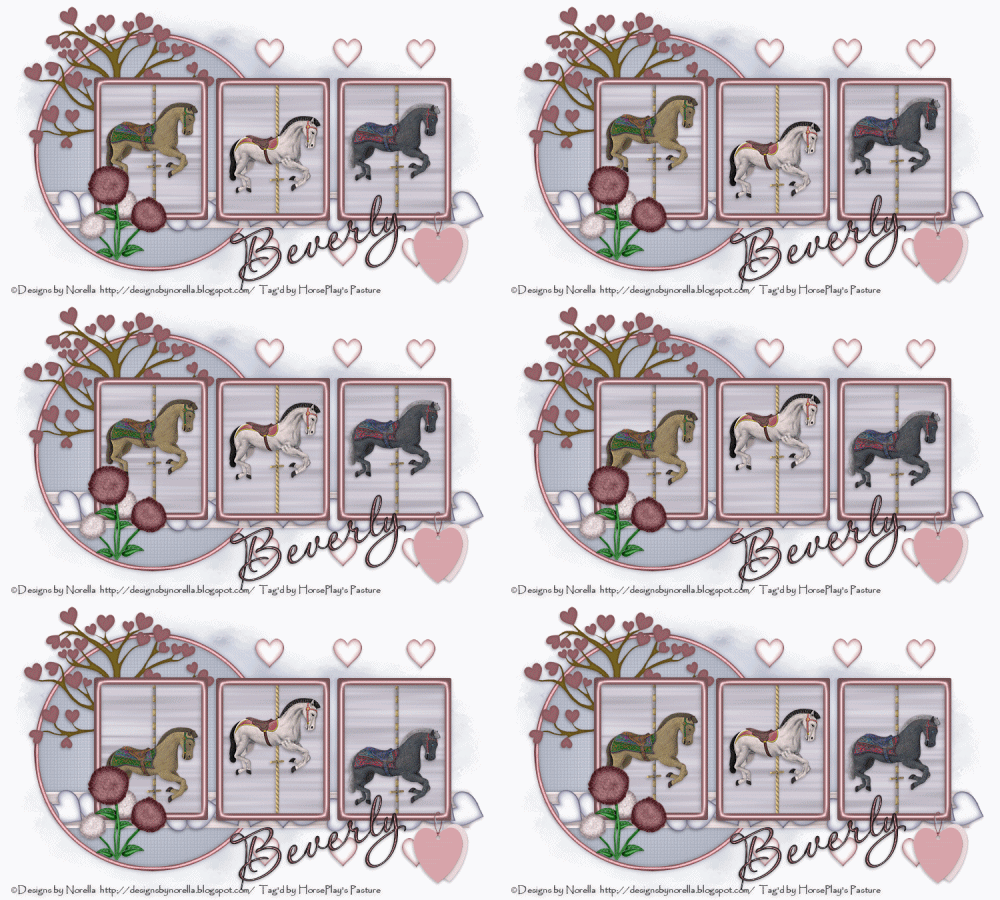
Ride the Carousel

 photo RidetheCoursel_zps1cfa325b.gif

Supplies Needed  

Carousel Horses by Designs by Norella which can be purchased from Heartbeatz Creationz.
You can also visit Norella's blog here.  Thank you Norella for these fabulous horses!

Font of choice – I used Aquarelle here

Vix Mask 452 here

Tracy F. Designz template 16 here

Plug Ins used:
Xero - Fratillary 

Animation Shop

 "Heart Whispers" is a tagger size scrap kit (also available in full size) created by Karen of Sweet Occasion Designs and can be purchased from Heartbeatz Creationz.  You can visit her blog here.  Thank you Karen for a really beautiful kit!  

~♥~ Let’s get started ~♥~

Before we start working on the template...
Open up a 700 x 400 blank canvas.
Select All.
Copy and paste Paper 10 Into Selection.
Deselect.
Lock the layer by clicking on the lock icon at the top of your pallet.
Adjust/Blur/Motion Blur:
Angle: 90
Strength: 100
OK
Apply the motion blur 3 more times.
Unlock the layer.
Effects/Image Effects/Seamless Tiling:
Use Default Settings.
OK
Copy.
Close this canvas out.  You won't be using it any more.

Open up a blank canvas:
1400 x 400
OK
Select All.
Paste Into Selection.
Deselect.
Set this aside for now.

Open up the template.
Shift + D.
Close out the original.
Image/Canvas size
750 x 450
OK
New Raster layer.
Send to bottom.
Flood fill white.
Delete the top 2 layers.

Highlight the Circle Frame layer.
Click on it with your Magic Wand.
New Raster layer.
Flood fill with #986167
Deselect.
Delete the template layer.
Give the frame a slight Inner Bevel:

Duplicate the frame.
Change the Properties to Multiply.
Merge Down.

Highlight Frame 1 layer.
Click on it with your Magic Wand.
New Raster layer.
Flood fill with the same color.
Give it the same slight Inner Bevel.
Deselect.
Delete the template layer.

Repeat the above step with Frame 2 and Frame 3 layers.

Merge Visible Frames 1, 2, and 3.
Bring this merged layer just above Square 3 template layer in your layers pallet.

In your layers pallet move Square 3 layer just above Square 2 layer.
Merge Down.
Move the merged layer just above Square 1 layer.
Merge Down.
All 3 squares should be on the same layers.
We'll come back to this merged layer in a while.

Color Pallet:
Foreground: #d4daea  
Background: #a0a6b4 
Set on Gradient - 
Style: Sunburst
Repeats: 0
Horizontal and Vertical: 50
OK

Highlight Circle layer.
Click on it with your Magic Wand.
New Raster layer.
Flood fill with the gradient.
Apply Xero - Fratillary:
Use Default Settings.
OK
Deselect.
Delete the template layer.

Highlgiht Strip layer.
Click on it with your Magic Wand.
New Raster layer.
Copy and paste Paper 6 Into Selection.
Click the lock icon at the top of your layers pallet to lock this layer.
Adjust/Blur/Motion Blur:
Use same settings.
Apply the Motion Blur once more.
Deselect.
Delete the template layer.

Copy and paste Heart Line 4 as a new layer.
Resize 40%
Move into position over the strip layer - see my tag for reference.
Duplicate the circle frame and bring it just above the heart line element.
Highlight the Circle layer.
Click anywhere outside of it with your Magic Wand.
Highlight the Heart Line layer.
Use your Eraser Tool and erase what overhangs on the left side of the circle.
Deselect.
Highlight the Circle Frame layer.
Duplicate.
Move it just above the Heart Line in your layers pallet.
Use your Eraser Tool and erase the circle frame on the right side that overlaps the strip and Heart Line.

Higliht the Heart Line layer.
Use your Freehand Selection Tool set on Point to Point and section off the tail end of the element.

Tap the delete key.
Deselect.

Add your elements.  I used:
Heart Tree 1:  Resize 35%
Tag 2:  Resize 25%
Tag 3:  Resize 25%/Free rotate Left 10 degrees
Heart 1:  Resize 10%/Duplicate 5 times
Pom Flowers 3:  Resize 15% and 80%/Mirror
Pom Flowers 1:  Resize 20% and 80%

Highlight your white background.
New Raster layer.
Select All
Copy and paste Paper 9 Into Selection.
Deselect.
Adjust/Blur/Gaussian Blur:
Radius: 10
OK
Apply the mask.
Use your Pick Tool and pull all 4 sides out just a little.
Merge Group.

Add your copyright.

Add your name:
Color Pallet: 
Foreground: #383d41
Background: #986167
Stroke: 1

Type your name.
Tilt it slightly.
Give it a slight Inner Bevel:

Copy the 1400 x 400 canvas you made earlier.

Paste as a new layer just over the merged layer of the 3 squares.
Make sure it covers all 3 squares and the left side sticks out a little from the left side of the far left frame.
Make your Pick Tool active (hit the K button on your keyboard)
Pull the top down and bottom up so that it's just a little wider than the height of the squares.
I'm sure you're scratching your head wondering what in the world!  There is a reason to my madness, honest!
Rename the Paper layer "MOTION BLUR PAPER" and the merged template layer "MERGED TEMPLATE"
Just leave this paper like this for now.

Copy and paste each of the horses as new layers just ABOVE the frames.
Resize each horse 10% and 65%.
The pole on each horse needs to be lengthened so...

Highlight a horse.
Make your Selection Tool active set on Rectangle.
Section off the top area of the pole.
Copy.
Deselect.
Paste as New layer.
Match this little piece of pole to the bottom part of the pole.
Merge Visible the horse and pole piece.
Center it below one of the frames.

Repeat the above step with the other 2 horses.

To create an almost seamless loop while the animation runs do the following:
Be sure the horses aren't lined up exactly.  Move one horse up, another down, etc.  But don't make it so drastic that one horse is extremely high and another extremely low.  Just slightly "off".
Once you've done that, duplicate each horse.
Merge Visible the duplicated horses.
Rename the layer "Beginning-End Loop".
Close this layer out.
This layer will be used as a stopping guide point.

Highlight the Merged Template layer.
Click anywhere outside of it with your Magic Wand.
Highlight the Motion Blur Paper layer.
Tap the delete key.
Highlight each of the horses and tap the delete key.
Deselect.

Copy Merged.

~Time to Animate~

Open up Animation Shop.
Edit/Paste/As New Animation.

Back in PSP.
Press the Undo button until the paper and horses are all whole again.  The marching ants around the template should still be there.
Click your mouse on the paper layer.
Press the Left Arrow button on your keyboard to move the paper a little to the left.
Click on a horse and move the horse slightly in the direction you were already moving it.
Repeat this with the other 2 horses.
Highlight the paper and horses and tap the delete key.
Copy Merge.

Carry into AS.
Edit/Paste/After Current Frame.

Repeat the above 2 steps.
What you want to do is make each of the horses ride to the top and bottom of each square and when they're making another ride (whether it's up or down) you want it to BARELY match up with the "Beginning End Loop" layer.
You DO NOT want that Beginning End Loop layer to ever show.  It was made strictly to use as a guide.  

Once you created all the frames you care to - 
View your animation.
If you're happy then -
Ctrl + A to highlight all frames.
Animation/Frame Properties:
Display Time:
23
OK
Animation/Resize Animation
Pixel Size checked
Width: 500
OK

I’d love to see your results.
Email me!
Hugs,
Bev 

Friday, August 16, 2013

Just Beachy


Supplies Needed  

1 tube of choice – I used the beautiful artwork of Greg Andrews which can be purchased from Up Your Art.  You must have a license to use. 

Font of choice – I used Rum Raisin here

My Mask 1 here

Sinners template 1 by Dangerously Delicious here
You can find it under Thursday, August 1, 2013

Plug Ins used:
Tramages - Tow the Line
DSB Flux - Bright Noise

 "Just Beachy" is a tagger size scrap kit created by Susan of TootyPup Scraps and can be purchased from any of her stores here.  Thank you Susan for an incredible summer kit!  

~♥~ Let’s get started ~♥~

Open up the template.
Shift + D.
Close out the original.
Delete the top 12 layers and Teal Strip.
Open up the background layer.

Highlight Bottom Brown Rectangle layer.
Click on it with your Magic Wand.
New Raster layer.
Copy and paste Paper 6 Into Selection.
Deselect.
Delete the template layer.

Highlight Top Brown Rectangle layer.
Repeat the above step.

Highlight Bottom Creme Circle layer.
Click on it with your Magic Wand.
New Raster layer.
Copy and paste Frame Circle 2 Into Selection.
Deselect.
Delete the template layer.

Highlight Large Dark Circle layer.
Repeat the above step.

Highlight Teal Square layer.
Click on it with your Magic Wand.
New Raster layer.
Copy and paste Paper 4 Into Selection.
Deselect.
Delete the template layer.
Give the paper a slight Inner Bevel:

Highlight Left Rust Strip layer.
Copy and paste Window 02 as a new layer.
Resize 60%
Make your Pick Tool active (tap the letter K on your keyboard) and pull the sides in so that the element is the same width as the template layer.
Move into exact position over the template layer.
Delete the template layer.
Duplicate the element.
Move into position over Rust Right Strip layer.
Delete the template layer.

Highlight Grey Rectangle layer.
Click on it with your Magic Wand.
New Raster layer.
Copy and paste Paper 7 Into Selection.
Give the paper the same slight Inner Bevel.
Copy and paste Beach 01 as a new layer.
Resize 70%
Move into position - see my tag for reference.
Selections/Invert
Tap the delete key.
Deselect.

Highlight Top Creme Circle layer.
Copy and paste Summer Fruit Deco 01 as a new layer.
Resize 60%
Move into position over the template layer.
Click inside the frame with your Magic Wand.
Selectons/Modify/Expand by 2.
New Raster layer below the frame.
Copy and paste Paper 6 Into Selection.
Copy and paste your tube as a new layer below the frame.
Change the Properties of the tube to Overlay.
Selections/Invert
Tap the delete key.
Deselect.
Delete the template layer.

Copy and paste your tube as a new layer.

Add your elements.  I used:
Palm 02:  Resize 45%
Sand 01:  Resize 70%/Use Pick Tool to flatten
Daisys 03:  Resize 70%
Sun 01a:  Resize 25%
Birdie 01:  Resize 15%
Flower Deco 04:  Resize 25%/Duplicate/Flip/Mirror
Butterfly 03:  Resize 10%/Duplicate/Mirror
Heart Cluster 01:  Resize 50%

Image/Canvas Size:
750 x 600
Highlight your white background.
Flood fill white.
New Raster layer.
Select All
Copy and paste Paper 6 Into Selection.
Deselect.
Apply the mask.
Merge Group.
Duplicate
Merge Down.
Apply Tramages - Tow the Line:
Use Default Settings.

Add your copyright.

Add your name:
Color Pallet: 
Foreground:  #392a22
Background: Pattern/Paper 6
Stroke: 1

Type your name.
Give it a slight Inner Bevel:

Apply DSB Flux - Bright Noise:
Intensity: 25
Mix checked
OK

Resize all layers 80%.

I’d love to see your results.
Email me!
Hugs,
Bev 

Traveller

 photo Traveller_zps0a9bed66.gif

Supplies Needed  

1 tube of choice – I used the amazing artwork of Verymany which can be purchased from Pics for Design.  You must have a license to use. 

Font of choice – I used Carnivalee Freakshow here

Weescotlass Mask 297 here

Divine Intentionz template 347 here

Plug Ins used:
Eyecandy 3.1 - Glow

Animation Shop

 "Traveller" is a tagger size scrap kit created by Conchi of DnScraps and can be purchased from Heartbeatz Creationz.  You can visit her blog here.  Thank you Conchi for an incredibly beautiful kit!  

~♥~ Let’s get started ~♥~

Open up the template.
Shift + D.
Close out the original.
Resize all layers 90%
Image/Canvas size
700 x 550
OK
Highlight the background layer.
Flood fill white.
Delete the top 5 layers, Circle Centre 1, and Glittered Centre Circle.

Highlight Glittered Circle Right layer.
Click anywhere outside of it with your Magic Wand.
Selections/Invert
New Raster layer.
Flood fill with #330812
Adjust/Add Remove Noise/Add Noise:
Random & Monochrome checked
Noise: 68%
OK
Deselect.
Delete the template layer.

Repeat the above step with the following template layers:
Glittered Circle Left, Glittered Frame 1
Glittered Frame 2, Glittered Circle Bottom Left, Glittered Circle Top Right
Glittered Circle Centre 2

Copy and paste Banner 3 (from ele2pa folder) as a new layer.
Resize 40%
Free rotate Left 90 degrees
Move into position over Rectangle 1 template layer.
Make your Pick Tool active and pull down on the top a little to make the element the same length as the template layer.
Duplicate the element layer.
Move into positin over Rectangle 2 layer.
Use your Pick Tool again if you need to shorten the element layer to make it the same length as this template layer.
Delete Rectangle 1 and Rectangle 2 template layers.

Highlight Circle Right layer.
Click anywhere outside of it with your Magic Wand.
Selections/Invert
New Raster layer.
Copy and paste Paper 5 Into Selection.
Deselect.
Delete the template layer.

Repeat the above step with Circle Left layer.

Highlight Square 1 layer.
Click on it with your Magic Wand.
New Raster layer.
Copy and paste Paper 3 Into Selection.
Deselect.
Delete the template layer.

Repeat thea above step with Square 2 layer.

Highlight Frame Background 1 layer.
Click outside of it with your Magic Wand.
Copy and paste Paper 13 as a new layer.
Resize 35%
Move into position over the template layer.
Tap the delete key.
Deselect.
Delete the template layer.
***IMPORTANT - Rename this paper layer "ANI 1"

Repeat the above step with Frame Background 2 layer.
***IMPORTANT - Rename this paper layer "ANI 2"

Highlight Heart Frame 1 layer.
Click on it with your Magic Wand.
New Raster layer.
Copy and paste Paper 4 Into Selection.
Deselect.
Delete the template layer.

Repeat the above step with Heart Frame 2 layer.

Highlight Circle Bottom Left layer.
Click on it with your Magic Wand.
New Raster layer.
Copy and paste Paper 1 Into Selection.
Deselect.
Delete the template layer.

Highlight Circle Top Right layer.
Click on it with your Magic Wand.
New Raster layer.
Paste Paper 1 Into Selection.
New Raster layer.
Copy and paste Time Clock (from ele folder) Into Selection.
Change the Properties of the element to Hard Light.
Deselect.
Delete the template layer.

Highlight Circle Centre 1 layer.
Click on it with your Magic Wand.
New Raster layer.
Copy and paste Paper 9 Into Selection.
Copy and paste Baby Bob (from ele2pa folder) as a new layer.
Resize 50%
Change the Properties to Soft Light and lower the Opacity to about 44.
Move into position over the paper layer.
Selections/Invert
Tap the delete key.
Paste Baby Bob as a new layer again.
Resize 30%
Move into position.
Tap the delete key.
Deselect.

Copy and paste your tube as a new layer.
If you're using the same one I did, resize 40%

Add your elements.  I used:
(from ele2pa folder)
Cap Frame:  Resize 55%
Bird:  Resize 10%/Duplicate/Mirror
Big Bow:  Resize 25%
Boots 3:  Resize 20%
(From ele folder)
Malete:  Resize 40%
Glass Hat:  Resize 10%
Leafs:  Resize 25%/Duplicate/Mirror/Duplicate/Duplicate original leaf/Mirror/Flip/Duplicate/Mirror/Resize 80% 
Glitters:  Resize 50%/Duplicate 3x's

Highlight your white background.
New Raster layer.
Select All
Copy and paste Paper 15 Into Selection.
Deselect.
Apply the mask.
Resize 110%
Merge Group.

Add your copyright.

Add your name:
Color Pallet: 
Foreground: #261414
Background: #946042
Stroke: 1

Type your name.
Give it a slight Inner Bevel:

Apply Eyecandy 3.1 - Glow:
Width: 3
Opacity: 100%
Opacity Drop Off: Fat
Color: #f9ece1
OK

Getting ready for animation:
Just to make it LOADS easier on you we're going to merge layers to reduce what shows in your layers pallet.

Merge Visible Ani 1 and Ani 2 paper layers.
Rename this layer "FRAME BACKGROUND"

In your layers Pallet close out FRAME BACKGROUND layer and every single layer below it.
Once you're done that highlight any layer above all the closed out layers.
Merge Visible.
All the layers above should now be merged.
Name this merged layer "TOP LAYERS"

Open up all layers.
Close out TOP LAYERS and FRAME BACKGROUND layers.
Highlight any open layer.
Merge Visible.
Name this merged layer "BOTTOM LAYERS".

Open up all the layers.
Your layers Pallet should now have 3 layers in the following order from to to bottom:
TOP LAYERS
FRAME BACKGROUND
BOTTOM LAYERS

Copy and paste Car (from elepa2 folder) as a new layer.
Resize 15%
Move this car into position behind the top frame of your tag leaving just the nose to poke out from behind the frame:

Highlight the Frame Background layer.
Click anywhere outside of it with your Magic Wand.
Highlight the car layer.
Tap the delete key.
Deselect.
Copy Merge.

~Time to Animate~
I bet you thought you'd NEVER get to this point!
But you did....yay!

Open up Animation Shop.
Edit/Paste/As New Animation.

Back in PSP.
Click the Undo button twice - it makes the entire car show up again.
Press the Right arrow key on your keyboard to make the car move forward some
***TIP - If the car won't budge then click your mouse on the car and then press the arrow key on your keyboard.
Once your moved the car forward a little then tap the delete key.
Deselect.
Copy Merge

Carry into AS.
Edit/Paste/After Current Frame.

Back in PSP.
Keep repeating the above 2 steps until the car can no longer be seen...it's "drives" off behind the circle.
Copy Merge (you should not see any car at all on this image) and carry into AS.
Edit/Paste/After Current Frame.

View your animation this far by clicking on the "View Animation" icon:

If you're happy with it so far then highlight the last frame (this frame should not have a car image on it) and copy.
Highlight the first frame.
Edit/Paste/Before Current Frame.

Back in PSP.

Now you want the car to come in from the opposite direction in the frames on the bottom part of your tag.
To do that simply duplicate and mirror the car element and follow the same directions as above.

In AS - Once you have all frames copied and pasted, have the car driving behind your tube and "disappearing" it's time to change the Frame Properties -
Ctl + A to highlight all frames.
Animation/Frame Properties
Display Time: 13
OK
Use the slider bar at the bottom to slowly scroll through all your frames and look for the frame that should be in the middle somewhere - the frame that has no car showing at all - highlight that frame.
Hold down the Ctrl key and highlight the first frame.
The first frame and the frame in the middle (both are identical looking frames) should now be highlighted.
Animation/Frame Properties
Display time: 150

Animation/Resize Animation:
Pixel Size checked
Width: 500
OK

Go ahead and watch your animation.
If you're happy with it then save.

I’d love to see your results.
Email me!
Hugs,
Bev 

Thursday, August 15, 2013

Her Bad Side


Supplies Needed  

1 tube of choice – I used the amazing artwork of Cris DeLara which can be purchased from Up Your Art.  You must have a license to use. 

Font of choice – I used Gesso here

Becky Mask 22 here

 "My Black Heart" is a tagger size scrap kit created by Jessica of Gothic Inspirations and can be purchased from her store here.  You can visit her blog here.  Thank you so much for another fabulous kit, Jess!

~♥~ Let’s get started ~♥~

Open up a 700 x 700 blank canvas.
Flood fill white.

Copy and paste Frame 7 as a new layer.
Resize 60%
Free rotate Left 93 degrees
Paste the Frame as a new layer again.
Resize 60%
Free rotate Left 90 degrees
Move both frames into position - see my tag for reference.

Highlight the right frame.
Click inside of it with your Magic Wand.
Selections/Modify/Expand by 4.
New Raster layer below the frame.
Copy and paste Paper 11 Into Selection.
Copy and paste Ghoast as a new layer just below the frame.
Change the Properties of the element to Dodge.
Selections/Invert
Tap the delete key.
Deselect.

Highlight the left frame.
Click inside of it with your Magic Wand.
Selections/Modify/Expand by 4.
New Raster layer below the frame.
Copy and paste paper 11 Into Selection.
Copy and paste your tube as a new layer just below the frame.
Move into position.
Change the Properties to Luminance (Legacy) and lower the Opacity to about 65.
Selections/Invert
Tap the delete key.
Deselect.

Copy and paste your tube as a new layer.
Position on the right side of your canvas - see my tag for reference.

Add your elements.  I used:
Daisies:  Resize 60%
Barbwire 1:  Resize 60%/Effects/Edge Effects/Enhance
Grass:  Resize 90%/Duplicate/Mirror
Butterflies:  Resize 30%
Grass: Position behind the frames.
Grass again:  Resize 50%
Bottle:  Resize 30%
Lamp:  Resize 45% and 90%
Pent:  Resize 15%
Skul21:  Resize 30%/Mirror
Raven:  Resize 40%
Spider:  Resize 10%/Duplicate/Mirror (use this one to decorate your name)
Word Art 2:  Resize 60%/Duplicate
Light:  Resize 60%
String:  Resize 40% (used to decorate your name)

Highlight your white background.
New Raster layer.
Select All
Copy and paste Paper 12 Into Selection.
Deselect.
Apply the mask.
Merge Group.
Duplicate.
Lower the Opacity to about 53.

Add your copyright.

Add your name:
Color Pallet: 
Foreground: #000000
Background: ##412d2
Stroke: 1.0

Type your name.
Give it a slight Inner Bevel:

Decorate with the string element.

Resize all layers 80%.

I’d love to see your results.
Email me!
Hugs,
Bev

Tuesday, August 13, 2013

Dragon's Way

Supplies Needed  

1 tube of choice – I used the wonderful artwork of Michael Calandra which can be purchased from CDO.  You must have a license to use. 

Font of choice – I used Burton's Nightmare here

Weescotlass Mask 297 here

My template 158 here

Plug Ins used:
Eyecandy 3.1 - Glow

"Creeped" is a tagger size scrap kit created by Cindy of ChiChi Designz and can be purchased from any of her stores here.  Thank you Cindy for a fantastic kit.  

~♥~ Let’s get started ~♥~

Open up the template.
Shift + D.
Close out the original.
Image/Canvas size
700 x 700
OK
Highlight the background layer.
Flood fill white.
Delete the credit layer, Raster 3, and Raster 4 layers.

Highlight Raster 2 layer.
Click in each frame with your Magic Wand.
New Raster layer.
Copy and paste Paper 13 Into Selection.
Deselect.

Highlight Raster 7 layer.
Click anywhere outside of it with your Magic Wand.
Copy and paste Paper 14 as a new layer.
Resize 50%
Move into position over the template layer.
Tap the delete key.
Deselect for now.
Delete the template layer.

Highlight Raster 10 layer.
Repeat the above step.

Copy and paste the following elements and position over the top circle paper.  Dont worry about what overhangs the paper.  We'll clean that up in a bit.
Cloud:  Resize 25%
Cloud again:  Resize 40%
Dragon:  Resize 25%
Tree 3:  Resize 70%
Tree 1:  Resize 70%

Highlight the paper layer that's below all the elements.
Click anywhere outside of it with your Magic Wand.
Highlight each element and tap the delete key.
Deselect.

Copy and paste Tab as a new layer.
Resize 70%
Free rotate Left 90 degrees
Duplicate
Move both into exact position - DO NOT put a drop shadow on the bottom one yet.

Copy and paste your tube as a new layer.
Move into position over the bottom circle paper - see my tag for reference.
Highlight the circle paper layer.
Click anywhere outside of it with your Magic Wand.
Highlight the tube layer and erase the bottom part of the tube that overhangs the paper.
Deselect.
Highlight the Tab element that's positioned behind the bottom circle paper layer.
Click anywhere outside of it with your Magic Wand.
Highlight your tube layer and erase what overhangs the edge of the Tab element.
Deselect.
You can now give the Tab element a drop shadow.

Copy and paste Crystal Ball 1 as a new layer.
Copy and paste your tube as a new layer.
Change the Properties to Overlay.
Position it over the Crystal Ball.
Make your Freehand Selection Tool active set on either Freehand or Point to Point - whichever you feel comfortable using.
Section around the ball part of the element.
Selections/Invert
Selections/Modify/Inside Outside feather:
Both checked
Feather amount: 10
OK
Tap the delete key a few times.
Deselect.
Merge Visible the tube and crystal ball element.
Resize 70%

Add your elements.  I used:
Spider:  Resize 25%
Bow:  Resize 45%/Mirror/Use Target Tool to change the color to #867975
Skulls:  Resize 70%
Screw:  Resize 10%/Duplicate 5x's
Signs:  Resize 85%
Cross:  Resize 70%/Free rotate Right 25 degrees
Bullet:  Resize 60%/Duplicate/Free rotate Right 95 degrees
Glitter Bling

Highlight your white background.
New Raster layer.
Select All
Copy and paste Paper 17 Into Selection.
Deselect.
Apply the mask.
Merge Group.

Add your copyright.

To add street names to the wood sign:
Color Pallet:
Foreground:  Null
Background:  #d7d7d7
Type a street name of your choice or you can use mine.
Convert to Raster layer.
Make your Pick Tool active and tilt the name slightly so that it slants with the sign.

Add your name:
Color Pallet: 
Foreground: #0f1c11  
Background: #515151
Stroke: 1

Type your name.
Give it a slight Inner Bevel:

Apply Eyecandy 3.1 - Glow:
Width: 3
Opacity: 100
Opacity Drop Off:  Fat 
OK

Resize all layers 80%.

I’d love to see your results.
Email me!
Hugs,
Bev 

Monday, August 12, 2013

Lavendar Fantasy


 Supplies Needed  

1 tube of choice – I used the beautiful artwork of Renee Lavoie which can be purchased from PSP Tube Stop.  You must have a license to use.  For a savings the tube and kit can be purchased together! 

Font of choice – I used Wretched here

Weescotlass Mask 219 here

"Pastels & Pearls" is a tagger size scrap kit created by me, Bev of HorsePlay's Pasture Designs and can be purchased exclusively from PSP Tube Stop.  You can visit my designing blog here.

~♥~ Let’s get started ~♥~

Open up a 700 x 700 blank canvas.
Flood fill white.

Copy and paste El 36 as a new layer.
Resize 80%
Click inside of it with your Magic Wand.
Selections/Modify/Expand by 4.
New Raster layer below the frame.
Copy and paste Paper 13 Into Selection.
Copy and paste 13 as a new layer below the frame.
Resize 50%
Move into position - see my tag for reference.
Selections/Invert
Tap the delete key.
Copy and paste El 10 as a new layer.
Resize 50%
Move into position behind the hourglass - see my tag for reference.
Deselect.

Copy and paste your tube as a new layer.
Move into position - see my tag for reference.

Copy and paste El 16 as a new layer.
Copy and paste your tube as a new layer.
Move it below the bubble layer and resize your tube so that it looks nice inside the bubble.
Highlight the bubble layer.
Click anywhere outside of it with your Magic Wand.
Selections/Modify/Inside Outside Feather:
Both checked
Feather amount 10%
OK
Tap your delete key a few times.
Deselect.
Lower the Opacity of the tube to about 32.
Merge Visible the bubble and tube layer.
Duplicate/Resize 70%
Position the smaller bubble below the frame - see my tag for reference.

New Raster layer at the top of our layers pallet.
Make your Selection Tool active set on Rectangle.
Make a rectangle approximately 290 x 500 pixels.
Copy and paste Paper 14 Into Selection.
Deselect.
Give the paper layer a slight Inner Bevel:

Duplicate the paper layer.
Move both papers into position - see my tag for reference.

Add your elements.  I used:
El 60:  Resize 50%/Duplicate
El 59:  Resize 40%/Duplicate
El 17:  Resize 65%
El 15:  Resize 85%
El 48
El 55:  Free rotate Left 90 degrees/Duplicate
El 52:  REsize 50%
El 49
El 11:  Resize 50%/Free rotate Right 30 degrees
El 2:  Resize 60%/Duplicate

Highlight your white background.
New Raster layer.
Select All
Copy and paste Paper 8 Into Selection.
Deselect.
Apply the mask.
Resize 110%
Use your Pick Tool and pull the sides out a little.
Merge Group.

Add your copyright.

Add your name:
To make your name curve with the ribbon:

Color Pallet:  
Foreground: #000000
Background: Null

Make your Pen Tool active set on Draw Freehand
Create on Vector checked
Line Style: Solid
Width: 2.00

Draw a line along the bottom of the ribbon:

Color Pallet: 
Foreground & Background: #efefef

Move your mouse along the line you drew at the center until you see a rocking A then click your mouse.
Type your name.
Apply.
In your layers pallet click on the + sign.
Click on the eye of the New Path layer.
Right Click your mouse on Vector 1 layer.
Convert to Raster layer.
Duplicate your name layer.

Color Pallet:
Foreground: #efefef
Background: #c99bd3

Make your Color Replacer Tool active
Double Right click on your name.
It should have turned purple.
Move this layer slightly to the right.
In your layers pallet move beneath your white name layer.
Merge Visible both name layers.

Resize all layers 80%.

I’d love to see your results.
Email me!
Hugs,
Bev

Pearl of the Ocean

Supplies Needed  

1 tube of choice – I used the beautiful artwork of Renee Lavoie which can be purchased from PSP Tube Stop.  You must have a license to use.  For a savings the kit can be purchased with the tube!    

Font of choice – I used Centeria Script Demo here

Becky Mask 22 here

A Lil Bit of Heaven Template by Dee's Sign Post here
You can find it under Sunday, August 12, 2012

"Pastels & Pearls" is a tagger size scrap kit created by me, Bev of HorsePlay's Pasture Designs and can be purchased exclusively from PSP Tube Stop.  You can visit my designing blog here.

~♥~ Let’s get started ~♥~

Open up the template.
Shift + D.
Close out the original.
Image/Canvas size
725 x 625
OK
Highlight the background layer.
Flood fill white.
Delete the top 9 layers, Top Dotted Circle, Small Drk Blue Circle, Bottom Dotted Circle, Small Lt Blue Circle, and Gray Circle layer.

Highlight Right Blue Square layer.
Click on it with your Magic Wand.
New Raster layer.
Copy and paste Paper 10 Into Selection.
Duplicate
Change the Properties of the paper to Multiply.
Merge Down.
Deselect.
Delete the template layer.
Give the merged paper layer a slight Inner Bevel:

Highlight Left Blue Square layer.
Repeat the above step.

Highlight Blue Oval layer.
Click on it with your Magic Wand.
New Raster layer.
Copy and paste Paper 11 Into Selection.
Deselect 
Delete the template layer.
Give it the same slight Inner Bevel.

Copy and paste El 45 as a new layer.
Resize 40%
Free rotate Right 65 degrees.
Duplicate
Position both of these element layers over Top Strip template layer.
Delete the template layer.
Duplicate and mirror both element layers.
Move them into position over Bootton Strip template layer.
Delete the template layer.

Highlight Left Frame bg layer.
Click on it with your Magic Wand.
New Raster layer.
Copy and paste Paper 13 Into Selection.
Deselect for now.

Repeat the above step with Right Frame bg and Center Frame bg layers.

Copy and paste your tube as a new layer.
Duplicate the tube 2x's and close them out for now.
Move the original tube layer into position over the center paper.
Highlight the Center Frame bg template layer.
Click anywhere outside of it with your Magic Wand.
Highlight your tube layer.
Use your Eraser Tool to erase the parts of the tube you don't want to overhang the frame.
Deletelect.
Delete the template layer.

Open up one of the tube layers that you duplicated.
Free rotate Left 10 degrees.
Move into position over the left bg paper.
Change the Properties of the tube to Overlay.
Highlight Left Frame bg template layer.
Click anywhere outside of it with your Magic Wand.
Highlight the tube layer.
Tap the delete key.
Deselect.
Delete the template layer.

Open up the other tube layer that you duplicated.
Free rotate Left 25 degrees.
Change the Properties of the tube to Overlay.
Move into position over the Right bg paper layer.
Highlight the Right frame bg template layer.
Click anywhere outside of it with your Magic Wand.
Highight the tube layer.
Tap the delete key.
Deselect.
Delete the template layer.

Color Pallet:
Foreground: #5c5791

Highlight Left Frame layer. 
Use your Target Tool and change the color to your foreground color.

Repeat the above step with Right Frame and Center Frame.

Add your elements.  I used:
El 56:  Resize 10%/Duplicate 4x's
El 36:  Resize 60%
El 31:  Use your Pick Tool and flatten it out
El 59 & El 60:  Resize 65%
El 17:  Resize 70%
El 54:  Resize 40%
El 53:  Resize 40%/Free rotate Right 30 degrees
El 13:  Resize 60%
El 21:  Resize 40%
El 33
El 48:  Free rotate Left 75 degrees
Wl 52:  Resize 80%/Free rotate Left 75 degrees
El 10:  Resize 85%
El 1:  Resize 60%/Free rotate Right 25 degrees/Duplicate/Mirror/Resize 70%
El 16:  Resize 65%/Duplicate as many times as you like

Highlight your white background.
New Raster layer.
Select All
Copy and paste Paper 12 Into Selection.
Deselect.
Apply the mask.
Use your Pick Tool and pull the sides out a little.
Merge Group.

Add your copyright.

Add your name:
Color Pallet: 
Foreground & Background: #08113a

Type your name.

Resize all layers 70%.

I’d love to see your results.
Email me!
Hugs,
Bev