Saturday, July 10, 2010

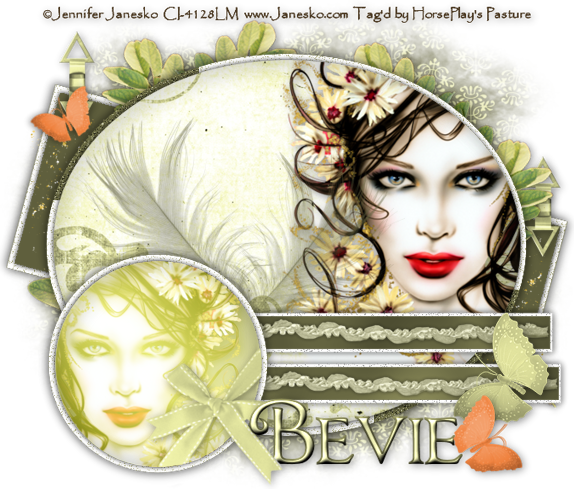
Summer's Reflection


Supplies
1 tube of your choice - I used the beautiful artwork of Jennifer Janesko at CILM
Font of Choice - I used Chocolate Box here
Linda’s template #58 - can be found at Creative Misfits here - scroll down the blog. You’ll find it under the name of Linda.
Designs by Vab’s Mask 111 here
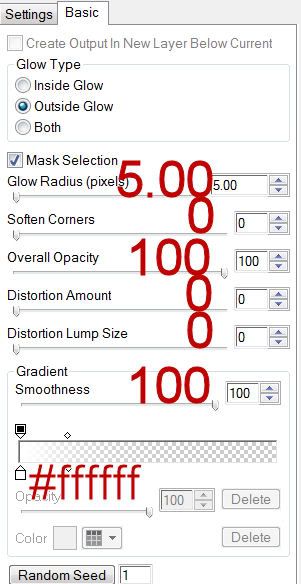
Greg’s Factory Output - Vol II: Pool Shadow
“Late Summer Days” is a PTU full size scrap kit created by Dana of Danas Creative Studio and can be purchased at Twilight Scraps. You can visit her blog here.
Thank you Dana for a very beautiful summer kit.

This tutorial was written assuming you have a working knowledge of PSP.

~♥~ Let’s get started ~♥~

Open up the template.
Shift + D.
Close out the original.
Open up the Background layer.
Delete the following layers:
Credit, Text, Splat Brush, Pixel Text, and Shape.

Highlight Oval layer.
Select All/Float/Defloat
Copy and paste Paper 6 as a new layer.
Resize 25% and 60%
Move into the position you like.
Selections/Invert
Tap the delete key.
DO NOT DESELECT.

Copy and paste your tube as a new layer.
Move into position.
Tap the delete key.
Deselect.
Delete the template layer.
 
In your color pallet:
Foreground: #5f5f3d
Background: #f2f3b7
Set to Gradient:
Style: Linear
Angle: 45
Repeats: 1

Highlight Glitter Squares layer.
Make your Target Tool active and color the glitter layer with the foreground color.

Repeat the above step with the following layers:
Glitter Oval
Feather Brush
Feather Brush 2
Glitter Rectangles
Glitter Circle

Highlight Rectangles layer.
Select All/Float/Defloat
New Raster layer.
Flood fill the layer with your foreground color.
DO NOT DESELECT.

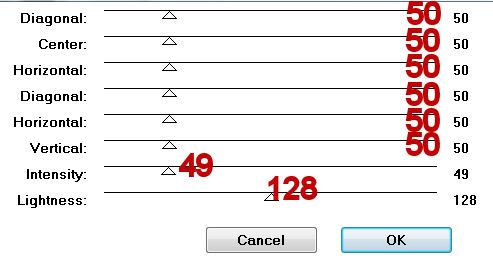
Apply Greg’s Factory Output - Vol II: Pool Shadow

Deselect.
Delete the template layer.

Highlight Circle layer.
Select All/Float/Defloat
New Raster layer.
Flood fill with your gradient.
DO NOT DESELECT.

Copy and paste your tube again.
Move into position over the gradient circle.
Resize as needed.
Selections/Invert
Tap the delete key.
Deselect.
Delete the template layer.
Change the Properties to Overlay.

Add your embellishments. I used:
Bow 2: Resize 25% Free rotate right 45 degrees
Ribbon 1: Resize 25% and 70%/Mirror
Fastner 2: Resize 25% and 04% Free rotate right 90 degrees
Leaves 4: Resize 25% and 70% Free rotate left 25 degrees - duplicate as many times as you like - you can mirror some if you like etc.
Glitter 1: Resize 25% Duplicate/Mirror
Butterfly 1: Resize 25% and 25%
Butterfly 2: Resize 25% and 25% and 70%/Mirror

Highlight your white background.
Select All
New Raster layer.
Copy and paste a paper of choice Into Selection.
Deselect.
Apply the mask.
Merge Group.

Add your credits.

Add your name.
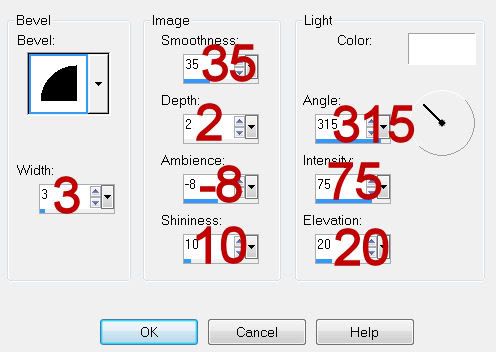
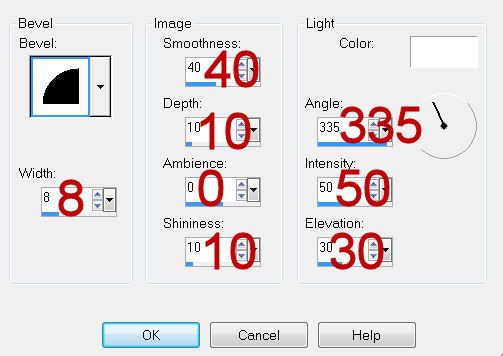
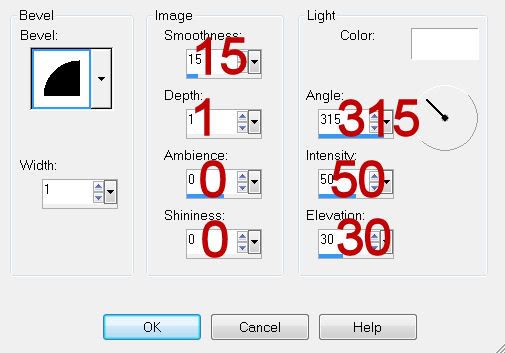
Give it a slight inner bevel:

Resize all layers 85%.

I hope you enjoyed this tutorial.
I’d love to see your results and show it off in my gallery.
Email me!
Hugs,
Bev

Friday, July 9, 2010

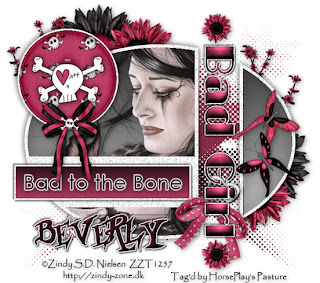
Bad Girl


Supplies
1 tube of your choice - I used the wonderful artwork of Zindy S.D. Nielsen here
Font of Choice - I used Borracho here
Linda’s template #59 - can be found at Creative Misfits here - scroll down the blog. You’ll find it under the name of Linda.
Eyecandy 5: Impact - Gradient Glow
“Tortured Deams” is a PTU tagger size scrap kit created by Tammy of Tammy’s Scraps and can be purchased at Lollipops n Gumdrops. You can visit her blog here.
Thank you Tammy - I totally love, love, loved this kit!!

This tutorial was written assuming you have a working knowledge of PSP.

♥~ Let’s get started ~♥~

Open up the template.
Shift + D.
Close out the original.
Open up the Background layer.
Delete the following layers:
Credit, Skull, Pixel Text, and Stars

Highlight Black Oval layer.
Use your Magic Wand and click on all the portions of it.
New Raster layer.
In your color pallet:
Foreground: Black
Background: white
Set to Gradient:
Style: Linear
Angle and Repeats both set to 0.
Flood fill the layer with your gradient.
Copy and paste your tube as a new layer.
Selections/Invert
Tap the delete key.
Deselect.
Delete the template layer.

In your color pallet change the colors:
Foreground: #231019
Background: #b63959

Highlight Halftone layer.
Make your Target Tool active and change the template layer’s color using the background color.

Highlight Text layer.
Select All/Float/Defloat
New Raster layer.
Change the gradient angle:
Angle: 90
Repeat: 1
Invert: Unchecked
Flood fill the layer.
Give it a slight inner bevel:


Deselect.
Delete the template layer.

Highlight Rectangle layer.
New Raster layer.
Flood fill with the gradient set to:
Angle and Repeat: 0
Invert: checked

Highlight Bad to the Bone.
Apply Eyecandy 5: Gradient Glow


Apply Gradient Glow again.

Highlight Lines
Select All/Float/Defloat
New Raster layer.
Copy and paste Paper 5 Into Selection.
Deselect.
Delete the template layer.

Highlight Circle layer.
Select All/Float/Defloat
New Raster layer.
Copy and paste Button 2 Into Selection.
Deselect.
Delete the template layer.

Add your embellishments. I used:
Bow 3: Resize 35%
Cherry Blossom 1: Resize 60%
Skull and Crossbone 1: Resize 30%
Heart and Ribbons 2: Resize 40% Free rotate right 25 degrees
Butterflies 1 & 2: Resize 25%
Flower 2: Resize 40%
Flower 1: Resize 30%
Flower 1 again: Resize 25% and 50% Duplicate/Flip

Add your credits.

Add your name.
Apply Eyecandy 5 - Gradient Glow twice to it.

Resize all layers 85%.

I hope you enjoyed this tutorial.
I’d love to see your results and show it off in my gallery.
Email me!
Hugs,
Bev
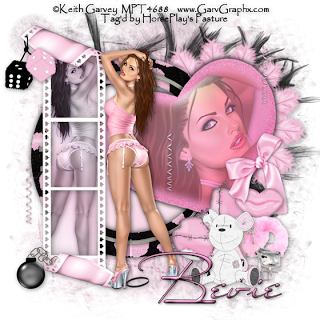
Thursday, July 8, 2010

Playtoy


Clicking on the image will enlarge to full view.

Supplies
1 tube of choice and 1 close up image - I’m using the awesome artwork of Keith Garvey at MPT
Font of Choice - I’m using Miss Stanford here
Scrap Dimentions Mask 6 here
Xerox - Porcelain
DSB Flux - Bright Noise
“Playtoy” is a PTU scrap kit created by Michelle of Scraps with Attitude and can be purchased from her store Scraps with Attitude. You can visit her blog here.
Thank you Missy for such a fun kit!

This tutorial was written assuming you have a working knowledge of PSP.

~♥~ Let’s get started ~♥~

Open up a 700 X 700 blank canvas.
Flood fill white.

Copy and paste Round Frame 1 a new layer.
Resize 55%
Click inside with your Magic Wand.
Selections/Modify/Expand by 6.
New Raster layer below the frame.
Flood fill with a gradient of choice.
Deselect.

Close out your white layer.
Merge Visible.
Reopen your white canvas.

Copy and paste Film Strip 2 as a new layer.
Resize 75%
Free rotate left 90 degrees
Click inside each of the squares with your Magic Wand.
Selections/Modify/Expand by 3.
New Raster layer below the film strip.
Flood fill with the same gradient.
Copy and paste your tube below the strip.
Selections/Invert
Tap the delete key.
Deselect.
Change the Properties to Luminance Legacy.
Merge Down with the gradient layer.
Apply Xerox - Porcelain
Default Settings.

Close out your round merged layer and your white background.
Merge Visible.
Reopen all layers.

Move your merged film strip layer and merged circle layers into position.
See my tag for reference.

Copy and paste Glass Heart 1 as a new layer.
Resize 50%
Free rotate left 20 degrees
Duplicate the heart.
Highlight the duplicated heart layer.
Select All/Float/Defloat
Copy and paste your close up image as a new layer.
Move into position over the heart.
Selections/Modify/Feather
Number of Pixels:
43
OK
Tap the delete key until you have a nice feathered look.
Deselect.
Change the Properties to Multiply and lower the Opacity to about 59 or so.

Highlight the original Glass Heart layer.
Select All/Float/Defloat
Apply DSB Flux - Bright Noise:
Intensity: 25
Mix: checked
OK
Selections/Modify/Feather
Number of Pixels:
45
OK
DO NOT DESELECT

Highlight the Duplicated Heart layer.
Selections/Invert
Tap the delete key a couple of times just to give the edges of the heart a glittered effect.
Deselect.

Copy and paste your other tube as a new layer.

Add your embellishments. I used:
Feather Fan 1: Resize 50% Free rotate right 45 degrees
Feathers 2
Barbed Wire Heart 1: Resize 25% Free rotate left 45 degrees
Bear: Resize 25%
Fuzzy Hand Cuffs: Resize 25% and 80%
Lip Sucker 1: Resize 30%
Ball n Chain 2: Resize 25%
Fuzzy Dice: Resize 25% and 60%
Satin Bow 1: Resize 25%
Streamer 1: Resize 25% and 70%

Highlight your white background.
New Raster layer.
Select All.
Copy and paste a paper of choice Into Selection.
Deselect.
Apply the mask.
Merge Group.
Duplicate/Merge Down

Add your credits.

Add your name.

Resize all layers 80%.

I hope you enjoyed this tutorial.
I’d love to see your results and show it off in my gallery.
Email me!
Hugs,
Bev
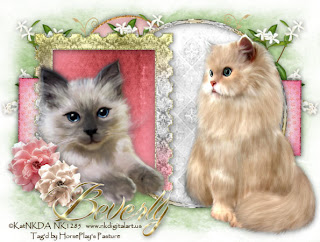
Wednesday, July 7, 2010

Feline - A Masterpiece

Clicking on the image will enlarge to full view.

Supplies
2 tubes of choice - I’m using Miyoki Sans and Pete- both tubes are the amazing artwork of KatNKDA which you can purchase here
Font of Choice - I’m using Billy Argel here
Gem’s Mask 166 here
“Soul Mates” is a PTU art kit created by KatNKDA. It can be downloaded from her store NK Art Shop. You can visit Kat’s blog here.
Kat, your talents is truly an amazing gift. Thank you so much choosing to share it with the world.

This tutorial was written assuming you have a working knowledge of PSP.

~♥~ Let’s get started ~♥~

Open up a 700 X 700 blank canvas.
Flood fill white.

Copy and paste Element 6 as a new layer.
Resize 25% and 60%
Click inside with your Magic Wand.
Selections/Modify/Expand by 6.
New Raster layer below the frame.
Copy and paste a paper of choice Into Selection.
Copy and paste your tube as a new layer.
Selections/Invert
Tap the delete key.
Deselect.

Close out your white layer.
Merge Visible.
Reopen your white canvas.

Copy and paste Element 12 as a new layer.
Resize 25% and 90%
Click inside with your Magic Wand.
Selections/Modify/Expand by 4.
New Raster layer below the frame.
Copy and paste a paper of choice Into Selection.
Deselect.

Merge Visible Element 12 and the paper.

Copy and paste your other tube as a new layer - position it before the circle frame.

Add your embellishments. I used:
El 18: Resize 35% - Free rotate left 3 degrees
El 38: Resize 25% and 60%
El 3: Resize 40%
El 13: Resize 25%
El 2: Resize 25% and 35%
El 1: Resize 25% and 30%

Crop your Image.

Highlight your white background.
New Raster layer.
Select All.
Copy and paste a paper of choice Into Selection.
Deselect.
Apply the mask.
Merge Group.

Add your credits.

Add your name.

Resize all layers 85%.

I hope you enjoyed this tutorial.
I’d love to see your results and show it off in my gallery.
Email me!
Hugs,
Bev
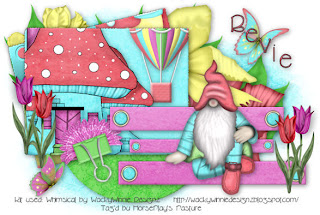
Whimsical


Clicking on the image will enlarge to full view.

Supplies
Font of Choice - I used Cricket here
Vix Mask 452 here
Essence of Creativity Template 38 here
“Whimsical” is a PTU tagger size scrap kit created by Sue of WackyWinnie Designz and can be purchased at Lollipops n Gumdrops. You can visit her blog here.
Thank you Sue for such an adorable kit!

This tutorial was written assuming you have a working knowledge of PSP.

~♥~ Let’s get started ~♥~

Open up the template.
Shift + D.
Close out the original.
Resize all layers 140%.
Delete the template layer.

Highlight Circle layer.
Click on it with your Magic Wand.
New Raster layer.
Copy and paste a paper of choice Into Selection
Deselect.
Delete the template layer.
Give it a slight inner bevel:


Highlight Square 2 layer.
Click on it with your Magic Wand.
New Raster layer.
Copy and paste a paper of choice Into Selection.
Copy and paste Mushroom 2 as a new layer.
Resize 70% and move into position - see my tag for reference.
Coy and paste Moon 1 as a new layer.
Resize 25% - move into position - see my tag for reference.
Selections/Invert
Highlight each of the element layers and tap the delete key.
Deselect.
Delete the template layer.
Merge Visible the paper and elements.
Give it the same slight inner bevel.

Highlight Square 1 layer.
Click on it with your Magic Wand.
New Raster layer.
Copy and paste a paper of choice Into Selection.
Copy and paste House as a new layer.
Resize 40% - move into position - see my tag for reference.
Copy and paste Hot Air Balloon as a new layer.
Resize 25% - move into position - see my tag for reference.
Selections/Invert
Highlight each of the element layers and tap the delete key.
Merge Visible the paper and elements.
Deselect.
Delete the template layer.
Give it the same slight inner bevel.

Add your embellishments. I used:
Binder Clip 2: Resize 30%/Flip/Free rotate left 20 degrees
Brad 2: Resize 25% and 50%
Brad 2 again: 25% and 25%
Dwarf 2: Resize 40%
Tulip 1 & 2: Resize 25%
Butterfly 1: Resize 25% and 70%/Mirror
Butterfly 2: Resize 25%
Flower 4: Resize 70%
Flower 3: Resize 60%/Mirror
Bougainville 1: Resize 40%
Leaves: Resize 30%

Highlight your white background.
New Raster layer.
Select All.
Copy and paste a paper of choice Into Selection.
Deselect.
Apply the mask.
Resize 105%
Merge Group.

Add your credits.

Add your name.

Resize all layers 90%.

I hope you enjoyed this tutorial.
I’d love to see your results and show it off in my gallery.
Email me!
Hugs,
Bev
Tuesday, July 6, 2010

Gentle Persuasion

Clicking on the image will enlarge to full view

Supplies
1 tube and 1 close up of your choice - I used the wonderful artwork of Jamie Kidd at CILM
Font of Choice - I used Impact which came with my pc and Al Sandra here
Monti Circular Mask here
“Spring to the Occassion” is a PTU tagger size scrap kit created by Denise of Lil Country Angel Designs and can be purchased at Lollipops n Gumdrops. You can visit her blog here.
Thank you Denise for such a beautiful kit!

This tutorial was written assuming you have a working knowledge of PSP.

~♥~ Let’s get started ~♥~

Open up a 700 x 700 blank canvas.
Flood fill white.

Copy and paste Frame 5 as a new layer.
Resize 50%
Free rotate left 45 degrees
Move into position at the left side of your canvas.
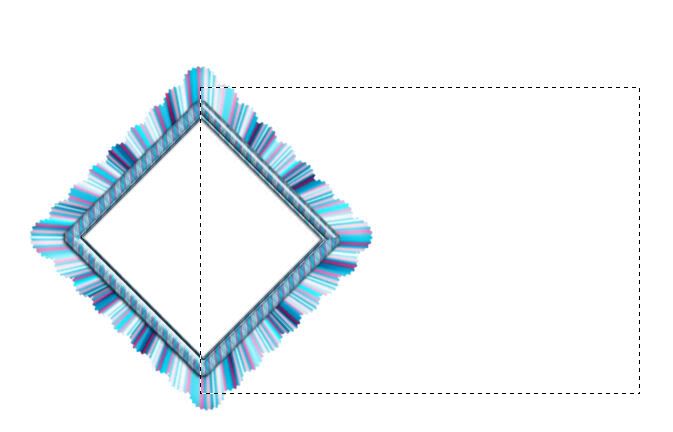
Make your Selection Tool active.
Create a rectangle on your canvas.

New Raster layer below the frame.
Copy and paste a paper of choice Into Selection.
Deselect.
Give it a slight inner bevel:


Highlight the frame.
Click inside of it with your Magic Wand.
Selections/Modify/Expand by 6.
New Raster layer below the frame.
Flood fill with a gradient of your choice.
Copy and paste your close up tube below the frame.
Resize as needed.
Selections/Modify/Feather
Number of Pixels:
23
OK
Selections/Invert
Tap the delete key until your image has a nice feathered look you like.
Deselect.
Change the Properties to Multiply.
Lower the Opacity to about 59 or so.

Close out your white layer and your rectangle layer.
Merge Visible.
Reopen all layers.
Duplicate your merged layer and move it behind the rectangle.
See my tag for reference.

Add your embellishments. I used:
Candle 3: Resize 50%/Duplicate/Mirror/Resize 80%
Bubble 2: Resize 25% and 30%/Duplicate
Hearts 2: Resize 25%/Free rotate left 20 degrees
Flowers 18: Resize 25%/Duplicate/Resize 80%/Free rotate right 15 degrees - position these behind the frame.
Duplicate and resize the flowers as you like and position them in front of the frame.
RHG2 and RHG3: Resize 25% and 80%/Free rotate 15 degrees
Butterfly 3: Resize 25%, 60%, and 80%
Butterfly 5: Resize 25% and 60%

Highlight your white background.
New Raster layer.
Select All.
Copy and paste a paper of choice Into Selection.
Deselect.
Apply the mask.
Resize 110%
Merge Group.

Add your credits.

Add your name.
Type it out using the Impact Font.
Use your Pick Tool to pull the sides out to enlarge.
Give it an Inner Bevel.

Type your name again using Al Sandra front.
Use your Pick tool to stretch your name out just a tad.
Give it the same Inner Bevel.

Resize all layers 80%.

I hope you enjoyed this tutorial.
I’d love to see your results and show it off in my gallery.
Email me!
Hugs,
Bev
Monday, July 5, 2010

Mint to Be


Clicking on the image will enlarge to full view.

Supplies
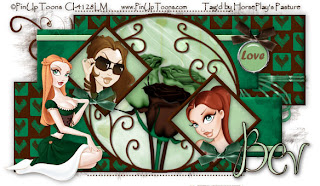
3 tubes of choice - I used the wonderful artwork of PinUpToons at CILM
Font of Choice - I used Ma Sexy
Weescotlass Mask 297 here
Scrapity Scrap and More here.
“Mint to Be” is a PTU tagger size scrap kit created by Kristi of oOohLaLa Scraps and can be purchased at her store I Got Lucky Skraps. You can visit her blog here.
Thank you Kristi for such a delicious kit!

This tutorial was written assuming you have a working knowledge of PSP.

~♥~ Let’s get started ~♥~

Open up the template.
Shift + D.
Close out the original.
Delete the credit layer.

Highlight Bottom Gray Rect layer.
Click on it with your Magic Wand.
New Raster layer.
Copy and paste paper 10 as a new layer.
Resize 75%
Move into position over the rectangle.
Selections/Invert
Tap the delete key.
Deselect.
Delete the template layer.

Highlight Top Gray Rect layer.
Repeat the above step.

Highlight Border Bottom Gray layer.
Select All/Float/Defloat
New Raster layer.
Copy and paste one of the dark brown papers of choice Into Selection.
Deselect.
Delete the template layer.
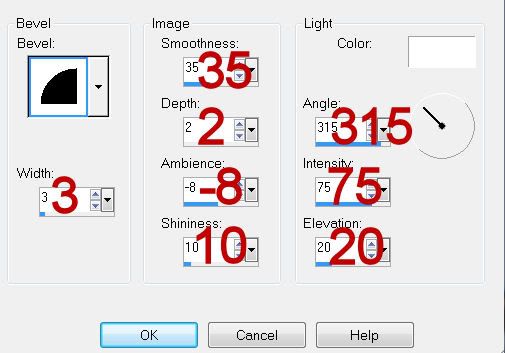
Give it a slight Inner Bevel:


Highlight Border Top Gray layer.
Repeat the above step.

Highlight Top Small Rect layer.
Click on it with your Magic Wand.
Copy and paste Paper 21 as a new layer.
Resize 68%
Move into position by lining up the top of the paper with the top of the rectangle.
Selections/Invert
Tap the delete key.
Deselect.
Delete the template layer.
Give it the same Inner BEvel.

Highlight Bottom Small Rect layer.
Repeat the above step.

Highlight Line Top Small layer.
Select All/Float/Defloat
Copy and paste a Paper 1 Into Selection.
Deselect.
Delete the template layer.
Give it an inner bevel:


Highlight Line Bottom Small layer.
Repeat the above step.

Highlight Circle layer.
Click on it with your Magic Wand.
New Raster layer.
Copy and paste Paper 15 Into Selection.
Modify/Contract by 5.
Tap the delete key.
Selections/Modify/Expand by 3.
New Raster layer below the “round frame” you just made.
Copy and paste Paper 17 Into Selection.
New Raster layer.
Copy and paste Frame 6 Into Selection.
Copy and paste Hearts just above the paper.
Resize 30%
Move into position.
Selections/Invert
Tap the delete key.
Change the Properties to Soft Light.
Deselect.
Delete the template layer.

Highlight Diamonds layer.
Click on them with your Magic Wand.
New Raster layer.
Copy and paste Paper 15 Into Selection.
Modify/Contract by 8.
Tap the delete key.
Selections/Modify/Expand by 3.
New Raster layer just below the new diamond frames you just made.
Copy and paste Paper 1 Into Selection.
Copy and paste a tube below each of the frames.
Selections/Invert
Highlight each tube layer and tap the delete key.
Deselect.
Delete the template layer.

Highlight the diamond frames layer.
Give it a slight inner bevel.
Highlight Dotted Lines layer.
Select All/Float/Defloat
New Raster layer.
Copy and paste a dark brown paper of choice Into Selection.
Deselect.
Delete the template layer.

Copy and paste your 3rd tube as a new layer.
 
Add your embellishments. I used:
Bow 3: Resize 30% Free rotate right 5 degrees
Charm 4: Resize 30%
Bow 2: Resize 30%
Flower 2: Resize 35% Free rotate left 10 degrees Duplicate/Mirror
Flower 1: Resize 40%/Mirror/Free rotate right 5 degrees
Doodle 4: Resize 30%

Highlight your white background.
New Raster layer.
Select All.
Copy and paste a paper of choice Into Selection.
Deselect.
Apply the mask.
Merge Group.

Add your credits.

Add your name.
Give it the same Inner Bevel.

Resize all layers 85%.

I hope you enjoyed this tutorial.
I’d love to see your results and show it off in my gallery.
Email me!
Hugs,
Bev