Friday, August 5, 2011

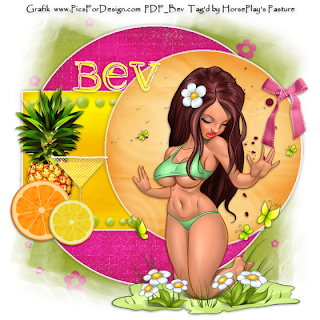
Fruit Punch


Supplies

1 tube of choice - I used the artwork of Grafik and can be purchased from Pics For Design. You will have to create your own license to use.

Font of choice - I used Griffin here

Designs by Vaybs Mask 133 here

Brutal Designs Template Pack 12 - Plain Template 1 here. It’s at the top of the page, labeled “New Template Pack”

Plug Ins:
Eyecandy 3.1 - Glow

“Fruit Punch” is a FTU tagger size scrap kit created by Pimp’d Designz and can be downloaded from here. Scroll down the page.

This tutorial was written assuming you have a working knowledge of PSP.

~♥~ Let’s get started ~♥~

Open up the template.
Shift + D.
Close out the original.
Delete the top 2 layers and Pink Circle Bottom layer.
Image/Canvas Size
700 x 700
Flood fill the background layer white.

Highlight Blk Circle layer.
Click on it with your Magic Wand.
New Raster layer.
Copy and paste Paper 2 Into Selection.
Deselect.
Delete the template layer.
Apply Eyecandy 3.1 - Glow:
Width: 3
Opacity: 100
Opacity Drop off: Fat
Color: White
OK

Highlight Blue Rec layer.
Click on it with your Magic Wand.
New Raster layer.
Copy and paste Paper 10 Into Selection.
Deselect.
Delete the template layer.
Give it the same Glow effect.

Highlight Pink Cir Top layer.
Click on it with your Magic Wand.
New Raster layer.
Copy and paste Paper 1 Into Selection.
Copy and paste Splatter 2 as a new layer.
Resize 80%
Selections/Invert
Tap the delete key.
Deselect.
Delete the template layer.
Give the paper circle the same Glow Effect.

Copy and paste your tube as a new layer.

Add your embellishments. I used:
Border: Resize 50%/Duplicate
Fruit 3: Resize 70%
Glass 1: Resize 30%
Fruit 1: Resize 40%
Fruit 2: Resize 30%
Ribbon 4: resize 40%

Highlight your white canvas.
New Raster layer.
Select All.
Copy and paste Paper 4 Into Selection.
Deselect.
Apply the mask.
Merge Group.

Add your copyrights.

Add your name.

Resize all layers 80%.

I hope you enjoyed this tutorial.
I’d love to see your results and show it off in my gallery.
Email me!
Hugs,
Bev

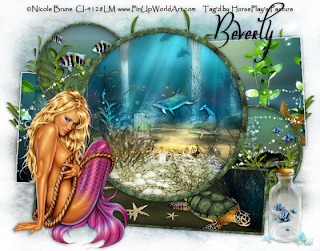
Dolphin Dreams


Supplies

1 tube of choice - I used the artwork of Nicole Brune and can now be purchased from CDO. You must have a license to use.

Font of choice - I used Oh Lara - a pay font

Gem Mask 166 here

Artmama’s Template 21 here

Plug Ins:
Eyecandy 3.1 - Glow

“Dolphin Dreams” is a tagger size scrap kit created by Stina of Designs by Stina and can be purchased from Twilight Scraps. You can visit her blog here.
Thank you Stina for a fantastic kit!

This tutorial was written assuming you have a working knowledge of PSP.

~♥~ Let’s get started ~♥~

Open up the template.
Shift + D.
Close out the original.
Delete the following layers:
Credit, Dots, Summer, Summer Glitter, Break Break, and Tiny Text
Image/Canvas Size
700 x 550
OK
Highlight Bg layer and flood fill white.

Highlight L. lg. Rectangle layer.
Click anywhere outside of it with your Magic Wand.
Copy and paste Paper 5 as a new layer.
Resize 60%
Move into a position you like.
Tap the delete key.
Deselect.
Delete the template layer.
Apply Eyecandy 3.1 - Glow:
Width: 3
Opacity: 100
Opacity Drop off: Fat
Color: White
OK

Highlight R. lg. Rectangle layer.
Click anywhere outside of it with your Magic Wand.
Copy and paste Paper 2 as a new layer.
Resize 60%
Move into a position you like.
Tap the delete key.
Deselect.
Delete the template layer.
Apply the same Glow effect.

Highlight r. sm. circle layer.
Click anywhere outside of it with your Magic Wand.
Copy and paste Paper 10 as a new layer.
Move into a position you like.
Tap the delete key.
Copy and paste Underwater 01 as a new layer.
Resize 35%
Move into position over the circle paper layer.
Tap the delete key.
Copy and paste Seaweed as a new layer.
Resize 40%
Move into position.
Tap the delete key.
Deselect.
Delete the template layer.

Open up the Sea Turtle element.
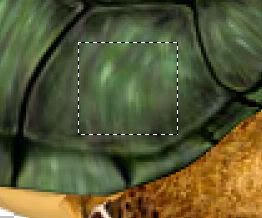
Use your Selection Tool set on Rectangle and section out an area of the turtle shell.

In your color pallet set the foreground to Pattern and look for the turtle shell.
Highlight r. circle frame layer.
Select All/Float/Defloat
New Raster layer.
Flood fill with the shell pattern.
Adjust/Add Remove Noise/Add Noise:
Uniform and Monochrome checked
Noise: 35%
OK
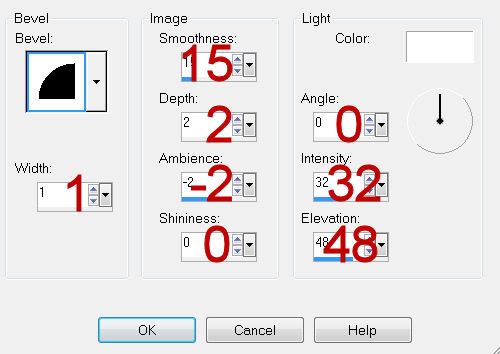
Give it a slight Inner Bevel:


Deselect.
Delete the template layer.

Repeat the above step with:
l. circle frame
Bottom Rectangle Frame
Lg. circle frame

Highlight L. sm. circle layer.
Click anywhere outside of it with your Magic Wand.
Copy and paste Paper 10 as a new layer.
Move into a position you like.
Tap the delete key.
Copy and paste Fish 1 as a new layer.
Resize 25%
Move into position over the circle paper.
Copy and paste Sea Weed as a new layer.
Resize 40%
Move into position.
Tap the delete key.
Deselect.
Delete the template layer.

Highlight Bottom Rectangle layer.
Click anywhere outside of it with your Magic Wand.
Copy and paste Paper 9 as a new layer.
Resize 75%
Move into a position you like.
Tap the delete key.
Copy and paste Starfish 4 as a new layer.
Resize 40%
Move into position over the paper.
Tap the delete key.
Copy and paste Sea Turtle as a new layer.
Resize 50%
Position it over the paper layer.
Tap the delete key.
Deselect.
Delete the template layer.

Highlight lg. circle layer.
Click anywhere outside of it with your Magic Wand.
Copy and paste Paper 9 as a new layer.
Resize 60%
Move into position.
Tap the delete key.
Copy and paste Underwater Scene 07 as a new layer.
Resize 35%
Move into position.
Tap the delete key.
Change the Properties to Luminance.
Deselect.
Delete the template layer.

Copy and paste your tube as a new layer.

Add your embellishments. I used:
Sea Weed: Resize 50%/Duplicate/Mirror
Bottle 2: Resize 40%

Highlight your white canvas.
New Raster layer.
Select All.
Copy and paste Paper 10 Into Selection.
Deselect.
Apply the mask.
Merge Group.

Add your copyrights.

Add your name.

Resize all layers 80%.

I hope you enjoyed this tutorial.
I’d love to see your results and show it off in my gallery.
Email me!
Hugs,
Bev

Sunday, July 31, 2011

Arsenic and Old Lace


Supplies

1 tube of choice - I used the beautiful artwork of Alena Lazareva and can be purchased from Up Your Art. You must have a license to use.

Font of choice - I used Inspiration here

Weescotlass Mask 297 here

Toxic Desires Template 159 here

“Arsenic and Old Lace” is a tagger size scrap kit created by Dianna of Digit cats (& Dogs) and can be purchased from Inspirations of Scrap Friends. You can visit her blog here.
Thank you Dianna for a truly wicked kit!

This tutorial was written assuming you have a working knowledge of PSP.

~♥~ Let’s get started ~♥~

Open up the template.
Shift + D.
Close out the original.
Delete the top 7 layers.
Resize all layers 85%
Image/Canvas Size
700 x 550
OK
Highlight and open the Background layer.
Flood fill white.

Highlight Right Circle 1 layer.
Click on it with your Magic Wand.
New Raster layer.
Copy and paste Cog 02 Into Selection.
Deselect.
Delete the template layer.

Highlight Left Circle 1 layer.
Click on it with your Magic Wand.
New Raster layer.
Copy and paste Cog 03 Into Selection.
Deselect.
Delete the template layer.

Highlight Right Circle 2 layer.
Click on it with your Magic Wand.
New Raster layer.
Copy and paste Deco Into Selection.
Deselect.
Delete the template layer.

Highlight Left Circle 2 layer.
Click on it with your Magic Wand.
New Raster layer.
Copy and paste Cog 01 Into Selection.
Deselect.
Delete the template layer.

Highlight Large Circle 1 layer.
Click on it with your Magic Wand.
New Raster layer.
Copy and paste Paper 1 Into Selection.
Deselect.
Delete the template layer.
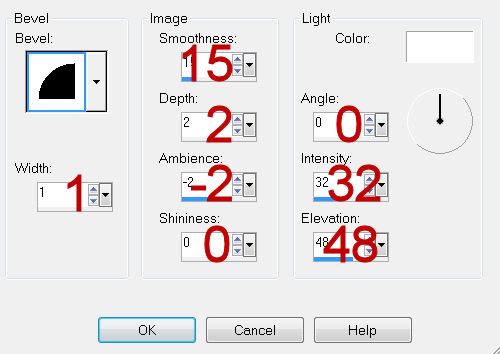
Give it a slight Inner Bevel:

Highlight Dotted Square 1 layer.
Select All/Float/Defloat
New Raster layer.
Copy and paste Paper 6 Into Selection.
Deselect.
Delete the template layer.

Repeat the above steps with Dotted Square 2, 3, and 4 layers.

Highlight the top layer in your layers pallet.
Paste Paper 4 as a new layer.
Resize 40%
Free rotate Right 55 degrees
Copy
Close the layer out.

Highlight Left Square 1 layer.
Click on it with your Magic Wand.
New Raster layer.
Paste Paper 4 Into Selection.
Deselect.
Delete the template layer.

Reopen Paper 4 layer at the top of your layers pallet.
Mirror/Flip/Copy
You can delete this layer because you no longer need it.

Highlight Right Square 1 layer.
Click on it with your Magic Wand.
New Raster layer.
Paste Paper 4 Into Selection.
Deselect.
Delete the template layer.
Give it the same slight Inner Bevel.

Highlight the top layer in your layers pallet again.
Paste Paper 11 as a new layer.
Resize 40%
Free rotate Right 35 degrees
Copy
Close the layer out.

Highlight Left Square 1 layer.
Click on it with your Magic Wand.
New Raster layer.
Paste Paper 11 Into Selection.
Copy and paste Arsenic as a new layer.
Resize 70%
Move into position over the paper - see my tag for reference.
Selection/Invert
Tap the delete key.
Deselect.
Delete the template layer.
Give the paper the same slight Inner Bevel.

Reopen Paper 11 layer as the top of your layer pallet again.
Mirror/Flip
Copy
Delete this layer because you won’t be using it again.

Highlight Right Square 2 layer.
Click on it with your Magic Wand.
New Raster layer.
Paste Paper 11 Into Selection.
Deselect.
Delete the template layer.
Give it the same slight Inner Bevel.

Highlight Glitter Circle 1 layer.
Click anywhere outside of it with your Magic Wand.
New Raster layer.
Copy and paste Paper 6 Into Selection.
Adjust/Add Remove Noise/Add Noise:
Gaussian and Monochrome checked
Noise: 40%
OK
Deselect.
Delete the template layer.

Highlight Large Circle 2 layer.
Click on it with your Magic Wand.
New Raster layer.
Open up Paper 16
Mirror/Copy
Highlight your working canvas.
Paste the paper Into Selection.
Copy and paste your tube as a new layer over the paper.
Selections/Invert
Use your Eraser Tool and erase the part of the tube you don’t want to stick outside of the circle.
Deselect.
Delete the template layer.

Add your embellishments. I used:
Leaves: Resize 70%
Flower 3: Resize 25% and 80%/Duplicate/Flip/Resize 70%
Hourglass
Hat: Resize 50%

Highlight your white canvas.
New Raster layer.
Select All.
Copy and paste Paper 7 Into Selection.
Deselect.
Apply the mask.
Merge Group.

Add your copyrights.

Add your name.
Color Pallet:
Foreground: Black
Background: Pattern/Paper 13
Stroke: .80
Type your name.
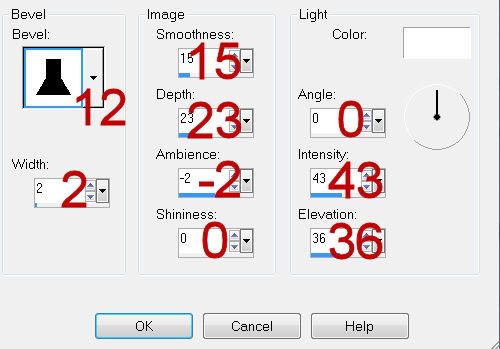
Give it a slight Inner Bevel:

Resize all layers 80%.

I hope you enjoyed this tutorial.
I’d love to see your results and show it off in my gallery.
Email me!
Hugs,
Bev