Saturday, December 18, 2010

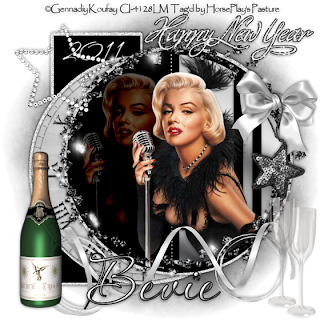
Happy New Year 2011


Clicking on the image will allow you to enlarge for bigger view.

Supplies

1 tube of choice - I used the artwork of Gennadiy Koufay at CILM
Font of Choice - I used Aquarelle here
Monti Circular Mask here
Tracy F Designz Template 69 at Freebie Friends Scraps here
“New Year‘s Glitter” is a FTU scrap kit created by Seven’s Scraps and can be from her blog here.
Please leave a thank you when downloading as it’s a small gesture for hard work given freely.

This tutorial was written assuming you have a working knowledge of PSP.

~♥~ Let’s get started ~♥~

Open up the template.
Shift + D.
Close out the original.
Delete the top 2 layers.
New Raster layer.
Send to bottom.
Image/Canvas Size
700 x 700
OK
Highlight the bottom layer and flood fill white.

In your color pallet:
Foreground set on Gradient: Metallic Silver
Angle: 32
Repeat: 0
Invert checked

Highlight Circle 1 layer.
Select All/Float/Defloat
New Raster layer.
Copy and paste Clock 01 Into Selection.
Deselect.
Delete the template layer.

Highlight Half Circle layer.
Select All/Float/Defloat
New Raster layer.
Flood fill with your gradient.
Duplicate
Adjust/Blur/Gaussian blur:
Radius: 20
OK
Deselect.
Delete the template layer.

Make a new 700 x 700 blank canvas.
Flood fill with your gradient.
Copy
Close the canvas out. You won’t be needing it any more.

Highlight Dotted Line layer.
Select All/Float/Defloat
New Raster layer.
Paste Into Selection.
Deselect.
Delete the template layer.

Copy and paste your tube as a new layer.
Position it mostly over the gradient - see my tag for reference.
Duplicate/Move to the left/In your layers pallet move just above Circle 2 layer.
Change the Properties to Hard Light and lower the Opacity to about 36.

To get rid of the bit of tube that overhangs the circles:
Highlight the half circle gradient layer and click anywhere outside of it with your Magic Wand.
Selections/Invert
Highlight the tube and erase the bottom area that overhangs the circle.
Deselect.
Highlight Circle 2 layer and click anywhere outside of it with your Magic Wand.
Selections/Invert
Highlight each of the tubes and erase what overhangs the bottom of the circle.
Deselect.

Add your embellishments. I used:
Star 02: Resize 70%
Frame 16: Resize 115%
Bow 02: Resize 70%
Star 02: Resize 70%
Ribbon 5
Word Art 02: Resize 55%
Bottle 02: Resize 90%
Glass 04: Resize 70%
Type out the year 2011

Highlight your white background.
Select All.
New Raster layer.
Copy and paste a paper of choice Into Selection.
Deselect.
Apply the mask.
Merge Group.

Add your credits.

Add your name.
Foreground: #000000
Background: #efefef
Stroke set at 2
Type out your name.
Convert to Raster layer.
Select All/Float/Defloat
Selections/Modify/Contract by 2
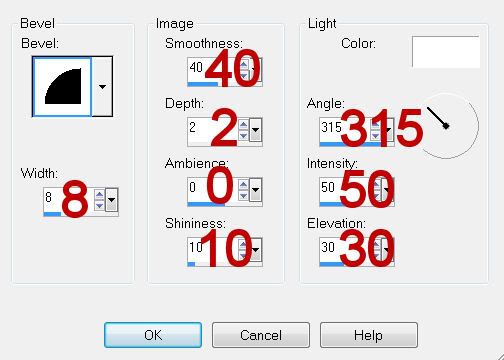
Give it an inner bevel 3x’s:

Deselect.

Resize all layers 80%.

I hope you enjoyed this tutorial.
I’d love to see your results and show it off in my gallery.
Email me!
Hugs,
Bev

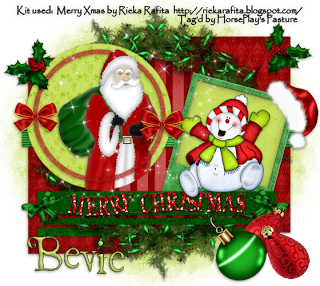
Merry Xmas


Supplies

Font of Choice - I used St. Nicholas here
Vix Mask 451 here
Divine Intentionz Template 355 here
DSB Flux - Bright Noise
Brush Strokes - Sprayed Strokes
“Merry Xmas” is a PTU scrap kit created Rieka_Rafita and can be purchased from Heartbeatz Creationz. You can visit her blog here.
Thank you Rieka for a really cute Christmas kit!

This tutorial was written assuming you have a working knowledge of PSP.

~♥~ Let’s get started ~♥~

Open up the template.
Shift + D.
Close out the original.
Delete the top 2 layers.
Image/Canvas Size
700 x 625
OK
Highlight the background layer and flood fill white.

Highlight Shape 1 layer.
Click on it with your Magic Wand.
New Raster layer
Copy and paste Paper 7 Into Selection.
Deselect.
Delete the template layer.

Highlight Shape 2 layer.
Repeat the above step.

Highlight Circle Background layer.
Copy and paste Wreath as a new layer and position it above the template layer.
Delete the Circle Background template layer and Circle template layer.
Highlight the wreath.
Click inside of it with your Magic Wand.
New Raster layer below the wreath.
Copy and paste Paper 4 Into Selection.
Deselect.

Highlight Thin Rectangle 2 layer.
Click on it with your Magic Wand.
New Raster layer.
Open up Paper 5.
Free rotate Left 90 degrees.
Copy
Make your template active.
Paste Into Selection.
Deselect.
Delete the template layer.

Highlight Polaroid layer.
Click on the white area of it with your Magic Wand.
New Raster layer.
Copy and paste Paper 11 Into Selection.
Deselect.

Highlight the Polaroid layer again.
Click on the black area with your Magic Wand.
New Raster layer below the Polaroid paper layer.
Make Paper 9 active and use your Selection Tool set on Rectangle to section out a plain green area of the paper.
Set your foreground to Pattern and find the green area.
Make your working canvas active.
Flood fill with the pattern.
Deselect.
Delete the template layer.

Highlight Small Circle layer.
Click on it with your Magic Wand.
New Raster layer.
Make Paper 9 active. Deselect if you haven’t already.
Copy
Make your working canvas active.
Paste Into Selection.
Copy and paste Santa as a new layer.
Resize 70%
Position over the circle - see my tag for reference.
Selection/Invert
Tap the delete key.
Deselect.
Delete the template layer.

Highlight Transparent Circle Edge layer.
Click on it with your Magic Wand.
New Raster layer.
Copy and paste Paper 10 Into Selection.
Deselect.
Delete the template layer.
Lower the Opacity about 69.
Apply DSB Flux - Bright Noise:
Intensity: 30
Mix checked
OK

Open up Paper 8.
Use your Selection Tool set on Rectangle and section out a plain green area.
Set your foreground to Pattern and look for the green area.

Highlight Thin Rectangle 4 layer.
Click on it with your Magic Wand.
New Raster layer.
Flood fill with your Pattern.
Deselect.
Delete the template layer.

Make Paper 8 active.
Deselect.
Apply Brush Strokes - Sprayed Strokes:
Stroke Length: 1
Spray Radius: 21
OK
Copy

Make your working canvas active.
Highlight Thin Rectangle.
Merge Down.
Both thin rectangles should be on one layer.
Us your Magic Wand and click on both rectangles.
New Raster layer.
Paste Into Selection.
Deselect.
Delete the template layer.

Add your embellishments. I used:
Holly: Resize 30%
Bow 1: Resize 35%
Snowman: Resize 405/Free rotate Left 10 degrees
Snow Cap: Resize 40%
Banner: Resize 90%
Sparkle 2
Christmas 4: Resize 405
Christmas Ball 3: Resize 70%/Free rotate Left 40 degrees

Highlight your white background.
Select All.
New Raster layer.
Copy and paste a paper of choice Into Selection.
Deselect.
Apply the mask.
Resize 120%
Merge Group.

Add your credits.

Add your name.

Resize all layers 80%.

I hope you enjoyed this tutorial.
I’d love to see your results and show it off in my gallery.
Email me!
Hugs,
Bev
Wednesday, December 15, 2010

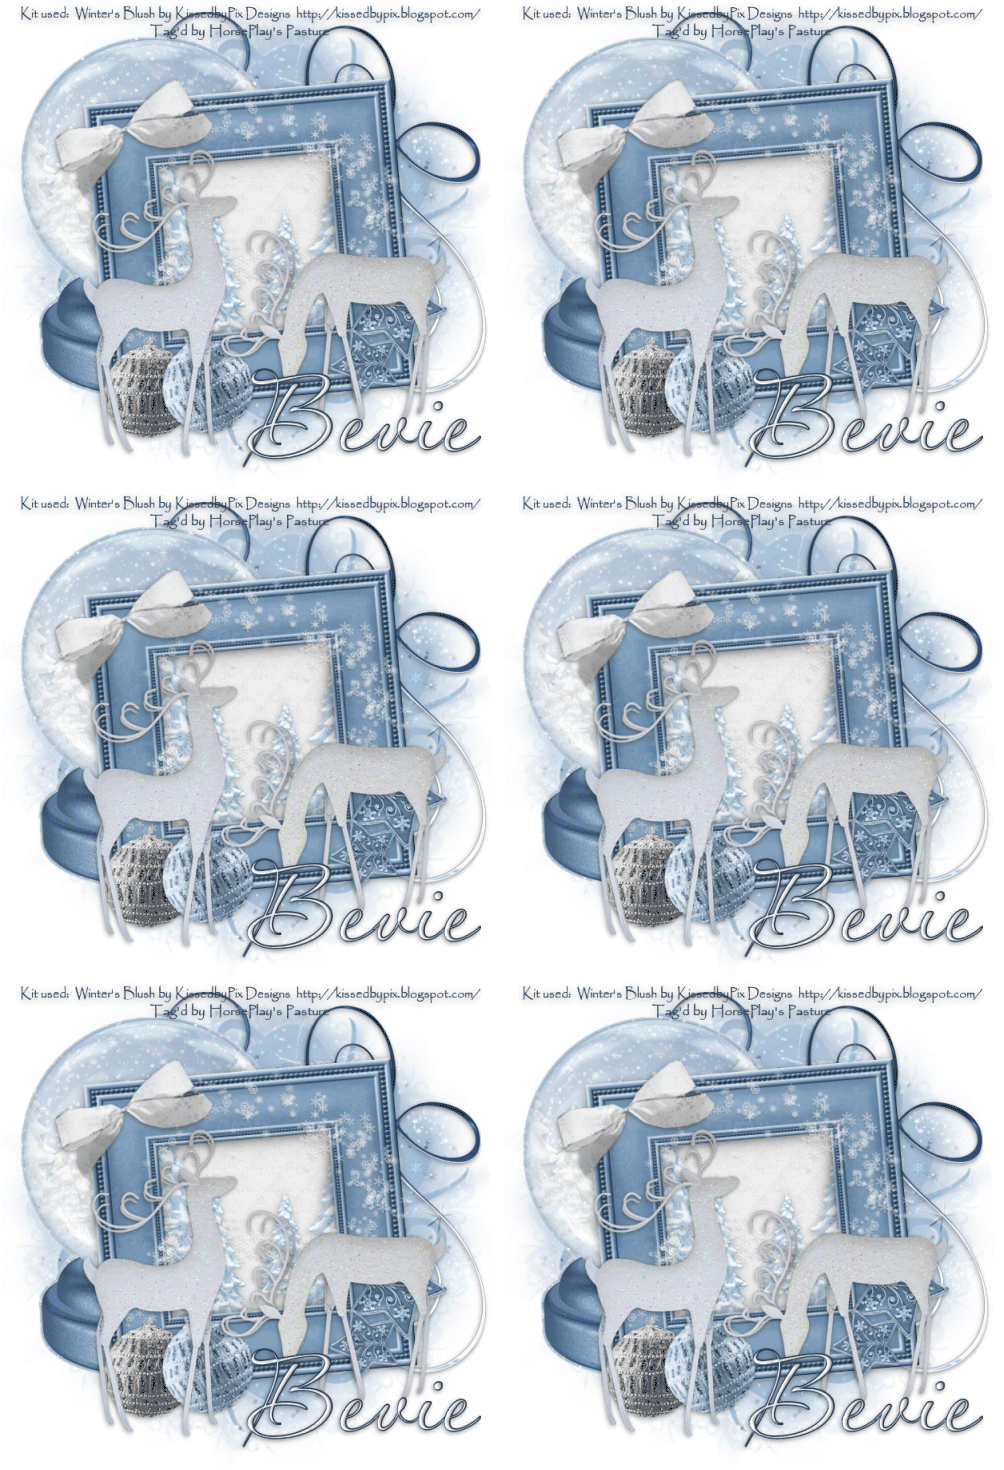
Winter's Blush


Supplies

Font of Choice - I used Aquarelle here
Gem Mask 70 here
Mura’s Meister - Cloud
Snow which I’ve supplied here
Animation Shop
“Winter‘s Blush” is a PTU scrap kit created by Pixie of KissedbyPix Designs and can be purchased from her store TKO Scraps. You can visit her blog here.
Thank you Pixie for an incredibly beautiful kit!

This tutorial was written assuming you have a working knowledge of PSP.

~♥~ Let’s get started ~♥~

Open up a 700 x 700 blank canvas.
Flood fill white.

Copy and paste Frame Blue as a new layer.
Resize 80%
Free rotate left 5 degrees
Click inside of it with your Magic Wand.
Selections/Modify/Expand by 6.
New Raster layer below the frame.
Copy and paste Glittery Paper White Into Selection.
Deselect.
Copy and paste Snow Trees 2 as a new layer below the frame.
Resize 60%
Move into position - see my tag for reference.

Copy and paste Snow Globe as a new layer.
Resize 70%
Move it into position behind the frame.
We’ll come back to decorate that in a bit.


For now go ahead and add your embellishments. I used:
Snow Bulb 1: Resize 25%
Snow Bulb 2: Resize 25%/Free rotate Left 15 degrees
Snowflake Bow White: Resize 30%/Free rotate Left 25 degrees
Star Blue: Resize 30%/Duplicate/Mirror/Resize 70%
Snowflake Swirl White: Resize 80%
Deer 2a: Resize 60%
Deer 1a: Resize 50%/Mirror
Blue Doodle: Mirror/Flip

Highlight your white background.
Select All.
New Raster layer.
Copy and paste a paper of choice Into Selection.
Deselect.
Apply the mask.
Merge Group

Add your credits.

Add your name.

Move the Snow Globe into the exact position where you want it behind the frame.

In your color pallet:
Foreground: #bfd1e0
Background: #efefef

Click anywhere outside of the globe with your Magic Wand.
Selections/Invert
New Raster layer below the globe.
Apply Mura’s Meister - Cloud
Click on the reset button.
Move the “Amount” slider to your choice.
OK
Rename this layer “Cloud”
Copy and paste Snow Trees 1 as a new layer just above the Cloud layer.
Resize 70%
Move into position.
Selections/Invert
Tap the delete key.
Deselect.

Open up the snow that I supplied.
Highlight Frame 1/Copy
Make your working canvas active.
Highlight the layer that’s just below the Snow Globe.
Paste the snow layer - Rename Snow 1.
Highlight the snow I supplied again.
Highlight Frame 2/Copy
Make your working canvas active.
Paste - (it should be just above Snow 1 layer). Rename Snow 2.
Continue this until you have all 10 snow layers copied onto your working canvas.

Highlight the Cloud layer.
Click anywhere outside of it with your Magic Wand.
Highlight each of the snow layers and tap the delete key.
Deselect.

Close out all snow layers accept for Snow 1.

Resize all layers 80%

Copy Merge

~Time to Animate~

Open up Animation Shop.
Edit/Paste as New Animation.

Back in PSP.
Close out Snow 1 layer.
Open up Snow 2 layer.
Copy Merge.

Carry into AS.
Edit/Paste/After Current Frame.

Back in PSP.
Close out Snow 2 layer.
Open up Snow 3 layer.
Copy Merge.

Carry Into AS.
Edit/Paste/After Current Frame.

Continue copying all snow layers from PSP and pasting in AS.
Once you have them all copied over into AS view your animation.
If you’re happy then save.

I hope you enjoyed this tutorial.
I’d love to see your results and show it off in my gallery.
Email me!
Hugs,
Bev
Sunday, December 12, 2010

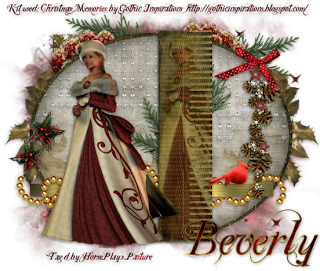
Christmas Memories


Clicking on the image will allow you to enlarge for bigger view.

Supplies

Font of Choice - I used Special Type here
Gem Mask 204 here
Divine Intentionz Template 266 here
Greg’s Factory Output Vol. II - Pool Shadow
“Christmas Memories” is a PTU scrap kit created by Jessica of Gothic Inspiratons and can be purchased from her store Gothic Inspirations. You can visit her blog here.
Thank you Jessica for another amazing kit. This one is absolutely beautiful!

This tutorial was written assuming you have a working knowledge of PSP.

~♥~ Let’s get started ~♥~

Open up the template.
Shift + D.
Close out the original.
Delete the top 2 layers and Words layer.
Image/Canvas Size
650 x 550
OK
Highlight the background layer and flood fill white.

Highlight Rectangle layer.
Select All/Float/Defloat.
Copy and paste Paper 12 as a new layer.
Resize 50%.
Selections/Invert
Tap the delete key.
Deselect.
Delete the template layer.

Highlight Oval layer.
Click on it with your Magic Wand.
New Raster layer.
Copy and paste Paper 11 Into Selection.
Adjust/Add Remove Noise/Add Noise:
Uniform and Monochrome checked
Noise: 35%
OK
Selections/Modify/Contract by 7
OK
New Raster layer.
Copy and paste Paper 14 Into Selection.
Copy and paste Snowflake curtain as a new layer above the paper layer.
Resize 75%/Move into position - see my tag for reference.
Tap the delete key.
Copy and paste Mooses as a new layer above the paper.
Resize 85%/Move into position - see my tag for reference.
Tap the delete key.
Change the Properties to Soft Light.
Deselect.
Delete the template layer.

Highlight Thin Rectangle layer..
Click on it with your Magic Wand.
Copy and paste Paper 13 Into Selection.
Apply Greg’s Factory Output Vol. II - Pool Shadow
Default Settings
Deselect.
Delete the template layer.

Highlight Thin Rectangle 2 layer.
Use your Magic Wand and click just to the left of the pink dotted lines.
New Raster layer.
Copy and paste Paper 11 Into Selection - Rename “Top Paper”
Deselect.
Highlight Thin Rectangle 2 layer again.
Select All/Float/Defloat
New Raster layer just above the template layer.
Copy and paste Paper 13 Into Selection.
Add some Noise: Same settings
Copy and paste Snow Bride as a new layer above Top Paper layer.
Resize 70%
Selections/Invert
Tap the delete key.
Deselect.
Change the Properties to Soft Light.

Add your embellishments. I used:
Holly: Resize 40%/Duplicate/Mirror
Berries: Resize 60%/Duplicate/Mirror
Beads: Resize 70%
Pine Cone Spray: Resize 55%
Bow 2: Resize 25%/Erase the string bow on the Pine Cone Spray
Fir: Resize 25%/Place behind the Oval
Fir again: Resize 25%/Free rotate Right 45 degrees - place behind the strip with the Bride in it/Duplicate/Mirror
Cardinal: Resize 25% and & 70%
Star 1: Resize 25% and 60%/Free rotate right 20 degrees/Duplicate/Mirror
Snow Bride: Resize 70%

Highlight your white background.
Select All.
New Raster layer.
Copy and paste a paper of choice Into Selection.
Deselect.
Apply the mask.
Merge Group.

Add your credits.

Add your name.
Color pallet:
Foreground: Gradient/Metal Brass
Background: Pattern/Paper 7
Stroke: 1
Type your name out.
Convert to Raster layer.
Select All/Float/Defloat
Selections/Modify/Contract by 1
Apply Greg’s Factory Output Vol. II - Pool Shadow:
Default Settings.
Deselect.

Resize all layers 85%.

I hope you enjoyed this tutorial.
I’d love to see your results and show it off in my gallery.
Email me!
Hugs,
Bev
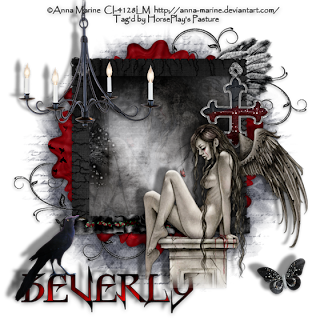
Darkness


Clicking on the image will allow you to enlarge for bigger view.

Supplies

1 tube of choice - I used the artwork of Anna Marine at CILM
Font of Choice - I used Horst Roman here
Weescotlass Mask 236 here
Greg’s Factory Output Vol. II - Pool Shadow
“Darkness” is a PTU scrap kit created by Broken Angel Creations and can be purchased from Digital Chaos. You can visit her blog here.
Thank you Angel for a totally awesome kit!!

This tutorial was written assuming you have a working knowledge of PSP.

~♥~ Let’s get started ~♥~

Open up a 700 x 700 blank canvas.
Flood fill white.

Copy and paste Frame 5 as a new layer.
Resize 80%
Apply Greg’s Factory Output Vol. II - Pool Shadow:
Use Default Settings
Click inside of it with your Magic Wand.
Selections/Modify/Expand by 6.
New Raster layer below the frame.
Copy and paste Paper 18 as a new layer.
Copy and paste your tube as a new layer - you want it to stay on the larger size.
Selections/Invert
Tap the delete key.
Deselect.
Change the Properties to

Copy and paste your tube as a new layer.
Position in front of the frame - see my tag for reference.
Give it an exaggerated drop shadow.
Take note of the drop shadow you use because you’ll need to use the same one for a few of the elements.

Add your embellishments. I used:
Frame 7: Resize 95%
Wing 1: Mirror
Doodle 3: Mirror/Duplicate/Flip/Mirror
Ruffle: Resize 60%
Button: Resize 25% and 40%/Duplicate 3x and place at each corner of the frame.
Cross 2: Resize 60%
Chandelier: Resize 75%/Give it an exaggerated drop shadow
Butterfly 1: Resize 35%/Give it an exaggerated drop shadow
Crow: Apply Greg’s Factory Output Vol. II - Pool Shadow and use default settings. Resize 60%/Give it an exaggerated drop shadow

Highlight your white background.
Select All.
New Raster layer.
Copy and paste a paper of choice as a new layer.
Apply the mask.
Merge Group.

Add your credits.

Add your name.
Color pallet:
Foreground: Black
Background: Pattern/I sectioned out an area of Flower 3
Stroke: 1
Type your name out.
Convert to Raster layer.
Select All/Float/Defloat
Selections/Modify/Contract by 1
Apply Greg’s Factory Output Vol. II - Pool Shadow:
Same Settings.
Deselect.
Give your name the same exaggerated drop shadow.

Resize all layers 80%.

I hope you enjoyed this tutorial.
I’d love to see your results and show it off in my gallery.
Email me!
Hugs,
Bev