Saturday, May 12, 2012

Bountiful

Supplies

1 tube of choice – I used the beautiful artwork of Christina Lark which can be purchased from PSP Tube Stop.  You must have a license to use.

Font of choice - I used Coneria Script here

Weescotklass Mask 208 here

“Bountiful Basket” is a tagger size scrap kit created by Dillie of Dillie’s Designs and can be purchased from Lollipops n Gumdrops.  You can visit her blog here.

This tutorial was written assuming you have a working knowledge of PSP.

~~ Lets get started ~~

I spent hours making this tag using Tracy’s Easter Template 6 here.  When I began to write this tutorial I realized the link to it was no longer valid.  I have tried to get in contact with her several times in the last few weeks about the template links here and there no longer being valid and have had no luck at a response.  So until I hear from her this will be the last tutorial I use her templates on.  Since it goes against her TOU to upload them to share I have written this tutorial so that you can create the template on your own.  I want to be sure you understand that the shapes and placement of the shapes you create IS NOT OF MY CREATION.  Tracy gets all the credit for that.  Keep your fingers crossed I hear from her as I just love her templates!! 

Open up a 700 x 700 blank canvas.
Flood fill white.

New Raster layer.
Make your Selection Tool active set on Circle.
Create a circle approximately 500 pixels.
Flood fill white.
Adjust/Add Remove Noise/Add Noise:
Random and Monochrome checked
Noise: 84%
OK
Selections/Modify/Contract by 8.
Copy and paste Paper 8 Into Selection.
Deselect.
Center it on your canvas and move to the left of your canvas.

New Raster layer.
Make your Selection Tool active set on Ellipse.
Make an Oval approximately 550 x 450 pixels.
Flood fill white.
Give it the same Noise effect.
Selections/Modify/Contract by 8.
New Raster layer.
Copy and paste Paper 12 Into Selection.
Deselect.
Center it on your canvas and move to the right just a bit.

New Raster layer.
Make your Selection Tool active set on Circle.
Create a circle approximately 375 pixels.
Flood fill white.
Give it the same Noise effect.
Move this so it sits just within the oval – see my tag for reference.
Tip: It’s important you get this circle layer into position now.
Click anywhere outside of the circle with your Magic Wand.
Selections/Invert
New Raster layer.
Copy and paste Paper 10 Into Selection.
Copy and patse your tube as a new layer over the paper layer.
If you’re using the same tube as I did do not resize.
Selections/Invert
Tap the delete key.
Deselect.
Change the Properties of the tube to Luminance.
Lower the Opacity to about 30.

New Raster layer.
Make your Selection Tool active set on Square.
Make a square approximately 390 pixels.
Flood fill white.
Deselect.
Free rotate Left 15 degrees.
Apply the same noise effect.
Move into position at the left side of your canvas – see my tag for reference.
Click anywhere outside of the square with your Magic Wand.
Selections/Invert
New Raster layer.
Copy and paste Paper 1 Into Selection.
Deselect.

Copy and paste your tube as a new layer.
If you’re using the same tube as I did, resize 85%
Move into position.

Highlight the bottom circle layer.
Click anywhere outside of it with your Magic Wand.
Highlight the tube layer.
Use your Eraser Tool and erase any part of it you don’t want to overhang the circle.
Deselect.

Highlight the Oval layer.
Repeat the above step.

Add your elements.  I used:
Branch:  Resize 25% and 705/Mirror
Flower 1:  Resize 10%/Duplicate/Mirror
Flower 4: Resize 10%
Scattered Butterflies 1:  Resize 10%

Crop your image.
  
Highlight your white background.
New Raster layer.
Select All.
Copy and paste Paper 4 Into Selection.
Deselect.
Apply the mask.
Resize 110%.
Merge Group.
Duplicate
Change the Properties to Multiply.

Add your credits.

Add your name.
Foreground: Null
Background: #1f1f1f
Type your name.
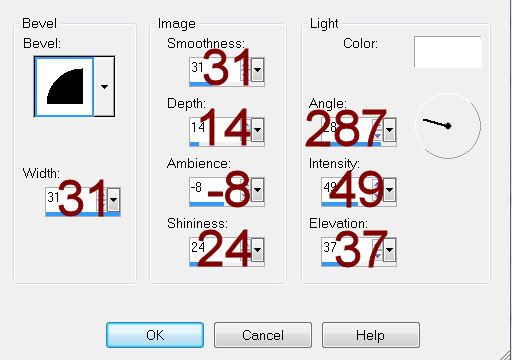
Give it a slight Inner Bevel:
Resize all layers 80%.

I’d love to see your results.
Email me!
Hugs,
Bev

Friday, May 11, 2012

Ride to Heaven

Supplies

1 tube of choice – I used the beautiful artwork of Sue Miller which can be purchased from Up Your Art.  You must have a license to use.

Font of choice - I used Coneria Script here

Weescotklass Mask 208 here

Supplies here of template, paper, and elements.
They are to be used for this tutorial only.

Plugs Ins used:
Tramages – Tow the Line

This tutorial was written assuming you have a working knowledge of PSP.

~~ Lets get started ~~

Open up the template.
Shift + D.
Close out the original.
There’s not much there!

To each template layer:
Adjust/Add Remove Noise/Add Noise:
Random & Monochrome checked
Noise: 88%
OK

Highlight your background layer.
Flood fill white.

Highlight the Circle template layer.
Click anywhere outside of it with your Magic Wand.
Selections/Invert
Selections/Modify/Contract by 4.
New Raster layer.
Copy and paste Paper 1 Into Selection.
Copy and paste your tube as a new layer.
Selections/Invert
Use your Eraser Tool and erase any part of your tube you don’t want to overhang the paper.
Deselect.

Highlight the Rectangle layer.
Click anywhere outside of it with your Magic Wand.
Selections/Invert
Selections/Modify/Contract by 4.
New Raster layer.
Copy and paste Paper 1 Into Selection.
Duplicate
Apply Tramages – Tow the Line:
Use Default Settings.
OK
Change the Properties to Soft Light.
Lower the Opacity to about 32.
Deselect.

Merge Visible the Rectangle paper layers and Rectangle template layer.
Duplicate
Move into position – see my tag for reference.

Add the elements.  I used:
See my tag for reference

Crop you image.
  
Highlight your white background.
New Raster layer.
Select All.
Copy and paste Paper 2 Into Selection.
Deselect.
Apply the mask.
Merge Group.
Resize 110%

Add your credits.

Add your name.

Resize all layers 80%.

I’d love to see your results.
Email me!
Hugs,
Bev

Thursday, May 10, 2012

On Swan Lake

Supplies

1 tube of choice – I used the beautiful artwork of Sue Miller which can be purchased from Up Your Art.  You must have a license to use.

Font of choice - I used Coneria Script here

Weescotklass Mask 208 here

Biene’s Candy Template here
You can find it under Sunday, May 6, 2012

“Forever Fall” is a tagger size scrap kit created by Jessica of Gothic Inspirations and can be purchased from her store GothicInspirations.  You can visit her blog here.
Thank you Jess…Just love your kits!

This tutorial was written assuming you have a working knowledge of PSP.

~~ Lets get started ~~

Open up the template.
Shift + D.
Close out the original.
Delete the top 4 layers,. Pixel Words, Right Rectangle, and Pixel Words 1.

Highlight Glitter Rectangle.
Click anywhere outside of it with your Magic Wand.
Copy and paste Paper 1 as a new layer.
Move into a position you like over the template layer.
Tap the delete key.
Adjust/Add Remove Noise/Add Noise:
Random and Monochrome checked
Noise: 43%
OK
Deselect.
Delete the template layer.

Repeat the above step with Pink Circle layer.

Highlight Black Rectangle layer.
Click anywhere outside of it with your Magic Wand.
Copy and paste Mesh Mask element from the kit as a new layer.
Resize 80%
Tap the delete key.
Deselect.
Lower the Opacity to about 36.

Highlight Blue Rectangle layer.
Click on it with your Magic Wand.
New Raster layer.
Copy and paste Paper 5 Into Selection.
Deselect.
Delete the template layer.

Highlight Gradient Circle.
Click anywhere outside of it with your Magic Wand.
Selections/Invert
New Raster layer.

Open up your tube.
From the tube copy the very bottom Image layer.

Make your working canvas active.
Paste Into Selection.
Deselect.
What we want to do is “erase” the swan -
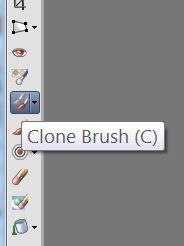
Make your Clone Brush active:
Choose the default brush and use default settings.
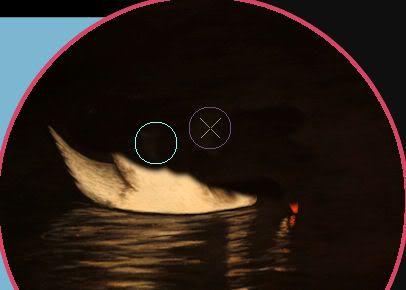
Right click on the black area above the swan.
Hold down the left mouse button and brush over the swan only:


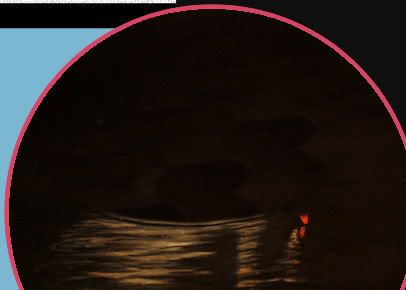
When you're done "erasing" the swan it should look something like this:

From the tube – copy the layer labeled “Tube SM0111 Night Visitor”
(It’s just the swan with a little bit of water beneath it)

Make your working canvas active.
Paste as a new layer.
Resize 70%
When I did this the swan ended up in the exact spot I wanted.  If yours didn’t then move into position.

Copy and paste Light element as a new layer behind the swan.
Resize 70%
Highlight the Gradient Circle Template layer.
Click anywhere outside of it with your Magic Wand.
Highlight the light layer.
Tap the delete key.
Deselect.
Use your Eraser Tool and erase the part of the light ray that can be seen below the swan.
Delete the gradient circle template layer.

Add the elements.  I used:
P Willow:  Resize 60%/Duplicate/Mirror
Cornflower:  Resize 15%/Duplicate/Mirror
Leaves:  Resize 70%
Bird:  Resize 15%

Crop you image – (trim some of the bottom off)
  
Highlight your white background.
New Raster layer.
Select All.
Copy and paste Paper 6 Into Selection.
Deselect.
Apply the mask.
Resize 115%.
Merge Group.

Add your credits.

Add your name.
Color Pallet:
Foreground: #bc955a
Background: #251b12
Stroke: 0.8
Type your name.
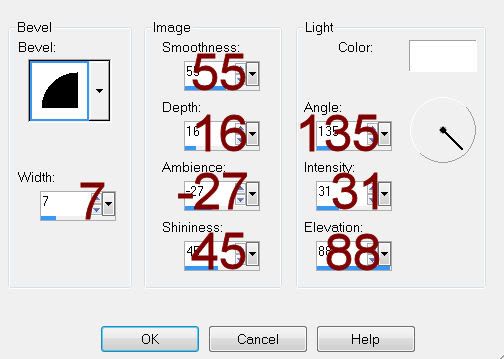
Give it a slight Inner Bevel:

Resize all layers 80%.

I’d love to see your results.
Email me!
Hugs,
Bev

Sunday, May 6, 2012

Expecting Fairy

Supplies

2 tubes of choice – I used the beautiful artwork of Katerina Koukiotis which can be purchased from PSP Tube Stop.  You must have a license to use.

Font of choice - I used Before the Rain here

Weescotklass Mask 362 here

Tracy F. Designz Template 57 here
Tip:  Download from her bulk templates.  It has been brought to
my attention the individual template link is not working.

Elements and Paper which I’ve supplied here
These elements are to be used for this tutorial only.

Plug Ins Used:
Apply Eyecandy 5 – Textures: Stone Wall

This tutorial was written assuming you have a working knowledge of PSP.

~~ Lets get started ~~

Open up the template.
Shift + D.
Close out the original.
Delete the credit layer.
Image/Canvas Size:
700 x 600
New Raster layer.
Flood fill white.
Send to bottom.

Open up the paper that I supplied.
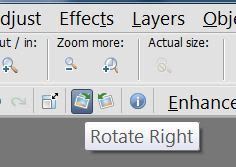
Click on the Rotate Right icon at the top of your work space:

Copy.

Highlight Circle 1 layer.
New Raster layer.
Copy and paste the paper Into Selection.
Duplicate
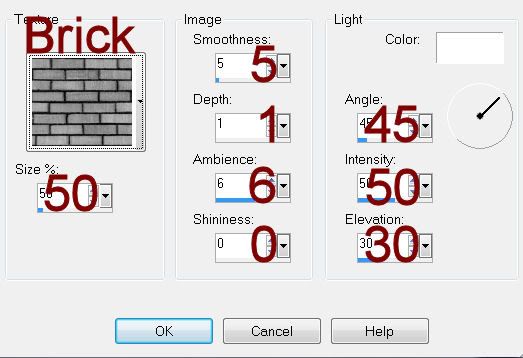
Effect/Texture Effect/Texture:
Look for “Bricks” and match your settings to mine:
OK
Change the Properties to Soft Light.
Deselect.
Delete the template layer.

Highlight Rectangle layer.
Click anywhere outside of it with your Magic Wand.
Copy and paste the paper as a new layer.
Position it so that the bottom left corner of the paper aligns with the bottom left corner of the template layer – it can overhang a little.
Tap the delete key.
Duplicate
Apply Eyecandy 5 – Textures: Stone Wall
Choose Cobblestone from the settings tab.
Use Default Settings
OK
Adjust/Blur/Gaussian blur:
Radius: 6
OK
Deselect.
Delete the template layer.

Highlight Circle 2 layer.
Click anywhere outside it with your Magic Wand.
Copy and paste the paper as a new layer.
Move into a position you like.
Tap the delete key.
Copy and paste your tube as a new layer over the paper layer.
Tap the delete key.
Deselect.
Change the Properties of the tube layer to Soft Light.

Highlight Heart 1 layer.
Click on it with your Magic Wand.
New Raster layer.
Copy and paste the paper Into Selection.
Copy and paste your tube as a new layer over the paper layer.
Selections/Invert
Tap the delete key.
Deselect.
Delete the template layer.
Change the Properties to Soft Light.

Color Pallet:
Foreground: #d09271   
Background: #dacbc5
Set to Gradient:
Style: Linear
Angle: 11
Repeats: 3

Highlight Hearts layer.
Click anywhere outside of them with your Magic Wand.
New Raster layer.
Flood fill with the gradient.
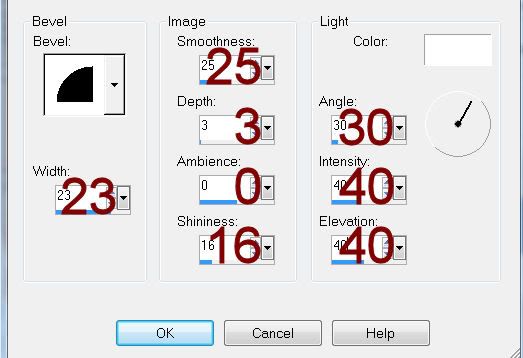
Give it a slight Inner Bevel:
Deselect.
Delete the template layer.

Highlight Heart 2 layer.
Click anywhere outside of it with your Magic Wand.
Selections/Invert
New Raster layer.
Flood fill with the gradient.
Give it the same slight Inner Bevel.
Copy and paste your second tube as a new layer – resize as needed.
Position over the gradient heart.
Selections/Invert
Tap the delete key.
Change the Properties to Soft Light.
Deselect.
Delete the template layer.

Copy and paste your tube as a new layer positioning it in front of the heart.
If you’d like to give it a feathered look –
Give the tube a drop shadow.
Make your Freehand Selection Tool active.
Circle around the tube letting the dotted line touch wherever you’d like the tube feathered and staying far away from the area’s you don’t want feathered.
Selections/Modify/Inside Outside Feather:
 Both checked
Feather amount: 35
Selections/Invert
Tap the delete key until you have the feathered effect you like.
Deselect.

Add the elements I provided:
Baby’s Breath: Duplicate/Mirror/Resize 70%
Butterfly: Duplicate/Mirror/Resize 70%
Bow: Duplicate/Mirror
Wording
  
Highlight your white background.
New Raster layer.
Select All.
Copy and paste the paper Into Selection.
Deselect.
Duplicate/Change the Properties to Multiply
Merge Down.
Apply the mask.
Resize 110%.
Merge Group.

Add your credits.

Add your name.

Resize all layers 80%.

I’d love to see your results.
Email me!
Hugs,
Bev