Saturday, October 9, 2010

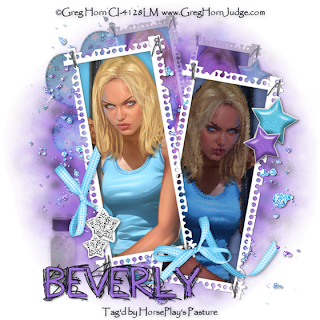
My Evil Twin


Clicking on the image will allow you to enlarge for bigger view.

Supplies

1 tube of your choice - I used the artwork of Greg Horn and can be purchased from CILM.
Font of Choice - I used All Over Again here
Monti Circular Mask here
Brush Strokes - Sprayed Strokes
“Good or Bad” is a PTU tagger size scrap kit created by Kristen of Toxic Desirez and can be purchased from Twilight Scraps. You can visit her blog here.
Thank you Kristen for a really wicked kit!

This tutorial was written assuming you have a working knowledge of PSP.

~♥~ Let’s get started ~♥~

Open up a 700 x 700 blank canvas.
Flood fill white.

Copy and paste Frame 1 as a new layer.
Resize 80%
Free rotate left 100 degrees.
Click inside the frame with your Magic Wand.
New Raster layer below the frame.
Selections/Modify/Expand by 4.
Copy and paste Paper 3 Into Selection.
Copy and paste your tube as a new layer below the frame.
Selections/Invert
Tap the delete key.
Deselect.

Close out your white background.
Merge Visible.
Reopen your white background.

Copy and paste Frame 1 again as a new layer.
Resize 80%
Free rotate left 80 degrees.
Click inside the frame with your Magic Wand.
New Raster layer below the frame.
Selections/Modify/Expand by 4.
Copy and paste Paper 2 Into Selection.
Copy and paste your tube as a new layer below the frame.
Selections/Invert
Tap the delete key.
Deselect.
Apply Brush Strokes - Sprayed Strokes to the tube:
Default Settings
OK

Close out your white background and merged layer.
Merge Visible.
Reopen all layers and move both merged layers into position - see my tag for reference.

Add your embellishments. I used:
Ribbon 1: Resize 70%
Star 1: Resize 50%
Star 2: Resize 40%/Mirror
Star and Diamonds: Resize 60%/Duplicate/Mirror/Resize 70%
Splat 1: Duplicate

Close out your white background.
Merge Visible.
Reopen the white background.

Duplicate merged layer.
Resize 70%
Move the duplicated/resized layer up on your canvas a bit.
Move it behind the other merged layer in your layers pallet.
Change the Properties to Soft Light.

Highlight the white background.
New Raster layer.
Select All
Copy and paste Paper 14 Into Selection.
Deselect.
Adjust/Blur/Gaussian blur
Radius: 5
OK
Apply the mask.
Merge Group.

Copy and paste Stitched Heart as a new layer.
Resize 50%
Free rotate left 30 degrees
Duplicate/Resize 80%
Move both of these stitched heart layers just above your mask layer - letting them peek out from the left side of the merged layer.
Change the Properties of both heart layers to Soft Light.

Copy and paste Bottle as a new layer.
Resize 40%
Move it just above the mask layer in your layers pallet.
Change the Properties to Soft Light.

Add your credits.

Add your name.

Resize all layers 80%.

I hope you enjoyed this tutorial.
I’d love to see your results and show it off in my gallery.
Email me!
Hugs,
Bev

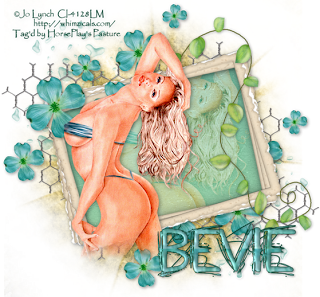
In Love


Clicking on the image will allow you to enlarge for bigger view.

Supplies

1 tube of your choice - I used the artwork of Jo Lynch and can be purchased from CILM.
Font of Choice - I used All Over Again here
Gem’s Mask 71 here
Filters Unlimited 2.0 - Optional
Photo Aging kit (to install in Filters Unlimited) - Optional
“Welcome to ACD” is a FTU tagger size scrap kit created by Bits n Bobs and can be downloaded in her group Another Creative Design. You can visit her blog here.
Thank you Julie for sharing your amazing talent so freely!

This tutorial was written assuming you have a working knowledge of PSP.

~♥~ Let’s get started ~♥~

Open up a 700 x 700 blank canvas.
Flood fill white.

Copy and paste Element 4 as a new layer.
Resize 80%
Free rotate left 15 degrees.
Click inside the frame with your Magic Wand.
New Raster layer below the frame.
Selections/Modify/Expand by 4.
Flood fill with a gradient of choice.
Deselect.

Apply Filters Unlimited 2.0 to the gradient layer:
Photo Aging Kit
Cracked Paper:
Intensity: 35
Texture 93
Apply

Apply Filters Unlimited 2.0 again -
Paper Texture - Recycling Paper:
Intensity: 50
Lightness: 87
Apply

Copy and paste your tube as a new layer.
Move it into the exact position you want it.
Duplicate/Move to the right a little/Move below the frame in your layers pallet.
Highlight the gradient layer.
Click anywhere outside of it with your Magic Wand.
Highlight the tube layers just above the gradient layer.
Tap the delete key.
Deselect.
Change the Properties to Soft Light.

Add your embellishments. I used:
27
28
1
14

Crop your image.

Highlight the white background.
New Raster layer.
Select All
Copy and paste a paper of choice Into Selection.
Deselect.
Apply the mask.
Merge Group.

Add your credits.

Add your name.
Select your colors
Stroke: 1.5
Type your name.
Convert to Raster layer.
Select All/Float/Defloat
Selections/Modify/Contract by 1
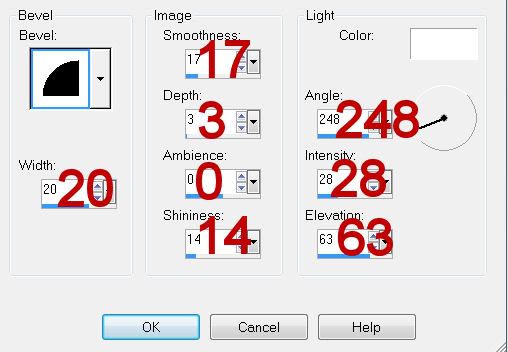
Give it an inner bevel:


Repeat the inner bevel.
Deselect.

Resize all layers 80%.

I hope you enjoyed this tutorial.
I’d love to see your results and show it off in my gallery.
Email me!
Hugs,
Bev

Friday, October 8, 2010

Wine and Roses


Click on the image will allow you to enlarge for bigger view.

Supplies

2 tubes of your choice - I used the artwork of Elias Chatzoudis and can be purchased from MPT.
Font of Choice - I used Halo Handletter here
Gem’s Mask 153 here
Eyecandy 4000 - Gradient Glow
“Wine and Roses” is a PTU tagger size scrap kit created by EmJay Scraps and can be purchased at Butterfly Blush Designs. You can visit her blog here.
Thank you EmJay for an amazing kit!

This tutorial was written assuming you have a working knowledge of PSP.

~♥~ Let’s get started ~♥~

Open up a 700 x 700 blank canvas.
Flood fill white.

Copy and paste Element 25 as a new layer.
Resize 50%
Duplciate
Move both frames into position - see my tag for reference.

Highlight the bottom frame.
Click inside with your Magic Wand.
Selections/Modify/Expand by 4.
New Raster layer below the frame.
Copy and paste a paper of choice Into Selection.
Copy and paste a tube as a new layer below the frame.
Selections/Invert
Tap the delete key.
Deselect.

Highlight the top frame.
Click inside with your Magic Wand.
Selections/Modify/Expand by 4.
New Raster layer below the frame.
Copy and paste a paper of choice Into Selection.
Deselect.

Copy and paste your tube as a new layer.


Add your embellishments. I used:
Element 16 & 17: Resize 80%
Element 14: Resize 70%
Element 32
Element 6: Resize 80%/Dupicate/Mirror/Duplicate/Resize 60%
Element 21

Highlight your white background.
Select All.
Copy and paste a paper of choice Into Selection.
Deselect.
Apply the mask.
Merge Group.

Add your credits.

Add your name.
Apply Eyecandy 4000 - Gradient Glow:


Color Tab:
Change the color to white.

Resize all layers 80%.

I hope you enjoyed this tutorial.
I’d love to see your results and show it off in my gallery.
Email me!
Hugs,
Bev

Thursday, October 7, 2010

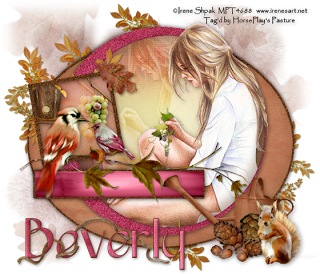
Fallen in Love


Clicking on the image will allow you to enlarge for bigger view.

Supplies

1 tube of your choice - I used the artwork of Irene Shpak and can be purchased at MPT
Font of Choice - I used Epittazio here
Divine Intentions Template 299 here
Gem’s Mask 54 here
“Fallen in Love” is a PTU tagger size scrap kit created by Scrapity Scrap and More… and can be purchased at Aussie Scrap Designs. You can visit her blog here.
Thank you Mirella for a most beautiful kit!

This tutorial was written assuming you have a working knowledge of PSP.

~♥~ Let’s get started ~♥~

Open up the template.
Shift + D.
Close out the original.
Image/Canvas Size
700 X 600
Highlight the bakcground layer.
Flood fill white.
Delete the top 2 layers.

Highlight Glittered Oval layer.
Use your Magic Wand and click on it.
Copy and paste Paper 17 Into Selection.
Deselect.
Delete the template layer.
Adjust/Add Remove Noise/Add Noise:
Gaussian and Monochrome checked
Noise: 33%
OK

Repeat the above step with Frame layer and Glittered Rectangle layer..

Highlight Oval layer.
Click on it with your Magic Wand.
New Raster layer.
Copy and paste Paper 19 Into Selection.
Deselect.
Delete the template layer.

Highlight Circle 1 layer.
Click on it with your Magic Wand.
New Raster layer.
Copy and paste Paper 18 Into Selection.
Deselect.
Delete the template layer.
Apply the same Noise.

Highlight Circle 2 layer.
Click on it with your Magic Wand.
New Raster layer.
Copy and paste Paper 5 Into Selection.
Copy and paste your tube as a new layer - Position it over the circle.
Duplicate.
Move the lower tube to the left and up just a bit.
Chang the Properties to Soft light.
Selections/Invert
Highlight each tube layer and tap the delete key.
Deselect.
Delete the template layer.

Highlight Rectangle layer.
Click on it with your Magic Wand.
New Raster layer.
Copy and paste Paper 4 Into Selection.
Deselect.
Delete the template layer.

Highlight Frame Background layer.
Click on it with your Magic Wand.
New Raster layer.
Copy and paste Paper 7 Into Selection.
Deselect for now.
Copy and paste element 19 as a new layer.
Resize 25%/Mirror
Move into position - see my tag for reference and don’t worry about what overhangs the box. We’ll take care of that in a bit.
Duplicate/Move slightly to the left and change the Properties to Soft Light.
Copy and paste Element 32 as a new layer.
Resize 50%
Move into position - see my tag for reference.
Highlight Frame Background template layer.
Click anywhere outside of it with your Magic Wand.
Highlight each of the element layers and tap the delete key.
Deselect.
Delete the template layer.

Add your embellishments. I used:
Element 18: Resize 25%
Element 17: Resize 25%
Element 64: Resize 25%
Element 63: Resize 25%
Element 62: Resize 25%/Mirror
Element 40
Element 33
Element 49
Element 42

Highlight your white background.
Select All.
Copy and paste Paper 9 Into Selection.
Deselect.
Apply the mask.
Merge Group.

For added effect I used Element 38/resized/positioned/lowered the opacity to around 20 or so - all leaf layer were moved just above the mask layer.

Add your credits.

Add your name.
Convert to Raster layer.
Select All/Float/Defloat
Selections/Modify/Contract by 1
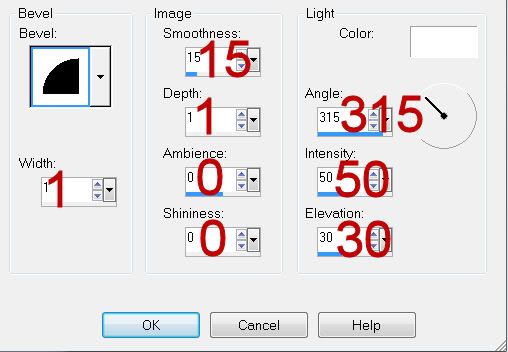
Give it an inner bevel:


Repeat the inner bevel 2 more times.
Deselect.

Resize all layers 80%.

I hope you enjoyed this tutorial.
I’d love to see your results and show it off in my gallery.
Email me!
Hugs,
Bev

Monday, October 4, 2010

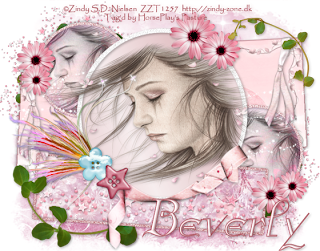
When the Magic is Gone


Clicking on the image will allow you to enlarge for bigger view.
Supplies

1 tube of your choice - I used the artwork of Zindy S.D. Neilsen and can be purchased from her site here.
Font of Choice - I used Anglican Italic here
Artmama’s Studio Template 21 here
Becky Mask 22 here
Eyecandy 4000 - Gradient Glow
“Dream Princess” is a PTU tagger size scrap kit created by Disyas Digitals Designs and can be purchased at Lollipops n Gumdrops. You can visit her blog here.
Thank you Dilcia for an enchanting kit!

This tutorial was written assuming you have a working knowledge of PSP.

~♥~ Let’s get started ~♥~

Open up a 700 x 700 blank canvas.
Flood fill white.

Open up the template.
Shift + D.
Close out the original.
Image/Canvas Size
700 x 550
OK
Delete the following layers:
Credit, Dots, Summer, Summer Glitter, Break, and Tiny Text

Highlight L. Lg. Rectangle layer
Copy and paste Paper 5 as a new layer.
Resize 50%/Free rotate Right 3 degrees.
Move into position so that the top left corner of the paper fits nicely into the top left corner of the template.
Highlight the template layer.
Click anywhere outside of it with your Magic Wand.
Highlight the paper layer.
Tap the delete key.
Deselect.
Delete the template layer.
Apply Eyecandy 4000 - Gradient Glow:


On the color tab:
Choose #bf7e86.

Highlight R. lg. Rectangle layer.
Repeat the above 2 steps using the same paper accept free rotate it Left 3 degrees.

Highlight R. Sm. Circle layer.
Click on it with your Magic Wand.
New Raster layer.
Copy and paste Paper 1 Into Selection.
Copy and paste your tube as a new layer.
Resize as needed.
Selections/Invert
Tap the delete key.
Deselect.
Delete the template layer.
Change the Properties to Luminance Legacy.

Highlight L. Sm. Circle layer.
Repeat the above step.

Highlight R. Circle Frame layer.
Make your Target Tool active and change the color of the layer to a dark pink shade.

Highlight L. circle Frame layer.
Repeat the above step.

Highlight Bottom Rectangle layer.
Copy and paste Paper 1 as a new layer.
Resize 70%/Free rotate Right 4 degrees.
Highlight the Bottom Rectangle layer.
Click anywhere outside of it with your Magic Wand.
Highlight the paper layer.
Tap the delete key.
Deselect.
Delete the template layer.

Highlight Bot. Rec. Frame layer.
Colorize the same as you did the other frames.

Highlight Lg. Circle layer.
Click on it with your Magic Wand.
New Raster layer.
Flood fill with a gradient of your choice.
Deselect.
Delete the template layer.
Copy and paste your tube as a new layer.

Highlight Lg. Circle Frame.
Adjust/Add Remove Noise/Add Noise
Monochrome and Gaussian checked
Noise: 33%
OK

Add your embellishments. I used:
Fairy Wings 1
Foliage 4: Resize 85%
Foliage 2: Mirror
R 7: Resize 85% and 90%/Free rotate right 25 degrees
Buttons 2 and 4: Resize 70%
E 17: Free rotate L 3 degrees/Position at left of canvas/Duplicate/Mirror
Flower 7: Resize 50%/Duplciate/Resize 80%

Highlight your white background.
Select All.
Copy and paste a paper of choice Into Selection.
Deselect.
Apply the mask.
Resize 105%
Merge Group.
Duplicate

Add your credits.

Add your name.
Select your colors
Stroke: 1.5
Type your name.
Convert to Raster layer.
Select All/Float/Defloat
Selections/Modify/Contract by 1
Give it an inner bevel:


Repeat the inner bevel once more.
Deselect.

Resize all layers 80%.

I hope you enjoyed this tutorial.
I’d love to see your results and show it off in my gallery.
Email me!
Hugs,
Bev


Sunday, October 3, 2010

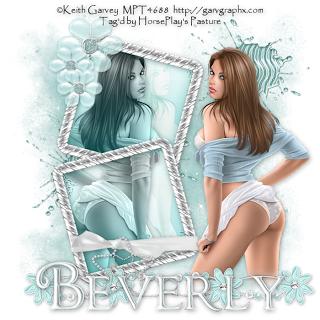
Powder Soft Beauty


Supplies

1 tube of your choice - I used the artwork of Keith Garvey and can be purchased at MPT
Font of Choice - I used Chocolate Box here
Gem’s Mask 161 here
“Water and Grass” is a PTU tagger size scrap kit created by ZaZa of Scrap and Tubes and can be purchased at Butterfly Blush Designs. You can visit her blog here.
Thank you ZaZa for a really beautiful kit!

This tutorial was written assuming you have a working knowledge of PSP.

~♥~ Let’s get started ~♥~

Open up a 700 x 700 blank canvas.
Flood fill white.

Copy and paste Frame as a new layer.
Resize 40%
Free rotate right 15 degrees
Duplicate/Mirror
Move both frames into position - see my tag for reference.

Highlight the top Frame.
Click inside of it with your Magic Wand.
Selections/Modify/Expand by 4.
New Raster layer below the frame.
Copy and paste Paper 2 Into Selection.
Deselect.

Highlight the bottom frame.
Repeat the above step.

Copy and paste your tube as a new layer below the top frame.
Duplicate/Mirror (close this tube layer out for now)
Move the tube that's under the frame into exact position.
Change the Properties to Luminance Legacy.
Duplciate/Move this tube just above the paper of the bottom frame in your layer’s pallet.

Highlight the tube that’s below the top frame.
Duplicate/Move to the right just slightly
Change the Properties to Soft Light
Duplicate this tube and move just above the paper of the bottom frame in your layers pallet.

Highlight the paper of the top frame.
Click anywhere outside of the paper with your Magic Wand.
Highlight each of the tube layers that are below the frame and tap the delete key.
Deselect.
The tube layers that you changed the Properties to Soft light….duplicate it.

Highlight the paper of the bottom frame.
Repeat the above step.

I truly hope I didn’t confuse you!!

Highlight the tube just below the top frame - (you changed the Properties of this tube to Luminance Legacy).
Use your Magic Wand and click ON it.
Make your Eraser Tool active.
Highlight each tube BELOW the Luminance Legacy one and erase the tube.
Deselect.
Now you shouldn’t see any other tubes showing through!

Repeat the above step with the tubes in the bottom frame.

You can now open up the tube layer I had you close out in the beginning.

Add your embellishments. I used:
Aqua Splatter
Glass Flower: Resize 50%/Duplicate/Resize 70%/Duplicate
To give these flowers a drop shadow - Put the drop shadow on a layer of its own. Click on the flower with your Magic Wand. Highlight the shadow layer and erase. Deselect.
White Bow: Resize 41% - Make your Pick Tool active. Hold down the Shift key and move the bottom left corner in until the edge of the ribbon aligns with the frame edge. Lower the opacity of the bow until you can see through it. Use your Freehand Selection Tool to section off what overhangs on the right side of the frame. Tap the delete key. Deselect. Put the Opacity back to 100%
Flower Beads Ribbon: Free rotate right 90 degrees
Star: Resize 60%

Highlight your white background.
Select All.
Copy and paste Paper 1 Into Selection.
Deselect.
Apply the mask.
Merge Group.

Add your credits.

Add your name.
Select your colors
Stroke: 1
Type your name.
Convert to Raster layer.
Select All/Float/Defloat
Selections/Modify/Contract by 1
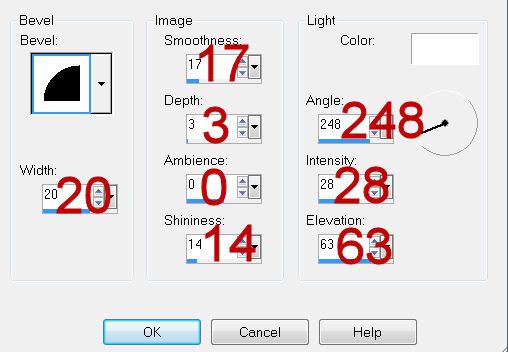
Give it an inner bevel:


Repeat the inner bevel 2 more times.
Deselect.

Resize all layers 80%.

I hope you enjoyed this tutorial.
I’d love to see your results and show it off in my gallery.
Email me!
Hugs,
Bev
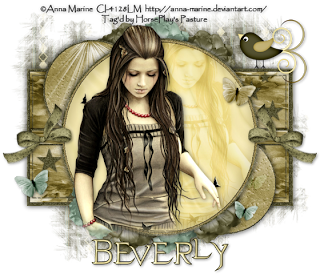
Serene Moments


Clicking on the image will allow you to enlarge for bigger view.

Supplies

1 tube of your choice - I used the artwork of Anna Marine and can be purchased at CILM
Font of Choice - Evanescenct here
Template by Marieke here - You’ll find it under August 29, 2010 under her name. Just click the image to download.
Weescotlass Mask 297 here
“Country Life” is a PTU tagger size scrap kit created by Mystical Illusionz and can be purchased at Twilight Scraps. You can visit her blog here.
Thank you Kristen for such a lovely kit. Having an affinity for country life I certainly enjoyed this kit very much♥

This tutorial was written assuming you have a working knowledge of PSP.

~♥~ Let’s get started ~♥~

Open up the template.
Shift + D.
Close out the original.
Resize all layers 85%
Image/Canvas Size
700 x 600
Delete the top 4 layers and Raster 10 layer.

Highlight Raster 4 layer.
Click on it with our Magic Wand.
New Raster layer.
Flood fill with #504d2e
Deselect.
Delete the template layer.

Highlight Raster 13 layer.
Click on it with your Magic Wand.
New Raster layer.
Copy and paste PP9 Into Selection.
Deselect.
Delete the template layer.
Adjust/Add Remove Noise/Add Noise
Monochrome and Gaussian checked
Noise: 33%
OK

Highlight Raster 14 layer.
Click on it with your Magic Wand.
New Ratser layer.
Copy and paste PP1 Into Selection.
Deselect.
Delete the template layer.

Highlight Raster 15 layer.
Select All/Float/Defloat
New Raster layer.
Copy and paste PP9 Into Selection.
Deselect.
Delete the template layer.

Highlight Raster 2 layer.
Click on it with your Magic Wand.
New Raster layer.
Copy and paste PP 9 Into Selection.
Deselect.
Delete the template layer.

Highlight Kopie Van Raster 2 layer.
Repeat the above step.

Highlight Raster 12 layer.
Click on it with your Magic Wand.
Copy and paste PP1 as a new layer.
Selections/Invert
Tap the delete key.
Deselect.
Delete the template layer.

Highlight Raster 11 layer.
Repeat the above step.

Highlight Raster 3 layer.
Click on it with your Magic Wand.
New Raster layer.
Flood fill with #504d2e.
Deselect.
Delete the template layer.
Add the same noise as before.

Highlight Raster 5 layer.
Click on it with your Magic Wand.
New Raster layer.
Copy and paste PP 3 Into Selection.
Deselect.
Delete the template layer.
Apply the same noise.

Move Raster 7 below the largest circle paper layer in your layers pallet.
Move Raster 8 just above Raster 7.

Highlight Raster 7 layer.
Click on it with your Magic Wand.
New Raster layer.
Flood fill with #504d2e
Apply the same Noise.
Deselect.
Delete the template layer.

Highlight Raster 8 layer.
Click on it with your Magic Wand.
New Raster layer.
Copy and paste PP1 Into Selection.
Deselect.
Delete the template layer.

Highlight Raster 6 layer.
Click on it with your Magic Wand.
New Raster layer.
Copy and paste PP 8 Into Selection.
Deselect for now.

Copy and paste your tube as a new layer at the top of your layer pallet.
Move it into exact position.
Duplicate.
Move the duplicate tube layer to sit just above the circle paper of Raster 6.
Move it slightly to the side.
Highlight Raster 6 layer.
Click anywhere outside of it with your Magic Wand.
Highlight the duplicated tube layer.
Tap the delete key.
Deselect.
Delete the template layer.
Change the Properties to Soft Light.

Add your embellishments. I used:
Moth 1 & 2: Resize 25%/Free rotate 15 degrees
Ray of Light: Resize 80%
Stars 2: Resize 90%
Bird 2: Resize 25%
Bow 1: Resize 25%
Flowers 1 & 2: Resize 50%

I duplicated one of the butterflies (refer to my tag, it’s the lower left one)
Duplicate/Resize 70%/Mirror/Duplicate
I then moved the butterfly off to the side just a bit and in my layers pallet moved it just above the small circle paper.
Change the Properties to Soft Light.

Highlight your white background.
Select All.
Copy and paste Paper 6 Into Selection.
Deselect.
Apply the mask.
Merge Group.

Add your credits.

Add your name.
Choose your foreground and background colors.
Stroke: 1
Type out your name.
Convert to Raster layer.
Selections/Modify/Contract by 1

Give it an inner bevel:


Apply the inner bevel 2 more times.
Deselect.

Resize all layers 80%.

I hope you enjoyed this tutorial.
I’d love to see your results and show it off in my gallery.
Email me!
Hugs,
Bev