Saturday, August 1, 2009

Summer is...

Clicking on the image will enlarge to full view.

Supplies
2 tubes of choice - I’m using the artwork of Keith Garvey which you can purchase here
Font of Choice - I’m using Beebop here
Weescotlass Mask 297 here
My Template #2 here
“Blue Sky Mine” is a FTU (for 4 days only) tagger size scrap kit Created by Jill. It can be purchased at Exquisite Scraps here. You can visit Jill’s blog here.
Thank you Jill for an awesome kit!!

This tutorial was written assuming you have a working knowledge of PSP

~♥~ Let’s get started ~♥~

Open up the template.
Shift + D.
Close out the original.
Delete the Copyright and Flower layers.
Highlight the background layer.
Image/Canvas Size
700 X 700
Flood Fill white.

Highlight the Oval Layer.
Select All/Float/Defloat
New Raster Layer.
Copy and paste a paper of choice Into Selection.
Deselect.
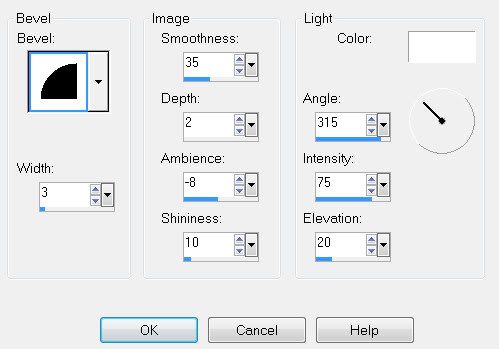
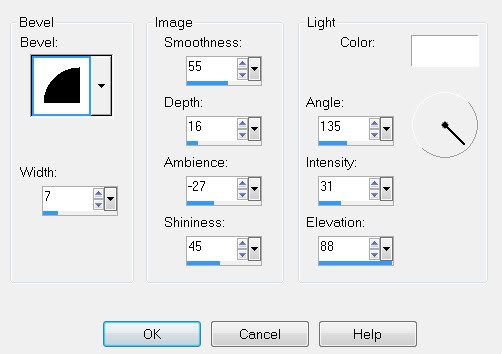
Give it a slight inner bevel:
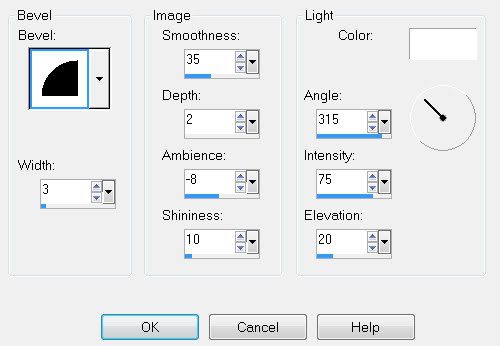

Delete the template layer.

Highlight Square 1 layer.
Select All/Float/Defloat
Copy and paste a paper of choice as a new layer.
Select/Invert
Tap the delete key.
Deselect.
Delete the template layer.

Repeat the above step with Square 2 layer.

Highlight Frame 1 layer.
Select All/Float/Defloat
New Rater layer.
Copy and paste a paper of choice Into Selection.
Hit the delete key.
Deselect.
Give it the same inner bevel as you used before.
Delete the template layer.

Copy and paste a tube of choice below each frame.

Highlight the oval layer.
Copy and paste the Balloon as a new layer.
Mirror/Resize 90%
Change the Properties to Soft Light.

Copy and paste Flowers as a new layer just above the balloon.

Add your embellishments. I used:
Buttons: Resize 20% and 90%
Bark
Watering Can: Resize 40%
Leaves: Resize 40%
Bow 3: Resize 30%

Highlight your white canvas.
New Raster Layer.
Select All.
Copy and paste a paper of choice Into Selection.
Deselect.
Apply the Mask.
Merge Group.

Add your copyrights.

Add your name.

Crop your image.
Resize all layers 85%.

I hope you enjoyed this tutorial.I’d love to see your results and show it off in my Show Arena.
Email me!
Hugs,
Bev

Tranquility

Clicking on the image will enlarge to full view.

Supplies
1 tubes of choice - I’m using the artwork of Gary George which you can purchase here
Font of Choice - Jester here
Weescotlass Mask 39 here
“Happy Summer” is a PTU tagger size scrap kit created by Petra‘s Designs. It can be purchased at Butterfly Blush Designs. You can visit Petra’s blog here.
Thank you Petra for a scrap kit that’s truly beautiful!

This tutorial was written assuming you have a working knowledge of PSP

~♥~ Let’s get started ~♥~

Open a transparent 700 x 700 canvas.
Flood Fill white.

Copy and Paste Rahmen 07 as a new layer.
Select All/Float/Defloat
Copy and paste a paper of choice as a new layer.
Selections/Invert
Tap the delete key.
Deselect.
Delete the white frame layer.

Use your Magic Wand and click inside of each side of the frame.
Selections/Modify/Expand by 4.
Copy and paste a paper of choice below the frame.
Selections/Invert
Tap the delete key.
Deselect.

Add your embellishments. I used:
Bluemen 07: Resize 25%
Bluemen 06: Resize 75%
Gruen 04: Resize 50% (place behind the frame)
Gruen 04: Resize 40% (place in front of the frame)
Bluemen 04: Resize 30%
Bluemen 07: Resize 25% (place inside the frame)
Bluemen 06: Resize 75%
Vogel 01: Resize 35%
Leiter: Resize 30%
Schme Herling 02: Resize 30%
Highlight your white canvas.

New Raster Layer.
Select All.
Copy and paste a paper of choice Into Selection.
Deselect.
Apply the Mask.
Merge Group.

Add your copyrights.

Add your name.

Resize all layers 85%.
I hope you enjoyed this tutorial.
I’d love to see your results and show it off in my Show Arena.
Email me!
Hugs,
Bev

Friday, July 31, 2009

Dusty Glamour

Clicking on the image will enlarge to full view.

Supplies
1 tube of choice - I’m using the artwork of Gennadiy Koufay which you can purchase here
Font of Choice - I’m using AdriaDB here
Weescotlass Mask 84 here
Divine Intentionz Template 18 here
“Glamour Dust” is a PTU tagger size scrap kit created by Terry of Treasures by Terry. It can be purchased at Butterfly Blush Designs here. You can visit Terry’s blog here.
Thank you Terry for another stunningly beautiful kit!!

This tutorial was written assuming you have a working knowledge of PSP.

~♥~ Let’s get started ~♥~

Open up the template.
Shift + D.
Close out the original.
Delete the Missy layer.
Highlight the background layer.
Image/Canvas Size
700 X 700
Flood Fill white.

Highlight the Circle Layer.
Select All/Float/Defloat
New Raster Layer.
Copy and paste Into Selection Ball 1 of the element.
Deselect.
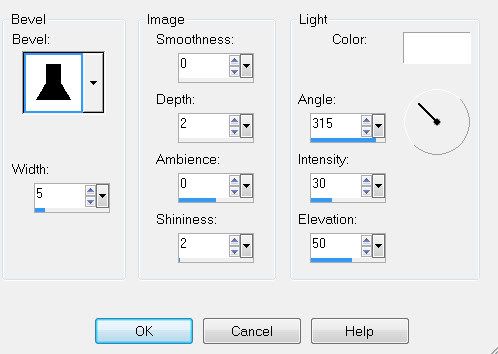
Give it a slight inner bevel:

Delete the template layer.

Highlight the Large Rectangle layer.
Select All/Float/Defloat
Copy and paste a paper of choice as a new layer.
Select/Invert
Tap the delete key.
Deselect.
Give it a slight inner bevel:


Delete the template layer.

Highlight the Scalloped Edge Circle.
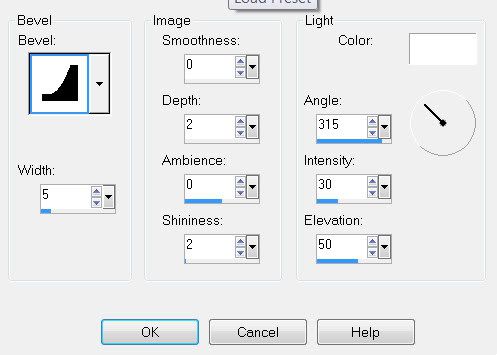
Repeat the above step accept give it this inner bevel:


Delete the template layer.

Highlight the Small Rectangle layer.
Select All/Float/Defloat
Copy and paste a paper of choice as a new layer.
Selections/Invert
Hit the delete key.
Deselect.
Give it the same inner bevel as the Large Rectangle layer.
Delete the template layer.

Select All/Float/Defloat
Selections/Modify/Contract by 3
New Raster Layer.
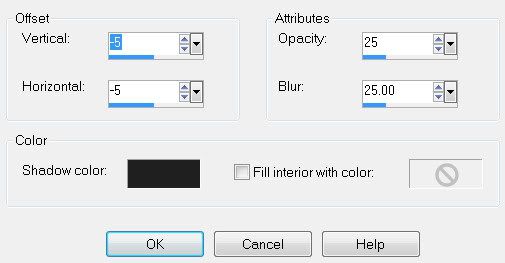
Effect/3DEffects/Cutout


Repeat the above step accept change the horizontal and vertical numbers to -5.
DO NOT DESELECT.

Copy and paste your tube as a new layer below the cutout layers.
Resize larger.
I resized mine 175%.
Selections/Invert
Tap the delete key.
Deselect.
Change Properties to “Lighten”.

Copy and paste Frame 6 as a new layer.
Resize 95%
Place it behind the scalloped circle.
Duplicate.
Free rotate right 45 degrees.

Add your embellishments. I used:
Heart 9: Resize 40%
Heart 1: Resize 50%
Bow 10: Resize 50% Free rotate Left 25 degrees
Blow 9: Resize 40% Free rotate Left 25 degrees
Butterfly 3: Resize 30%
Swirl 2: Resize 75%

Copy and paste your tube as a new layer.

Highlight your white canvas.
New Raster Layer.
Select All.
Copy and paste a paper of choice Into Selection.
Deselect.
Apply the Mask.
Merge Group.

Add your copyrights.

Add your name.

Crop your image.
Resize all layers 85%.

I hope you enjoyed this tutorial.
I’d love to see your results and show it off in my Show Arena.
Email me!
Hugs,
Bev


Sunday, July 26, 2009

Summer Splash!

Clicking on the image will enlarge to full view
and you can also see the animation.

Supplies
2 tubes of choice - I’m using the artwork of Dean Yeagle which you can purchase here
Mask 71 Kreations here -
If you know who this mask belongs to please email me so that I can give proper credit.
DSB Flux - Bright Noise
Animation Shop
“Surfer Girl” is a PTU tagger size scrap kit created by Mellie of Pink Quixotic. It can be purchased at Dazzling Scraps.
Thank you Mellie for this summery fun kit!!

This tutorial was written assuming you have a working knowledge of PSP.

~♥~ Let’s get started ~♥~

Open a transparent 700 x 700 canvas.
Flood Fill white.

Copy and Paste the Life Ring as a new layer.
Resize 85%.
Use your Magic Wand and click inside of it.
Selections/Modify/Expand by 6.
Copy and paste a paper of choice.
Selections/Invert
Tap the delete key.
Deselect.

Copy and paste your tubes as a new layer.

Add your embellishments. I used:
Palm Tree: Resize 75%
Surfboard: Resize 60%
Sun 1: Resize 25%
Flower Bunch 3: Resize 80%
Beach Ball 1: Resize 25%
Beach Chair: Resize 45%
Flip Flop 1: Resize 20 & 80%
Starfish: Resize 10%
Shell bundle - seashells of your choice: Resize 20%

Highlight your white canvas.
New Raster Layer.
Select All.
Copy and paste a paper of choice Into Selection.
Deselect.
Apply the Mask.
Merge Group.

Repeat the above step using a different paper.

Move one mask up and to the left a little.
Move the other down and to the right a little.

Add your copyrights.

Add your name.
Give it an inner bevel:


Duplicate your name twice for a total of 3.
Rename Name 1, 2, and 3.
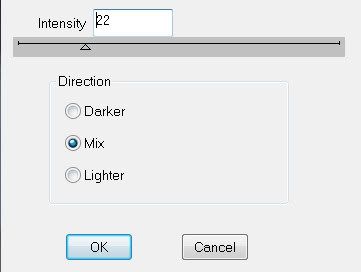
Highlight Name 1 and apply DSB flux - Bright Noise


Highlight Name 2 and apply the same Bright Noise accept hit the mix button twice.

Repeat for Name 3 accept hit the Mix button 3 times.

Close out Name 2 & Name 3.

Time to animate:
Copy Merge and carry into Animation Shop.
Edit/Paste/As New Animation.
Go back into PSP.

Close out Name 1 and open Name 2.
Copy Merge and carry into AS.
Edit/Paste/After Current Frame.
Go back into PSP.

Close out Name 2 and open Name 3.
Copy Merge and carry into AS.
Edit/Paste/After Current Frame.

View your animation.
If you’re happy with it then save.

I hope you enjoyed this tutorial.
I’d love to see your results and show it off in my Show Arena.
Email me!
Hugs,
Bev