Supplies
1 tube and image of choice – I’m using the beautiful artwork of Mitzi
Sato-Wiuff which can be purchased from PSP Tube Stop. You must have a license to use.
My template 143 here
Plug Ins used:
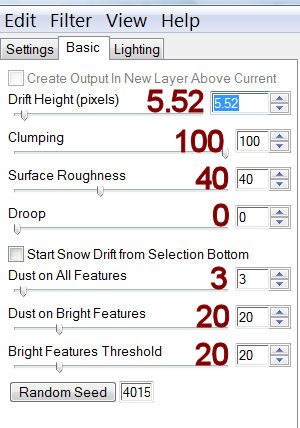
Tramages – Tow the Line
DSB Flux – Bright Noise
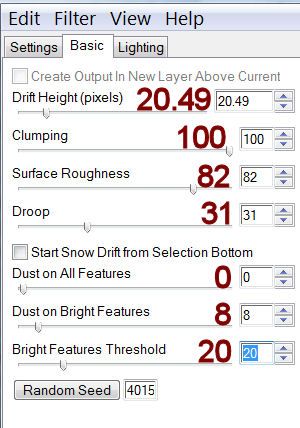
Mura’s Meister – Cloud
This tutorial was written assuming you have a working knowledge of PSP.
~♥~ Let’s get started ~♥~
Open up the template.
Shift + D.
Close out the original.
Image/Canvas Size
700 x 700
OK
Highlight the background layer.
Flood fill white.
Highlight Glitter Circle 1 layer.
Click anywhere outside of it with your Magic Wand.
Selections/Invert
New Raster layer.
Flood fill with #925c7d
Apply DSB Flux – Bright Noise:
Intensity: 20
Mix checked
OK
Deselect.
Delete the template layer.
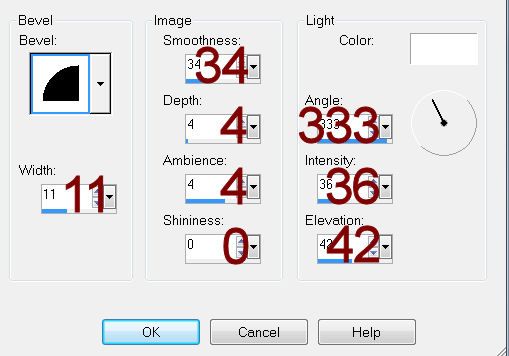
Give it a slight Inner Bevel:
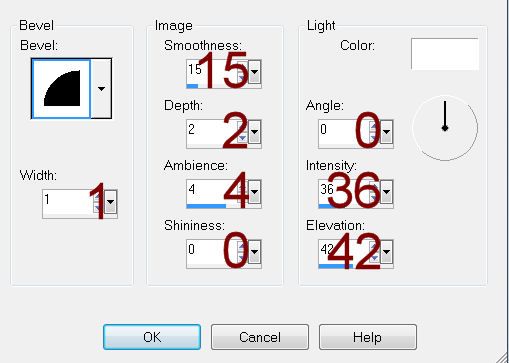
Repeat the above step with:
Glitter Rectangle
Top Glitter Square
Bottom Glitter Square
Highlight Circle 1 layer.
Click on it with your Magic Wand.
New Raster layer.
Copy and paste the image layer (labeled “Original”) Into Selection.
Duplicate
Adjust/Blur/Gaussian Blur:
Radius: 5
OK
Apply Tramages – Tow the Line:
Use Default settings.
OK
Deselect.
Delete the template layer.
Color Pallet:
Foreground: #a19f3e
Background: #f1d381
Highlight Rectangle 1 layer.
Click on it with your Magic Wand.
New Raster layer.
Apply Mura’s Meister – Cloud:
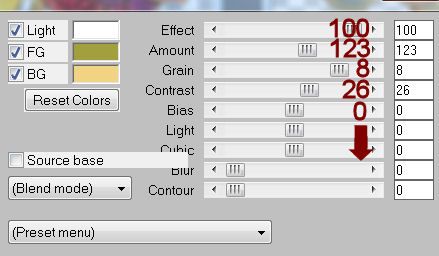
Effects/Texture Effect/Mosaic Antique:
Use Default Settings.
Give it the same slight Inner Bevel.
Deselect.
Delete the template layer.
Highlight Rectangle 2 layer.
Click on it with your Magic Wand.
New Raster layer.
Copy and paste the image layer (labeled “Original”) Into Selection.
Deselect.
Duplicate/Mirror – we’ll come back to this shortly.
In your layers pallet:
Merge Visible the top and bottom Glitter square layers – they’re the
little squares you turned purple and added noise to.
Merge Visible the top and bottom Square template layers – be sure these
are above the merged glitter square layer.
Click anywhere outside of the merged squares template layer.
Highlight the duplicated image layer and move this above the merged
square template layer.
Tap the delete key.
Duplicate
Adjust/Blur/Gaussian Blur:
Radius: 15
OK
Copy and paste your tube as a new layer and position it over the
blurred layer.
Tap the delete key.
Deselect.
Change the Properties of the tube layer to Soft Light.
Delete the merged template layer.
Copy and paste your tube again as a new layer. Keep it at the top of your layers pallet.
Highlight Rectangle 2 template layer.
Click anywhere outside of it with your Magic Wand.
Use your Eraser Tool to erase the bottom area of the tube that
overhangs the rectangle.
Deselect.
Delete the template layer.
Add the elements that came with this tube:
The cluster layer resize 70%
The berries layer resize 60%.
Paste the berries again: Resize
40%/mirror
Color Pallet:
Foreground: #000000
Background: Nullss
Make your Ellipse Tool active set on Circle.
Create a circle that’s slightly larger than the glitter circle – it’s
ok if the circle is slightly too larger or too small.
Objects/Align/Center in Canvas
Now you can resize the circle so that it’s only slightly larger than
the glitter circle.
Color Pallet:
Foreground: #8d5211
Background: #ec6321
Using the Epifania font, move your mouse along the center of the top of
the circle. When you see a rocking A
click your mouse. A text box will
appear. In it type:
October’s poplars are flaming torching lighting
the way to winter.
Type it 2 times to make it around the circle.
Tip: Type the entire
sentence. Did you find the font isn’t
the correct size? Highlight the entire
line.
Right click
Cut
Change the font size
Highlight the text box.
Ctl + V
Your sentence will appear again.
Ctl + V again.
Your sentence will appear again.
If it looks good on your tag click Apply.
I hope that tip helped.
In your layers pallet click the + sign.
Click on the eye of the New Ellipse layer to close it out.
Highlight Vector 1 layer.
Right Click.
Convert to Raster layer.
Highlight your white background.
New Raster layer.
Select All
Copy and paste the image layer Into Selection.
Deselect.
Adjust/Blur/Gaussian Blur:
Radius: 20
OK
Apply the Mask.
Resize 115%
Merge Group
Add your credits.
Add your name.
Foreground: #a19f3e
Background: #97272f
Stroke: 1
Type your name.
Give it a slight Inner Bevel:
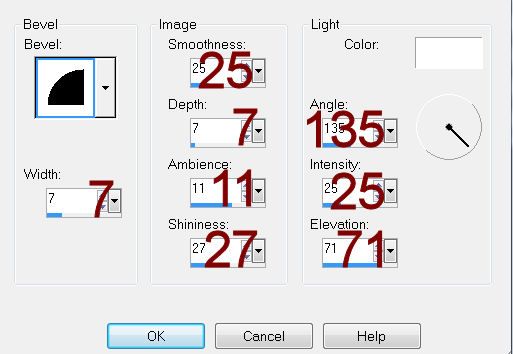
Resize all layers 80%.


