Supplies
3 tubes of choice - I used the artwork of PinUpToons and can now be purchased from CDO
Font of Choice - I used CSDesign/Fabrica de ideas here
Becky Mask 9 here
DSB Flux - Bright Noise
Xerox - Porcelain
Animation Shop
My supplies here - Tutorial writers please email for permission to take my supplies and use them in your own tutorials. Thank you.
“Gothic Valentine” is a PTU tagger size scrap kit created by Rieka_Rafita and can be purchased from Heartbeatz Creationz. You can visit her blog here.
Thank you Rieka for a terrific gothic Valentine kit!
This tutorial was written assuming you have a working knowledge of PSP.
~♥~ Let’s get started ~♥~
Open up a 700 x 700 blank canvas.
Flood fill white.
Copy and paste Frame 3 as a new layer.
Resize 40%
Duplicate
Duplicate/Mirror
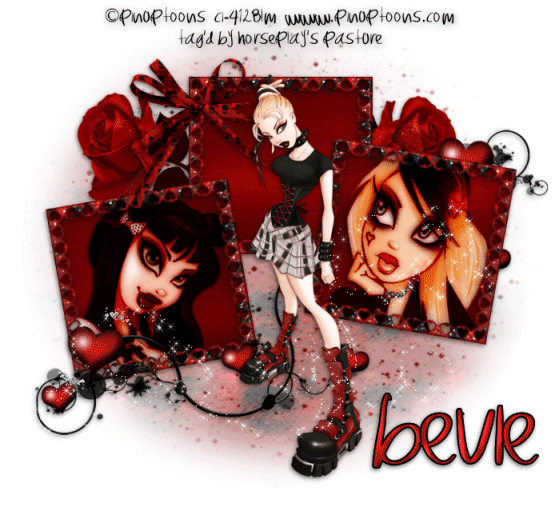
Move all 3 frames into position - see my tag for reference.
Highlight the top frame.
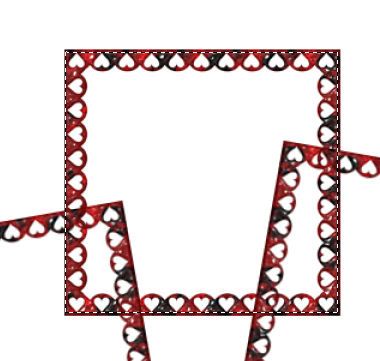
Use your Freehand Selection Tool and outline the frame - I zoomed right in on the frame for a better view.
Copy and paste Paper 3 as a new layer below the frame. Move into the position where you want.
Selections/Invert
Tap the delete key.
Deselect.
Highlight the left frame.
Repeat the above step accept also copy and paste your tube below the frame.
Tap the delete key.
Deselect.
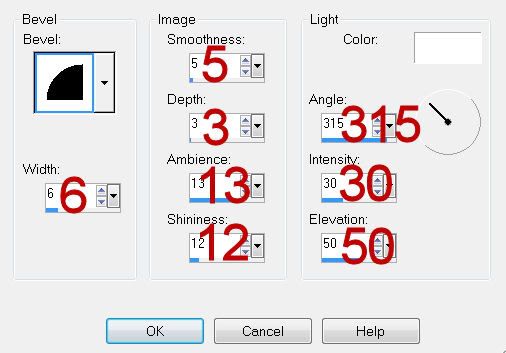
Apply Xerox - Porcelain effect:
Use Default Settings accept move the Blue Channel button all the way to zero.
Change the Properties to Hard Light.
Highlight the right frame.
Repeat the above step.
Add your embellishments. I used:
Bow 1: Resize 50%
Flower 3: Resize 50%/Free rotate right 55 degrees/Duplicate/Mirror
Steampunk Heart 3: Resize 80%/Duplicate and move behind the right frame - erase what sticks out of the frame that you don’t want.
Sparkle 3
Highlight your white background.
New Raster layer.
Copy and paste Paper 14 Into Selection.
Deselect.
Apply the Mask.
Use your Pick Tool to pull the sides out just a little.
Merge Group.
Add your credits.
Add your name.
In your color pallet:
Foreground: Black
Background: #c21a1d
Stroke: 2
Type out your name.
Convert to Raster layer.
Select All/Float/Defloat
Selections/Modify/Contract by 2
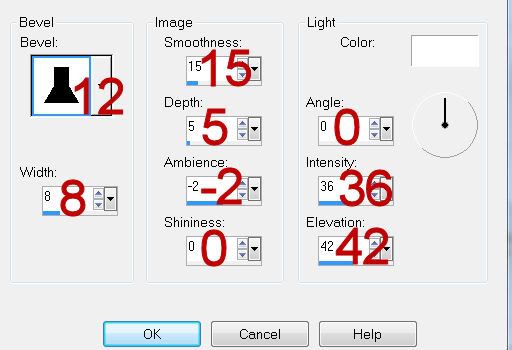
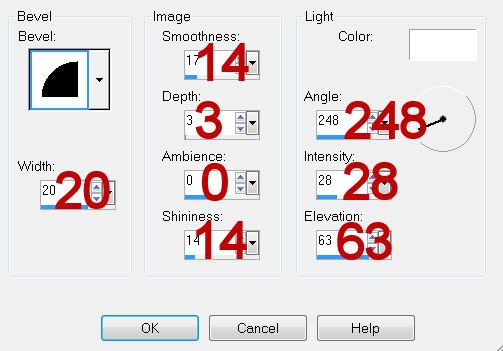
Give it a slight Inner Bevel:
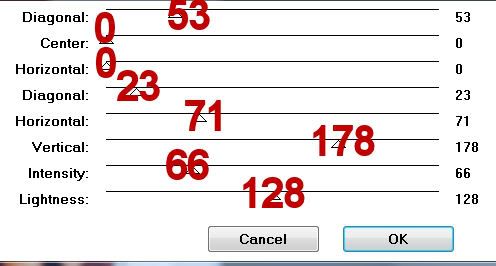
Apply Greg’s Factory Output Vol. II - Pool Shadow:
Deselect.
Time to get the tag ready for animation…
Merge Visible the rose layers.
Duplicate twice for a total of 3 rose layers.
Rename them Rose 1, 2, and 3.
Highlight Rose 1 layer.
Using your Freehand Selection Tool, section out areas of the rose you’d like to see glitter.
Apply DSB Flux - Bright Noise:
Intensity: 24
Mix checked
OK
Highlight Rose 2 layer.
Apply the same effect accept hit the mix button twice.
Highlight Rose 3 layer.
Apply the same effect accept hit the mix button 3 times.
Deselect.
Close out Rose layers 2 and 3.
Keep Rose layer 1 open.
Edit/Copy Merge.
~Time to Animate~
Open up Animation Shop.
Edit/Paste/As New Animation.
Back into PSP.
Close out Rose 1 layer.
Open up Rose 2 layer.
Edit/Copy Merge
Carry into AS.
Edit/Paste/After Current Frame.
Back in PSP.
Close out Rose 2 layer.
Open up Rose 3 layer.
Edit/Copy Merge
Carry Into AS.
Edit/Paste/After Current Frame
You should now have 3 frames.
Ctrl + A to highlight all frames.
Edit/Copy
Highlight the last frame.
Edit/Paste/After Current Frame.
Highlight the last frame.
Edit/Paste/After Current Frame.
Repeat the above step until you have 21 frames.
Highlight Frame 19.
Edit/Copy
Highlight Frame 21.
Edit/Paste/After Current Frame.
You should now have 22 frames.
Open up the Glitter Heart that I supplied.
Ctrl + A to highlight all frames.
Make your tag frames active.
Ctrl + A to highlight all frames.
Ctrl + E
Move your mouse to place your glitter heart. Right click the mouse to set the heart.
View your animation.
If you’re happy then resize:
Animation/Resize Animation
Percentage of Original checked
Width x Height: 80%
OK
I hope you enjoyed this tutorial.
I’d love to see your results and show it off in my gallery.
Email me!
Hugs,
Bev