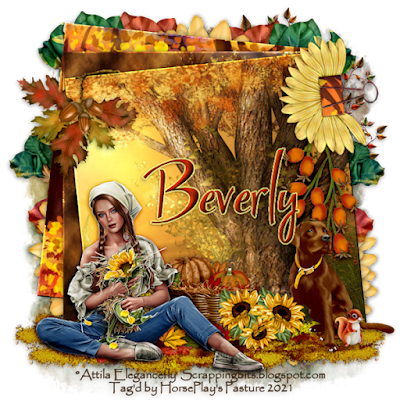
Saturday, November 27, 2021

Autumn Colors


Supplies Needed 

1 tube of choice – the tube in this tutorial is included with the kit

Font of choice – I used Al Sandra here 

Dangerously Delicious Dezines template 171 Autumnrifically Happy here 

Weescotlass Mask 19 here

Plug Ins used:
Brush Strokes:  Angled Strokes, Sprayed Strokes, and Crosshatch
DSB Flux – Bright Noise
Xero - Porcelain

“Autumn Banquet” is a PTU Tagger Size scrap kit created by Julie of Bits ‘n Bobs and can be purchased from Mystical Scraps here

This tutorial was written assuming you have a working knowledge of PSP. 

~~ Let’s get started ~~ 

Open up the template.
Shift + D
Close out the original.
Delete the top 8 layers, Leaves Overlay, and Leaves Colorable
Highlight Raster 2
Image/Canvas Size:
700 x 700
Flood fill #ffffff 

Highlight Bottom Orange Square.
Click on it with your Magic Wand.
New Raster layer.
Copy and paste Paper 12 Into Selection.
Duplicate
Click the lock icon at the top of your layers pallet to lock this layer.
Effects/Texture Effects/ Mosaic Glass:

OK
Click the lock icon at the top of the layers pallet to Unlock the layer.
Merge Down – both paper layers should be one layer now.
Deselect.
Apply Brush Strokes – Cross Hatch:
Stroke length: 32
Sharpness: 6
Strength: 1
OK
Click the lock icon at the top of the layers pallet to Unlock the layer.
Copy.
Delete the template layer.

Highlight Bottom Yellow Square layer.
Click on it with your Magic Wand.
New Raster layer.
Paste Into Selection.  You should now have the yellow paper pasted.
Deselect.
Delete the template layer.

Highlight Pink Rectangle layer.
Click on it with your Magic Wand.
New Raster layer.
Copy and paste Paper 2 Into Selection.
Deselect.
Apply Brush Strokes – Crosshatch:
Use same settings.
OK
Delete the template layer.

Highlight Red Circle:
Click on it with your Magic Wand.
New Raster layer.
Copy and paste Paper 7 Into Selection.
Apply Brush Strokes - Angle Strokes 2x’s:
Direction Balance: 20
Stroke Length: 15
Sharpness: 3
OK
Apply Brush Strokes – Crosshatch:
Use same settings as before
Deselect.
Delete the template layer. 

Highlight White Strips:
Click on each one with your Magic Wand.
New Raster layer.
Open up Paper 17 and click on the Rotate Left button:

Copy
Close the paper out – when the prompt asks if you want to save choose NO.
Make your working image active.
Paste Into Selection.
Deselect.
Apply Brush Strokes – Sprayed Strokes:
Stroke Length: 12
Spray Radius: 7
Stroke Direction: Right diag
OK
Delete the template. 

Highlight Top Orange Square:
Click on it with your Magic Wand.
Open up Paper 4.
Mirror it.
Copy and Paste as a New Layer onto your working canvas.  Move the paper into a position you like.
Right click on it in your layers pallet and choose “Promote Section to Layer” from the sub menu.
Deselect.

Move the original paper layer just above Yop Yellow Square template layer.
Click on each template square with your Magic Wand.
Move the paper into a position you like.
Right click on the paper in your layers pallet and choose “Promote Section to Layer” from the sub menu.
Deselect.
Delete the original paper layer.

Copy and paste your tube as a new layer.  If you’re using the same tube as I did, resize 25%.
Move into position in front of the left large square. 
Paste your tube again as a new layer.
Resize 40% (if using the same tube as I did)
Apply Xero – Porcelain to the tube:
Use Default settings accept move the blue channel to 0.
OK
Move the tube into a position you like over the smaller yellow squares.

Highlight Yop Yellow Squares template layer and click on each square with your Magic Wand.
Highlight the tube layer in your layers pallet, Right click on it and choose “Promote Section to Layer” from the submenu. 
Delete the original tube layer.
Delete the template layer.
Deselect.
Lower the Opacity of the tube to about 58.  Change the Blend Mode to Multiply.
Duplicate and change the Opacity of this tube layer to 100.  Change the Blend Mode to Soft Light.

Highlight Top Small Dotted Squares layer.
Select All/Float/Defloat.
New Raster layer.
Copy and paste Paper 13 Into Selection.
Duplicate
Merge Down.
Deselect.
Delete the template layer.

Highlight Top Large Dotted Square layer.
Repeat the above steps.

Add your elements.  See my tag for placement.  I used:
El 85:  Resize 70% and 80%
48:  Duplicate 3x’s and position behind the large circle
El 6:  Flip Vertical/Resize 50%/Duplicate
El 39:  Resize 50%
El 102:  Resize 30%
El 31:  Resize 10%/Duplicate/Resize 80%/Duplicate/Resize 80%/Duplicate each flower 2xs
El 42:  Resize 70%
El 74:  Resize 70%
El 97:  80%
El 84:  Resize 80%
El 71:  Resize 15% 

Highlight the white background layer.
New Raster layer.
Select All.
Copy and paste Paper 7 Into Selection.
Deselect.
Apply the mask.
Resize 135%
Merge Group
Duplicate and Change the Blend Mode to Darken

Add your copyrights.
If you’re using the tube from the kit, you can find the copyright in the tube folder.

Add your name.
Color Pallet:
Foreground:  #900000
Background: #bf0002
Set the stroke to 0.5
Type your name.
 Convert to Raster Layer.
Give it a slight Inner Bevel 2x’s:

Apply DSB Flux – Bright Noise:
Intensity: 25
Mix checked
OK

I hope you enjoyed this tutorial.   
I’d love to see your results.
Email me!
Hugs,
Bev


Tuesday, November 23, 2021

Autumn Banquet


Supplies Needed 

1 tube of choice – the tube in this tutorial is included with the kit

Font of choice – I used starmiX here

Becky Mask 22 here 

Plug Ins used:
Eyecandy 3.1 - Glow

“Autumn Banquet” is digital scrap kit available in Full size & Tagger size, created by Julie of Bits ‘n Bobs and can be purchased from Mystical Scraps here

This tutorial was written assuming you have a working knowledge of PSP. 

~~ Let’s get started ~~

Open up a 700 x 700 blank canvas.
Flood fill white.

Copy and paste Paper 5 as a new layer.
Resize 60%
Free rotate Right 84 degrees.
Give it a slight Inner Bevel:


Copy and paste Paper 2 as a new layer.
Resize 60%.
Give it the same slight Inner Bevel. 

Copy and paste Paper 4 as a new layer.
Resize 60%.
Free rotate Right Left 6 degrees.
Give it the same slight Inner Bevel.

Join papers at the top right corner making sure they’re all pretty much centered on the canvas.

Copy and paste the tube as a new layer.
Resize 20%
Move into position – see my tag for reference. 

Add your elements.  I used:
El 73:  Resize 35%
El 76:  Resize 35%
El 80:  Resize 15%
El 98:  Resize 35%/Free Rotate Right 84 degrees
El 35:  Resize 35%/Vertical Flip
El 6:  Resize 40%
El 42:  Resize 70%
El 47:  Resize 75%/Duplicate/Mirror
El 24:  Resize 40%
El 46:  Duplicate/Mirror
El 49:  Duplicate 2x’s and position one at the top, and on each side near the bottom

Highlight the white background layer.
New Raster layer.
Select All.
Copy and paste Paper 7 Into Selection.
Deselect.
Apply the mask.
Merge Group.

Duplicate the merged mask layer. 

Add your copyrights.
If you’re using the tube from the kit you can find the copyright in the tube folder.

Add your name.
Color Pallet:
Foreground:  #430a00
Background: #a23638
Set the stroke to 0.5
Type your name.
 Convert to Raster Layer.
Give it a slight Inner Bevel 2x’s:


Apply Eyecandy 3.1 – Glow:
Width: 3
Opacity 100
Opacity Dropoff: Fat
Color: #fefd8f
OK

I hope you enjoyed this tutorial.   
I’d love to see your results.
Email me!
Hugs,
Bev


Sunday, November 21, 2021

Cozy


Supplies Needed

1 tube of choice – I used the wonderful artwork of Marta Sarmiento which can be purchased from  Digital Art Heaven
 here.

 Font of choice – I used Shimes One here

 Rene Mask 586 here

 My template 142 here

 Plug Ins used:

Brushed Strokes: Sprayed Strokes

DSB Flux – Bright Noise
Eyecandy 5 – Nature: Snow Drift

Animation Shop

Download Snow here

Snaggles can be downloaded here

“Twilight Frost Fairy” is a PTU Tagger Size scrap kit created by Moonshine Dezinez and can be purchased from Digital Art Heaven here

This tutorial was written assuming you have a working knowledge of PSP. 

 ~~ Let’s get started ~~

 Open my template.
Delete Credit Layer, Stars, and Strip

 Highlight Rec 1 Layer.

Click on it with your Magic Wand.
Open up the tube and Copy and paste Full Tube layer from the tube as a new layer.
Move into position over the template layer, making sure the corners of the template are covered as well.
In your layers pallet right click on the tube and choose “Promote Section to Layer”.
Deselect.
In your layers pallet move the original tube layer over Rec 2 layer.

Highlight Rec 2 layer.
Click on it with your Magic Wand.
Highlight the original tube layer, and like before, “Promote Section to Layer”
Deselect.
Delete the original tube layer and Template layers.

To Each tube layer apply Brush Stokes – Sprayed Strokes:
Stroke Length: 12
Spray Radius: 7
Stroke Direction: Right Diag
OK

Highlight Rec 1 Dotted Corner layer.
Make your Color Changer Tool active.
In your color pallet:
 Foreground - #808080
Background - #58130d
Zoom in and right click on the template.
It should have changed to a rich brown color.

 Repeat the above step with Rect 2 Dotted Corner layer.

Highlight Glitter Oval layer.
Click anywhere outside of it with your Magic Wand.
Selections/Invert
New Rater layer.
Flood fill with your background color.
Apply DSB Flux – Bright Noise:
Intensity: 38
Mix checked
OK 

Highlight Oval layer.
Click on it with your Magic Wand.
New Raster layer.
Copy and paste Paper 9 Into Selection.
We’re going to create the scene within the oval -
Copy and paste Element 2 as a new layer.
Resize 60% and duplicate the element 2x’s.
Move them into position at the bottom of the oval in a way that you like – see my tag for reference.
Once you’ve done that, to each element layer Right click on it in your layers pallet and choose “Promote Section to Layer”.
Delete all 3 original element layers.
Deselect for now.

Copy and paste the following elements within the oval – see my tag for reference:
Don’t worry about anything overhanging the sides of the oval.  We’ll clean it up in a bit.
El:  14:  Resize 70%/Duplicate/Mirror
El 14 again: Resize 70% and 35%/Duplicate/Mirror/Resize 70% and change the Blend Mode to Overlay
El 23:  Resize 10%/Duplicate/Mirror
El 21:  Resize 25% and erase a bit of the hooves so it appears to be standing in snow
El 41:  Resize 55%

Apply Eyecandy 5: Nature – Snow Drift to the Lantern element.
Settings tab:
Choose Small, First Flakes.
Basic Tab:


OK

Once you have all the elements in exact position –
Highlight the Oval template layer.
Click anywhere outside of it with your Magic Wand.
Each element that overhangs, highlight it in your layers pallet and tap the delete key.
Deselect.

DO NOT delete the template layer.

Highlight the very top layer in your layers pallet.
Open up the snow.
Highlight Frame 10 layer.
Copy.
Make your working canvas active.
Paste as a new layer and name it S10
Make your snow layers active again.
Highlight Frame 9 layer.
Copy.
Make your working canvas active.
Paste as a new layer and name it S9.

Repeat the above steps until all snow layers are copied onto your working canvas and layers renamed accordingly.

Once you have all snow layers pasted onto your working canvas, highlight Oval template layer and click anywhere outside of it with your Magic Wand.
Highlight each snow layer and tap the delete key.
Close out all snow layers except for S1, keep that one open.
You can delete the template layer now.

Copy and paste your tube as a new layer – see my tag for reference.

Add the rest of the elements to your tag.  I used:
El 45:  Resize 20%
El 30:  Resize 30%

Highlight the white background layer.
New Raster layer.
Select All.
Copy and paste Paper 5 Into Selection.
Deselect.
Apply the mask.
Merge Group.

New Raster layer above the mask layer.
Select All.
Copy and paste Paper 3 Into Selection.
Deselect.
Apply the mask.
Merge Group.
Change the Blend Mode to Saturation.

Add your copyrights 

Add your name.
Color Pallet:
Foreground: #070300
 Background: #5b3515
Set the stroke to .50

Type your name.
Convert to Raster Layer.
Give it a slight Inner Bevel 2x’s:


Select All/Float/Defloat
Selections/Modify/Expand by 3.
New Raster layer below your name.
Flood fill with #f6f8f9
Adjust/Add Remove Noise/Add Noise:
Uniform checked
Noise: 30%
OK

Merge Visible both name layers.

 ~Time to Animate~

Be sure S1 layer is the only snow layer open.

Copy Merge
Carry into AS.
Edit/Paste as new Animation.

Back in PSP.
Close out S1.
Open S2.
Copy Merge.
Carry into AS
Edit/Paste/After Current Frame.

Back in PSP.
Close out S2.
Open S3.
Copy Merge.
Carry into AS
Edit/Paste/After Current Frame.

Back in PSP.
Close out S3.
Open S4.
Copy Merge.
Carry into AS
Edit/Paste/After Current Frame.

Back in PSP.
Close out S4.
Open S5.
Copy Merge.
Carry into AS
Edit/Paste/After Current Frame.

Back in PSP.
Close out S5.
Open S6.
Copy Merge.
Carry into AS
Edit/Paste/After Current Frame.

Back in PSP.
Close out S6.
Open S7.
Copy Merge.
Carry into AS
Edit/Paste/After Current Frame.

Back in PSP.
Close out S7.
Open S8.
Copy Merge.
Carry into AS
Edit/Paste/After Current Frame.

Back in PSP.
Close out S8.
Open S9.
Copy Merge.
Carry into AS
Edit/Paste/After Current Frame.

Back in PSP.
Close out S9.
Open S10.
Copy Merge.
Carry into AS
Edit/Paste/After Current Frame.

View your animation.
If you’re happy then save by clicking Save and following each prompt.

I hope you enjoyed this tutorial.   
I’d love to see your results.
Email me!
Hugs,
Bev