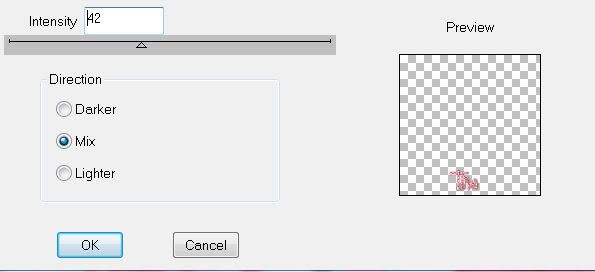
Clicking on the image will enlarge to full view.
Supplies
1 tube of choice - I’m using the wonderful artwork of Keith Garvey which you can purchase
here.Font of Choice - I used Al Sandra
here, Aquarelle
here, and Impact
hereArtmama Mask 6
here“Love Me” is a FTU tagger size scrap kit created by
Wacky Winnie Designz which you can download from her blog
here.Please leave a thank when downloading as it’s a small gesture for hard work given freely.
This tutorial was written assuming you have a working knowledge of PSP.
~♥~ Let’s get started ~♥~
Open up a 700 X 700 blank canvas.
Flood fill white.
Copy and paste Frame 2 as a new layer.
Resize 50%.
Free rotate left 25 degrees.
Use your Magic Wand and click inside the frame.
Selections/Modify/Expand by 6.
New Raster layer below the frame.
Copy and paste a paper of choice Into Selection.
Deselect.
Using the Aquarelle font, type out the words “Happy Valentine’s Day”, each word being on a layer of it’s own.
Free rotate each layer 25 degrees left and position them within the center of the heart frame.
Merge Visible the frame, paper, and words.
Copy and paste Frame 1 as a new layer.
Resize 40%
Free rotate right 10 degrees.
Use your Magic Wand and click inside the frame.
Selections/Modify/Expand by 6.
New Raster layer below the frame.
Copy and paste a paper of choice Into Selection.
Deselect.
Again, using the Aquarelle font this time type out the words “I love you”, each word being on a layer of it’s own.
Free rotate each word layer right 10 degrees.
Position them within the center of the heart frame.
Copy and paste Envelope 1 as a new layer.
Resize 25% and 80%
Mirror/Free rotate right 25 degrees.
Move into position so that it looks tucked into the frame.
Copy and paste Envelope 2 as a new layer.
Resize 25% and 70%
Free rotate right 35 degrees.
Tuck this also into frame like the other.
See my tag for reference.
Merge Visible the Heart, paper, words, and envelopes.
Move both merged hearts into position.
See my tag for reference.
Copy and paste Gerber 2 as a new layer.
Resize 85% and position behind the heart on the left side of your canvas.
Paste Gerber 2 again.
Resize 70% and position behind the hearts in the center.
Paste Gerber 2 once again.
Resize 25%/Mirror/Free rotate right 25 degrees.
Copy and paste Calla Lillie’s 2 as a new layer.
Resize 65%.
Position in the center behind the smaller heart.
Copy and paste Tag 1 as a new layer.
Resize 30%
Position it so that it looks to be hung from the smaller heart.
Use whatever font you like and type out "XOXO"
Free rotate them 90 degrees and position over the tag.
Copy and paste your tube as a new layer.
Highlight your white background.
New Raster layer.
Select All.
Copy and paste a paper of choice Into Selection.
Deselect.
Apply the mask.
Merge Group.
Add your copyrights.
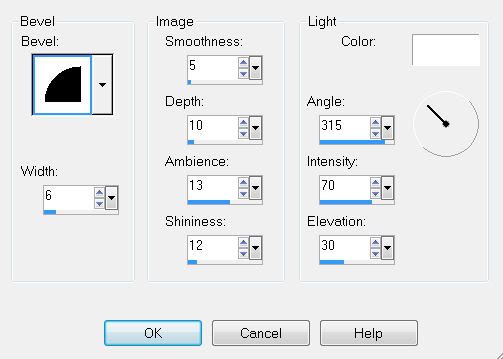
Using the Impact font, type out the word “LOVE“.
Give it a slight inner bevel:
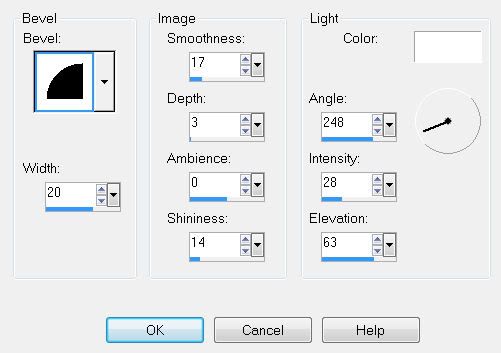
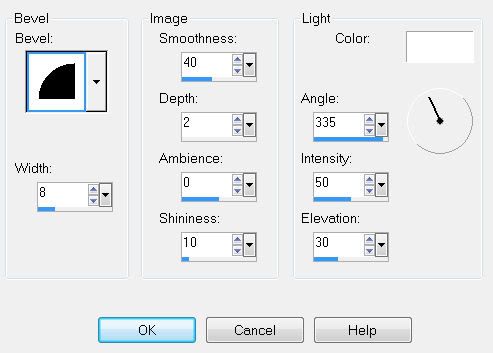
Add your name using the font Al Sandra and position it over the word love.
Give it the same slight inner bevel.
Crop your image slightly.
Resizes all layers 80%.
I hope you enjoyed this tutorial.
I’d love to see your results and show it off in my Show Arena.
Hugs,
Bev

 Clicking on the image will enlarge to full view.