Saturday, April 20, 2013

Ocean Waves


Supplies Needed

Font of choice – I used Clive Barker here

Becky Mask 22 here

“Ocean Waves” is a tagger size scrap kit also available in Page Kit created by Soxie of Soxational Scraps and can be purchased from ExquisiteScraps.  You can visit her blog here. Thank you Soxie for a truly wonderful kit.  I just fell in love with it.
  
This tutorial was written assuming you have working knowledge of PSP. 

~~ Let’s get started ~~

Open up a 700 x 700 blank canvas.
Flood fill white.

Don’t worry about placement of anything. 
I’ll let you know when it’s time to move into place.

New Raster layer.
Make your Selection Tool active set on Rectangle.
Create a rectangle approximately 475 x 325 pixels.
Copy and paste Paper 7 Into Selection.
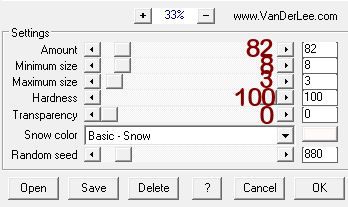
Adjust/Add Remove Noise/Add Noise:
Gaussian and Monochrome checked
Noise: 35%
OK
Selections/Modify/Contract by 7.
New Raster layer.
Copy and paste Paper 1 Into Selection.
Deselect.

Close out your background layer.
Merge Visible.
Reopen your background layer.

Copy and paste Bouy as a new layer.

Copy and paste Umbrella as a new layer.
Resize 70%

Copy and paste Frame 3 as a new layer.
Resize 55%
Free rotate Left 10 degrees
Duplicate
Mirror

Move all elements into their exact positions –
See my tag for reference.

Highlight the frame on the left.
Click inside of it with your Magic Wand.
Selections/Modify/Expand by 4.
New Raster layer below the frame.
Copy and paste Paper
6 Into Selection.
Deselect.

Highlight the right frame.
Repeat the above step.

Add your elements.  I used:
Bird:  Resize 50%/Mirror
Beach Ball:  Resize 70%
Bucket 2:  Resize 50%/Free rotate Left 10 degrees
Pelican:  Resize 70%
Crab:  Resize 35%
Starfish 1, 2, and 3:  Resize 20%/Use your Pick Tool to turn this way and that
Sand 2: Use your Pick Tool to pull the sides out to reach both sides of the canvas.  Directions to feather the sand will come later in this tutorial.

Highlight your white canvas. 
New Raster Layer. 
Select All. 
Copy and paste Paper 1 Into Selection.
Deselect. 
Apply the mask. 
Merge Group.
Duplicate

Stay on this mask layer.
Click your Magic Wand in the bottom left corner of your canvas.  You should have marching ants all around your mask layer.
Highlight the Sand layer in your layers pallet.
Selections/Modify/Inside Outside Feather:
Feather amount: 20
OK
Tap the delete key a couple of times.
Deselect.

Add your copyrights.

Add your name.

Resize all layers 80%.
   
I’d love to see your results.
Email me!
Hugs,
Bev

Friday, April 19, 2013

Let It Rain

 photo LetitRain_zps5be3de52.gif
Supplies Needed

1 tube of choice.  I'm using the adorable artwork of Lisa Victoria which you can purchase from Up Your Art.  You must have a license to use.

Font of choice - I'm using R Young here

Weescotlass Mask 138 here

Plug Ins used:
Mura’s Meister - Copies
Van Der Lee Snowflake

Animation Shop

“Let it Rain” is a tagger size scrap kit created by Stu of Creative Crazy Scraps and can be purchased from Scraps From the Heart.  Thank you Stu for such a wonderful kit.
  
This tutorial was written assuming you have working knowledge of PSP. 

~~ Let’s get started ~~

Open up a 700 x 700 blank canvas.
Flood fill white.

Copy and paste 16 as a new layer.
Resize 80%
Free Rotate Left 90 degrees.
Click inside each rectangle with your Magic Wand.
Selections/Modify/Expand by 4.
New Raster layer below the frame.
Copy and paste Paper 1 Into Selection.
New Raster layer.
Flood fill with #59b6ec
Change the Properties to Color.
Copy and paste 7 as a new layer below the frame – Move into position – see my tag for reference.
Selections/Invert
Tap the delete key.
Deselect.

Copy and paste your tube as a new layer.
If you’re using the same tube as I did, resize 80% and snug the edges up to the frame – see my tag for reference.
Paste your tube again as a new layer just above the flood fill layer.
Change the Properties to Soft Light and move into position – see my tag for reference.
Highlight the flood fill layer.
Click anywhere outside of it with your Magic Wand.
Highlight the tube layer just above it and tap the delete key.
Deselect.

New Raster layer just below the frame layer – Name this layer Rain 1
Apply Van Der Lee – Snowflakes:
Match your settings to mine – moving the Random Seed button where you like.
 photo snowflakes_zpsfcee1166.jpg
Close the layer out.

New Raster layer – Name it Rain 2.
Repeat the above step accept move the Random Seed Button a little.
Close the layer out.

New Raster layer – Name it Rain 3.
Repeat the above step.

New Raster layer – Name it Rain 4.
Repeat the above step.
Open up Rain 1 layer.

To each Rain layer:
Adjust/Blur/Motion Blur - 
Angle: 28
Strength: 30%
OK

Copy and paste 30 as a new layer.
Resize 5%
Apply Mura’s Meister – Copies:  Encircle.
Use default settings accept change Number to 25.
OK
Make your Target Tool active and change the new circle element you just made to #59b6ec.
Duplicate and change the color to #87a861.
Move both circle elements into position – see my tag for reference.

Add your elements.  I used:
37:  Resize 15%/Duplicate 3x’s
8;  Resize 30%

Highlight your white canvas. 
New Raster Layer. 
Select All. 
Copy and paste Paper 13 Into Selection.
Deselect. 
Apply the mask. 
Merge Group.

Add your copyrights.

Add your name.

Copy Merged.

~Time to Animate~

Open up Animation Shop.
Edit/Paste/As New Animation.

Back in PSP.
Close out Rain 1 layer.
Open up Rain 2 layer.
Copy Merged.

Carry into AS.
Edit/Paste/After Current Frame.

Back in PSP.
Close out Rain 2 layer.
Open up Rain 3 layer.
Copy Merged.

Carry into AS.
Edit/Paste/After Current Frame.

Back in PSP.
Close out Rain 3 layer.
Open up Rain 4 layer.
Copy Merged.

Carry into AS.
Edit/Paste/After Current Frame.

Animation/Frame Properties:
Change the Display time to 15.
OK

Animation/Resize Animation:
Percentage of Original checked
Width & Height: 80
OK

Save if you like the animation.
   
I’d love to see your results.
Email me!
Hugs,
Bev

Sunday, April 14, 2013

Beach Treasures


Supplies

1 tube of choice - I used the fantastic artwork of Steve Baier which now be purchased from Up Your Art.  You must have a license to use.

Font of choice - I used Recorda Script here

Divine Intentionz Template 447 here

 Becky Mask 22 here

“Beach Treasures ” is a tagger size scrap kit created by Noelle of Lady Noelle Buttons & Bows Scraps and can be purchased from ScrapsFrom the Heart.  You can visit her blog here.  Thank you Noelle for such a beautiful kit!

This tutorial was written assuming you have a working knowledge of PSP.

~♥~ Let’s get started ~♥~

Open up the template.
Shift + D.
Close out the original.
Delete the top 5 layers, Copy of Small Thin Rectangle, Small Thin Rectangle, Copy of Frame, Frame, Thin Rectangle 2, Thin Rectangle 1
Open up the background layer.

Open up Bottle Cap 01 element.
Mirror
Copy

Make your working canvas active.
Highlight Circle 1 layer.
Click on it with your Magic Wand.
New Raster layer.
Copy and paste the element Into Selection.
Deselect.
Delete the template layer.

Highlight Circle 2 layer.
Click on it with your Magic Wand.
New Raster layer.
Copy and paste Bottle Cap 2 Into Selection.
Deselect.
Delete the template layer.

Highlight Rounded Edge Rectangle layer.
Click on it with your Magic Wand.
New Raster layer.
Copy and paste Paper 1 Into Selection.
Deselect.
Delete the template layer.
Give it a slight Inner Bevel:
 photo redinnerbevel_zps089a307c.jpg

Highlight Rounded Edge Rectangle 2 layer.
Copy and paste Beach Footprints Picture Boards as a new layer.
Resize 75%
Line the right edge and top of the element up with the template layer.
Make your Pick Tool active and pull the left side in to line up with the left side of the template.
Delete the template layer.

Highlight Rectangle 1 layer.
Click on it with your Magic Wand.
New Raster layer.
Copy and paste Paper 1 Into Selection.
Deselect.
Delete the template layer.
Give it the same slight Inner Bevel.

Highlight Rectangle 2 layer.
Repeat the above step.

Highlight Thin Rectangle 3 layer.
Click on it with your Magic Wand.
New Raster layer.
Copy and paste Ribbon 01 Into Selection.
Deselect.
Delete the template layer.

Highlight Square 1 layer.
Click on it with your Magic Wand.
New Raster layer.
Copy and paste Paper 2 Into Selection.
Deselect.
Delete the template layer.

Highlight Square Frame layer.
Select All/Float/Defloat
New Raster layer.
Copy and paste Paper 4 Into Selection.
Change the Properties to Color
Deselect.
Give a drop shadow to the template layer.

Copy and paste your tube as a new layer.
See my tag for placement.

Add your elements.  I used:
Beach Footprints Picture Boards:  Resize 75%/Mirror/Erase what overhangs down below
Beach Treasures Glass:  Resize 30%/Duplicate/Mirror
Bow Charm Pin 02:  Resize 45%/Duplicate
Journaling Mat 03:  Resize 60%/Free rotate Left 10 degrees/Duplicate
Fern
Bead Strand:  Resize 50%
Bead String:  Resize 50%/Free rotate Right 90 degrees/Duplicate

Highlight your white canvas.
New Raster layer.
Select All.
Copy and paste the kit preview image Into Selection.
Deselect.
Adjust/Blur/Gaussian Blur:
Radius: 10
OK
Apply the mask.
Make your Pick Tool active and pull the sides and top out just a little.
Merge Group.

Add your copyrights.

Add your name:

Resize all layers 80%.

I hope you enjoyed this tutorial.
I’d love to see your results and show it off in my gallery.
Email me!
Hugs,
Bev