Saturday, February 26, 2011

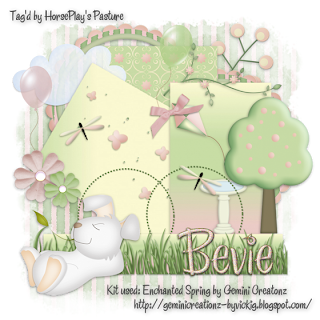
Spring's Arrival


Clicking on the image will allow you to enlarge for bigger view.

Supplies

Font of Choice - I used Chicken Basket
Becky mask 22 here
My Template 78 here
“Enchanted Spring” is a PTU tagger size scrap kit created by Vicki of Gemini Creationz and can be purchased from TKO Scraps. You can visit her blog here.
Thank you Vicki for such super precious spring kit!

This tutorial was written assuming you have a working knowledge of PSP.

~♥~ Let’s get started ~♥~

Open up the template.
Shift + D.
Close out the original.
Delete the following layers:
Credit, Barbed Wire, Rectangle 5, Ring 1, and Ring 2
Highlight the background layer.
Image/Canvas Size
700 x 700
OK
Flood fill white.

Highlight Rectangle 1 layer.
Click on it with your Magic Wand.
Copy and paste Paper 8 as a new layer.
Resize 60%
Move into position.
Selections/Invert
Tap the delete key.
Deselect.
Delete the template layer.

Highlight Rectangle 2 layer.
Click on it with your Magic Wand.
New Raster layer.
Copy and paste Paper 4 Into Selection.
Deselect.
Delete the template layer.

Highlight Rectangle 3 layer.
Click on it with your Magic Wand.
New Raster layer.
Copy and paste Paper 3 Into Selection.
Deselect.
Delete the template layer.

Highlight Double Ring layer.
Select All/Float/Defloat
New Raster layer.
Flood fill with #68854a
Deselect.
Delete the template layer.

Highlight Rectangle 4 layer.
Click on it with your Magic Wand.
New Raster layer.
Copy and paste Paper 3 Into Selection.
Deselect.
Delete the template layer.

Add your embellishments. I used:
Frame 3: Resize 70%/Duplicate
Flower Branch 2: Resize 70%
Flower Branch: Resize 40%
Butterly Scatter: Resize 40%
Bird Bath: Resize 25%
Kite: Resize 30%
Tree: Resize 50%
Cloud: Resize 40%
Bow 5: Resize 25% and 70%
Balloon 3: Resize 40%
Balloon 1: Resize 40%/Free rotate Right 15 degrees
Flower 7: Resize 25%
Flower 8: Resize 25% and 70%
Grass: Resize 70%
Bunny: Resize 50%/Mirror
Dragonfly: Resize 25%/Free Rotate Left 25 degrees/Duplicate/Mirror

Highlight your white canvas.
New Raster layer.
Select All.
Copy and paste Paper 12 Into Selection.
Deselect.
Apply the mask.
Merge Group.

Add your copyrights.

Add your name
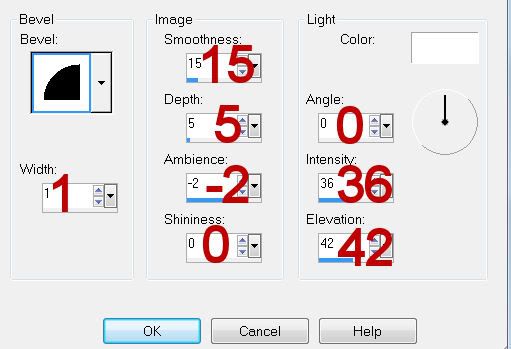
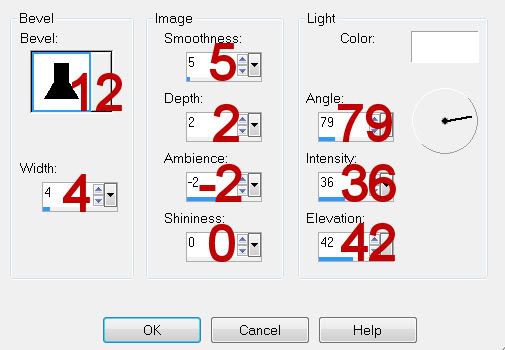
Give it a slight Inner Bevel:
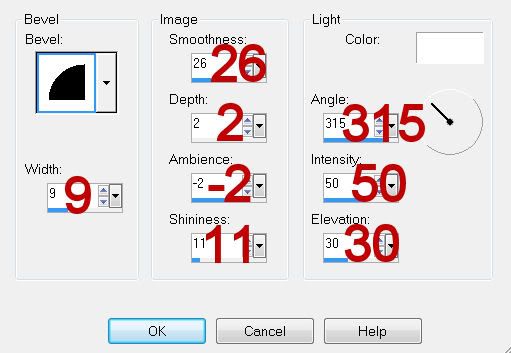

Adjust/Add Remove Noise/Add Noise:
Uniform checked
Noise: 35%
OK

Resize all layers 80%.

I hope you enjoyed this tutorial.
I’d love to see your results and show it off in my gallery.
Email me!
Hugs,
Bev

Friday, February 25, 2011

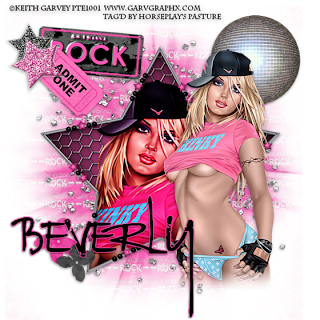
Admit One

Clicking on the image will allow you to enlarge for bigger view.

Supplies

1 tube of choice - I used the artwork of Keith Garvey that can be purchased at PSP Tubes Emporium
Font of Choice - I used Rat Infested Mailbox here
Gem mask 71 here
Eyecandy 3.1 - Glow
“Girls Wanna Rock” is a PTU tagger size scrap kit created by Missy of Scraps with Attitude and can be purchased from her store Scraps with Attitude. You can visit her blog here.
Thank you Missy for such an awesome kit!

This tutorial was written assuming you have a working knowledge of PSP.

~♥~ Let’s get started ~♥~

Open up a 700 x 700 blank canvas.
Flood fill white.

Copy and paste Beaded Star 1 as a new layer.
Resize 70%
Click inside the frame with your Magic Wand.
Selections/Modify/Expand by 2.
New Raster layer below the frame.

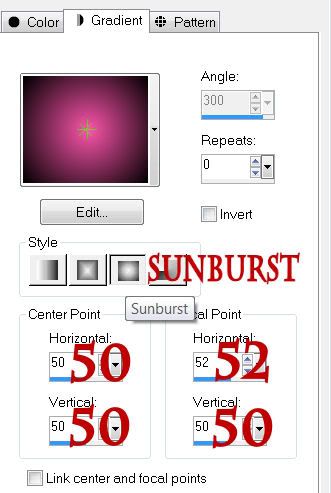
Color Pallet:
Foreground: #fb55ab
Background: #000000


Copy and paste Fencing as a new layer above the gradient.
Selections/Invert
Tap the delete key.
DO NOT DESELECT.

Copy and paste your tube as a new layer above the fencing.
Resize larger as needed.
Tap the delete key.
Deselect.
Change the Properties to Multiply.
Click anywhere outside of the tube with your Magic Wand.
Selections/Invert
Tap the delete key.
Deselect.
Duplicate/Change the Properties to Hard Light.

Paste your tube as a new layer.
Position in front of the star and to the side a little.

Add your embellishments. I used:
Plate 2: Resize 35%/Free rotate Right 5 degrees
Ticket 1: Resize 25% and 80%
Star Brad 1: Resize 25% and 60%
Star Brad 2: Resize 25% and 70%/Free Rotate Left 20 degrees
Disco Ball: Resize 25%
Flower 4: Resize 25% and 605
Flower 3: Resize 25% and 50%/Flip
Glitter: Resize 75%

Highlight your white canvas.
New Raster layer.
Select All.
Copy and paste Paper 1 Into Selection.
Deselect.
Apply the mask.
Merge Group.

Add your copyrights.

Add your name
Apply Eyecandy 3.1 - Glow
Width: 3
Opacity: 100
Opacity Dropoff: 100%
Color: #f854ad
OK

Resize all layers 80%.

I hope you enjoyed this tutorial.
I’d love to see your results and show it off in my gallery.
Email me!
Hugs,
Bev

Thursday, February 24, 2011

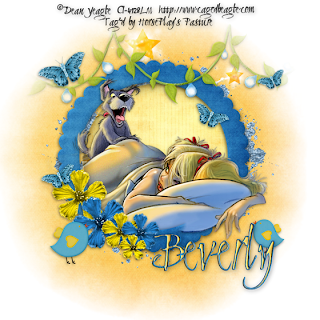
Rise and Shine!


Clicking on the image will allow you to enlarge for bigger view.

Supplies

1 tube of choice - I used the artwork of Dean Yeagle that can now be purchased at CDO
Font of Choice - I used Clive Barker here
Monti Circular mask here
“Bees In a Bonnet” is a PTU tagger size scrap kit created by Joanne of My Scrappy Life and can be purchased from Stargazer Scraps. You can visit her blog here.
Thank you Joanne for such an adorable kit!

This tutorial was written assuming you have a working knowledge of PSP.

~♥~ Let’s get started ~♥~

Open up a 700 x 700 blank canvas.
Flood fill white.

Copy and paste 52 as a new layer.
Resize 70%
Click inside the frame with your Magic Wand.
Selections/Modify/Expand by 6.
New Raster layer below the frame.
Copy and paste Paper 7 Into Selection.
Copy and paste a tube below the frame.
Selection/Invert
Tap the delete key.
Deselect.

Add your embellishments. I used:
12: Resize 40%/Duplicate/Resize 70%
11: Resize 40%/Duplicate/Resize 70%/Duplicate/Resize 70%
7: Resize 50%/Apply Monti Circular Mask/Merge Group
2: Resize 70%
65: Duplicate/Mirror/Flip
42: Resize 25/Duplicate/Mirror/Resize 80%
14: Resize 25%/Free rotate Left 25 degrees/Duplicate and resize as you like

Highlight your white canvas.
New Raster layer.
Select All.
Copy and paste Paper 5 Into Selection.
Deselect.
Apply the mask.
Merge Group.

Add your copyrights.

Add your name
Apply a small Inner Bevel:


Resize all layers 80%.

I hope you enjoyed this tutorial.
I’d love to see your results and show it off in my gallery.
Email me!
Hugs,
Bev

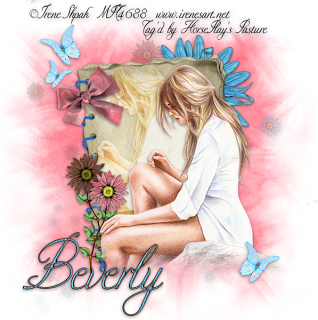
Refined


Clicking on the image will allow you to enlarge for bigger view.

Supplies

1 tube of choice - I used the artwork of Irene Schpak that can be purchased at MPT
Font of Choice - I used Nadine Script Extra here
Weescotlass mask 249 here
“Refined” is a FTU scrap kit created by Jolene of JRM Scrap Kits. With her permission I can supply the kit to you here. With this download it gave me a corrupt file warning after I unzipped. It’s ok though - the entire kit will be wherever you unzipped it.
Thank you so much for your generosity Jolene!

This tutorial was written assuming you have a working knowledge of PSP.

~♥~ Let’s get started ~♥~

Open up a 700 x 700 blank canvas.
Flood fill white.

Copy and paste Bound Papers as a new layer.
Free rotate Left 10 degrees.

Copy and paste your tube as a new layer.
Position it slightly to the right of the bound papers.
Duplicate/Move up and to the left just a little.
In your layers pallet, move the duplicate below the original tube layer.
Highlight the Bound Papers layer.
Click anywhere outside of it with your Magic Wand.
Highlight the duplicated tube layer.
Tap the delete key.
Selections/Modify/Inside Outside Feather:
Both checked
Feather Amount: 43
OK
Tap the delete key until you have a nice feathered effect.
Deselect.
Change the Properties to Soft Light.
Duplicate.

Add your embellishments. I used:
Bow 1: Resize 35%/Free rotate Left 10 degrees
Flower Stem 1: Resize 35%
Flower Stem 3: Resize 25%/Mirror
Flower Stem 2: Place behind the bound papers and erase the stem that sticks out at the bottom.
Butterfly: Resize 40%/Erase the dotted lines if you like/Duplicate/Mirror/Duplicate/Resize 70%
Flowers 2 & 3: Resize 25% and 70%/Duplicate as many times as you like and splash them around in the background. Lower the Opacity if you choose.

Highlight your white canvas.
New Raster layer.
Select All.
Copy and paste Paper 1 Into Selection.
Deselect.
Apply the mask.
Merge Group.

Crop your image.

Add your credits.

Add your name:
Give it a slight Inner Bevel:


I hope you enjoyed this tutorial.
I’d love to see your results and show it off in my gallery.
Email me!
Hugs,
Bev

Wednesday, February 23, 2011

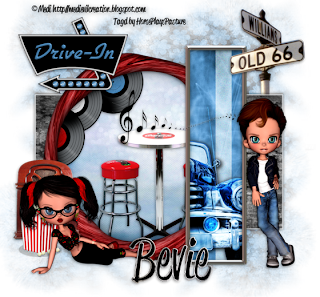
Route 66


Clicking on the image will allow you to enlarge for bigger view.

Supplies

Font of Choice - I used Reklame Demo here. Add the free version to your cart and check out.
Gem mask 54 here
Creative Misfits Template here. Scroll down the blog and look for Nanc. It’s pink and says Heartbreaker on it.
Eyecandy 4000 - Chrome
Eyecandy 3,1 - Glow
Transparency - Eliminate White
“Route 66” is a PTU tagger size scrap kit created by Kara of Sweet Cravings Scraps and can be purchased from TKO Scraps. You can visit her blog here.
Thank you Kara for a kit that shouts “blast from the past“! This was so much fun to work with!

This tutorial was written assuming you have a working knowledge of PSP.

~♥~ Let’s get started ~♥~

Open up the template.
Shift + D.
Close out the original.
Image/Canvas Size
700 650
OK
Highlight the very bottom layer - Raster 12.
New Raster layer
Flood fill white.
Delete the following layers.
(starting at the top of the layers pallet)
Top 8 layers.
Splat
Tone
Heart Front
Heart Bg
White
Tone
Circle Front
Dots
Circle Med
Splat
Splat
Text
Rectangle Bg
Raster 12

Yikes! Doesn’t leave much of the template, does it?

Highlight Rectangle Front layer.
Click on it with your Magic Wand.
New Raster layer.
Copy and paste Paper 12 Into Selection.
Deselect.
Delete the template layer.
Apply Eyecandy 3.1 - Glow:
Width: 3
Opacity: 100
Opacity Dropoff: Fat
Color: White

Highlight Circle Bg layer.
Copy and paste Frame 2 as a new layer.
Resize 60% - Move into position over the Circle template layer.
Delete Circle Bg template layer - you only needed it for placement of the frame.
Highlight the frame layer.
Click inside of it with your Magic Wand.
New Raster layer below the frame.
Copy and paste Paper 1 Into Selection.
Copy and paste Table as a new layer over the paper.
Resize 40% - Move into position - see my tag for reference.
Copy and paste Records 1, 2, and 3 as new layers.
Resize each of them 35% - move into position - see my tag for reference.
Highlight the paper layer.
Click anywhere outside of it with your Magic Wand.
Highlight each of the element layers below the frame and tap the delete key.
Deselect.

Highlight Frame bg layer.
Click on it with your Magic Wand.
Copy and paste 4 as a new layer.
Resize 60% - move into position.
Selections/Invert
Tap the delete key.
Copy and paste Car as a new layer.
Resize 60% - move into position - see my tag for reference.
Tap the delete key.
Deselect.
Change the Properties to Hard Light.
Duplicate.

Highlight White Rectangle layer.
Adjust/Add Remove Noise/Add Noise:
Uniform checked
Noise: 35%
OK
Move below the bottom car layer.
Duplicate.

Highlight Frame 3 layer.
Select All/Float/Defloat
New Raster layer.
Flood fill with any color.
Deselect.
Apply Eyecandy 4000 - Chrome
Choose Outdoor from the Basic tab
Use Default Settings
Delete the template layer.

Open up Music Notes.
Shift + D.
Close out the original.
New Raster layer - move below the music note - flood fill white.
Merge Visible.
Apply Transparency - Eliminate White.
Like magic you should now just have the music notes.
Copy and paste onto your working canvas.
Resize 40%

Add your embellishments. I used:
DriveIn Sign 1: Resize 40%
Radio: Resize 35%
Popcorn: Resize 35%
Street Sign: Resize 60%
BillyBo 5: Resize 50%
Cheribomb 8: Resize 40%

Highlight your white canvas.
New Raster layer.
Select All.
Copy and paste Paper 10 Into Selection.
Deselect.
Apply the mask.
Resize 115%
Merge Group.

Add your copyrights.

Add your name.
Give it a slight Inner Bevel:


Resize all layers 80%.

I hope you enjoyed this tutorial.
I’d love to see your results and show it off in my gallery.
Email me!
Hugs,
Bev

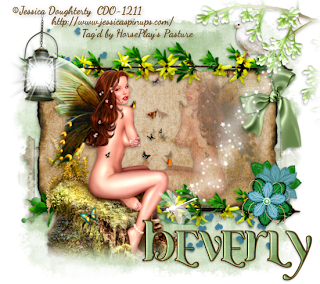
A Spring Garden


Clicking on the image will allow you to enlarge for bigger view.

Supplies

1 tube of choice - I used the artwork of Jessica Dougherty that can be purchased at CDO
Font of Choice - I used Ayosmonika Bold here
Becky mask 22 here
“A Spring Garden” is a PTU scrap kit created by Jessica of Gothic Inspirations and can be purchased from here store Gothic Inspirations. You can visit her blog here.
Thank you so much Jess for a spring kit that’s more than gorgeous!

This tutorial was written assuming you have a working knowledge of PSP.

~♥~ Let’s get started ~♥~

Open up a 700 x 700 blank canvas.
Flood fill white.

Copy and paste Parchment 2 as a new layer.
Resize 80%

Copy and paste your tube as a new layer.
Position it at the left side of the parchment paper.
Duplicate/Mirror
You can move the duplicate tube layer into a better position it you like.
Highlight the parchment paper layer.
Click anywhere outside of it with your Magic Wand.
Highlight the duplicated tube layer.
Tap the delete key.
Selections/Modify/Inside Outside feather:
Both checked
Feather amount: 43
OK
Tap the delete key until you have a nice feathered effect.
Deselect.
Change the Properties to Multiply.
Lower the Opacity to about 44.

Add your embellishments. I used:
Lantern: Resize 50%
Flowers: Resize 90%/Free rotate Left 12 degrees/Duplicate
Doodle: Resize 90%
Bird: Resize 25% and 70%
Bow 2: Resize 40%
Flower: Resize 25%
Flower 2: Resize 25%
Dragonfly Trail: Resize 80%
Heart Spill: Resize 90%/Mirror
Tree buds: Mirror

Highlight your white background.
Select All/Modify/Inside Outside Feather:
Both checked:
Feather amount: 43
OK
Selections/Invert
Highlight the lantern layer and tap the delete key until you have a nice feathered effect.
Highlight the Tree buds layer and give it a nice feathered effect too.
Deselect.

Highlight your white background.
New Raster layer.
Select All.
Copy and paste Paper 9 Into Selection.
Deselect.
Copy and paste Fence as a new layer above the paper.
Merge Down.
Apply the mask.
Merge Group.

Add your credits.

Add your name.
Give it a slight Inner Bevel:


Resize all layers 80%.

I hope you enjoyed this tutorial.
I’d love to see your results and show it off in my gallery.
Email me!
Hugs,
Bev


Tuesday, February 22, 2011

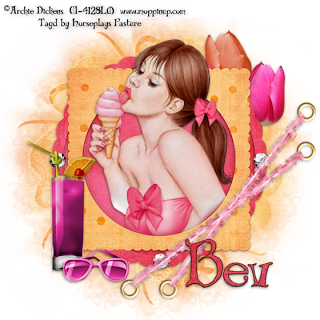
Summer Picnic


Clicking on the image will allow you to enlarge for bigger view.

Supplies

1 tube of choice - I used the artwork of Archie Dickens that can now be purchased at CDO
Font of Choice - I used Bibliotheque here
Gem mask 70 here
“Summer Picnic” is a FTU scrap kit created by Jolene of JRM Scrap Kits. With her permission I can supply the kit to you here.
Thank you so much for your generosity Jolene!

This tutorial was written assuming you have a working knowledge of PSP.

~♥~ Let’s get started ~♥~

Open up a 700 x 700 blank canvas.
Flood fill white.

Copy and paste Frame as a new layer.
Using your Freehand Selection Tool outline the circle frame.
New Raster layer below the frame.
Copy and paste Paper 5 Into Selection.
Copy and paste your tube as a new layer.
Selections/Invert
Tap the delete key.
Deselect.

Add your embellishments. I used:
Eyelet Stitches: Mirror/Flip
Tulip 2: Mirror
Tulip 1
Fruity Drink
Sunglasses

Highlight your white canvas.
New Raster layer.
Select All.
Copy and paste Paper 1 Into Selection.
Deselect.
Apply the mask.
Merge Group.

Add your credits.

Add your name:
Give it a slight Inner Bevel:


Adjust/Add Remove Noise/Add Noise:
Uniform checked
Noise: 35%
OK

Resize all layers 80%.

I hope you enjoyed this tutorial.
I’d love to see your results and show it off in my gallery.
Email me!
Hugs,
Bev
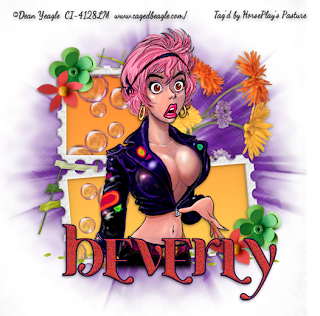
***Gasp***

Clicking on the image will allow you to enlarge for bigger view.

Supplies

1 tube of choice - I used the artwork of Dean Yeagle that can now be purchased at CDO
Font of Choice - I used Ayosmonika Bold here
Gem mask 71 here
Brush Strokes - Cross Hatch
“Splash of Colour” is a PTU scrap kit available in both full and tagger size created by Julie of Bits N Bobs and can be purchased from Exquisite Scraps. You can visit her blog here.
Thank you Julie for a really terrific and energetic kit!

This tutorial was written assuming you have a working knowledge of PSP.

~♥~ Let’s get started ~♥~

Open up a 700 x 700 blank canvas.
Flood fill white.

Copy and paste 46 as a new layer.
Resize 85%
Click inside of each square with your Magic Wand.
Selections/Modify/Expand by 4
New Raster layer below the frame.
Flood fill with a gradient of your choice.
Deselect.

Be sure the gradient layer is highlighted.
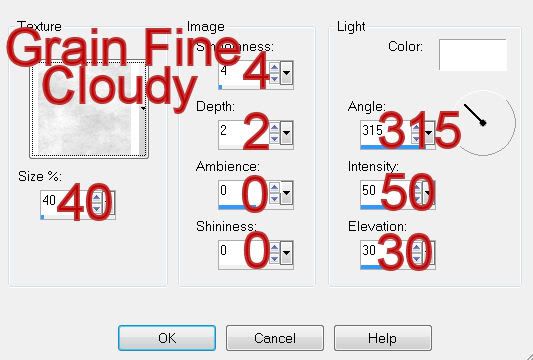
Effects/Texture Effects/Texture:


Copy and paste your tube as a new layer.
Position it before the frames.

Copy and paste 10 as a new layer above the gradient layer.
Move into position.
Highlight the gradient layer
Click anywhere outside of the gradient with your Magic Wand.
Highlight the bubbles layer.
Tap the delete key.
Deselect.

Add your embellishments. I used:
37
39
17: Resize 40%/Duplicate/Mirror
18: Resize 40%/Duplicate/Mirror

Highlight your white canvas.
New Raster layer.
Select All.
Copy and paste Paper 8 Into Selection.
Deselect.
Apply Brush Strokes - Cross Hatch:
Stroke Length: 29
Sharpness: 13
Strength: 2
OK
Apply the mask.
Merge Group.

Add your credits.

Add your name
Foreground: #bf3536
Background: #ea4845
Stroke: 2
Type your name.
Right click over your name (on the canvas)
Click on Properties.
Vector Property box will open.
Click on the color box of Stroke.
Change the color to #04001e
OK
Click OK on the Vector Property box.
In the layers pallet right click on your name.
Convert to Raster layer.
Select All/Float/Defloat
Selections/Modify/Contract by 2
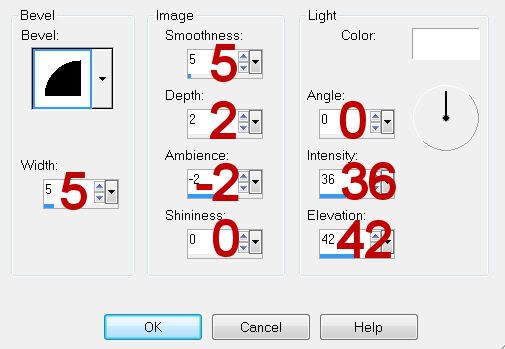
Apply a small Inner Bevel:


Adjust/Add Remove Noise/Add Noise:
Uniform checked
Noise: 35%
OK

Resize all layers 80%.

I hope you enjoyed this tutorial.
I’d love to see your results and show it off in my gallery.
Email me!
Hugs,
Bev
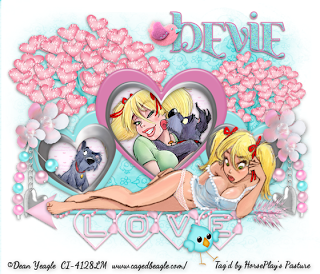
Unconditional Love

Clicking on the image will allow you to enlarge for bigger view.

Supplies

3 tubes of choice - I used the artwork of Dean Yeagle that can now be purchased at CDO
Font of Choice - I used Ayosmonika Bold here
Gem mask 127 here
“Love Birds” is a PTU tagger size scrap kit created by Jen of Sleek and Sassy Designz and can be purchased from her store Scrappin Dollar. You can visit her blog here.
Thank you Jenn for such an adorable kit that‘s totally packed with pretties!

This tutorial was written assuming you have a working knowledge of PSP.

~♥~ Let’s get started ~♥~

Open up a 700 x 700 blank canvas.
Flood fill white.

Copy and paste Triple Heart Frame as a new layer.
Resize 80%
Click inside of each heart with your Magic Wand.
Selections/Modify/Expand by 6.
New Raster layer below the frame.
Copy and paste Paper 18 Into Selection.
Copy and paste a tube below the frame and center it in the middle heart.
Selection/Invert
Tap the delete key.
Paste another tube as a new layer below the frame and move into position below the left heart.
Tap the delete key.
Deselect.
If any of the tubes are showing up in other hearts and you don’t want it there then highlight the tube and erase the portion that overlaps into another heart.

Close out your white canvas.
Merge Visible.
Reopen your white canvas.
Move the merged layer up just a little on your canvas.
Copy and paste Arrow as a new layer.
Move into position - see my tag for reference.

Copy and paste your tube as a new layer.
Position over the arrow.

Add your embellishments. I used:
Tree: Resize 70%/Duplicate/Mirror/Resize 70%
Pendant: Resize 40%
Bird: Resize 25% and 70%
Flower 4: Resize 25%/Duplicate/Resize 70%
Bird 6: Resize 25% and 70%

Crop your Image.

Highlight your white canvas.
New Raster layer.
Select All.
Copy and paste Paper 12 Into Selection.
Deselect.
Apply the mask.
Merge Group.

Add your copyrights.

Add your name
Foreground: #da7fb0
Background: #97e5e7
Stroke: 2
Type your name.
Convert to Raster layer.
Select All/Float/Defloat
Selections/Modify/Contract by 2
Apply a small Inner BeveL:


Adjust/Add Remove Noise/Add Noise:
Uniform checked
Noise: 35%
OK

Resize all layers 80%.

I hope you enjoyed this tutorial.
I’d love to see your results and show it off in my gallery.
Email me!
Hugs,
Bev
Monday, February 21, 2011

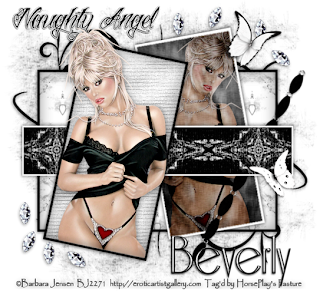
Naughty Angel


Clicking on the image will allow you to enlarge for bigger view.

Supplies

1 tube of choice - I used the artwork of Barbara Jensen here
Font of Choice - I used Riesling here
Weescotlass mask 297 here
Creative Misfits Collab templates here under Janaury 23, 2011 - download Deb & Kat templates.
“I Have a Dream” is a PTU tagger scrap kit created by Shelle of Shellez Creations and can be purchased from Scraps with Attitude. You can visit her blog here.
Thank you Shelle for such an elegant scrap kit! Love it!!

This tutorial was written assuming you have a working knowledge of PSP.

~♥~ Let’s get started ~♥~

Open up the template.
Delete the following layers:
Little Stars
Lg Stars
Naughty Angel
Black Swirl
Image/Canvas Size
650 x 650
OK
Highlight Raster 1 layer.
Flood fill white.

Highlight Lg Pink Rect layer.
Click on it with your Magic Wand.
New Raster layer.
Copy and paste Paper 7 Into Selection.
Deselect.
Delete the template layer.

Highlight Tall Black Rect layer.
Click on it with your Magic Wand.
New Raster layer.
Copy and paste Paper 1 Into Selection.
Copy and paste your tube as a new layer over the paper layer.
Selections/Invert
Tap the delete key.
Deselect.
Change the Properties to Soft Light.
Duplicate.
Delete the template layer.

Highlight Black Rect layer.
Click on it with your Magic Wand.
Copy and paste Paper 9 as a new layer.
Move into position over the rectangle getting the print of the paper squared within the rectangle.
Selection/Invert
Tap the delete key.
Deselect.
Delete the template layer.

Highlight Lt Pink Rect1 layer.
Click on it with your Magic Wand.
New Raster layer.
Copy and paste Paper 8 Into Selection.
Copy and paste your tube as a new layer.
Selections/Invert
Tap the delete key.
Deselect.
Delete the template layer.

Highlight Word Art layer.
Merge Down.
Resize 70%
Move into position near the top left of your canvas.

Add your embellishments. I used:
Eyelet: Resize 30%/Free rotate Right 30 degrees
Doodle 2: Duplicate/Mirror/Flip
Pretty Butterfly 1: Resize 25%/Mirror
Pretty Butterfly 2: Resize 30%
Gem 2: Resize 30%/Duplicate as many times as you like and use your Pick Tool to rotate each one.

Highlight your white background.
New Raster layer.
Select All.
Copy and paste Paper 3 Into Selection.
Deselect.
Apply the Mask.
Resize 110%
Merge Group.
Duplicate.

Crop your image.

Add your copyrights.

Add your name.
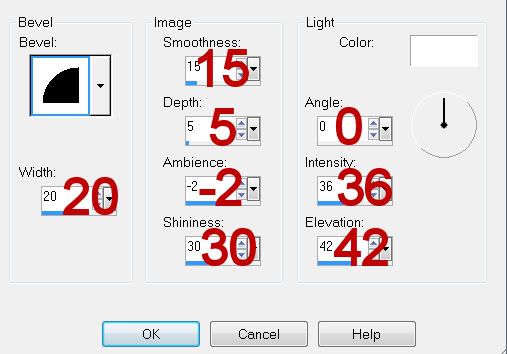
Give it a slight Inner Bevel:


Resize all layers 85%.

I hope you enjoyed this tutorial.
I’d love to see your results and show it off in my gallery.
Email me!
Hugs,
Bev
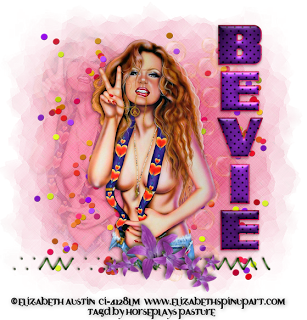
Splash of Colour


Clicking on the image will allow you to enlarge for bigger view.

Supplies

1 tube of choice - I used the artwork of Elizabeth Austin that can now be purchased at Up Your Art
Font of Choice - I used Super Retro M54 here
My mask 27 here
Brush Strokes - Cross Hatch
Greg’s Factory Output Vol. II - Pool Shadow
“Splash of Colour” is a PTU scrap kit available in both full and tagger size created by Julie of Bits N Bobs and can be purchased from Exquisite Scraps. You can visit her blog here.
Thank you Julie for such a vibrant kit. Perfect for lifting the spirits this time of year!

This tutorial was written assuming you have a working knowledge of PSP.

~♥~ Let’s get started ~♥~

Open up a 700 x 700 blank canvas.
Flood fill white.

Copy and paste you tube as a new layer.
Center it on your canvas.

Copy and paste 27 as a new layer.
Position at the bottom of your tube.

Copy and paste 28 as a new layer just above your white canvas.

Highlight your white canvas.
New Raster layer.
Select All.
Copy and paste Paper 9 Into Selection.
Deselect.
Apply Brush Strokes - Cross Hatch:
Stroke Length: 35
Sharpness: 11
Strength: 1
OK
Apply the mask.
Merge Group.

Highlight you tube layer.
Duplicate.
Move it to the left and up slightly.
In your Layers pallet, move it below the original tube layer.
Apply the mask (to the duplicate layer)
Change the Properties to Luminance Legacy.
Lower the Opacity to about 40.

Copy and paste 12 as a new layer.
Move into position just below the original tube layer.
Lower the Opacity to about 42.

Color Pallet:
Foreground: Patten/Paper 9
Background: Patten/Paper 8
Stroke set at 2
Set the direction of your font to go up and down.

Type your name out.
If the letters are too far apart play around with your Kerning setting -
The negative numbers bring the letters closer together.
Convert your name to a Raster layer.
Select All/Float/Defloat
Selections/Modify/Contract by 2
Give it a slight Inner Bevel:


Apply Greg’s Factory Output Vol. II - Pool Shadow:
Use Default Settings accept lower the Intensity bar to 57.
OK

Deselect.

Add your copyrights.

Crop your Image.

Resize all layers 85%.

I hope you enjoyed this tutorial.
I’d love to see your results and show it off in my gallery.
Email me!
Hugs,
Bev
Sunday, February 20, 2011

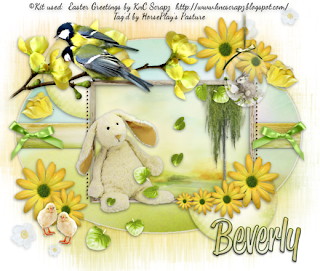
Easter Greetings


Clicking on the image will allow you to enlarge for bigger view.

Supplies

Font of Choice - I used ReklameScript Demo here. Just add the free one to your cart and check out.
Weescotlass mask 39 here
Divine Intentions Template 250 here
Eyecandy 3.1 - Glow
“Easter Greetings” is a PTU tagger size scrap kit created by Kesha of KnC Scrapz and can be purchased from her store Lollipops n Gumdrops. You can visit her blog here.
Thank you Kesha for such a beautiful Easter kit!!

This tutorial was written assuming you have a working knowledge of PSP.

~♥~ Let’s get started ~♥~

Open up the template.
Shift + D.
Close out the original.
Delete By Missy layer.
Image/Canvas Size
650 x 550
OK
Flood fill the background layer white.

Highlight Oval Shape Layer.
Click on it with your Magic Wand.
New Raster layer.
Copy and paste PP9 Into Selection.
Deselect.
Delete the template layer.
Apply Eyecandy 3.1 - Glow:
Width: 3
Opacity: 100
Opacity Dropoff: Fat
Color: white

Highlight Circle 1 layer.
Click on it with your Magic Wand.
New Raster layer.
Copy and paste PP2 Into Selection.
Deselect.
Delete the template layer.

Repeat the above step with Circle 2 layer.

Highlight Rectangle layer.
Click on it with your Magic Wand.
New Raster layer.
Copy and paste PP 2 Into Selection.
Give it a slight Inner Bevel:

Deselect.
Delete the template layer.

Highlight Copy of Line 1 layer.
Merge Down.
Select All/Float/Defloat
New Raster layer.
Flood fill with #654526
Deselect.
Delete the template layer.

Highlight Frame Background layer.
Click on it with your Magic Wand.
New Raster layer.
Copy and paste PP3 Into Selection.
Copy and paste Tree as a new layer above the paper.
Resize 60%
Move into position.
Selections/Invert
Tap the delete key.
Deselect.
Delete the template layer.

Highlight Frame layer.
Click on it with your Magic Wand.
New Raster layer.
Copy and paste PP5 Into Selection.
Deselect.
Delete the template layer.

Add your embellishments. I used:
Bow 2: Resize 25% and 70%/Duplicate/Mirror
Flower Branch: Resize 50%
Birds: Resize 25%/Mirror - erase the bird leg that sticks out
Rabbit Egg: Resize 30%
Stuffed Rabbit: Resize 30%/Mirror
Flower 4: Resize 25% and 70%. Each time you duplicate/resize 70%
Flower 4 again (to be placed at the outer edges of the oval): Resize 25% and 80%/Duplicate/Resize 70%
Leaves: Resize 40%/Free rotate Right 35 degrees
Floating Flowers: Resize 40%/Mirror/Duplicate/Lower the Opacity to about 46
Butterfly: Resize 25% and 70%/Free rotate Left 20/Duplicate/Mirror
Chick: Resize 25% and 30%/Duplicate/Mirror

Highlight your white background layer.
New Raster layer.
Select All.
Copy and paste Paper 6 Into Selection.
Deselect.
Apply the mask.
Resize 115%
Merge Group.
Duplicate

Add your copyrights.

Add your name.

Resize all layers 80%.

I hope you enjoyed this tutorial.
I’d love to see your results and show it off in my gallery.
Email me!
Hugs,
Bev
Steamy Kind of Love


Clicking on the image will allow you to enlarge for bigger view.

Supplies

1 tube of choice - I used the artwork of Jennifer Janesko that can now be purchased from CDO
Font of Choice - I used Starstruck here
Weescotlass mask 236 here
Artmama’s Template 14 here
“Steamy Kind of Love” is a PTU tagger size scrap kit created by Jo of A Taggers Scrap and can be purchased from Stargazer Scraps. You can visit her blog here.
Thank you Jo for a super terrific steam kit!

This tutorial was written assuming you have a working knowledge of PSP.

~♥~ Let’s get started ~♥~

Open up the template.
Shift + D.
Close out the original.
Delete the following layers:
Delete
Word
Tiny Words
Image/Canvas Size
700 x 650
OK
New Raster layer.
Send to bottom.
Flood fill white.

Highlight Rectangle Layer.
Select All/Float/Defloat
New Raster layer.
Copy and paste Paper 11 Into Selection.
Deselect.
Delete the template layer.

Highlight C. Back layer (the one just above the rectangle layer)
Click on it with your Magic Wand.
New Raster layer.
Flood fill with #000000
Adjust/Add Remove Noise/Add Noise:
Gaussian checked
Noise: 45%
OK
Adjust/Sharpness/Sharpen
Deselect.
Delete the template layer.

Repeat the above step with layers:
Dots
C. Back
H. Back

Highlight Circle layer (the big black circle near the bottom)
Click on it with your Magic Wand.
New Raster layer.
Copy and paste Paper 3 Into Selection.
Copy and paste Chickenwire as a new layer just above the paper.
Selection/Invert
Tap the delete key.
Change the Properties to Soft Light.
Copy and paste your tube as a new layer.
Resize as needed and move into position.
Tap the delete key.
Deselect.
Delete the template layer.
Move your tube layer above the Sparkle Strips layer.

Highlight Strip layer.
Select All/Float/Defloat
New Raster layer.
Copy and paste Paper 11 Into Selection.
Deselect.
Delete the template layer.

Highlight Sparkle Strips layer.
Select All/Float/Defloat
New Raster layer.
Copy and paste Paper 11 Into Selection.
Adjust/Add Remove Noise/Add Noise:
Gaussian checked:
Noise: 45%
OK
Deselect.
Delete the template layer.

Highlight Circle layer (the small pink one)
Click on it with your Magic Wand.
New Raster layer.
Copy and paste Paper 12 Into Selection.
Deselect.
Delete the template layer.

Highlight Heart layer.
Select All/Float/Defloat
New Raster layer.
Copy and paste Paper 5 Into Selection.
Deselect.
Delete the template layer.

Copy and paste Heart Pin as a new layer.
Resize 50%
Move into position over the heart.
Use your Eraser Tool and erase a small piece of it to give it the effect as if it’s stuck through the heart - see my tag for reference.
Make your Burn Tool active and set the size to approximately 18 or so.
Highlight the heart layer.
Use your Burn tool to darken the area where the pin goes into the heart and comes out of the heart by placing it where you want the material burned and click your mouse button.

Add your embellishments. I used:
Bow 4: Resize 40%
Candleabra 2: Resize 80%
Flower 5: Resize 70%
Flower 4: Reize 60%
Flowers 2 & 3: Resize 30%
Rose 1 & 2
Wire: Resize 60%
Butterfly 3: Resize 50%
Butterfly 1: Resize 40%/Free Rotate Left 20 degrees

Highlight your white background layer.
New Raster layer.
Select All.
Copy and paste Paper 6 Into Selection.
Deselect.
Apply the mask.
Resize 115%
Merge Group.
Duplicate

Add your copyrights.

Add your name.

Resize all layers 80%.

I hope you enjoyed this tutorial.
I’d love to see your results and show it off in my gallery.
Email me!
Hugs,
Bev