Thursday, September 5, 2013

Unicorn Dream

 photo UnicornDreamBevie_zps2374f2c5.gif
Supplies Needed  

1 tube of choice – I used the wonderful artwork of Lori Karels which can now be purchased from Up Your Art.  You must have a license to use. 

Font of choice – I used Wonderland here

Crazy Vicky's Template 31 here

Plug Ins used:
Brosh Strokes - Sprayed Strokes
Photo Tools - Gradient Sky - Compliment
VM Natural - Sparkle
Eyecandy 5 - Texture - Stone Wall
Eyecandy 5 - Impact - Glass
Simple - Diamonds
DSB Flux - Bright Noise

Animation Shop - Optional

Supplies which I provide here
They are to be used for this tutorial only.

~♥~ Let’s get started ~♥~

Open up the template.
Shift + D. 
Close out the original.
Delete the top 7 layers.

Color Pallet:
Foreground: #44454a  
Background: #d5c8e5

Highlight the Mask Layer.
Use your Target Tool and change it to the background color.

Highlight Rec 1 layer.
Click on it with your Magic Wand.
Apply Eyecandy Texture - Stone Wall:
Basic Tab:

OK
Deselect.

Of the tube, copy the image layer.
Paste as a new Image.
Effects/Image Effects/Seamless Tile
Copy

Highlight your working canvas.
Highlight Rec 2 layer.
Click on it with your Magic Wand.
New Raster layer.
Paste the Image Into Selection.
Adjust/Blur/Gaussian Blur:
Radius: 20
OK
Apply Brush Strokes - Sprayed Strokes:
Stroke Length: 12
Spray Raidus: 7
Stroke Direction: Right Diag
OK
Apply Simple - Diamonds - 2x's
Deselect.
Delete the template layer.

Color Pallet:
Set to gradient:
Style: Linear
Angle: 0
Repeats: 0
Invert checked

Highlight Circle 1 layer.
Click on it with your Magic Wand.
New Raster layer.
Flood fill with the gradient.
Name this layer "GRADIENT"
Apply Photo Tools - Gradient Sky- - Compliment:

Duplicate the gradient layer 4x's.
Name each one Star 1, Star 2, Star 3, and Star 4.
Do NOT deselect.

Highlight Star 1 layer.
Apply VM Natural - Sparkle:

Change the Properties of this layer to Soft Light.
Close this layer out.

Highlight Star 2 layer.
Repeat the above step accept move the Random Seed button.
Don't forget to change the Properties of the layer to Soft Light.

Repeat the above step with Star 3 and Star 4 layer.

Reopen Star 1 layer.
Star 2, 3, and 4 layers should all be closed.

Deselect for now.

Copy and paste all the elements I supplied accept for the bow as 

new layers just above Star 1 layer.
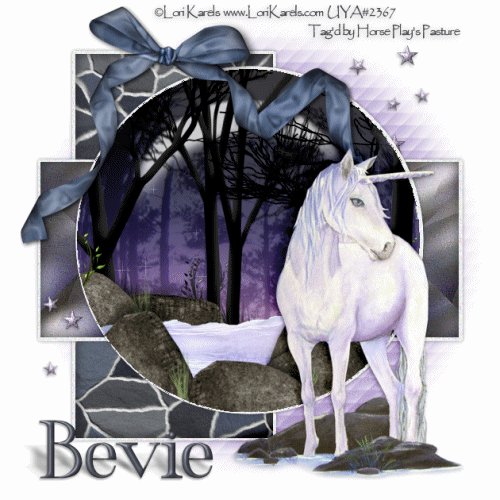
Move them into position - see my tag for reference, and don't worry about what overhangs the circle.  We'll clean that up in a bit.

TIPS: The faint looking trees on my tag are made with the glass plug in so don't waste your time copying and pasting the tree that many times.  I did duplicate the tree on the left once, used the Pick Tool to stretch it, duplicated the tree.  The rock was duplicated many times and the Pick Tool was used to turn different ways to change their look.  The grass was duplicated several times.
This is your tag.  Let your imagination go and make a forest any unicorn would love to romp in on a starry night!

Once you have your scene created with the elements - 
Highlight the circle template layer.
Click anywhere outside of it with your Magic Wand.
Highlight each element layer and tap the delete key.
Selections/Invert
New Raster layer at the top of your layers pallet.
Apply Eyecandy 5 - Impact - Glass:
Basic Tab:

Lighting Tab:
(check Select from File, choose Nature - Forest)

Tada!  You should have a faint looking forest now :)

Copy and paste your tube as a new layer.
Position it in front of the glass - see my tag for reference.

Change the Foreground color in your pallet to #44454a

Make your Symmetric Shape Tool active.
Settings should be:
Choose "Draw Stellated" - it looks like a star
Number of side: 5
Radius: 38
Line Style: Solid
Width: 1
Anti alias checked
mixer limit: 15

Draw a small star - about the side of my largest star on my tag.
Give it a slight Inner Bevel:

Apply DSB Flux - Bright Noise:
Intensity: 38
Mix checked
OK
Duplicate the star as many times as you like, turning them this way 

and that.

Color Pallet:
Change the background color to #5f6876

Type your name.
Give it the same Inner Bevel.
Give it a drop shadow on it's own layer.
Use your Pick Tool to flatten it a little.
Adjust/Blur/Motion Blur:
Angle: 309
Strength: 53
OK
Duplicate the drop shadow.

Add your copyright.

Copy Merged.

~Time To Animate~

OPen up Animation Shop.
Edit/Paste/As New Animation

Back in PSP.
Close out Sar 1 layer.
Open up Star 2 layer.
Copy Merged.

Back in AS.
Edit/Paste/After Current Frame.

Back in PSP.
Close out Sar 2 layer.
Open up Star 3 layer.
Copy Merged.

Back in AS.
Edit/Paste/After Current Frame.

Back in PSP.
Close out Sar 3 layer.
Open up Star 4 layer.
Copy Merged.

Back in AS.
Edit/Paste/After Current Frame.

View your animation.  If you're happy with it....

Ctrl + A (to highlight all frames)

Animation/Frame Properties:
Display Time: 25
OK

Animation/Resize Animation:
Pixel Size checked
Width: 500
OK

I hope you enjoyed this tutorial as much as I did creating it!

I’d love to see your results.
Email me!
Hugs,
Bev 

Tuesday, September 3, 2013

Halloween Magic


Supplies Needed  

1 tube of choice – I used the artwork of Katerina Koukiotis which can be purchased from PSP Tube Stop.  It can be purchased with the tube at a savings here!  You must have a license to use.    

Font of choice – I used Waterfalls 

Vix Mask 451 here

KanDee St. Pats 2013 (Template 3) here
You can find it under Sunday, February 13, 2013

"Halloween Magic" is a tagger size scrap kit created by me, Bev of HorsePlay's Pasture Designs.  It can be purchased from any of my stores here on my designing blog.  

~♥~ Let’s get started ~♥~

Open up the template.
Shift + D.
Close out the original.
Delete the credit layer.

Open up the image I supplied.
Copy
Close the image out.
Delete the top 12 layers.
Resize all layers 90%
Image/Canvas size:
700 x 600
Highlight and open up the background layer.
Flood fill white.

Highlight Bottom Dark Green Rectangle layer.
Click on it with your Magic Wand.
New Raster layer.
Copy and paste Paper 13 Into Selection.
Mirror
Flip
Deselect.
Delete the template layer.
Give the paper a slight Inner Bevel:

Highlight Bottom Green Rectangle layer.
Click on it with your Magic Wand.
New Raster layer.
Paste Paper 13 (it should still be in memory) Into Selection.
Deselect.
Delete the template layer.
Give the paper the same slight Inner Bevel.

Highlight Orange Rectangle.
Click on it with your Magic Wand.
New Raster layer.
Copy and paste Paper 1 Into Selection.
Copy and paste El 74 as a new layer.
Resize 60% and move into position - see my tag for reference.
Selections/Invert
Use your Eraser Tool and erase the left side and bottom of the element.
Deselect.
Delete the template layer.

Highlight White Rectangle layer.
Click on it with your Magic Wand.
New Raster layer.
Copy and paste Paper 4 Into Selection.
Adjust/Add Remove Noise/Add Noise:
Uniform and Monochrome checked
Noise: 37%
OK
Deselect.
Delete the tempalte layer.

Repeat the above step with White Circle layer.

Color Pallet:
Foreground: #000000
Background: #f56d3c

Highlight Dotted Rectangle layer.
Make your Color Replacer Tool active and double right click on the dotted rectangle.

Repeat the above step with Dotted Circle layer.

Highlght the house element.
Duplicate
Move above the Dotted Rectangle layer.
Use your Eraser Tool and erase the left and bottom area of the element.

Highlight Gold Rectangle layer.
Click on it with your Magic Wand.
New Raster layer.
Copy and paste Paper 14 Into Selection.
Deselect.
Delete the template layer.
Give it a slight Inner Bevel.

Highlight White Rectangle layer.
Click anywhere outside of it with your Magic Wand.
Selections/Invert
Copy and paste Paper 4 Into Selection.
Adjust/Add Remove Noise/Add Noise:
Use Same settings.
Deselect.
Delete the template layer.
Give it the same slight Inner Bevel.

Highlight Green Rectangle layer.
Click on it with your Magic Wand.
New Raster layer.
Copy and paste Paper 2 Into Selection.
Deselect.
Delete the template layer.

Highlight Yellow Circle layer.
Click on it with your Magic Wand.
New Raster layer.
Copy and paste Paper 14 Into Selection.
Deselect for now.
Add the following elements and move them into position within the circle paper - see my tag for reference.  Don't worry about what overhangs.  We'll clean that up in a bit.
El 16: Resize 70%/Duplicate
El 16: Resize 60%

Highlight the Circle paper layer.
Click anywhere outside of it with your Magic Wand.
Highlight each element and tap the delete key.
Deselect.

Copy and paste El 39.
Resize 85%
Copy and paste your tube as a new layer.
If you're using the same as I did, resize 60% and 80%

Add your elements.  I used:
El 79:  Resize 55/Duplicate
El 50:  Resize 40%
El 28:  Resize 80%
El 15:  Resize 40%
El 20:  Resize 60%/Mirror
El 14:  Resize 40%/Duplicate/Resize 70%/Use your Pick Tool and tilt just a little
El 13:  Resize 30%
El 12:  Resize 60%/Mirror
El 36:  Resize 40%/Duplicate/Resize 70%/Duplicate
El 26:  Erase the bottom part of it

Highlight your white background.
New Raster layer.
Select All
Copy and paste Paper 9 Into Selection.
Deselect.
Apply the mask.
Merge Group.
Center the mask a bit more behind the tag.
Make your Pick Tool active and pull down just a little on the mask.

Add your copyright.

Add your name:
Color Pallet: 
Foreground: #000000
Background: Pattern/Paper 10
Stroke: 1

Type your name.
Give it a slight Inner Bevel:


Resize all layers 80%.

I’d love to see your results.
Email me!
Hugs,
Bev 

Monday, September 2, 2013

Chasing the Blues


Supplies Needed  

1 tube of choice – I used the wonderful artwork of Max 13-Tulmes which is a bonus tube from Pics for Design.  You must generate a license to use. 

Font of choice – I used Quality Street here

Vix Mask 452 here

Plug Ins used:
Xero - Porcelain

"Chasing the Blues" is a tagger size scrap kit created by me, Bev of HorsePlay's Pasture Designs and is part of a massive collab which can be purchased from Scraps From the Heart.  Anyone who purchases the kit will get a free tube of choice from Up Your Art!  You can visit my designing blog here.

~♥~ Let’s get started ~♥~

Open up a 700 x 700 blank canvas.
Flood fill white.

Copy and paste El 8 as a new layer.
Click inside of each circle with your Magic Wand.
Selections/Modify/Expand by 4.
New Raster layer below the frame.
Copy and paste Paper 6 Into Selection.
Deselect for now.

Make your Selection Tool active set on Rounded Rectangle.
New Raster layer below the frame.
Create a rectangle approximately 290 x 610 pixels.
Copy and paste Paper 1 as a new layer.
Resize 80%
Selections/Invert
Tap the delete key.
Selections/Invert
New Raster layer.
Copy and patse Paper 6 Into Selection.
Deselect.
Resize 90%

Move both paper layers into position - See my tag for reference.
Give each paper a slight Inner Bevel: 

Copy and paste your tube as a new layer.
Position it to the left of the frame.
Duplicate the tube layer.
Mirror
Move into position below the frame - see my tag for reference.
Lower the Opacity of this tube to about 51.
Apply Xero - Porcelain:
Use Default settings.
Copy and paste El 11 as a new layer.
Resize 90%
Free rotate Left 90 degrees
Move into position just below the tube that you lowered the Opacity on.
Use your Erase Tool to erase any of the stars you might see through the tube.
Highlight the paper layer below the tube.
Click anywhere outside of it with your Magic Wand.
Highlight the stars element layer and tap the delete key.
Deselect.

Add your elements.  I used:
El 21:  Free rotate Left 90%/Erase any that overhangs the paper layer.
El 6:  Resize 30%/Duplicate
El 5:  Resize 45%/Duplicate/Resize 70%/Use Pick Tool to turn a little/Duplicate/Duplicate all 3 flower layers
El 12: Duplicate
El 24: Resize 50%/Duplicate/Flip
El 30: Duplicate 2x's
El 16:  Resize 35%
El 15;  Resize 35%/Mirror

Highlight your white background.
New Raster layer.
Select All
Copy and paste Paper 5 Into Selection.
Deselect.
Apply the mask.
Mirror
Use your Pick Tool to pull the bottom down a little.
Merge Group.
Duplicate the mask layer.

Add your copyright.

Add your name:

Color Pallet:  
Foreground: #48190c
Background: #c9883b
Stroke: 1.0

Type your name.
Give it a slight Inner Bevel:

Resize all layers 80%.

I’d love to see your results.
Email me!
Hugs,
Bev