Tuesday, August 7, 2012

Seven Deadly Sins


Supplies

1 tube of choice – I used the artwork of Zlata_M which can be purchased from Pics for Design.  You must generate a license to use.

Font of choice - I used Harabarahand here

Vix Mask 452 here

“Life” template by Dee’s Sign Post here
It’s under Monday, March 26, 2012

“7 Deadly Sins - Sloth” is a tagger size scrap kit created by Sue Ellen of Wicked Creationz Scraps and can be purchased from Lollipops n Gumdrops.  You can visit her blog here.
Thank you Sue Ellen for a super fantastic kit.
This tutorial was written assuming you have a working knowledge of PSP.

~~ Lets get started ~~

Open up the template.
Shift + D.
Close out the original.
Delete the top 11 layers, Spare Glitter Sheet, Top Striped Circle layer, and Bottom Striped Circle layer.
Open up the Bg layer.

Highlight White Square layer.
Click on it with your Magic Wand.
New Raster layer.
Copy and paste Paper 8 Into Selection.
Deselect.
Delete the template layer.

Repeat the above step with Top Black Circle and Bottom Black Circle layers.

Highlight Bottom Grey Strip layer.
Click on it with your Magic Wand.
New Raster layer.
Copy and paste Paper 6 Into Selection.
Deselect.
Delete the template layer.
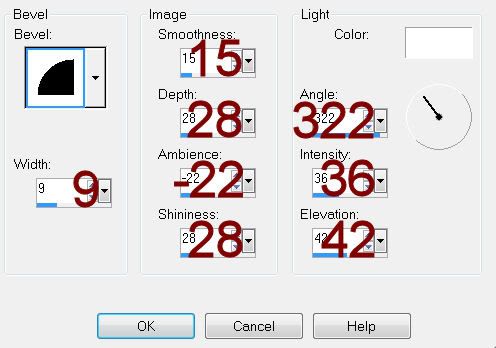
Give it a slight Inner Bevel:
Highlight Grey Oval layer.
Click on it with your Magic Wand.
New Raster layer.
Copy and paste Paper 7 Into Selection.
Deselect.
Delete the template layer.

Highlight Large Square layer.
Click on it with your Magic Wand.
New Raster layer.
Copy and paste Paper 9 Into Selection.
Copy and paste your tube as a new layer over the paper layer.
Change the Properties to Overlay and move into position – see my tag for reference.
Selections/Invert
Tap the delete key.
Deselect.
Delete the template layer.
Give the paper layer the same slight Inner bevel.

Highlight Small Grey Circle layer.
Click on it with your Magic Wand.
New Raster layer.
Copy and paste Paper 7 Into Selection.
Copy and paste Element 14 as a new layer.
Position over the circle paper.
Selections/Invert
Tap the delete key.
Deselect.
Delete the template layer.
Change the Properties of the element to Soft Light.

Copy and paste your tube as a new layer.

Add your elements.  I used:
21:  Resize 70%/Duplicate
12:  Resize 80%
14:  Resize 70%
3:  Resize 40%

Highlight your white background.
New Raster layer.
Select All.
Copy and paste Paper 6 Into Selection.
Apply the mask.
Use your Pick Tool to move the mask to the left slightly and pull the ride side out a little.
Merge Group.

Add your credits.

Add your name.

Resize all layers 80%.

I’d love to see your results.
Email me!
Hugs,
Bev

Monday, August 6, 2012

Rock On


Supplies

1 tube of choice – I used the awesome artwork of Zebrush which can be purchased from Pics for Design.  You must generate a license to use.

Font of choice - I used Clive Barker here

Weescotlass Mask 208 here

“Rock It" is a FTU tagger size scrap kit created by Mary of Country Bug and can be downloaded from her blog here.
Thank you Mary for another fantastic freebie!


This tutorial was written assuming you have a working knowledge of PSP.

~~ Lets get started ~~

Open up a 700 x 700 blank canvas.
Flood fill white.

Copy and paste Chain Frame as a new layer.
Resize 80%
Click inside of it with your Magic Wand.
Selections/Modify/Expand by 2.
New Raster layer below the frame.
Copy and paste Paper 8 Into Selection.
Copy and paste your tube as a new layer just below the frame.
Selection/Invert
Tap the delete key.
Deselect.
Change the Properties of the tube to Soft Light.

Copy and paste your tube as a new layer.
Position in front of the frame.

Add your elements.  I used:
Rock Guitar:  Mirror
Vinyl Record:  Resize 50%
Rock Star Red:  Flip
Rock Star Purple:  Use your Target Tool and change the color to black
Rock Background Deco:  Resize 120%

Highlight your white background.
New Raster layer.
Select All.
Copy and paste Paper 9 Into Selection.
Apply the mask.
Merge Group.

Add your credits.

Add your name.
Color Pallet:
Foreground: Null
Background: #c00000
Type your name.
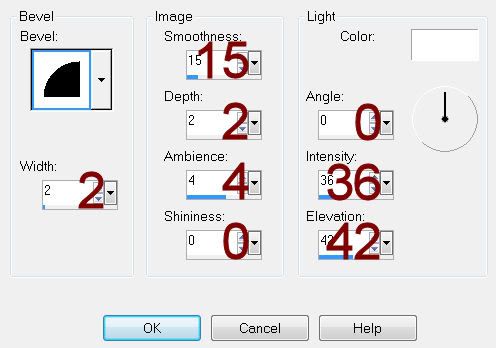
Give it a slight Inner Bevel:

Crop your image.

Resize all layers 80%.

I’d love to see your results.
Email me!
Hugs,
Bev

My Tender Love


Supplies

1 tube of choice – I used the awesome artwork of Zlata M which can be purchased from The PSP Project.  You must have a license to use.

Font of choice - I used Centeria Script here

Weescotlass Mask 208 here

“My Tender Love” is a tagger size scrap kit created by Sandrine of Rebellious Scraps and can be purchased from Inspirations of Scrap Friends.   You can visit her blog here.
Thank you Sandrine for a fabulous kit.
This tutorial was written assuming you have a working knowledge of PSP.

~~ Lets get started ~~

Open up Paper 9.
Color Pallet:
Foreground: Null
Background: Pattern/Paper 9
Angle: 0
Scale: 100%

Open up a 700 x 700 blank canvas.
Flood fill white.

New Raster layer.
Make your Ellipse Tool active set on Draw Circle.
Make a circle approximately 550 pixels.
Object/Align/Center In Canvas
Convert to Raster layer.
Adjust/Add Remove Noise/Add Noise:
Gaussian and Monochrome checked
Noise: 35%
OK
Click anywhere outside of the circle with your Magic Wand.
Selections/Invert
Seletions/Modify/Contract by 7.
New Raster layer.
Copy and paste Paper 8 Into Selection.
Deselect.

Copy and paste Frame 5 as a new layer.
Resize 65%
Free rotate Left 90 degrees
Move into position – see my tag for reference.
Click inside of each film square with your Magic Wand.
Selections/Modify/Expand by 2.
New Raster layer below the film strip.
Copy and paste Paper 6 Into Selection.
Copy and paste your tube as a new layer above the paper.
Selections/Invert
Tap the delete key.
Deselect.
Change the Properties of the tube to Hard Light.

Copy and paste your tube as a new layer.
Position off to the side of the film strip – see my tag for reference.

Add your elements.  I used:
Fan 1:  Resize 80%
Deco:  Resize 50%/Duplicate
Heart Cherries:  Resize 10%/Free rotate Left 20 degrees
Leaves 1:  Resize 30%/Duplicate/Mirror/Duplicate the original/Resize 70%
Butterfly 1:  Resize 12%/Free rotate Left 25 degrees/Duplicate/Mirror/Duplicate/Resize 70%
Martini:  Resize 20%
Sparkles

Highlight your white background.
New Raster layer.
Select All.
Copy and paste Paper 11 Into Selection.
Apply the mask.
Resize 110%
Merge Group.

Add your credits.

Add your name.

Resize all layers 80%.

I’d love to see your results.
Email me!
Hugs,
Bev