Saturday, November 12, 2011

Elegant Holiday


Supplies

1 tube of choice - I used the gorgeous artwork of Steve Baier which can be purchased from Up Your Art. You must have a license to use.

Font of choice - I used Scriptina here

Dee’s Sign Post Template “Linda - Deanna Collab Templates” here. You’ll find it under Saturday, October 9, 2010.

“Elegant Holiday” is a tagger size scrap kit created by Kesha of KnC Scrapz and can be purchased from her store Lollipops n Gumdrops. You can visit her blog here.
Thank you Kesha for another beautiful holiday kit.

This tutorial was written assuming you have a working knowledge of PSP.

~♥~ Let’s get started ~♥~

Open up the template.
Shift + D.
Close out the original.
Image/Canvas size:
700 x 700
OK
Highlight and open Bg layer.
Flood fill white.
Delete the top 5 layers, Left Shape, and Right Shape layers.

Open up Paper 1.
In your layers pallet set the foreground to Pattern/Set it on Paper 1
Angle: 0
Scale: 100
Make your Target Tool active and colorize Raster 4 layer of your working canvas.
Duplicate

Make Paper 1 active.
Copy
Make your working canvas active.
Highlight Glitter Oval layer.
Click anywhere outside of it with your Magic Wand.
Selections/Invert
New Raster layer.
Paste Paper 1 Into Selection.
Adjust/Add Remove Noise/Add Noise:
Monochrome and Gaussian checked:
Noise: 43%
OK
Deselect.
Delete the template layer.

Highlight Glitter Rectangle layer.
Repeat the above step.

Highlight Oval layer.
Click on it with your Magic Wand.
New Raster layer.
Copy and paste Paper 4 Into Selection.
Duplicate
Change the Properties to Multiply.
Deselect.
Delete the template layer.

Highlight Right Black Circle layer.
Click on it with your Magic Wand.
New Raster layer.
Copy and paste Element 2 Into Selection.
Deselect.
Delete the template layer.

Highlight Left Black Circle layer.
Repeat the above step.

Highlight Blue Rectangle layer.
Click on it with your Magic Wand.
New Raster layer.
Copy and paste Paper 2 Into Selection.
Deselect.
Delete the template layer.

Highlight Pink Circles layer.
Click on the left circle with your Magic Wand.
New Raster layer.
Copy and paste Element 4 Into Selection.
Deselect.
Delete the template layer.
Move the element up slightly - see my tag for reference.

Highlight Pink Strip layer.
Click on it with your Magic Wand.
New Raster layer.
Copy and paste Paper 4 Into Selection.
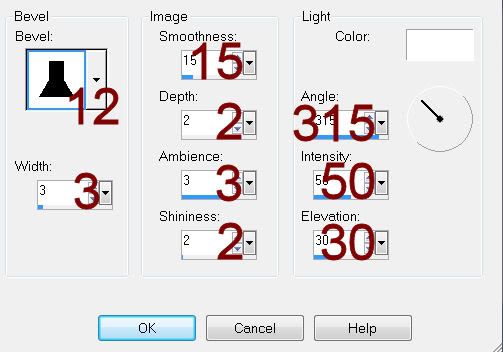
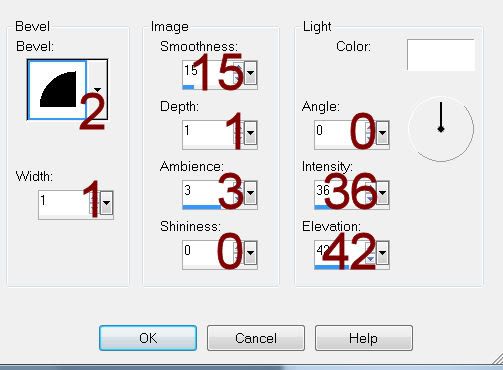
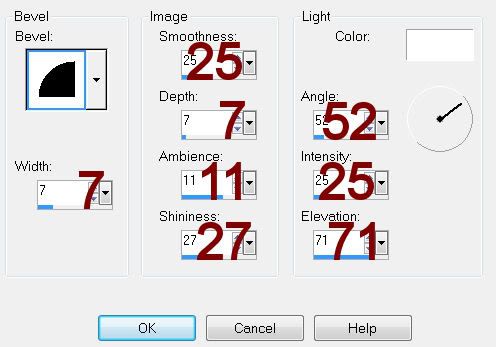
Give it a slight Inner Bevel:
Apply the same Noise effect accept lower the percentage to 20%.
Deselect.
Delete the template layer.

Highlight Stamp Frame Bg layer.
Click on both squares with your Magic Wand.
New Raster layer.
Copy and paste Paper 7 Into Selection.
Copy and paste your tube as a new layer just over the paper.
Selections/Invert
Tap the delete key.
Lower the Opacity to about 30.
Deselect.
Delete the template layer.

Highlight Stamp Frame layer.
Click on it with your Magic Wand.
New Raster layer.
Copy and paste Paper 5 Into Selection.
Deselect.
Delete the template layer.
Give it the same slight Inner Bevel.
Apply the same Noise effect.

Highlight Stars layer.
Click anywhere outside of it with your Magic Wand.
Selections/Invert
New Raster layer
Copy and paste Paper 1 Into Selection.
Deselect.
Delete the template layer.
Apply the same Noise Effect.

Highlight Blocks layer.
Select All/Float/Defloat
New Raster layer.
Paste Paper 1 Into Selection.
Deselect.
Delete the template layer.

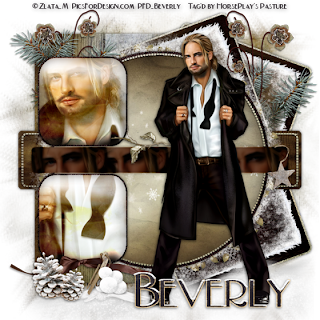
Add your elements. I used:
Branch 1: Resize 25%/Duplicate/Mirror
Candle: Resize 45%/Duplciate/Mirror
Branch: Resize 35%/Duplicate/Mirror
Butterfly: Resize 25% and 60%
Key: Resize 25%

Add your copyrights.

Add your name:
Give it a slight Inner Bevel:

Resize all layers 80%.

I hope you enjoyed this tutorial.
I’d love to see your results.
Email me!
Hugs,
Bev

Friday, November 11, 2011

Angelic Winter


Supplies

1 tube of choice - I used the gorgeous artwork of Steve Baier which can be purchased from Up Your Art. You must have a license to use.

Font of choice - I used Aquarelle here

Weescotlass Mask 236 here

Dee’s Sign Post Template “Dirty” here. You’ll find it under Thursday, July 8, 2010.

Plug Ins:
Eyecandy 3.1 - Glow
Xerox - Porcelain

“Rustic Holiday” is a tagger size scrap kit created by Kesha of KnC Scrapz and can be purchased from her store Lollipops n Gumdrops. You can visit her blog here.
Thank you Kesha….I totally loved this kit!!

This tutorial was written assuming you have a working knowledge of PSP.

~♥~ Let’s get started ~♥~

Open up the template.
Shift + D.
Close out the original.
Image/Canvas size:
700 x 700
OK
Highlight Raster 1 layer.
Flood fill white.
Delete the top 4 layers.

Highlight Top Square layer.
Copy and paste Paper 4 as a new layer.
Resize 70%
Free rotate Right 10 degrees.
Copy
Delete the paper layer.
Highlight Top Square layer.
Click on it with your Magic Wand.
New Raster layer.
Paste paper Into Selection.
Deselect.
Delete the template layer.

Highlight Bottom Square layer.
Repeat the above step accept Free rotate the paper Left 10 degrees.

Highlight Pink Strip layer.
Click on it with your Magic Wand.
New Raster layer.
Copy and paste Paper 9 Into Selection.
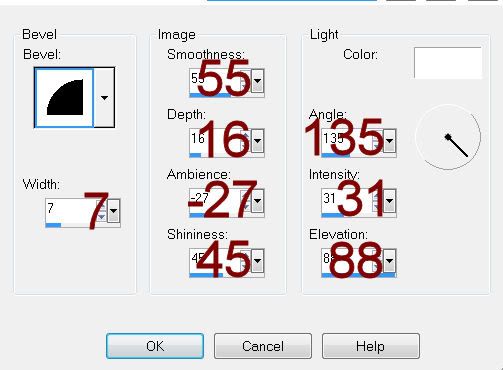
Give it a slight Inner Bevel:

Adjust/Add Remove Noise/Add Noise:
Gaussian and Monochrome checked
Noise: 43%
OK
Deselect.
Delete the template layer.

Highlight the other Pink Strip layer.
Repeat the above step.

Highlight Black Rectangle layer.
Click on it with your Magic Wand.
Copy and paste Paper 2 Into Selection.
Deselect.
Delete the template layer.
Give it the same slight Inner Bevel.

Open up Paper 4.
Make your Selection Tool active set on Rectangle.
Choose a small area of the paper.
In your Color Pallet set the foreground to pattern - look for the paper.

Highlight Large White Circle layer.
Click anywhere outside of it with your Magic Wand.
Selections/Invert
New Raster layer.
Flood fill with the pattern.
Apply the same Noise effect.
Deselect.
Delete the template layer.

Highlight Inner Circle Frame layer.
Click on it with your Magic Wand.
New Raster layer.
Copy and paste Paper 8 Into Selection.
Deselect.
Delete the template layer.

Highlight Large Pink Circle layer.
Click anywhere outside of it with your Magic Wand.
Selections/Invert
New Raster layer.
Copy and paste Paper 6 Into Selection.
Copy and paste your tube as a new layer.
Move into position within the circle.
Selections/Invert
Tap the delete key.
Deselect.
Delete the template layer.
Give it the same slight Inner Bevel.

Highlight Large Pink Rectangle layer.
Click anywhere outside of it with your Magic Wand.
Copy and paste Paper 2 as a new layer.
Resize 70%
Move into a position you like.
Tap the delete key.
Deselect.
Delete the template layer.

Highlight Bottom Circle Frame layer.
Click on it with your Magic Wand.
New Raster layer.
Copy and paste Paper 5 Into Selection.
Give it the same Noise effect.
Deselect.
Delete the template layer.

Repeat the above step with Middle and Top Circle Frame layers.

Highlight Top Circle Background layer.
Copy and paste Paper 6 as a new layer.
Resize 70%
Move the paper into position so that it covers all 3 circle backgrounds.
Duplicate the paper twice for a total of 3 layers.
Move one of the papers in your layers pallet just above the Middle Background template layer.
Move another of the papers in your layers pallet just above the Bottom Background template layer.

Highlight Top Circle Background layer.
Click anywhere outside of it with your Magic Wand.
Highlight the paper just above it.
Tap the delete key.
Deselect.
Delete the template layer.

Repeat the above step with Middle and Bottom Circle Background layers.

Highlight Bottom Circle Overlay layer.
Lower the Opacity to 38.

Repeat the above step with Middle and Top overlay layers.

Copy and paste your tube as a new layer just over the Top Circle Background paper layer.
Move this into position so that it covers all 3 circle background layers.
Once you have it in exact position duplicate it twice.
Move a tube layer just over the middle background paper layer in your layers pallet.
Move the other tube layer just over the bottom middle background paper layer in your layers pallet.

Highlight the top background paper layer.
Click anywhere outside of it with your Magic Wand.
Highlight the tube just above it.
Tap the delete key.
Deselect.

Highlight the middle and bottom background paper layers and repeat the above step.

To each tube layer apply Xerox - Porcelain:
Use default settings accept move the Blue Channel button to 0.

Add your elements. I used:
Bow: Resize 25%
Pinebranch: Resize 25% and 85%/Duplicate/Mirror/Duplicate
Ornament: Resize 25% and 50%
Bird: Resize 50%
Branch: Resize 25%/Mirror
Pinecone: Resize 25%/Duplicate/Mirror/Resize 70%
Frame 2: Resize 70%
Leaf: Resize 25% and 60%

Highlight your white background.
New Raster layer.
Select All.
Copy and paste Paper 6 Into Selection.
Deselect.
Apply the mask.
Resize 115%
Merge Group.

Add your copyrights.

Add your name:
Foreground and Background: #1d0501
Type your name.
Convert to Raster layer.
Apply Eyecandy 3.1 - Glow:
Width: 3
Opacity: 100
Opacity Drop off: Fat
Color: White

Resize all layers 80%.

I hope you enjoyed this tutorial.
I’d love to see your results.
Email me!
Hugs,
Bev

Thursday, November 10, 2011

Autumn Seductress


Supplies

1 tube of choice - I used the wonderful artwork of Lori Karels which can be purchased from Up Your Art.  You must have a license to use.

Font of choice - I used FP Third Hand here

Weescotlass Mask 208 here

Scrap Rebellion Template 48 here

Plug Ins:
Eyecandy 3.1 - Glow

“Autumn Harvest” is a tagger size scrap kit created by Kesha of KnC Scrapz and can be purchased from her store Lollipops n Gumdrops.   You can visit her blog here.
Thank you Kesha for another beautiful kit!

This tutorial was written assuming you have a working knowledge of PSP.

~♥~ Let’s get started ~♥~

Open up the template.
Shift + D.
Close out the original.
Resize all layers 85%
Image/Canvas Size:
700 x 550
OK
Highlight Raster 1 layer.
Flood fill white.
Delete Raster 7 layer.

Highlight Raster 6 layer.
Click anywhere outside of it with your Magic Wand.
Selections/Invert
New Rater layer.
Copy and paste Paper 1 Into Selection.
Adjust/Add Remove Noise/Add Noise:
Gaussian and Monochrome checked
Noise: 43%
OK
Deselect.
Delete the template layer.

Highlight Copy of Raster 6 layer.
Click on it with your Magic Wand.
New Raster layer.
Copy and paste Paper 2 Into Selection.
Deselect.
Delete the template layer.

Highlight Raster 3 layer.
Click anywhere outside of it with your Magic Wand.
Selections/Invert
New Raster layer.
Copy and paste Paper 7 Into Selection.
Apply the same Noise effect.
Deselect.
Delete the template layer.

Highlight Copy of Raster 3 layer.
Repeat the above step.

Highlight Raster 5 layer.
Select All/Float/Defloat
New Raster layer.
Paste Paper 7 Into Selection.
Deselect.
Delete the template layer.

Highlight Copy of Raster 5 layer.
Repeat the above step.

Highlight Raster 4 layer.
Click on it with your Magic Wand.
New Raster layer.
Copy and paste Paper 8 Into Selection.
Deselect.
Delete the template layer.

Highlight Raster 2 layer.
Click on it with your Magic Wand.
New Raster layer.
Copy and paste Paper 1 Into Selection.
Deselect.
Delete the template layer.

Highlight Copy of Raster 4 layer.
Click on it with your Magic Wand.
New Raster layer.
Copy and paste Paper 9 Into Selection.
Deselect.
Delete the template layer.

Copy and paste your tube as a new layer.

Add your elements.  I used:
Wreath:  Resize 60%
Branch:  Resize 25%
Bow 1:  Resize 25%
Doodle 2:  Resize 35%/Mirror
Flower 1:  Resize 25% and 40%/Duplicate
Flower 1 again:  Resize 25%, 40%, and 70%/Duplicate twice for a total of 3 flowers

Highlight your white background.
New Raster layer.
Select All.
Copy and paste Paper 8 Into Selection.
Deselect.
Apply the mask.
Resize 110%
Merge Group.

Add your copyrights.

Add your name:
Foreground:  #000000
Background:  #e29100
Stroke: 0.8
Type your name.
Convert to Raster layer.
Select All/Float/Defloat
Selections/Modify/Contract by 1
Give it a slight Inner Bevel:
Deselect.

Resize all layers 80%.

I hope you enjoyed this tutorial.
I’d love to see your results.
Email me!
Hugs,
Bev

Thanksgiving Home


Supplies

2 tubes of choice - I used the gorgeous artwork of Anna Marine which can be purchased from CDO.  You must have a license to use.

Font of choice - I used Before the Rain here

Becky Mask 22 here

Dee’s Sign Post template “Crazy for You” here.  You’ll find it under Friday, April 22, 2011

Plug Ins:
Eyecandy 3.1 - Glow

“Thanksgiving Home” is a tagger size scrap kit created by Kathi of KissedbyCari and can be purchased from TKO Scraps.   You can visit her blog here.
Thank you for another beautiful kit!

This tutorial was written assuming you have a working knowledge of PSP.

~♥~ Let’s get started ~♥~

Open up the template.
Shift + D.
Close out the original.
Delete the top 6 layers, Bottom X Grunge, Top Garv Strip, Top Circle, Bottom Circle, Main Grunge, Top X Grunge
Highlight Bg layer.
Flood fill white.

Highlight Large White Rectangle layer.
Click on it with your Magic Wand.
New Rater layer.
Copy and paste Paper 6 Into Selection.
Deselect.
Delete the template layer.
Give it a slight Inner Bevel:

Open up Frame 5.
Use your Selection Tool set on Rectangle and section off the plain green area of the frame.
Set the foreground in your Color Pallet to Pattern and look for the green portion of the frame.
Angle: 45
Scale: 130

Highlight Bottom Rectangle layer.
Click on it with your Magic Wand.
New Raster layer.
Flood fill with the green pattern.
Deselect.
Delete the template layer.
Give it the same Inner Bevel.

Highlight Top Rectangle layer.
Repeat the above step.

Highlight Top Film Frame layer.
Click on it with your Magic Wand.
New Raster layer.
Copy and paste Paper 13 Into Selection.
Deselect.
Delete the template layer.

Highlight Bottom Film Frame layer.
Repeat the above step.

Highlight Top Film White Square layer.
Click on it with your Magic Wand.
New Raster layer.
Copy and paste Paper 6 Into Selection.
Copy and paste your tube as a new layer above the paper.
Resize as needed and move into position over the paper.
Change the Properties to Multiply.
Selections/Invert
Tap the delete key.
Deselect.
Delete the template layer.

Highlight Bottom Film White Square layer.
Repeat the above step accept position a different area of the tube over the square.

Highlight Push Pin layer.
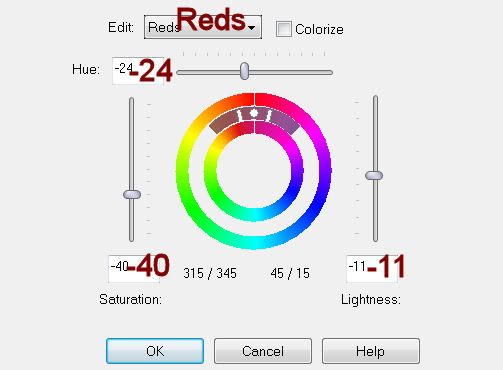
In your color pallet change the foreground to #834925.
Make your Target Tool active and change the color of the pin.
Adjust/Hue and Saturation/Hue/Saturation/Lightness
Match your settings to mine:

Highlight Bottom Pink Square layer.
Click on it with your Magic Wand.
New Raster layer.
Copy and paste Paper 5 Into Selection.
Deselect.
Delete the template layer.

Highlight Middle Pink Square layer.
Click on it with your Magic Wand.
New Raster layer.
Copy and paste Paper 4 Into Selection.
Deselect.
Delete the template layer.

Highlight Top Pink Square layer.
Click on it with your Magic Wand.
New Raster layer.
Copy and paste Paper 10 Into Selection.
Copy and paste your tube as a new layer below the frame - see my tag for reference.
Change the Properties to Soft Light.
Selections/Invert
Tap the delete key.
Deselect.
Delete the template layer.

Highlight Top White Frame.
Click on it with your Magic Wand.
New Raster layer.
Copy and paste Paper 12 Into Selection.
Deselect.
Delete the template layer.
Give it a slight Inner Bevel:

Repeat the above step with Middle White Frame and Bottom White Frame layers.

Copy and paste your tube as a new layer.

Add your elements.  I used:
Grapevine 2
Bow 4:  Resize 25%
Wreath: Resize 90%/Duplicate
Ivy:  Resize 85%/Duplicate
Scattered Leaves

Highlight your white background.
New Raster layer.
Select All.
Copy and paste Paper 14 Into Selection.
Deselect.
Apply the mask.
Use your Pick tool and pull the sides out a little.
Merge Group.

Add your copyrights.

Add your name:
Type your name.
Convert to Raster layer.
Apply Eyecandy 3.1 - Glow:
Width: 3
Opacity: 100
Opacity Drop off: Fat
Color: #e9e6c0

Resize all layers 80%.

I hope you enjoyed this tutorial.
I’d love to see your results.
Email me!
Hugs,
Bev

Wednesday, November 9, 2011

Rustic Holiday


Supplies

1 tube of choice - I used the gorgeous artwork of Zlata_M which is an exclusive tube from Pics for Design.

Font of choice - I used Nadall here

Weescotlass Mask 249 here

Dee’s Sign Post “Make Hay” here. You’ll find it under Tuesday, August 23, 2011

Plug Ins:
Mura’s Meister - Copies
Eyecandy 3.1 - Glow
Eyecandy Nature - Snow Drift
Xerox - Porcelain

“Rustic Holiday” is a tagger size scrap kit created by Kesha of KnC Scrapz and can be purchased from her store Lollipops n Gumdrops. You can visit her blog here.
Thank you Kesha….I totally loved this kit!!

This tutorial was written assuming you have a working knowledge of PSP.

~♥~ Let’s get started ~♥~

Open up the template.
Shift + D.
Close out the original.
Delete the top 4 layers and Half Circle layer.

Highlight Black Rectangle layer.
Click anywhere outside of it with your Magic Wand.
Copy and paste Paper 5 as a new layer.
Resize 80%
Selections/Invert
Tap the delete key.
Deselect.
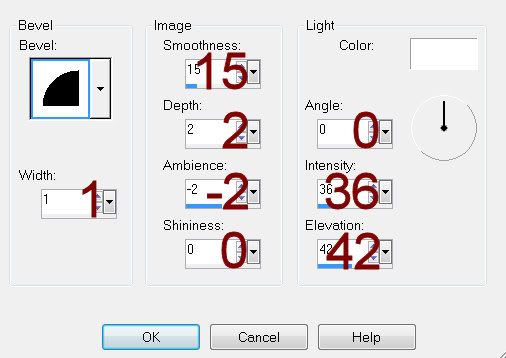
Give it a slight Inner Bevel:


Highlight Bottom Dark Grey Rectangle layer.
Click on it with your Magic Wand.
New Raster layer.
Copy and paste Paper 3 Into Selection.
Adjust/Add Remove Noise/Add Noise:
Gaussian and Monochrome checked
Noise: 43%
OK
Deselect.
Delete the template layer.

Highlight Top Dark Grey Rectangle layer.
Repeat the above step.

Highlight Bottom Light Grey Rectangle layer.
Copy and paste Paper 4 as a new layer.
Resize 70%
Free rotate Right 20 degrees.
In your layers pallet highlight Bottom Light Grey Rectangle layer.
Click anywhere outside of it with your Magic Wand.
Highlight the paper layer and move into position - see my tag for reference.
Tap the delete key.
Deselect.
Delete the template layer.

Highlight Top Light Grey Rectangle layer.
Repeat the above step accept Free rotate Left 20 degrees.

Highlight White Strip layer.
Click on it with your Magic Wand.
New Raster layer.
Copy and paste Paper 5 Into Selection.
Deselect.
Delete the template layer.
Give it the same Inner Bevel.

Highlight Dotted Strip layer.
Click anywhere outside of it with your Magic Wand.
Selections/Invert
New Raster layer.
Copy and paste Paper 3 Into Selection.
Deselect.
Delete the template layer.

Highlight Dotted Circle layer.
Repeat the above step.

Highlight White Circle layer.
Click on it with your Magic Wand.
New Raster layer.
Copy and paste Paper 7 Into Selection.
Give it the same Noise effect.
Deselect.
Delete the template layer.

Highlight Grey Circle layer.
Click on it with your Magic Wand.
New Raster layer.
Copy and paste Paper 6 Into Selection.
Deselect.
Delete the template layer.

Highlight Top White Square layer.
Click anywhere outside of it with your Magic Wand.
Selections/Invert
New Raster layer.
Paste Paper 7 Into Selection.
Give it the same Noise effect.
Deselect.
Delete the template layer.

Highlight Bottom White Square layer.
Repeat the above step.

Highlight Top Square layer.
Click on it with your Magic Wand.
New Raster layer.
Copy and paste Paper 1 Into Selection - Rename Top Square
Deselect.
Delete the template layer.

Highlight Bottom Square layer.
Repeat the above step accept rename the layer Bottom Square.

Copy and paste your tube as a new layer over the Bottom Square paper layer.
Change the Properties to Overlay.
Resize as you like and move into a position you like.
Duplicate/In your layers pallet move this layer over the Top Square paper layer.

Highlight Top Square paper layer.
Click anywhere outside of it with your Magic Wand.
Highlight the tube layer just above it.
Tap the delete key.
Deselect.

Highlight Bottom Square paper layer.
Repeat the above step.

Paste your tube again as a new layer just over the Black Strip layer.
Change the Properties to Overlay.
Find an area of the face you like and center that over the strip in the area that’s between the Top and Bottom square layers.
Apply Mura’s Meister - Copies:
Choose Line
Change Number to 6.
OK
Duplicate/Apply Xerox - Porcelain:
Use Default Settings accept move the Blue Channel button down to 0.
OK
Highlight the Original tube line layer.
Adjust/Blur/Gaussian Blur:
Radius: 2
OK
Highlight Black Strip layer.
Click anywhere outside of it with your Magic Wand.
Highlight each tube layer and tap the delete key.
Deselect.

Add your elements. I used:
Frame 2: Resize 65%
Branch: Resize 25% and 70%
Pine Branch: Resize 25%/Duplicate
Flower: Resize 40%
Bow 2: Resize 30%
Pinecone: Resize 25%/Free rotate Left 15 degrees/Duplicate/Mirror/Resize 70%
Element 1: Resize 25%
Ornament: Resize 25% and 40%
Snow 1: Resize 50%/To Feather:
Use your Freehand Selection Tool and section around the snow - making the line touch wherever you want the snow feathered.
Selections/Modify/Inside Outside Feather:
Both checked
Feather amount: 43
OK
Selections/Invert
Tap the delete key a few times.
Deselect.

Highlight your white background.
New Raster layer.
Select All.
Copy and paste Paper 2 Into Selection.
Deselect.
Apply the mask.
Use your Pick tool and pull the side out a little.
Merge Group.
Duplicate
Change the Properties to Burn.
Lower the Opacity to about 83

Add your copyrights.

Add your name:
Foreground and Background: #2a2429
Type your name.
Convert to Raster layer.
Apply Eyecandy 5: Nature - Snow Drift -
On the Settings Tab:
Small, First Flakes

Basic Tab:
Default settings accept lower “Dust on All Features” to about 14
OK

Resize all layers 80%.

I hope you enjoyed this tutorial.
I’d love to see your results.
Email me!
Hugs,
Bev
Sunday, November 6, 2011

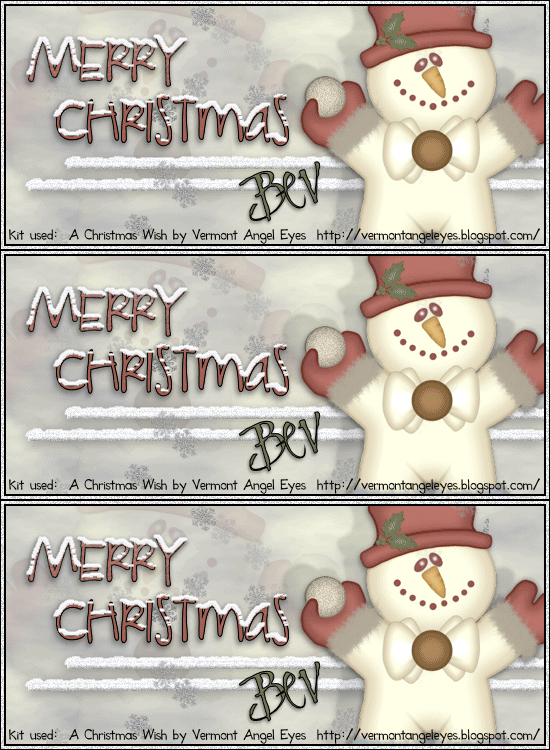
A Christmas Wish 10


Supplies

Font of choice - I used LDGregarious - a pay font.  Childish should work just as well here.  Clive Barker here

Animation Shop

Plug Ins:
Mura’s Meister - Cloud
Mura’s Meister - Copies
Eyecandy 5 Nature - Snow Drift
Dsb Flux - Bright Noise

“A Christmas Wish” is a tagger size scrap kit created by Edna of Vermont Angel Eyes.  This portion is part of a huge mega collab to help a fellow designer in her time of need.  It  can be purchased from TKO Scraps.   You can visit Edna’s blog here.
Thank you Edna for your fantastic portion.

This tutorial was written assuming you have a working knowledge of PSP.

~♥~ Let’s get started ~♥~

Color Pallet:
Foreground: #acadb1 
Background:  #ffffe7

Open up a 650 x 250 canvas.
 Apply Mura’s Meister - Cloud

Copy and paste Snowman as a new layer.
Resize 70%
Position to the right of your canvas - see my tag for reference.

Paste the Snowman again.
In your layers pallet move it just above the cloud layer.
Mirror
Position to the left of the canvas.
Low the opacity to about 28.

Highlight the Snowman that’s positioned on the right side.
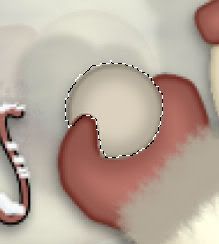
Use your Freehand Selection Tool set on Point to Point and trace around the snowball.

In your layers pallet right click and choose “Promote Section to Layer”
Duplicate twice for a total of 3 snowball layers.
Rename them Snowball 1, Snowball 2, and Snowball 3.

Highlight Snowball 1.
Apply DSB Flux - Bright Noise:
Intensity: 15
Mix checked
OK

Highlight Snowball 2.
Apply same Bright Noise accept hit mix button twice.
OK

Highlight Snowball 3.
Apply same Bright Noise accept hit mix button 3 times.
OK

Close out Snowball 2 and 3.
Leave Snowball 1 layer open.

Color Pallet:
Change the foreground to #efefef

Make your Selection Tool active set on rectangle.
New Raster layer.
Make a rectangle approximately 500 x 10 pixels.
Flood fill with the foreground color.
Deselect.
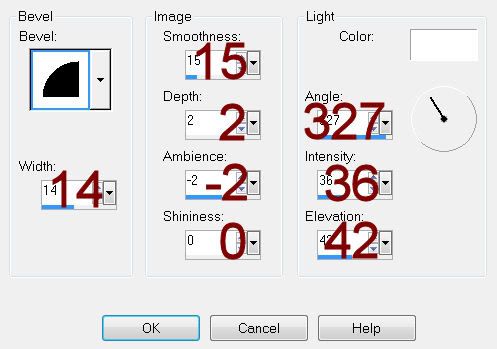
Give it a slight Inner Bevel:

Duplicate
To each rectangle layer apply Eyecandy 5: Nature - Snow Drift.
Settings Tab:
Small, First Flakes
Use default settings on all other tabs.
OK

Move both snow covered rectangle into position - see my tag for reference.
Merge visible both rectangle layers.
Duplicate twice for a total of 3 layers.
Rename them Bar 1, Bar 2, and Bar 3.

Highlight Bar 1
Apply same Bright Noise:
OK

Highlight Bar 2
Apply same Bright Noise accept hit mix button twice.
OK

Highlight Bar 3
Apply same Bright Noise accept hit mix button 3 times.
OK

Close out Bar 2 and 3.
Keep Bar 1 open.

Type the words Merry Christmas - each word on it’s own layer.  I used LDGregarious font for this.
Move them into position - see my tag for reference.
Merge Visible both word layers.
Apply Eyecandy 5: Nature - Snowdrift:
Use same settings as before accept on the Basic Tab change:
Drift Height: 3.21
And you can move “Dust on all Features” tab to one you like.
OK

Copy Snowflake 3 as a new layer.
Resize 10% and 70%
Apply Mura’s Meister - Copiers:  Wallpaper (Perspective)
Use Default settings accept change scale to 116
OK

Highlight the top layer in your layers pallet.
New Raster layer.
Flood fill with #000000
Select All
Selections/Modify/Contract by 1
OK
Tap the delete key.
DO NOT DESELECT.

New Raster layer.
Flood fill with #e6e6e6
Selections/Modify/Contract by 3
Tap the delete key.
Rename Noise Frame.
DO NOT DESELECT.

New Raster layer.
Flood fill with #000000
Selections/Modify/Contract by 2
Tap the delete key.
Deselect.

Highlight Noise Frame layer.
Duplicate twice for a total of 3.
Name each Noise Frame 1, Noise Frame 2, Noise Frame 3.

Highlight Noise Frame 1.
Apply DSB Flux - Bright Noise:
Intensity 32
Mix checked
OK

Highlight Noise Frame 2.
Apply same Bright Noise accept hit mix button twice.
OK

Highlight Noise Frame 3.
Apply same Bright Noise accept hit mix button three times.
OK

Close out Noise Frame 2 and 3.
Keep open Noise Frame 1.

Add your credit.

Add your name.

Copy Merge.

~Time to Animate~

Open up Animation Shop.
Edit/Paste/As New animation

Back in PSP.
Close out Noise Frame 1.
Open up Noise Frame 2.
Close out Snowball 1.
Open up Snowball 2.
Close out Bar 1.
Open up Bar 2.
Copy Merge.

Carry into AS.
Edit/Paste/After Current Frame.

Back in PSP
Close out Noise Frame 2.
Open up Noise Frame 3.
Close out Snowball 2.
Open up Snowball 3.
Close out Bar 2.
Open up Bar 3.
Copy Merge.

Carry into AS.
Edit/Paste/After Current Frame.

View your animation.
If you’re happy then save.

I hope you enjoyed this tutorial.
I’d love to see your results.
Email me!
Hugs,
Bev