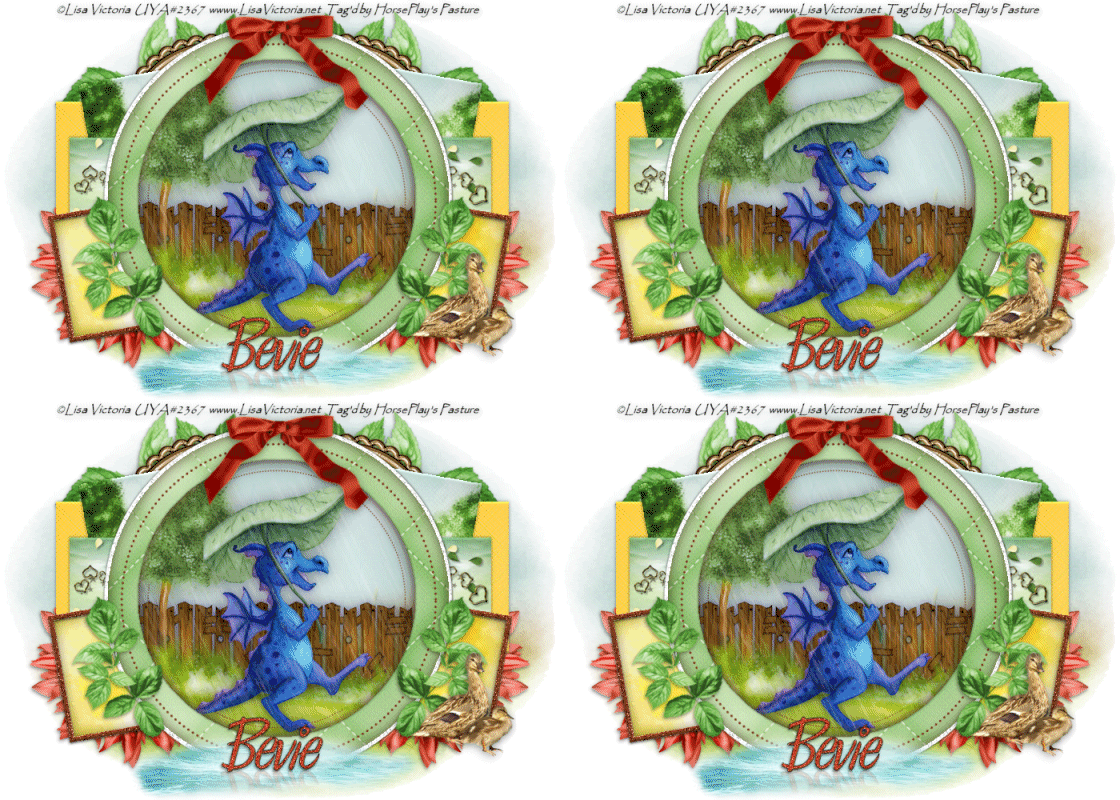
Supplies
1 tube of choice – I used the adorable artwork of Lisa Victoria which
can be purchased from Up Your Art. You must have a license to use.
Font of choice - I used Chicken Basket here
Divine Intentionz Template 450 here
Plug Ins:
Brush Strokes – Crosshatch
Xero – Porcelain
Van Der Lee Snowflakes
Animation Shop
This tutorial was written assuming you have a working knowledge of PSP.
~♥~ Let’s get started ~♥~
Open up the template.
Shift + D.
Close out the original.
Resize all layers 85%
Image/Canvas Size:
700 x 500
OK
Open up the background layer.
Flood fill white.
Delete the top 3 layers, Small Circle 1, and Small Circle 2 layers.
Highlight Rectangle 2 layer.
Click on it with your Magic Wand.
New Raster layer.
Copy and paste Paper 5 Into Selection.
Duplicate
Adjust/Blur/Gaussian Blur:
Radius: 3
OK
Apply Brush Strokes – Cross Hatch:
Stroke Length: 29
Sharpness: 6
Strength: 1
OK
Apply this same effect 2 more times.
Deselect
Delete the template layer.
Highlight Square 1 layer.
Click on it with your Magic Wand.
New Raster layer.
Copy and paste Paper 2 Into Selection.
Deselect.
Delete the template layer.
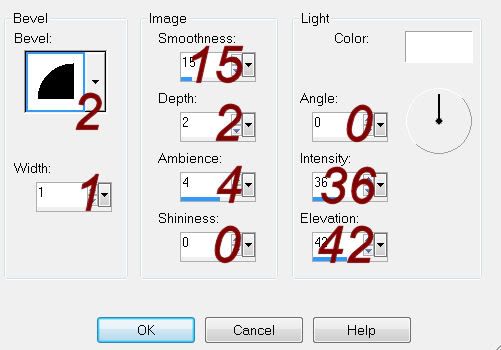
Give it a slight Inner Bevel:
Highlight Square 2 layer.
Repeat the above step.
Highlight Rectangle layer.
Click on it with your Magic Wand.
New Raster layer.
Copy and paste Paper 3 Into Selection.
Make the paper active again/Flip/Copy
Make your working canvas active.
Paste Into Selection.
Deselect.
Use your Selection Tool and section off the side off the right side of
the paper.
Tap the delete key.
Deselect.
Delete the template layer.
Merge Visible both paper layers.
Give it the same slight Inner Bevel.
Highlight Frame Back layer.
Click on it with your Magic Wand.
New Raster layer.
Copy and paste Paper 4 Into Selection.
Deselect.
Delete the template layer.
Highlight Copy of Frame Back layer.
Repeat the above step.
Highlight Frame layer.
Click on it with your Magic Wand.
New Raster layer.
Flood fill with #823d20.
Deselect.
Delete the template layer.
Give it the same slight Inner Bevel.
Adjust/Add Remove Noise/Add Noise:
Random and Monochrome checked
Noise: 20%
OK
Highlight Frame 2 layer.
Repeat the above step.
Highlight Circle 1 layer.
Click on it with your Magic Wand.
New Raster layer.
Copy and paste Paper 14 Into Selection.
Deselect.
Delete the template layer.
Highlight Circle 2 layer.
Click on it with your Magic Wand.
New Raster layer.
Copy and paste Paper 1 Into Selection.
Deselect for now.
We’re going to add the elements that will go within the circle. Don’t worry about what overhangs it. We’ll clean it up in a bit. Copy and paste the following elements – use my
tag for reference:
11: Resize 30%/Duplicate 3
times/Position to make one fence.
29: Resize 50%
57: Resize 50%
Highlight Circle 2 template layer.
Click anywhere outside of it with your Magic Wand.
Highlight each element within the circle and tap the delete key.
Deselect.
Copy and paste your tube as a new layer.
If you’re using the tube I did, resize 50%
Merge Visible the circle paper layer, the elements, and your tube.
Apply Xero – Porcelain:
Use Default Settings
Highlight the Circle 2 template layer again.
Click on it with your Magic Wand.
Highlight the merged layer.
Make 4 new layers above it – rename them Rain 1, 2, 3, and 4.
Highlight Rain 1 layer.
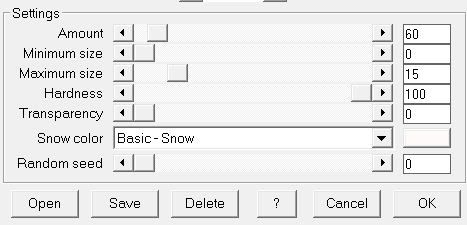
Apply Van Der Lee – Snowflakes:
Repeat the above step with Rain 2, 3, and 4 accept with each layer move
the Random Seed Button.
DO NOT DESELECT YET.
To each rain layer:
Adjust/Blur/Motion Blur:
Angle: 154.00
Strength: 86
OK
Deselect.
Close out Rain 2, 3, and 4.
Keep Rain 1 open.
Highlight Dotted Circle 2 layer.
In your layers pallet:
Change your foreground to the same color the dotted circle is.
Change your background color to: #823d20
Make your Color Replacer tool active and zoom in on the dots and double
right click twice. The dots should
change to the background color.
Highlight Dotted Circle layer.
Change the Foreground color to the color of the dots and repeat the
above step.
Add your elements. I used:
16: Resize 35%/Free rotate Right
40 degrees
25: Resize 35%/Duplicate/Mirror
38: Resize 50%/Duplicate
4: Resize 25%
31: Resize 35%/Free rotate Left
10 degrees/Duplicate/Mirror
31 again: Resize 70%/Free rotate
Right 100 degrees
66: Resize 70%/Duplicate/Mirror
Highlight your white canvas.
New Raster layer.
Select All.
Copy and paste Paper 1 Into Selection.
Deselect.
Apply the mask.
Merge Group.
Add your credits.
Add your name with the reflection -
Foreground: #202020
Background: #c84c26
Stroke Width: .75
Type your name.
Give it the same slight Inner Bevel.
Apply the same Noise effect.
Copy and paste 39 as a new layer.
Resize 50%
Move your name over it so that the bottom of your name is in the
middle.
Duplicate your name/Flip
In your layers pallet move beneath the original name.
On your canvas move it (the duplicate) so that the top matches up with
the bottom of the other name layer.
Lower the Opacity to about 18.
Highlight the puddle layer.
Click anywhere outside of it with your Magic Wand.
Highlight the duplicated name layer.
Tap the delete key.
Selections/Modify/Inside Outside Feather:
Both checked
Feather amount: 25
OK
Tap the delete key until no more of the name disappears at the bottom
edge of the puddle.
Deselect.
Merge Visible the two name layers and the puddle.
Move into position at the bottom of your canvas – see my tag for
reference.
Resize all layers 80%.
Copy Merge
~ Time to Animate ~
Open up Animation Shop.
Edit/Paste as New Animation.
Back in PSP.
Close out Rain 1.
Open up Rain 2.
Copy Merge
Carry Into AS
Edit/Paste/After Current frame.
Back in PSP.
Close out Rain 2.
Open up Rain 3.
Copy Merge
Carry Into AS
Edit/Paste/After Current frame.
Back in PSP.
Close out Rain 3.
Open up Rain 4.
Copy Merge
Carry Into AS
Edit/Paste/After Current frame.
View your Animation.
If you’re happy then save.
I’d
love to see your results.
Email me!
Hugs,
Bev


