

Supplies Needed
1 tube of choice – I
used the artwork of Robert Freeman which can be purchased from CDO. You must have a license to use.
Font of choice – I
used Euphoria Script here
My template 157 here
“Summer Breeze” is a
tagger size scrap kit created by Jessica of Gothic Inspirations and can be
purchased from her store here. You can visit her blog here. Thank you Jessica for another fantastic kit!
This tutorial was
written assuming you have working knowledge of PSP.
~♥~ Let’s get started ~♥~
Open up the template.
Shift + D.
Close out the original.
Delete the top 5 layers, Raster 2,
and Raster 3 layers.
Color Pallet:
Foreground: #202020
Background: #37a3b5
Highlight Raster 4 layer.
Make your Color Replacer Tool
active.
Zoom in on the layer on your working
canvas and double right click on it.
The dotted circle should have turned
blue.
Adjust/Add Remove Noise/Add Noise:
Random checked
Noise: 50%
OK
Highlight Raster 5 layer.
Repeat the above step.
Highlight Raster 6 layer.
Click on it with your Magic Wand.
New Raster layer.
Copy and paste Paper 13 Into
Selection.
Deselect.
Delete the template layer.
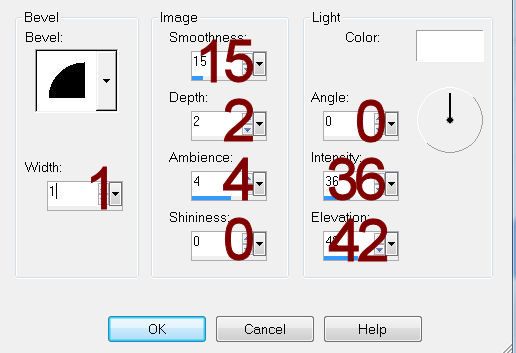
Give it a slight Inner Bevel:
Highlight Raster 7 layer.
Click on it with your Magic Wand.
New Raster layer.
Copy and paste Paper 7 Into
Selection.
Deselect.
Delete the template layer.
Highlight Raster 8 layer.
Click on it with your Magic Wand.
New Raster layer.
Copy and paste Paper 8 Into
Selection.
Deselect.
Delete the template layer.
Give it a slight Inner Bevel.
Highlight Raster 10 layer.
Repeat the above step.
Highlight Raster 9 layer.
Click on it with your Magic Wand.
New Raster layer.
Copy and paste Paper 10 Into
Selection.
Deselect for now.
Copy and paste your tube as a new
layer over the paper layer.
Change the Properties of the tube to
Soft Light.
Highlight Raster 12 layer.
Click on it with your Magic Wand.
Highlight the tube layer in your
layers pallet and right click on it.
Choose Promote Section to Layer.
Move that piece of the tube above
Raster 12 template layer.
Delete Template 12 layer.
Highlight Raster 9 template layer.
Click anywhere outside of it with
your Magic Wand.
Highlight the tube layer that’s just
above the paper.
Tap the delete key.
Deselect.
Delete the template layer.
Highlight Raster 11 layer.
Click on it with your Magic Wand.
New Raster layer.
Copy and paste Paper 10 Into
Selection.
Deselect for now.
Copy and paste your tube as a new
layer over the paper layer.
Change the Properties of the tube to
Soft Light.
Highlight Raster 13 layer.
Click on it with your Magic Wand.
Highlight the tube layer in your
layers pallet and right click on it.
Choose Promote Section to Layer.
Move that piece of the tube above
Raster 13 template layer.
Delete Template 13 layer.
Highlight Raster 11 template layer.
Click anywhere outside of it with
your Magic Wand.
Highlight the tube layer that’s just
above the paper.
Tap the delete key.
Deselect.
Delete the template layer.
Copy and paste your tube as a new
layer.
Move into position – see my tag for
reference.
Add your elements. I used:
Ribbon 1: Resize 25%/Free rotate Right 5
degrees/Duplicate/Mirror/Duplicate both ribbon layers
Shell 2: Resize 25%
Flowers 2: Resize 45%
Bird: Resize 25%
Button Flower: Resize 20%/Duplicate/Mirror/Duplicate/Resize 70%/Duplicate/Mirror/Duplicate/Resize
80%/Duplicate 3x’s
Staple: Resize 25%
Highlight your white background.
Select All.
Copy and paste Paper 15 Into
Selection.
Deselect.
Apply the mask.
Merge Group.
Add your copyrights.
Add your name.
Foreground: #202020
Background: #a40000
Stroke: 1
Type your name.
Give it a slight Inner Bevel:


Resize all layers 80%.
I’d love to see your results.
Hugs,
Bev


