Saturday, July 18, 2009

Princess for a Day

Clicking on the image will enlarge to full view.

Supplies
Font of Choice - LavishlyYours which I’ll supply
Weescotlass Mask 119 here
Twink
Animation Shop
Supplies here
“Summer Bride” is a PTU tagger size scrap kit created by Julie of Bits ’n Bobs and can be purchased at Exquisite Scraps. You can visit her blog here.
Thank you Julie for another beautiful kit!

This tutorial was written assuming you have working knowledge of PSP.

~♥~ Let’s get started ~♥~

Open up a 600 X 600 transparent canvas.
Flood Fill white.

Copy and paste Frame 3 as a new layer.
Resize 75%
Use your Magic Wand and click inside.
Selections/Modify/Expand by 2

New Raster layer below the frame.
Copy and paste a paper of choice Into Selection.
DO NOT DESELECT

New Rater layer.
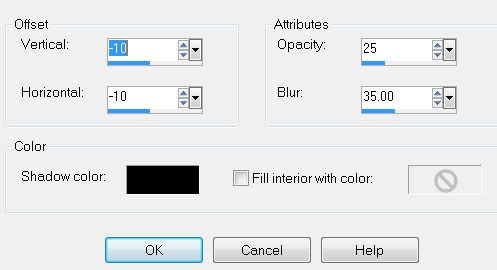
Effects/3D Effects/Cutout
Vertical and Horizontal: 10
Opacity: 15
Blue: 35
Color: Black
OK

Repeat the above step accept change the Vertical and Horizontal number to -10.
Deselect.

Copy and Paste Bride 1 as a new layer.
Position it to the left of the frame. Once you’ve got it where you like, Duplicate/Mirror. Lower the Opacity to 89.

Highlight the Frame layer and click inside with your Magic Wand.
Selections/Invert
Highlight the Duplicated bride.
Tap the delete key.
Deselect.

Add your embellishments. I used:
Bow 1: Resize 50%
Gem 1: Resize 30%
Gem 2: Resize 40%
Rings (Elem 4): Resize 40%
Doodle 3: Resize 25%
Feather 1 & 2: Resize 40%

Highlight your white canvas.
New Raster Layer.
Select All.
Copy and paste a paper of choice Into Selection.
Deselect.
Apply the mask.
Merge Group.

Copy and paste Glitter 1 just above the mask layer.
Lower the opacity to about 55.

Add your copyrights.

Add your name.

Time to Animate.
Copy Merge and carry into Animation Shop.
Edit/Paste/As new animation

Ctl + tap L key until you have 16 frames.
Open up the twinks I supplied.
Ctl + A to highlight all frames.
Edit/Copy

Make your tag frames active
Click on the Propagate Paste icon at the top of the screen
(It looks like 3 folders with the corners bent over)
Ctl + E and paste the twinks over the wedding bands.

I hope you enjoyed this tutorial.
I’d love to see your results and show it off in my Show Arena.
Email me!
Hugs,
Bev

Friday, July 17, 2009

Funtabulous Day

Clicking on the image will enlarge to full view.
 
Supplies
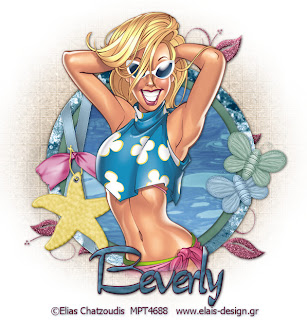
1 tube of choice - I’m using the artwork of Elias Chatzoudis here.
Font of Choice - Tabitha Regular here
Weescotlass Mask 62 here
jbs2designs Template 22 here
“Beauty of the Beach” is a PTU tagger size scrap kit created by Katie of Crazeds Creations and can be purchased at Scraps with Attitude. Visit her blog here.
Thank you Katie for such a fabulous kit!

This tutorial was written assuming you have working knowledge of PSP.

~♥~ Let’s get started ~♥~

Open up the template.
Shift + D. Close out the original.
Delete the copyright and brush layer.
Resize all layers 110%
Image/Canvas Size
700 X 700
New Raster layer.
Send to bottom.
Flood fill white.

Highlight the Large Circle layer.
Select All/Float/Defloat
New Raster Layer
Copy and paste a paper of choice Into Selection.
Deselect.
Delete the template layer.

Repeat the above step with Medium and Small circle layers.

Copy and paste a ribbon of choice (I used Ribbon 5).
Resize 50%.
Use your Pick Tool and rotate the ribbon until it covers over either the left or right rectangle layer.
Once you’ve done that, highlight the large circle layer.
Select All/Float/Defloat
Selections/Invert
Highlight your ribbon layer and tap the delete key.
Deselect.
Delete the template layer that you just covered up.

Paste the ribbon again as a new layer.
Repeat the above step with the remaining rectangle layer.

Add your embellishments. I used:
Bow 8: Resize 40%
Starfish Tag 3: Resize 60%
Butterfly 1 & 2: Resize 35%. Free rotate 25 degrees

Highlight the Doodle layer.
Select All/Float/Defloat
New Raster layer.
Flood fill with a gradient that’s complimentary to your tag.
Deselect.
Delete the template layer.
Adjust/Add Remove Noise/Add Noise
Random and Monochrome checked
Noise: 30%

Highlight your white canvas.
New Raster Layer.
Select All.
Copy and paste a paper of choice Into Selection.
Deselect.
Apply the mask.
Merge Group.

Add your copyrights.

Add your name.

Crop your image.

I hope you enjoyed this tutorial.
I’d love to see your results and show it off in my Show Arena.
Email me!
Hugs,
Bev
Wednesday, July 15, 2009

BlueJean Baby

Clicking on the image will enlarge to full view.

Supplies
1 tube of choice - I’m using the artwork of Olivia here.
Font of Choice - Chicken Basket I supplied here
Weescotlass Mask 297 here
jbs2designs Template 45 here
“Denim Dreams” is a PTU tagger size scrap kit created by Terry of Treasures by Terry and can be purchased at Butterfly Blush Designs. Visit her blog here.
Thank you Terry for another stunning kit!

This tutorial was written assuming you have working knowledge of PSP.

~♥~ Let’s get started ~♥~

Open up the template.
Shift + D. Close out the original.
Delete the copyright and brush layer.
Resize all layers 130%
Image/Canvas Size
700 X 700
New Raster layer.
Send to bottom.
Flood fill white.

Highlight the Rectangle layer.
Select All/Float/Defloat
New Raster Layer
Copy and paste a paper of choice Into Selection.
Deselect.
Delete the template layer.
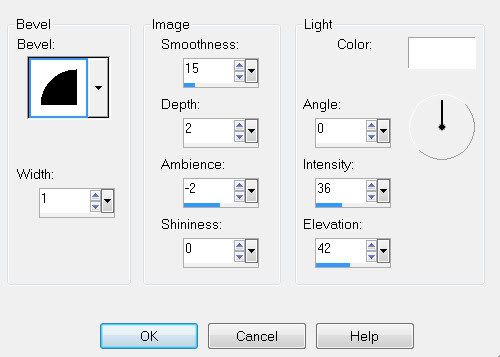
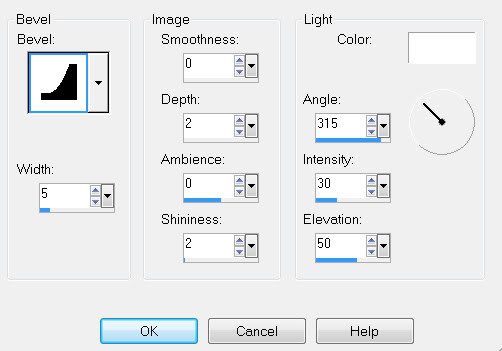
Give it a slight inner bevel:


Repeat the above step with Ribbon 1, Ribbon 2, and Circle layers.

Highlight the Diamond Layer.
Select All/Float/Defloat
New Raster Layer
Copy and paste a paper of choice Into Selection.
New Raster Layer.
Effects/3D Effects/Cutout
Vertical and Horizontal: 10
Opacity: 24
Blur: 35
Color: Black
OK
New Raster layer.
Apply the same cutout accept change Horizontal & Vertical numbers to -10.
DO NOT DESELECT YET.

Copy and paste your tube as a new layer. Resize as large as you like and position it over the diamond.
Selections/Invert
Hit the delete button.
Deselect.
Delete the template layer.

Merge Visible the Diamond Paper, Cutout Layers, and tube layer.
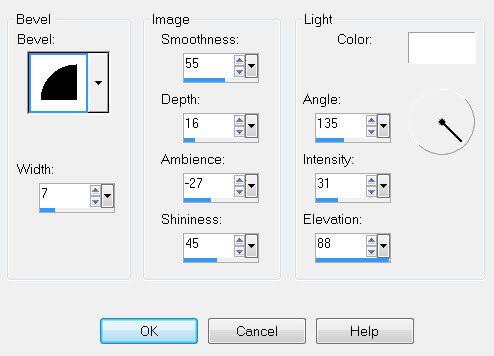
Give it a slight inner bevel:


Copy and paste Frame 9 as a new layer.
Resize 85%.
Free rotate 45 degrees
In your layer pallet, move it behind the merged Diamond layer.

Copy and Paste Ribbon 3 as a new layer.
Duplicate and move so the two are joined and forms one long ribbon.
Center it over the large rectangle - see my tag for placement.
Highlight the large rectangle.
Select All/Float/Defloat
Selections/Invert
Highlight the ribbon layer and tap the delete key.
Deselect.
Duplicate/Flip.

Add your embellishments. I used:
Flower Chain 3: Resize 30% Free Rotate Left 90 degrees
Heart 1: Resize 30%
Heart 2: Resize 40%
Butterfly 2: Resize 45%
Butterfly 3: Resize 30%
Feather: Resize 70%

Highlight your white canvas.
New Raster Layer.
Select All.
Copy and paste a paper of choice Into Selection.
Deselect.
Apply the mask.
Merge Group.

Add your copyrights.

Add your name.
I gave mine the first inner bevel that was used.

Crop your image.

Resize all layers 85%.

I hope you enjoyed this tutorial.
I’d love to see your results and show it off in my Show Arena.
Email me!
Hugs,
Bev

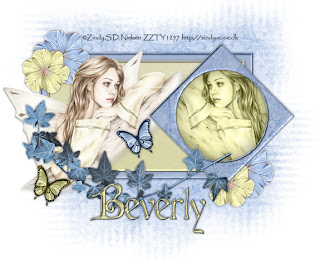
Dream

Clicking on the image will enlarge to full view.
 
Supplies
1 tube of choice - I’m using the artwork of Zindy S.D. Nielsen here.
Font of Choice - Cardinal alternate here
Weescotlass Mask 81 here
jbs2designs Template 42 here
“Blue Dream” is a FTU tagger size scrap kit created by RebelChick’s Scraps and can be found on her blog Whispers of a Memory. Please leave a thank you when downloading as it’s a small gesture for hard work given freely.
Thank you Reb for a beautifully amazing kit!!

This tutorial was written assuming you have working knowledge of PSP.


~♥~ Let’s get started ~♥~

Open up the template.
Shift + D. Close out the original.
Delete the copyright and brush layer.
Resize all layers 110%.
Image/Canvas Size
700 X 700
New Raster layer.
Send to bottom.
Flood fill white.

Highlight Large Rectangle layer.
Select All/Float/Defloat
New Raster Layer
Copy and paste a paper of choice Into Selection.
Deselect.
Delete the template layer.
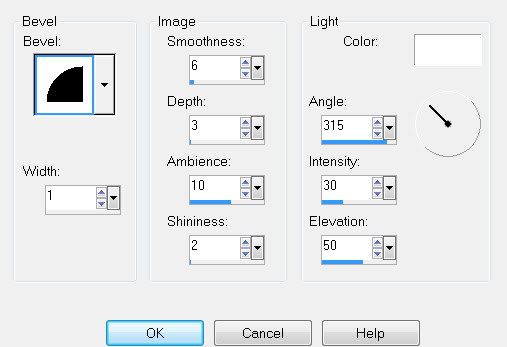
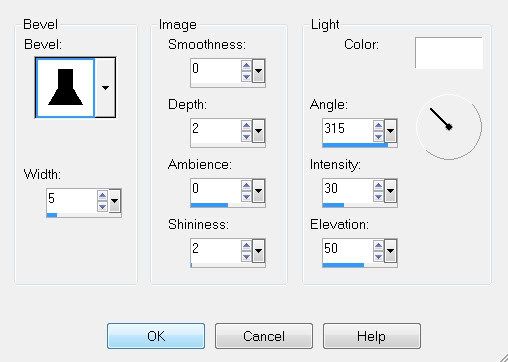
Give it a slight inner bevel:


Repeat the above step with the Small Rectangle Layer.

Highlight the Diamond Layer.
Select All/Float/Defloat
New Raster Layer
Copy and paste a paper of choice Into Selection.
Deselect.
Delete the template layer.
DO NOT ADD THE INNER BEVEL TO THIS LAYER YET.

Highlight the Circle layer.
Select All/Float/Defloat
Highlight the Diamond layer.
Tap the delete key.
Highlight the Circle layer again and move below the Diamond Layer.
Selections/Modify/Expand by 2.
New Raster Layer.
Copy and Paste a paper of choice Into Selection.
New Raster Layer.
Effects/3D Effects/Cutout
Vertical and Horizontal: 10
Opacity: 24
Blur: 35
Color: Black
OK
New Raster layer.
Apply the same cutout accept change Horizontal & Vertical numbers to -10.
Deselect.

Highlight the Diamond Layer.
Give it the inner bevel.

Copy and paste your tube as a new layer.
Position it to the left of the circle.
When you have it exactly where you want it, duplicate, mirror, move it below the cutout layers in the layers pallet, and position the duplicated tube layer below the diamond layer.
Once you have it exactly where you want it, click inside the diamond layer with your Magic Wand.
Selections/Modify/Expand by 2.
Highlight your duplicated tube layer and tap the delete key.
Deselect.
Change the Properties to Luminance Legacy.

Add your embellishments. I used:
Flower 4: Resize 50%
Flower 3: Resize 60%
Ivy: Resize 80%. Free Rotate L 45 degrees
Butterflies: Resize 20%. Free rotate 25 degrees

Highlight your white canvas.
New Raster Layer.
Select All.
Copy and paste a paper of choice Into Selection.
Deselect.
Apply the mask.
Merge Group.
Use your Pick Tool and bring the top and bottom of the mask in just a little.

Add your copyrights.

Add your name.
I gave mine the same inner bevel.

Crop your image.

Resize all layers 85%.

I hope you enjoyed this tutorial.
I’d love to see your results and show it off in my Show Arena.
Email me!
Hugs,
Bev
Monday, July 13, 2009

Angelic Bliss

Clicking on the image will enlarge to full view.

 
Supplies
2 tubes of choice - I’m using the artwork of Zindy S.D. Nielsen here.
Font of Choice - Chateau which I’ll supply here
Becky Mask 22 here
jbs2designs Template 68 here
Xerox - Porcelain
“Angel Kisses” is a tagger size scrap kit created by Kristi of Scrappin Divaz Designz and can be purchased at her store The Scrappin Divaz Designz here.
Thank you Kristi for a delicate and oh so beautiful scrap kit!
It’s downright gorgeous!

This tutorial was written assuming you have working knowledge of PSP.


~♥~ Let’s get started ~♥~

Open up the template.
Shift + D. Close out the original.
Delete the copyright layer.
Image/Canvas Size
700 X 700
New Raster layer.
Send to bottom.
Flood fill white.

Highlight Scallop 1 layer.
Select All/Float/Defloat
New Raster Layer
Copy and paste a paper of choice Into Selection.
Deselect.
Delete the template layer.
Give it a slight inner bevel:

Repeat the above steps with Scallop 2 layer.

Highlight the Square layer.
Select All/Float/Defloat
New Raster Layer
Copy and paste a paper of choice Into Selection.
Deselect.
Delete the template layer.

Highlight Square Frame layer.
Select All/Float/Defloat
Copy and paste a paper of choice as a new layer.
Selections/Invert
Hit the delete key.
Deselect.
Delete the template layer.
Give it the same slight inner bevel.

Highlight the heart layer.
Select All/Float/Defloat
Copy and paste a paper of choice as a new layer.
Selections/Invert
Hit the delete key.
DO NOT DESELECT.

Paste your tube over the heart - resizing it as necessary
Selections/Modify/Feather
Number of Pixels: 43
Tap the delete key until you have the feathered look you want.
Deselect.
Delete the template layer.

Merge the tube down onto the heart layer.
Apply the Xerox - Porcelain effect:

Copy your other tube as a new layer.
Again, apply the same Porcelain Effect to this tube as well.

Add your embellishments. I used:
Hanging Heart 1: Resize 60%
Bow 2: Resize 30%
Dove: Resize 25% & 90%
Wings: Resize 50% & 90%
Sparkles
Star Wire: Resize 40%, Flip
Light: Resize 80%

Highlight your white canvas.
New Raster Layer.
Select All.
Copy and paste a paper of choice Into Selection.
Deselect.
Apply the mask.
Merge Group
.
Add your copyrights.

Add your name.
I gave mine an inner bevel:


Resize all layers 85%.

I hope you enjoyed this tutorial.
I’d love to see your results and show it off in my Show Arena.
Email me!
Hugs,
Bev
Beauty in the Night

Clicking on the above image will enlarge to full view
and show the animation.
Supplies
1 tube of choice - I’m using Christine Kotlark here.
Font of Choice - Abagail Jackson here
Weescotlas Mask 241 here
Divine Intentionz Template 84 here
Eyecandy 5: Nature - Fire
Animation Shop
“Gothic Beauty” is a tagger size scrap kit created by Chaos Priestess and can be purchased at Digital Chaos Scrap Store.
Thank you Chaos Priestes for a stunning kit!!

This tutorial was written assuming you have working knowledge of PSP.

~♥~ Let’s get started ~♥~

Open up the template.
Shift + D. Close out the original.
Delete the Copyright and Heart layers.
Highlight the white canvas.
Image/Canvas Size
700 X 700
Flood fill white.

Highlight Frame Background 1 layer.
Select All/Float/Defloat
New Raster Layer
Copy and paste a paper of choice Into Selection.
Deselect.
Delete the template layer.

Highlight Frame 1 layer.
Select All/Float/Defloat
Copy and paste a paper of choice as a new layer.
Selections/Invert
Hit the delete key.
Deselect.
Delete the template layer.

Use your Magic Wand and click inside the frame.
Selections/Modify/Expand by 3.
Paste your tube below the frame.
Selections/Invert
Hit the delete key.
Copy and paste the branch behind your tube - resize 40%
Hit the delete key.
Deselect.

Repeat the above steps with the other frame.

Highlight the Small Circle layer.
Select All/Float/Defloat
New Raster Layer.
Copy and paste the clock Into Selection
Deselect.
Delete the template layer.

Copy and paste the full moon over the Circle layer.
Delete the circle template layer.

Add your embellishments. I used:
Candle: Resize 50%
Crystal Bling Drops: Resize 60% Free rotate right 7 degrees
Doodle Element 3: Resize 70%
Bow 6: Resize 40%. Free rotate left 5 degrees
Flower 4: Resize 50%
Flowers 2 & 3: Resize 40%
Sparkle

Highlight your white canvas.
New Raster Layer.
Select All.
Copy and paste a paper of choice Into Selection.
Deselect.
Apply the mask.
Merge Group.

Duplicate the candle layer two times to give you a total of 3 candle layers.
Rename them Candle 1, 2, and 3

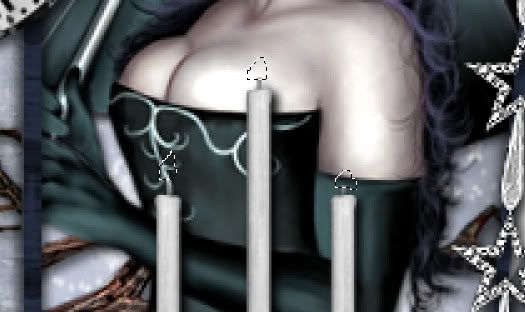
Highlight Candle 1 layer - using your Free Hand Selection Tool create an outline for a flame at the top of each candle.


Then apply Eyecandy 5: Nature - Fire with these settings:


Highlight Candle 2, apply the same plugin accept hit the random seed button once. Repeat for Candle 3.
Close out Candle Layers 2 & 3.
Deselect.

Add your copyrights.

Add your name.
I gave mine an inner bevel:

Resize all layers 85%.

Time to animate:

Copy Merge and carry into Animation Shop.
Edit/Paste/As New Animation

Back into PSP
Close out Candle Layer 1.
Open up Candle Layer 2.
Copy Merge and carry into Animation Shop.
Edit/Paste/After Current Frame

Back into PSP
Close out Candle Layer 2.
Open up Candle Layer 3.
Copy Merge and carry into Animation Shop.
Edit/Paste/After Current Frame

Animation/Frame Properties:
Change the display time to 20.

View your animation.
If you’re happy then save.

I hope you enjoyed this tutorial.
I’d love to see your results and show it off in my Show Arena.
Email me!
Hugs,
Bev
Sunday, July 12, 2009

Ride the Wind

Clicking on the image will enlarge to full view.
 
Supplies
Font of Choice - I supplied Wesley here
Vix Mask 350 here
Dezigns by Ali Template #77 here
“Kachina” is a tagger size scrap kit created by Funky of Fever-Fever and can be purchased at Butterfly Blush Designs. You can visit Funky’s blog here.
Thank you Funky for this amazingly beautiful kit!
The elements and papers are outstanding!!

This tutorial was written assuming you have working knowledge of PSP.


~♥~ Let’s get started ~♥~

Open up the template.
Shift + D. Close out the original.
Delete the copyright layer.
New Raster layer. Send to Bottom.
Image/Canvas Size
700 X 700
Flood fill white.

Highlight Back Shape 4
Select All/Float/Defloat
Copy and paste a paper of choice as a new layer.
Selections/Invert
Hit the delete key.
Deselect.
Delete the template layer.
Give a slight inner bevel:

Repeat the above step with Back Shape 1, 2, 3, Black Middle Box, and Frames 1 & 2.

Highlight Shape 2 Layer.
Select All/Float/Defloat
New Raster Layer.
Copy and paste a paper of choice Into Selection.
Deselect.
Delete the template layer.

Repeat the above step with Shape 1 Layer.
Highlight Frame 1 Layer.
Use your Magic Wand and click inside of it.
New Raster Layer below the frame.
Selections/Modify/Expand by 3
Effects/3D Effects/Cutout


Repeat the above step with Frame 2 Layer.
 
Add your embellishments. I used:
Fire: Resize 40%
Grass: Resize 30%
Dead Bush
Feathers: Resize 40%
Wolf: Resize 60%
Foliage: Resize 50%
Long Horn Skull: Resize 40%
Rope Bow: Resize 30%. Free rotate left 20 degrees.
Indian Princess: Resize 85%

Highlight your white canvas.
New Raster Layer.
Select All.
Copy and paste a paper of choice Into Selection.
Deselect.
Apply the mask.
Merge Group.

Add your copyrights.

Add your name.

Resize all layers 85%.

I hope you enjoyed this tutorial.
I’d love to see your results and show it off in my Show Arena.
Email me!
Hugs,
Bev