Saturday, September 10, 2011

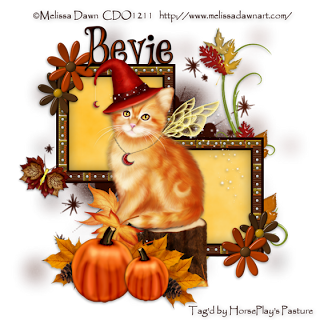
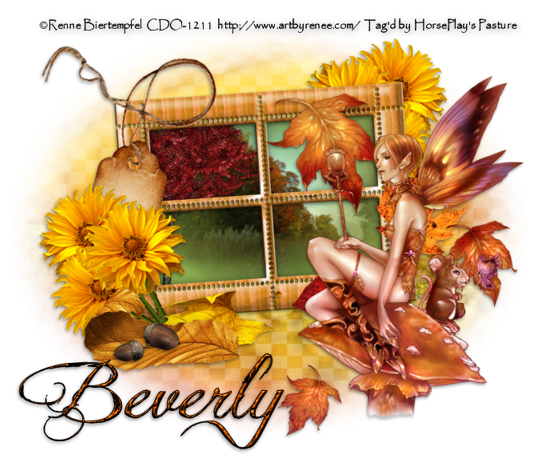
Shades of Autumn


Supplies

1 tube of choice - I used the artwork of Rene Biertempfel which can be purchased from CDO.  You must have a license to use.

Font of choice - I used Jellyka Delicious Cake here

Weescotlass Mask 208 here

“Shades of Autumn” is a scrap kit created by Karen of Sweet Occasion Designs and can be purchased from Lollipops n Gumdrops.  You can visit her blog here
Thank you Cindy for such a truly beautiful autumn kit!

This tutorial was written assuming you have a working knowledge of PSP.

~♥~ Let’s get started ~♥~

Open up a 700 x 700 blank canvas.
Flood fill white.

Copy and paste Autumn Frame_Heppy as a new layer.
Resize 45%
Click inside of all the windows with your Magic Wand.
Selections/Modify/Expand by 2.
New Raster layer below the frame.
Copy and paste cm_fc3 Paper Into Selection.
Copy and paste Beautiful Tree as a new layer below the frame.
Resize 25%
Move into Selection.
Selections/Invert
Tap the delete key.
Deselect.

Close out your white canvas.
Merge Visible.
Reopen your canvas.

Copy and paste your tube as a new layer.

Add your embellishments.  I used:
Fall Splendor_WishingonaStarr-0011:  Resize 25%/Mirror
WishingonaStarr_CU4CU Leaf Selection 6:  Resize 25%/Mirror
Flower 03:  Resize 25%/Duplicate/Mirror
Acorn 1:  Resize 25% and 25%/Mirror
Acorn 2:  Resize 25% and 25%

Highlight your white canvas.
New Raster layer.
Select All.
Copy and paste PHF_Fall10 Paper Into Selection.
Deselect.
Apply the mask.
If you need to, use your Pick Tool to pull the sides out to make it more centered.
Merge Group.

Add your copyrights.

Add your name:
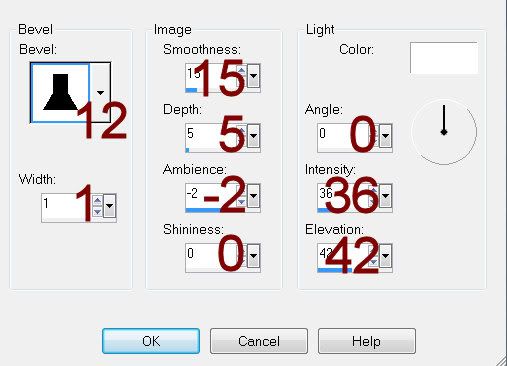
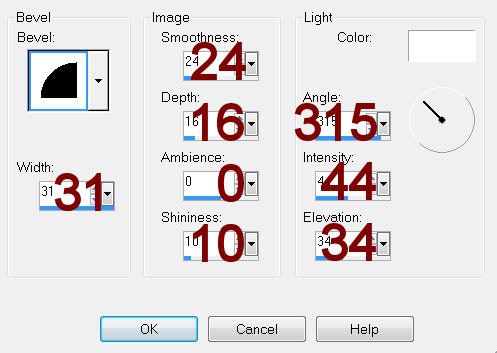
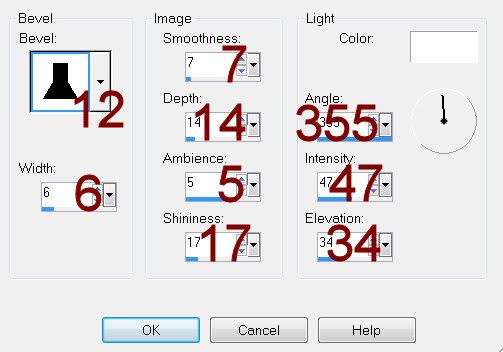
Give it a slight Inner Bevel: 
 

Resize all layers 80%.

I hope you enjoyed this tutorial.
I’d love to see your results and show it off in my gallery.
Email me!
Hugs,
Bev 

Friday, September 9, 2011

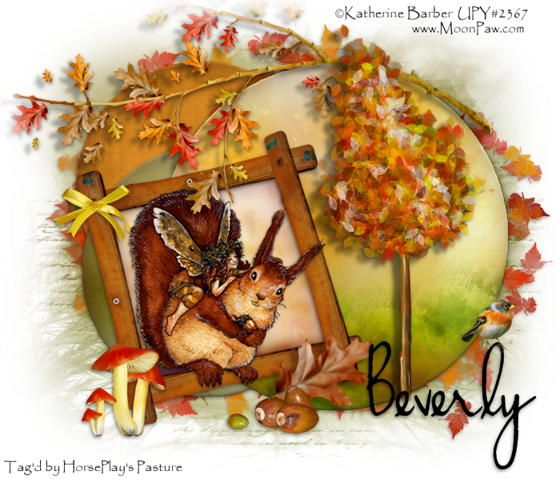
Going Nuts


Supplies

1 tube of choice - I used the adorable artwork of Katherine Barber which can be purchased from Up Your Art.  You must have a license to use.

Font of choice - I used Haikus Script here

My Mask 22 here and Weescotlass Mask 236 here

Creative by Nature Template 94 here

“Rustling Leaves” is a tagger size scrap created by Dani of Darkmoon’s Dream and can be purchased from Lollipops n Gumdrops.  You can visit her blog here
Thank you Dani for a really beautiful autumn kit!

This tutorial was written assuming you have a working knowledge of PSP.

~♥~ Let’s get started ~♥~

Open up the template.
Shift + D
Close out the original.
Resize all layers 90%
Image/Canvas Size
700 x 600
OK
Flood Fill Raster 1 layer white.
Delete the top 5 layers.

Copy and paste Frame 2 as a new layer.
Resize 40%
Free rotate Left 15 degrees.
Move into position over Copy of Vector 1 layer.
Delete Copy of Vector 1 layer and Raster 6 layer.

Click inside frame with your Magic Wand.
Selections/Modify/Expand by 4.
New Raster layer below the frame.
Copy and paste Paper 1 Into Selection.
Deselect.

Highlight Raster 3 layer.
Click on it with your Magic Wand
New Raster layer.
Copy and paste Paper 5 Into Selection.
Deselect.
Delete the template layer.
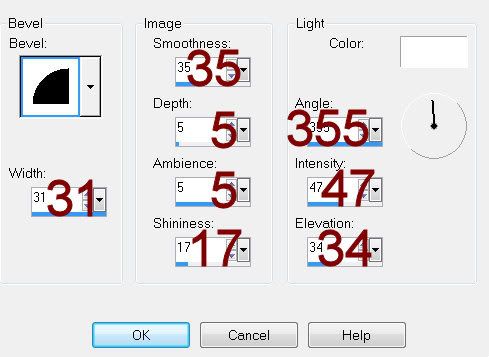
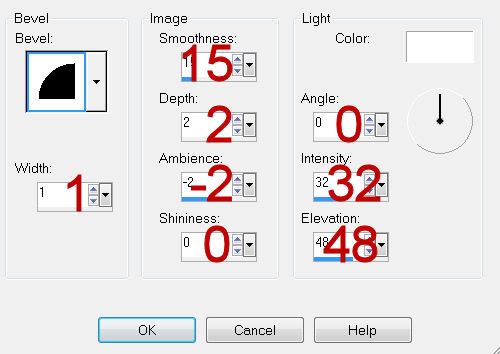
Give it a slight Inner Bevel:


Highlight Raster 4 layer.
Click on it with your Magic Wand
New Raster layer.
Copy and paste Paper 3 Into Selection.
Deselect.
Delete the template layer.
Give it the same slight Inner Bevel.

Highlight Raster 2 layer.
Click anywhere outside of it with your Magic Wand
Copy and paste Paper 2 as a new layer.
Selections/Invert
Tap the delete key.
Copy and paste Tree as a new layer.
Resize 60%
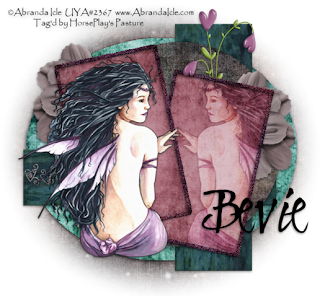
Move into position - see my tag for reference.
Use your Eraser tool and erase the trunk part that overhangs the circle.
Deselect.
Delete the template layer.
Give the paper layer the same slight Inner Bevel.

Copy and paste your tube as a new layer.
If you’re using the tube I did resize 45% and 90%

Add your embellishments.  I used:
Bow 3:  Resize 30%
Mushroom 2:  Resize 30%
Leaf 1:  Resize 50%/Free rotate Left 15 degrees
Acorns 1:  Resize 45%
Branch:  Mirror
Leaves 2:  Resize 65%/Duplicate/Mirror/Erase where you don’t want the leaves to show/Duplicate/Flip
Bird:  Resize 25% and 80%

Highlight your white canvas.
New Raster layer.
Select All.
Copy and paste Paper 3 Into Selection.
Deselect.
Duplicate.
On the bottom paper layer apply my Mask 22.
Merge Group.
On the paper above the mask apply Weescotlass Mask 236.
Change the Properties to Saturation (Legacy)

To give the branch the feathered look at the top and side:
Highlight the branch layer.
Use your Freehand Selection Tool and encircle the branch and make the dotted line touches where you want the branch to have that feathered look.
Selections/Modify/Inside Outside Feather
Both checked
Feather amount: 43
OK
Selections/Invert
Tap the delete key until you have the feathered look you want.
Deselect.

Add your copyrights.

Add your name:

Resize all layers 80%.

I hope you enjoyed this tutorial.
I’d love to see your results and show it off in my gallery.
Email me!
Hugs,
Bev

Thursday, September 8, 2011

The Season's Colors


Supplies

4 tubes of choice - I used the artwork of Anna marine which can be purchased from CDO.  You must have a license to use.

Font of choice - I used Wretched here

Becky Mask 22 here

“The Season‘s Colors” is a FTU tagger size scrap kit created by me, Bev of HorsePlay’s Pasture Designs and can be downloaded from my design blog here.

This tutorial was written assuming you have a working knowledge of PSP.

~♥~ Let’s get started ~♥~

Open up a 700 x 700 blank canvas.
Flood fill white.

Copy and paste 24 as a new layer.
Resize 60%
Free rotate Left 10 degrees

Paste 24 again.
Resize 25%
Free rotate Left 5 degrees

Copy and paste 25 as a new layer.
Resize 35%
Free rotate Right 5 degrees

Copy and paste 23 as a new layer.
Resize 65%

Arrange all the frames on your canvas - see my tag for reference.
The order of them in your layers pallet from bottom top to bottom is:
Littlest Frame
Medium Frame
Large Frame
Round Leaf frame.

Highlight the round leaf frame.
Click inside of it with your Magic Wand.
Selections/Modify/Expand by 4.
New Raster layer below the frame.
Copy and paste Paper 1 Into Selection.
Copy and paste your tube as a new layer above the paper.
Selections/Invert
Tap the delete key.
Deselect.
Change the Properties to Overlay.

Highlight the largest square frame.
Click inside of it with your Magic Wand.
Selections/Modify/Expand by 4.
New Raster layer below the frame.
Copy and paste Paper 6 Into Selection.
Copy and paste your tube as a new layer above the paper.
Selections/Invert
Tap the delete key.
Deselect.

Highlight the medium square frame.
Click inside of it with your Magic Wand.
Selections/Modify/Expand by 4.
New Raster layer below the frame.
Copy and paste Paper 4 Into Selection.
Copy and paste your tube as a new layer above the paper.
Selections/Invert
Tap the delete key.
Deselect.
Change the Properties to Luminance.

Highlight the smallest square frame.
Click inside of it with your Magic Wand.
Selections/Modify/Expand by 4.
New Raster layer below the frame.
Copy and paste Paper 6 Into Selection.
Copy and paste your tube as a new layer above the paper.
Selections/Invert
Tap the delete key.
Deselect.
Change the Properties to Luminance (Legacy).

Open up 19.
Use your Selection Tool and section off the rock area of the left side.
Copy
Paste on your working canvas and position behind the bottom of the largest frame.
Duplicate/Mirror

Add your embellishments.  I used:
16: Resize 70%
19:  Resize 45%
18:  Resize 25%
27:  Resize 45%
28:  Resize 35%
5:  Resize 40%
15:  Resize 35%/Duplciate/Mirror/Resize 70%
32:  Resize 60%
20, 21, and 22:  Resize 70%

Highlight your white canvas.
New Raster layer.
Select All
Copy and paste Paper 3 Into Selection.
Deselect.
Apply the mask.
Merge Group.

Add your copyrights.

Add your name:
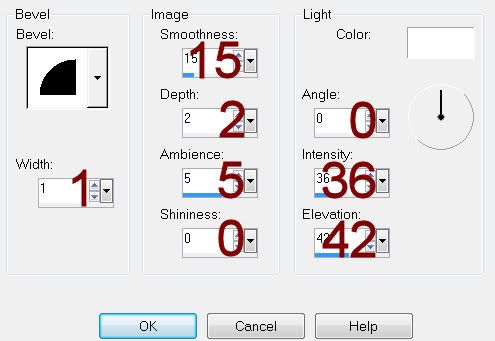
Give it a slight Inner Bevel:

Resize all layers 80%.

I hope you enjoyed this tutorial.
I’d love to see your results and show it off in my gallery.
Email me!
Hugs,
Bev 
Calming Waters

Supplies

1 tube of choice - I used the artwork of PinUpToons which can be purchased from CDO. You must have a license to use.

Font of choice - I used Dancing Script here and Jellyka Delicious Cake here

Designs by Vaybs Mask 2 here

Scraps of Enchantment Template 122 here

“Calming Waters” is a scrap kit available in both tagger and full size created by Dawn of Sunshine Daze and can be purchased from Aussie Scrap Designs. You can visit her blog here.
Thank you Dawn for another beautiful kit!

This tutorial was written assuming you have a working knowledge of PSP.

~♥~ Let’s get started ~♥~

Open up the template.
Shift + D.
Close out the original.
Resize all layers 90%
Image/Canvas Size
700 x 700
Ok
Flood fill the background layer white.
Delete the top 2 layers and Skullz layer

Highlight Large Background layer.
Click on it with your Magic Wand.
New Raster layer.
Copy and paste Paper 8 Into Selection.
Copy and paste Element 38 as a new layer.
Resize 70%
Move into position - see my tag for reference.
Selections/Invert
Tap the delete key.
Copy and paste your tube as a new layer.
Move into position - see my tag for reference.
Tap the delete key.
Change the Properties to Screen.
Deselect.
Delete the template layer.

Highlight Large Frame layer.
Click on it with your Magic Wand.
New Raster layer.
Copy and paste Paper 4 Into Selection.
Deselect.
Delete the template layer.
Adjust/Add Remove Noise/Add Noise:
Gaussian and Monochrome checked
Noise: 63%
Give it a slight Inner Bevel:


Highlight Small Frame layer.
Repeat the above step.

Highlight Small BK Background layer.
Click on it with your Magic Wand.
Copy and paste Paper 2 Into Selection.
Deselect.
Delete the template layer.

Highlight Dotted Frame layer.
Select All/Float/Defloat
New Raster layer
Copy and paste Paper 5 Into Selection.
Deselect.
Delete the template layer.

Add your embellishments. I used:
9: Resize 60%
24
40: Resize 30%/Duplciate/Resize 70%
26: Resize 30%/Duplicate/Resize 70%

Highlight your white canvas.
New Raster layer.
Select All.
Copy and paste Paper 3 Into Selection.
Deselect.
Apply the mask.
Resize 105%
Merge Group.

Color Pallet:
Foreground: #000000
Background: Null

To make the tranquility quote wavy…
Make your Pen Tool active set on Freehand.
Line: Solid
Width: 2
Draw a wavy line across the canvas - see my tag for reference.
Make your Text Tool active using Dancing Script font.
Move your mouse along the center of the line until you see a Rocking A.
Click the mouse.
A text box will open up.
Type: We fluctuate long between love and hatred before we arrive at tranquility.
OK
In your layers pallet click on the + sign.
Close out the New Path layer.
Highlight Vector 1 layer.
Right Click
Convert to Raster layer.

Add your copyrights.

Add your name:
Give it a slight Inner Bevel:


Resize all layers 80%.

I hope you enjoyed this tutorial.
I’d love to see your results and show it off in my gallery.
Email me!
Hugs,
Bev

Tuesday, September 6, 2011

Any Day Now


Supplies

1 tube of choice - I used the artwork of Abranda Icle which can be purchased from Up Your Art. You must have a license to use.

Font of choice - I used Clive Barker here

Designs by Vaybs Mask 2 here

Creative by Nature Template 110 here

“Any Day Now” is a full size scrap kit created by Dawn of Sunshine Daze and can be purchased from Aussie Scrap Designs. You can visit her blog here.
Thank you Dawn for a beautiful kit!

This tutorial was written assuming you have a working knowledge of PSP.

~♥~ Let’s get started ~♥~

Open up the template.
Shift + D.
Close out the original.
Resize all layers 90%
Image/Canvas Size
700 x 650
Ok
New Raster layer.
Send to bottom.
Flood fill white.
Delete the top 4 layers.

Highlight 10 layer.
Click on it with your Magic Wand.
New Raster layer.
Copy and paste Paper 3 Into Selection.
Deselect.
Delete the template layer.

Highlight 9 layer.
Click on it with your Magic Wand.
New Raster layer.
Copy and paste Paper 4 Into Selection.
Deselect.
Delete the template layer.
Give it the same slight inner bevel:


Highlight Rectangle 8 layer.
Repeat the above step.

Highlight 7 layer.
Click on it with your Magic Wand.
Copy and paste Paper 1 (the lighter shade of paper 1) as a new layer.
Resize 25% and 60%
Selections/Invert
Tap the delete key.
Deselect.
Delete the template layer.

Highlight 6 layer.
Click on it with your Magic Wand.
New Raster layer.
Copy and paste Paper 5 Into Selection.
Deselect.
Delete the template layer.

Highlight 4 layer.
Repeat the above step.

Highlight 5 layer.
Click on it with your Magic Wand.
New Raster layer.
Copy and paste Paper 2 Into Selection.
Adjust/Add Remove Noise/Add Noise:
Gaussian and Monochrome checked:
Noise: 43%
OK
Deselect.
Delete the template layer.

Highlight 3 layer.
Repeat the above step.

Copy and paste your tube as a new layer.
Move into position in front of the left rectangle.
Duplicate/Mirror
Move this tube layer below the right rectangle frame.
Highlight the right rectangle frame paper layer.
Click anywhere outside of it with your Magic Wand.
Highlight the duplicated tube layer.
Tap the delete key.
Deselect.
Change the Properties to Soft Light.

Add your embellishments. I used:
15: Resize 25% and 50%
7: Resize 25% and 50%
12: Resize 25%/Free rotate Right 65%/Duplicate/Mirror

Highlight your white canvas.
New Raster layer.
Select All.
Copy and paste Paper 1 (the darker shade of Paper 1) Into Selection.
Deselect.
Apply the mask.
Resize 110%
Merge Group.

Add your copyrights.

Add your name:

Resize all layers 80%.

I hope you enjoyed this tutorial.
I’d love to see your results and show it off in my gallery.
Email me!
Hugs,
Bev
Monday, September 5, 2011

Into the Evening


Supplies

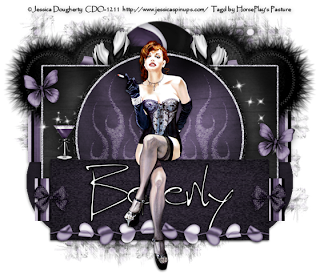
1 tube of choice - I used the artwork of Jessica Dougherty which can be purchased from CDO. You must have a license to use.

Font of choice - I used Scotosaurus here

Designs by Vaybs Template 0510 here. It’s part of a 3 piece forum set.

Plug Ins:
Greg’s Factory Output Vol. II - Pool Shadow

“Bad Candy” is a tagger size scrap kit created by Aurelie of Pink Candy Designs and can be purchased from Twilight Scraps. You can visit her blog here.
Thank you Aurelie for another fantastic kit!!

This tutorial was written assuming you have a working knowledge of PSP.

~♥~ Let’s get started ~♥~

Open up template 0510.
Shift + D.
Close out the original.
Resize all layers 85%
Image/Canvas Size
700 x 600
Ok
Flood fill Raster 1 layer white.
Delete the following layers:
Delete the top 7 layers, Circle 3, Circle 4, and Circle 5 layers.

Highlight Circle 1 layer.
Click on it with your Magic Wand.
New Raster layer.
Copy and paste Paper 2 Into Selection.
Deselect.
Delete the template layer.
Give it a slight Inner Bevel:


Highlight Circle 2 layer.
Repeat the above step.

Highlight Rectangle 1 layer.
Click on it with your Magic Wand.
New Raster layer.
Copy and paste Paper 5 Into Selection.
Deselect.
Delete the template layer.
Give it the same slight inner bevel.

Highlight Rectangle 3 layer.
Repeat the above step.

Highlight Rectangle 2 layer.
Click anywhere outside of it with your Magic Wand.
Selections/Invert
New Raster layer.
Copy and paste Paper 6 Into Selection.
Deselect.
Delete the template layer.
Adjust/Add Remove Noise/Add Noise:
Gaussian and Monochrome checked:
Noise: 43%
OK

Highlight Rectangle Brace layer.
Click on it with your Magic Wand.
New Raster layer.
Copy and paste Paper 1 Into Selection.
Apply Greg’s Factory Output Vol. II - Pool Shadow:
Use Default Settings.
Deselect.
Delete the template layer.

Highlight Circle 7 layer.
Click anywhere outside of it with your Magic Wand.
Selections/Invert
New Raster layer.
Copy and paste Paper 6 Into Selection.
Add the same noise effect.
Deselect.

Highlight Circle 7 layer again.
Click on it with your Magic Wand.
New Raster layer above the round noise paper.
Copy and paste Paper 2 Into Selection.
Apply the same Pool Shadow effect.
Deselect.
Delete the template layer.

Highlight Rectangle 4 layer.
Click on it with your Magic Wand.
New Raster layer.
Copy and paste Paper 10 Into Selection.
Deselect.
Delete the template layer.
Give it the same slight Inner Bevel.

Copy and paste your tube as a new layer.

Add your embellishments. I used:
Fluffy Heart: Free rotate Left 15 degrees/Duplicate/Mirror
Candy: Free rotate Left 45 degrees - erase wrapper ends of candy if they stick out from behind the hearts
Flame: Resize 60%/Duplicate/Change the Properties to Soft Light
Bow 2: Resize 30%/Duplicate/Mirror
Martini: Resize 25%
Roses 2: Duplicate/Mirror
Butterfly 3: Resize 40%/Duplicate/Mirror
Sparkles
Hearts: Resize 40%/Free rotate Left 90 degrees/Duplicate twice for a total of 3 heart layers. Arrange them along the bottom of the rectangle. Erase what overhangs. Merge Visible all 3 layers.

Highlight your white canvas.
New Raster layer.
Select All.
Copy and paste Paper 4 Into Selection.
Deselect.
Apply the mask.
Merge Group.

Add your copyrights.

Add your name:
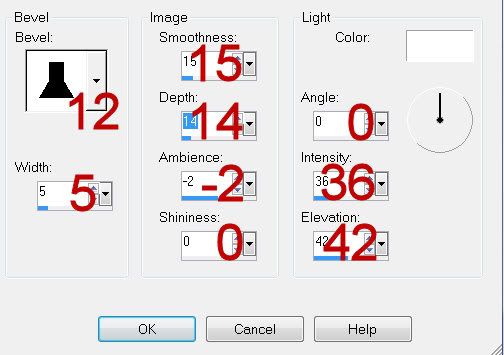
Foreground: Black
Background: White
Stroke: 2

Type your name.
Give it a slight Inner Bevel:


Resize all layers 80%.

I hope you enjoyed this tutorial.
I’d love to see your results and show it off in my gallery.
Email me!
Hugs,
Bev

Awaiting Halloween


Supplies

1 tube of choice - I used the artwork of Melissa Dawn which can be purchased from CDO. You must have a license to use.

Font of choice - I used Wizard’s Magic here

Designs by Vaybs Mask 87 here

Plug Ins:
Mura’s Meister - Cloud

“Amy‘s Colors” is a tagger size scrap kit created by AmyMarie’s Freebies and can be downloaded from her blog freebie here. You can visit her blog here.
Please leave a thank you when downloading as it’s a small gesture for hard work given freely.

This tutorial was written assuming you have a working knowledge of PSP.

~♥~ Let’s get started ~♥~

Open up a 700 x 700 blank canvas.
Flood fill white.

Color Pallet:
Foreground: #fec235
Background: #f6d99a

Copy and paste Frame 6 as a new layer.
Resize 35%
Click inside of each square with your Magic Wand. Be sure to get that little space in the middle.
Selections/Modify/Expand by 4.
New Raster layer below the frame.
Apply Mura’s Mestier - Cloud
Hit the reset button.
OK

Deselect.

Copy and paste your tube as a new layer.

Add your embellishments. I used:
Flower 4(2): Resize 35%/Duplicate
Flower 1: Resize 30%/Duplicate
Fall Cluster Glass: Resize 90%
Pumpkin: Resize 25%/Duplciate/Mirror/Resize 70%
Leaf 1: Resize 30%/Free rotate Right 90 degrees/Duplicate as many times as you like.
Pinecone: Resize 25% and 50%
Bfly 2: Resize 30%/Free rotate Right 25 degrees

Highlight your white canvas.
New Raster layer.
Select All.
Copy and paste Paper 10 Into Selection.
Deselect.
Apply the mask.
Merge Group.

Add your copyrights.

Add your name:
Foreground: #0f0200
Background: Pattern/Paper 9
Stroke: 2

Type your name.
Give it a slight Inner Bevel:


Resize all layers 80%.

I hope you enjoyed this tutorial.
I’d love to see your results and show it off in my gallery.
Email me!
Hugs,
Bev
Sunday, September 4, 2011

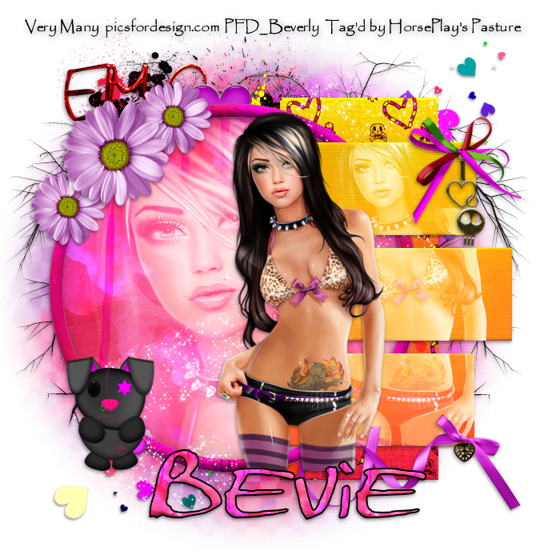
Emolicious


Supplies

1 tube of choice - I used the artwork of VeryMany which can be purchased from Pics for Design. You must have a license to use.

Font of choice - I used Marker Script here

Collab Tempz by Creative Scraps by Crys and Stef’s Tutorials here

Weescotlass Mask 208 here

“Emolicious” is a tagger size scrap kit created byCindy of Scrappin with Lil Ole Me and can be purchased from Butterfly Blush Designs. You can visit her blog here.
Thank you Cindy for a truly awesome kit!  I don’t know where you’ve been hiding out with all your wonderful kits but I’m thrilled to have found you!

This tutorial was written assuming you have a working knowledge of PSP.

~♥~ Let’s get started ~♥~

Open up Temp 1.
Shift + D
Close out the original.
Resize all 85%
Image/Canvas Size
700 x 700
Ok
New Raster layer
Send to bottom.
Flood Fill white.
Delete the following layers:
Top 3 layers and Small Rectangle layer.

Highlight Big Rectangle layer.
Click anywhere outside of it with your Magic Wand.
Copy and paste Paper 26 as a new layer.
Resize 60%
Move into position.
Tap the delete key.
Deselect.
Delete the template layer.
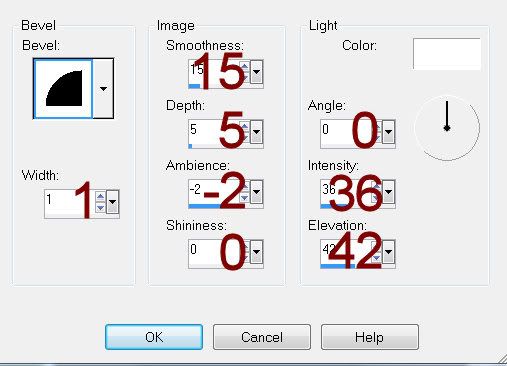
Give it a slight Inner Bevel:

Highlight Circle layer.
Click anywhere outside of it with your Magic Wand.
Copy and paste Paper 27 as a new layer.
Resize 70%
Move into position.
Tap the delete key.
Copy and paste your close up image as a new layer above the paper.
Tap the delete key.
Deselect.
Delete the template layer.

Highlight Circle Frame layer.
Select All/Float/Defloat
New Raster layer.
Copy and paste Paper 34 Into Selection.
Deselect.
Delete the template layer.
Give it a slight Inner Bevel:

Highlight Rectangle 3 layer.
Merge Down.
Merge Down again.
All 3 rectangles should now be on the same layer.
Use your Magic Wand and click anywhere outside of the rectangles.
Copy and paste Paper 28 as a new layer.
Resize 70%
Copy and paste your tube as a new layer.
Move into position over the rectangles.
Tap the delete key.
Deselect.
Change the Properties to Screen

Copy and paste your tube as a new layer.
Move into position in front of the circle.

Add your embellishments.  I used:
Daisy:  Resize 25%/Duplciate/Flip/Resize 70%/Duplicate
Bow 6:  Resize 25%
Gold Charm:  Resize 25% and 80%
Ribbon 3:  Resize 25%/Mirror
Emo Bunny:  Resize 25% and 70%
Tree:  Duplicate/Mirror/Erase the trunk of each tree
Hearts:  Resize 70%
Word Art 2:  Resize 40%

Highlight your white canvas.
New Raster layer.
Select All.
Copy and paste Paper 32 Into Selection.
Deselect.
Apply the mask.
Resize 105%
Merge Group.
Center it a bit more.

Add your copyrights.

Add your name:
Color Pallet:
Foreground: Black
Background:  Pattern/Paper 27
Angle: 0
Scale: 37

Stroke: 2

Type your name.
Give it the same Inner Bevel you did for the round frame.

Resize all layers 80%.

I hope you enjoyed this tutorial.
I’d love to see your results and show it off in my gallery.
Email me!
Hugs,
Bev