Supplies
1 tube of choice - I used the beautiful artwork of Anna Marine which can be purchased at CDO. You need a license to use.
Font of choice - I used Alban here
Becky Mask 22 here
Punk Butt’s Template 85 here
“Milk n Cookies” is a tagger size scrap kit created by Kesha of KnC Scrapz and can be purchased from her store Lollipops n Gumdrops. You can visit her blog here.
Thank you Kesha for yet another wonderful winter kit.
This tutorial was written assuming you have a working knowledge of PSP.
~♥~ Let’s get started ~♥~
Open up the template.
Shift + D.
Close out the original.
Resize all layers 85%
Image/Canvas Size 650 x 500
OK
Highlight the background layer and flood fill white.
Delete the following layers:
Top 2 layers
Right Circle Word Art
Left Circle Word Art
Copy and paste Paper 15 Into Selection.
Deselect.
Open up Santa Bag element.
Use your Freehand Selection Tool set on Rectangle and section out the center of the bag.
In your color pallet set the foreground to the pattern of the bag.
Open up Heart Frame.
Copy
Make your working canvas active and paste as a new layer at the top of your layers pallet.
Use your Magic Wand and click inside of each heart.
Selections/Modify/Expand by 2.
New Raster layer below the frame.
Flood fill each heart with the Santa Bag pattern.
Deselect.
Give the frame a drop shadow.
Merge Down
The frame and pattern layer should be on the same layer.
Move this into position over the left Pink Rectangle template layer.
Duplicate/Move into position over the Right Pink Rectangle template layer.
Delete the following template layers:
Left Pink Frame
Left Pink Rectangle
Right Pink Frame
Right Pink Rectangle
In your color pallet change the foreground to the color #c6180b
Highlight Left Blue Rectangle Frame layer.
Use your Target Tool and change the color to the foreground color.
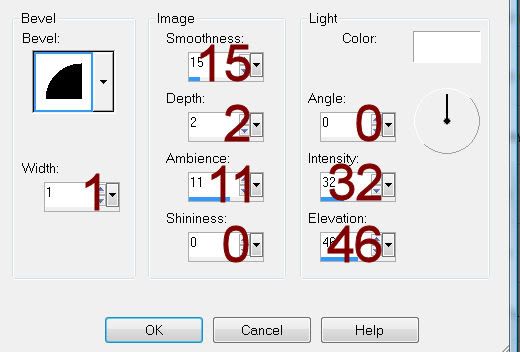
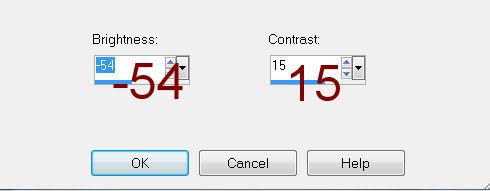
Adjust/Brightness and Contrast/Brightness/Contrast:
Repeat the above step with:
Right Blue Rectangle Frame
Large Circle Frame
Left Circle Frame
Right Circle Frame
Highlight Left Blue Rectangle layer.
Click anywhere outside of it with your Magic Wand.
Selections/Invert
New Raster layer.
Copy and paste Paper 1 Into Selection.
Deselect.
Delete the template layer.
Highlight Right Blue Rectangle layer.
Repeat the above step.
Highlight Large Circle layer.
Click anywhere outside of it with your Magic Wand.
Selections/Invert
New Raster layer.
Copy and paste Paper 6 Into Selection.
Copy and paste Tree as a new layer above the paper layer.
Resize 50%
Move into position - see my tag for reference.
Selections/Invert
Tap the delete key.
Change the Properties to Soft Light.
Duplicate
Deselect.
Delete the template layer.
Highlight Left Circle layer.
Click anywhere outside of it with your Magic Wand.
Selections/Invert
New Raster layer.
Copy and paste Paper 10 Into Selection.
Copy and paste your tube as a new layer over the paper layer.
Selections/Invert
Tap the delete key.
Change the Properties to Soft Light.
Deselect.
Delete the template layer.
Highlight Right Circle layer.
Click anywhere outside of it with your Magic Wand.
Selections/Invert
New Raster layer.
Copy and paste Paper 10 Into Selection.
Copy and paste Santa Bag as a new layer over the paper layer.
Resize 60%
Move into position - see my tag for reference.
Selections/Invert
Tap the delete key.
Change the Properties to Soft Light.
Deselect.
Delete the template layer
Copy and paste your tube as a new layer.
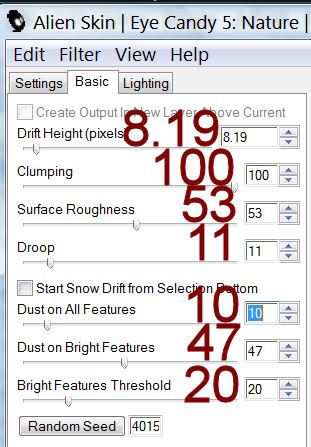
Add your elements. I used:
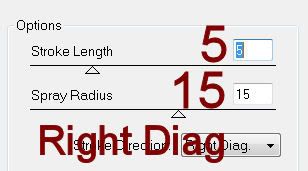
Branch: Resize 25%/Duplicate/Mirror/Merge Visible both branch layers/Duplicate/Flip
Bow: Resize 25% and 60%
Ornament String: Resize 35%
Red Ribbon: Resize 40%/Duplicate/Mirror
Santa Bag: Resize 40%
Frame 2: Resize 38%
Highlight your white canvas.
New Raster layer.
Select All.
Copy and paste Paper 3 Into Selection.
Deselect.
Apply the mask.
Move it slightly up on your canvas.
Use your Pick Tool and pull the sides out slightly.
Merge Group.
Duplicate
Add your copyrights.
Add your name.
Color Pallet:
Foreground: #320e19
Background: Pattern/do the Santa Bag pattern again
Stroke: 1.0
Type your name.
Resize all layers 90%.
I hope you enjoyed this tutorial.
I’d love to see your results.
Email me!
Hugs,
Bev