Supplies Needed
1 tube of choice – I
used the wonderful artwork of Ellie_Milk which can be purchased from PicsFor Design.
You must generate a license to use.
It can be found in Set 1
An Oval template which I supply here for this tutorial.
“Come Summer Morning” is a tagger size scrap
kit created by me, Bev of HorsePlay’s Pasture Designs and can be purchased at
either of your favorite stores: Scraps From the Heart or Heartbeatz Creationz.
This tutorial was
written assuming you have working knowledge of PSP.
~♥~ Let’s get started ~♥~
Open up a 700 x 700 blank canvas.
Flood fill white.
Open up the template.
Shift + D.
Close out the original.
Copy and paste the template onto
your canvas.
Click on it with your Magic Wand.
New Raster layer.
Copy and paste El 19 Into Selection.
Selections/Modify/Contract by 30.
New Raster layer.
Flood fill with #ffffff.
Selections/Modify/Contract by 8.
Tap the delete key.
Selections/Modify/Expand by 2.
New Raster layer below the white
oval ring.
Copy and paste Paper 10 Into
Selection.
Deselect.
Highlight the white Oval Ring layer.
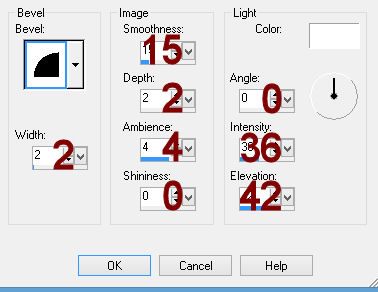
Give it a slight Inner Bevel:

Give the cardboard frame layer a drop
shadow.
Close out your white canvas.
Merge Visible.
Reopen your white canvas.
Copy and Paste El 19 as a new layer.
Resize 46%
Duplicate
Copy and paste El 17 as a new layer.
Free rotate Left 90 degrees
Move all layers into exact position –
see my tag for reference.
To each round frame:
Click inside of it with your Magic
Wand.
Selections/Modify/Expand by 4.
New Raster layer below the frame.
Copy and paste Paper 6 Into
Selection.
Deselect.
Copy and paste your tube as a new
layer.
Position it in front of both round
frames.
Duplicate the tube layer and move
below the top round frame – resize the tube larger if you have to.
Lower the Opacity of the tube to
about 40.
Highlight the paper below the tube.
Click anywhere outside of it with
your Magic Wand.
Highlight the tube layer.
Tap the delete key.
Deselect.
Copy and paste El 28 as a new layer.
Resize 45%
Position it outside of the bottom
round frame.
Paste the element again and move
below the frame.
Resize 70%
Lower the Opacity to about 40.
Highlight the paper below the
element.
Click anywhere outside of it with
your Magic Wand.
Highlight the flowers.
Tap the delete key.
Deselect.
To make the little cup of flowers:
Copy and paste El 26 as a new layer.
Resize 25%
Copy and paste individual flowers to
your liking – resize them as small or keep as large as you like.
Once you have the flowers “arranged”
give each a drop shadow and then –
Make your Freehand Selection Tool
active and trace around the cup like so:

Highlight each flower layer and tap
the delete key.
Deselect.
Give the cup a drop shadow.
Merge Visible the flowers and cup.
Add your elements. I used:
El 13: Resize 35%
El 43: Resize 35%
El 27: Duplicate
El 1: Resize 50%
El 12: Resize 80%
El 15: Resize 50%
El 14: Resize 30%
El 15: Resize 30%
El 12: Resize 30%
Crop your image.
Highlight your white background.
New Raster layer.
Select All.
Copy and paste Paper 1 Into
Selection.
Deselect.
Apply the mask.
Move into position a little better
and pull the right side out a little using your Pick Tool.
Merge Group.
New Raster layer above the mask
layer:
Select All.
Copy and paste Paper 9 Into
Selection.
Deselect.
Apply the mask.
Move into position a little better
and pull the right side out a little using your Pick Tool.
Merge Group.
Add your copyrights.
Add your name.
Color Pallet:
Foreground: #7e5c27
Background: #f9eb9f
Stroke: 1.0
Type your name.
Convert to Raster layer.
Select All/Float/Defloat
Selections/Modify/Contract by 1.
Give it a slight Inner Bevel:

Deselect.
Resize all layers 85%.
I’d love to see your results.
Hugs,
Bev