Tuesday, June 25, 2013

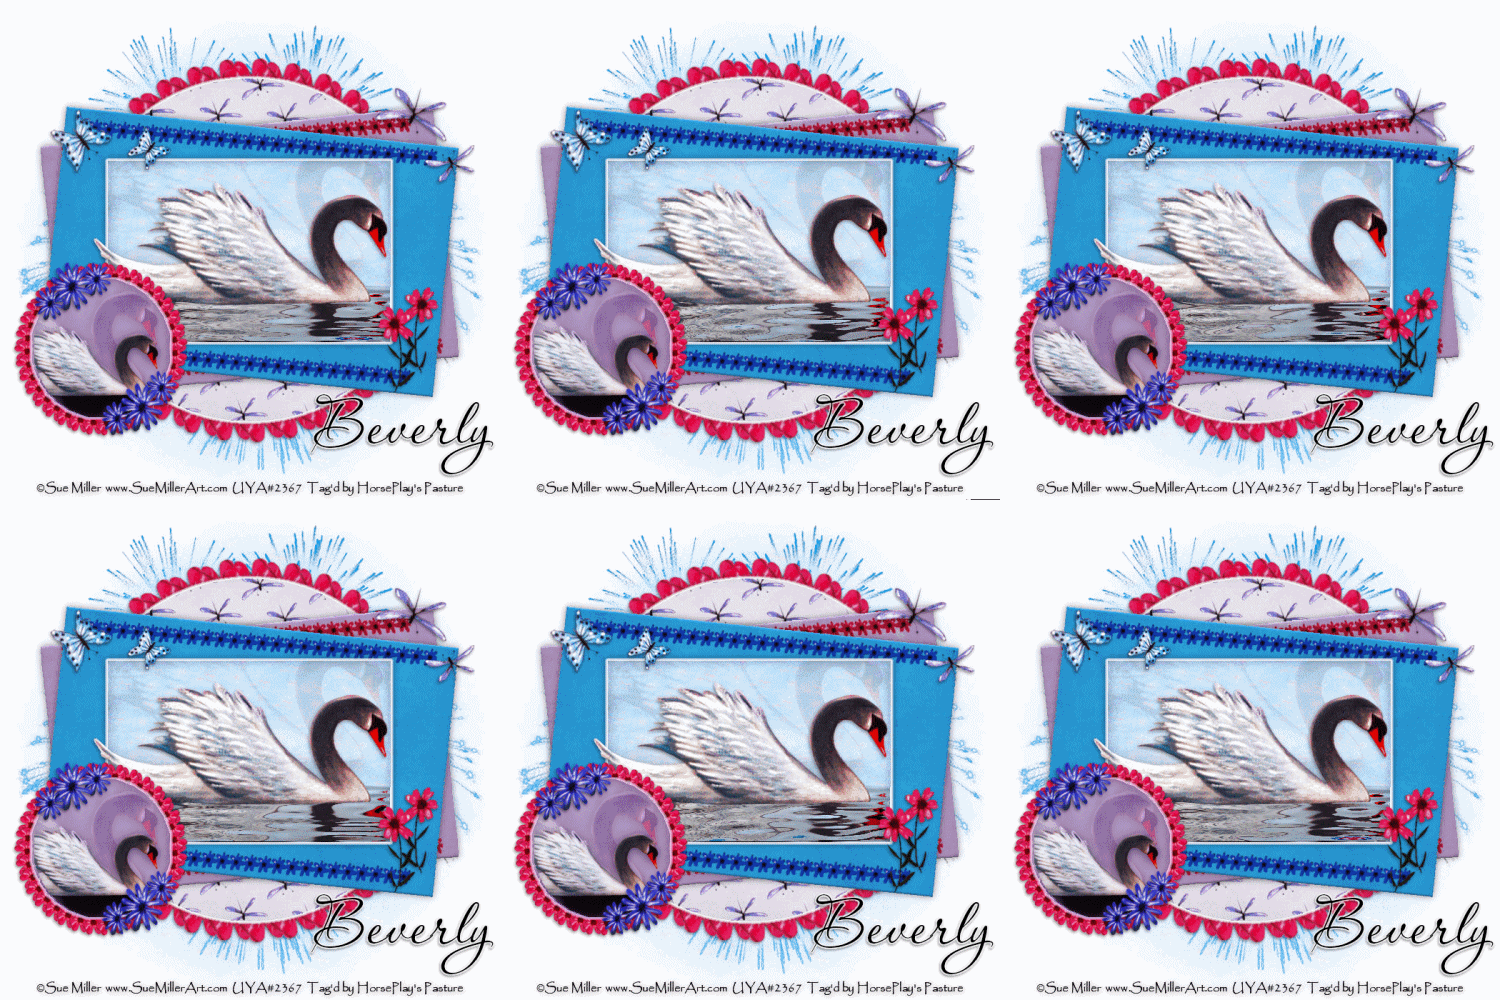
Tranquility on Swan Lake

 photo TranquilityisSwanLake_zpse8267c80.gif

Supplies Needed

1 tube of choice – I used the beautiful artwork of Sue Miller which can be purchased from Up Your Art.  You must have a license to use.

Font of choice – I used  Aquarelle here

Monti Circular Mask here

Vickie's template 33 here

Papers which I created and supplied here.
These papers are for personal use and only to be used in this tutorial.
All other elements in this tutorial are on separate layers that are included with the tube from UYA.

Plug Ins used:
Eyecandy 3.1 - Glow
Mura's Meister - Copies
Xero - Porcelain


This tutorial was written assuming you have working knowledge of PSP. 

~~ Let’s get started ~~

Open up the template.
Shift + D.
Close out the original.
Delete the credit layer.

Copy and paste the pink flower from the elements layer of the tube (NOT the flower with the stem and leaves) as a new layer on your working canvas.
Apply Mura's Meister - Copies:
Choose Encircle and match your settings to mine:

Duplicate the flower ring.
Resize 45%

In your layers pallet position the large flower ring behind Circle 1.
In your layers pallet position the small flower ring behind Circle 2.

Highlight Circle 2 layer.
Click on it with your Magic Wand.
New Raster layer.
Copy and paste Paper 4 Into Selection.
Copy and paste your tube as a new layer.
Resize 60%
Change the Properties to Soft Light.
Paste the tube again.
Resize 40%
Move both swan tubes into position over the small circle paper - see my tag for reference.
Highlight the paper layer.
Click anywhere outside of it with your Magic Wand.
Highlight each swan layer and tap the delete key.
Deselect.
 Highlight the paper layer.
Apply Eyecandy 3.1 - Glow:
Width: 5
Opacity: 100
Opacity Drop Off: Fat
Color: #ffffff
OK
Delete the template layer.

Merge Visible the two swan layers and the small circle paper layer.
Apply Xero - Porcelain: 
Use Default Settings

Copy and paste the (top) Purple flower from the elements layer of the tube.
Resize 70%
Duplicate 
Resize 70%
Duplicate
You should now have 3 flowers - 1 big, 2 smaller.
Move the three flowers into position over the merged layer - see my tag for reference.
Duplicate all 3 flowers and move these 3 flowers into position at the opposite side of the merged layer.

Merge Visible all flower layers, the merged layer, and the small ring of flowers.

Highlight Raster 1 layer.
Make your Target Tool active and change the color of the template layer to #2796d2.

Highlight Circle 1 layer.
Click on it with your Magic Wand.
New Raster layer.
Copy and paste Paper 1 Into Selection.
Deselect.
Apply Eyecandy 3.1 - Glow:
Use same settings.
Delete the template layer.

Highlight Rec 1 layer.
Click on it with your Magic Wand.
New Raster layer.
Copy and paste Paper 4 Into Selection.
Deselect.
Delete the template layer.
Give the paper a slight Inner Bevel:

Highlight Rec 2 layer.
Click on it with your Magic Wand.
New Raster layer.
Copy and paste Paper 3 Into Selection.
Deselect.
Give it the same slight Inner Bevel.
Delete the template layer.

Highlight Rec 3 layer.
Click on it with your Magic Wand.
New Raster layer.
Copy and paste Paper 2 layer Into Selection.
Copy and paste your tube as a new layer.
Resize 80%
Change the Opacity to about 12.
Paste the tube again as a new layer.
Resize 70%
Move both tubes into position - see my tag for reference.
Selections/Invert
Highlight each tube layer and tap the delete key.
Deselect.

Copy and paste the little blue flower from the element layer of the tube as a new layer.
Apply Mura's Meister - Copies:
Choose: Line
Change Number to 25.
OK
Free rotate Right 5 degrees
Resize 70%
Move into position at the top of the Blue paper.
Duplicate - move to the bottom of paper.
Duplicate the original flower line.
Mirror
Make your Target Tool active and change the color to #ed0747.
Duplicate
Move both flower lines into position over the Lavender colored paper.

Add the elements of your choice from the element layer of the tube.
I Duplicated/Resized 70%/Fliped/Mirrored the butterflies and dragonflies

Merge Visible the already merged layer (the small circle with swan) and the two stemmed flowers at the bottom right corner of the swan rectangle.

Highlight the background layer.
Select All.
New Raster layer.
Copy and paste Paper 2 Into Selection.
Apply the mask.
Merge Group.

Add your copyright.

Add your name:
Foreground: Null
Background: #000000

Type your name.
Convert to Raster layer.
Apply the same glow effect.

Time to add the water effect.

Close out the small circle merged layer.
Merge Visible.
Save as a Jpeg.

Open up the Sqirlz Water Reflection program.
Click on File and find the jpeg you just saved and open it up in the program.
Click on the Red Oval (Outline Tool) at the right side of the program:

Take your time and trace around the area where you want the water reflection - see my tag for reference. When you've come full circle and reached your starting point, double right click your mouse (to deactivate the outline tool)

Click on "Customise Basic Ripples" icon:


Set Perimeters for Basic Ripples box will appear.
Match your settings to mine and then click on the red x in the upper right corner:
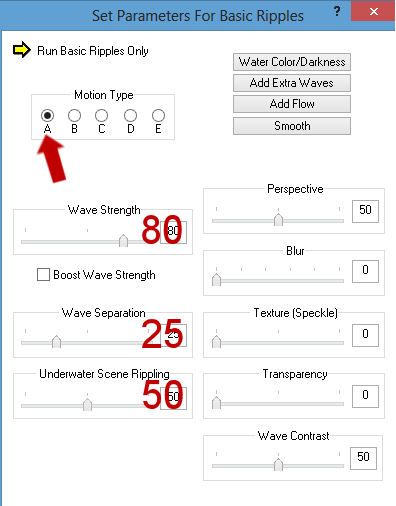
Click on Run Animation icon:

Basic Ripples Only should be already checked.
OK

Click on the gif button:

The Basic Ripples Only box will appear again'.
Click OK and save - 
Give it a name.
Click Save and then OK.

~Time to Animate ~

Open up Animation Shop.
Open up your water animation you just made.

Go back into PSP.
Click on all the eyes of every single layer - you are closing all opened layers and opening all closed layers.
Copy Merge.
Carry into AS.

Back in AS - 
Edit/Paste/As new Animation.
Edit/Copy
Highlight your water animation.
Ctrl + A to highlight all frames.
Click on Propogate Paste icon at the top - it looks like 3 papers with the corners bent down.
Ctrl + E and position the rest of your tag over the water animation and click your mouse once it's in position. 

Animation/Resize Animation:
Click Pixel Size
Type 500 in the width box.
OK

Save your animation.

I’d love to see your results.
Email me!
Hugs,
Bev

Monday, June 24, 2013

The Punishment


Supplies Needed

1 tube of choice – I used the gorgeous artwork of Michael Calandra which can be purchased from CDO.  You must generate a license to use.

Font of choice – I used  Irish Unicialfabeta here

Weescotlass Mask 249 here and Vix Mask 451 here

Scrapity Scrap and More Template 37 here

“The Punishment” is a tagger size scrap kit (also available in Full Size) created by Jessica of Gothic Inspirations and can be purchased from her store here.  You can visit her blog here.  Thank you Jess for another stunning Gothic kit! 
  
This tutorial was written assuming you have working knowledge of PSP. 

~~ Let’s get started ~~

Open up the template.
Shift + D.
Close out the original.
Image/Canvas Size:
800 x 550
OK
Highlight the background layer.
Flood fill white.
Delete the top 4 layers, Border Delicious, Delicious, Small Gray Rectangle

Highlight Big Rectangle layer.
Copy and paste Parchment as a new layer.
Free rotate Right 90 degrees.
Copy.
Delete the Parchment layer.
Use your Magic Wand and click on the Big Rectangle layer.
New Raster layer.
Paste the Parchment Into Selection.
Deselect.
Delete the template layer.

Highlight Circle layer.
Copy and paste Frame 7 as a new layer.
Resize 60%
Move into position over the circle template layer.
Delete the template layer.
Click inside the frame with your Magic Wand.
Selections/Modify/Expand by 4.
New Raster layer below the frame.
Copy and paste Paper 11 Into Selection.
Deselect for now.

Copy and paste the following elements below the frame - see my tag for placement reference: (Don't worry about what overhangs the frame.  We'll clean that up in a bit).
Arch:  Resize 60%
Tree 3:  Resize 50%
Fence:  Resize 60%
Cloud:  Resize 30%/Duplicate/Lower the Opacity to about 38%

Highlight the paper layer.
Click anywhere outside of it with your Magic Wand.
Highlight each element and tap the delete key.
Deselect.

Highlight Diamond Layer.
Click on it with your Magic Wand.
New Raster layer.
Copy and paste Paper 7 Into Selection.
Copy and paste Flairs as a new layer above the paper and move into a position you like.
Selections/Invert
Tap the delete key.
Deselect.

Highlight Line Diamond.
Click on it with your Magic Wand.
New Raster layer.
Copy and paste Paper 13 Into Selection.
Deselect.
Delete the template layer.

Repeat the above step with Line Gray Rectangle layer.
Lower the Opacity of the paper to about 62.

Highlight Border Diamond.
Select All/Float/Defloat
New Raster layer.
Copy and paste Paper 12 Into Selection.
Adjust/Add Remove Noise/Add Noise:
Uniform and Monochrome checked
Noise: 78%
OK
Deselect.
Delete the template layer.

Repeat the above step with:
Border Small Orange Rectangle 
Border Gray Rectangle

Highlight Small Orange Rectangle layer.
Click on it with your Magic Wand.
New Raster layer.
Copy and paste Paper 13 Into Selection.
Deselect.
Delete the template layer.

Highlight Gray Rectangle layer.
Click on it with your Magic Wand.
New Raster layer.
Copy and paste Paper 9 Into Selection.
Deselect.
Delete the template layer.

Copy and paste our tube as a new layer.
If you're using the same tube as I did, resize 70%

Add your elements.  I used:
Secrets Box:  Resize 35%
Skull W Spider:  Resize 25%
Skull:  Resize 20%
Buds:  Resize 25%/Mirror
Necklace:  Resize 25%
Web Droplets:  Resize 25%
Limb:  Resize 45%
Flowers:  Erase the bottom
Bow 1:  Resize 20%
Bush:  Resize 50%/Duplicate 2x's
Lamp:  Resize 30%
Grass 1:  Resize 70%
Glitter:  Resize 60%
Spider:  (to decorate your name) Resize 25%
Raven 2:  Resize 40%

Create a new canvas:
700 x 700 pixels.
Select All
Copy and paste Paper 7 Into Selection.
Deselect.
Apply Vix Mask 451
Merge Group.
Copy.

Make your working canvas active.
Highlight the white background.
Paste the mask as a new layer.
Resize 90%
Move into position behind the round frame.

Highlight your white background.
New Raster layer.
Select All.
Copy and paste Paper 7 Into Selection.
Deselect.
Apply the mask.
Merge Group.
Move this mask into position at the right side - see my tag for reference.

Add your copyrights.

Add your name:
Color Pallet: 
Foreground: #141e2d
Background: #3d4a47
Stroke: 1

Type your name.
Give it a slight Inner Bevel:

Resize all layers 80%.
   
I’d love to see your results.
Email me!
Hugs,
Bev

Sunday, June 23, 2013

Gone Bad


Supplies Needed

1 tube of choice – I used the artwork of Anna Marine which can now be purchased from CDO.  You must have a license to use.

Font of choice – I used Pieces of Eight here

Weescotlass Mask 236 here

Plug Ins used:
Brush Strokes - Sprayed Strokes

“Gone Bad” is a tagger size scrap kit created by Cindy of ChiChi Designz.  It can be purchased from any of her stores listed on her blog here.  Thank you Cindy for a fantastic kit. 
  
This tutorial was written assuming you have working knowledge of PSP. 

~~ Let’s get started ~~

Open up a 700 x 700 blank canvas.
Flood fill white.

Copy and paste Frame 2 as a new layer.
Resize 50% - This is your Right Frame.
Duplicate
Free rotate Right 5 degrees - This is your center frame.
Duplicate the original frame.
Free rotate Left 5 degrees - This is your Left Frame.
Move all 3 frames into exact position - see my tag for reference.

To each frame:
Click inside of it with your Magic Wand.
Selections/Modify/Expand by 4.
New Raster layer below the frame.
Copy and paste Paper 4 Into Selection.
Deselect.

Copy and paste your tube as a new layer below the Right frame.
Move it into position.
Highlight the paper layer.
Click anywhere outside of it with your Magic Wand.
Highlight the tube layer.
Tap the delete key.
Deselect.
Change the Properties of the tube layer to Burn.

Repeat the above step with the Left frame.

Copy and paste your tube as a new layer.
Position it in front of the center frame.

Copy and paste Tape as a new layer.
Copy and paste Chrome Chain as a new layer above the tape.
Highlight the Tape layer.
Tap the letter K on your keyboard to activate the Pick Tool.
Pull down on the top of the tap to make it thinner so that it's just a little wider than the Chrome Chain:
Move the Chrome chain into exact position over the tape - see my image above.  It's alright that it hangs over the edge on the right side.
Merge Down.
The tape and chain should now be on the same layer.
Duplicate
Move both merged layers into position - see my tag for reference.

Copy and paste Frame 1 as a new layer - placement doesn't matter right now.
Resize 45%
Click inside of it with your Magic Wand.
Selections/Modify/Expand by 4.
New Raster layer below the frame.
Copy and paste Paper 5 Into Selection.
New Raster layer.
Copy and paste Ghost Clock Into Selection.
Copy and paste your tube as a new layer below the frame.
Move into position - Change the Properties to Soft Light.
Selections/Invert
Tap the delete key.
Deselect.
Highlight the frame layer.
Merge Down.
Merge Down again.
Merge Down again.
The frame, tube, clock, and paper should all be on the same layer.
Move this merged layer into position - see my tag for reference.

Copy and paste Frame 1 as a new layer.
Resize 30%
Click inside of it with your Magic Wand.
Selections/Modify/Expand by 2.
New Raster layer below the frame.
Copy and paste Paper 12 Into Selection.
Deselect.
Highlight the frame layer.
Merge Down.
Move this merged layer into position behind the Left frame - see my tag for reference.

Repeat the above step accept Resize the frame 40%.
See my tag for placement.

Add your elements.  I used:
Brush:  Resize 70%/Free rotate Left 90 degrees/Duplicate/Mirror
Skull 1:  Resize 25%/Duplicate/Free rotate Left 5 degrees
Bow:  Resize 25%/Duplicate
Cup:  Resize 50%
Candle 1:  Resize 85%
Candle:  Resize 85%

Highlight your white background.
New Raster layer.
Select All.
Copy and paste Paper 8 Into Selection.
Deselect.
Apply Brush Strokes - Sprayed Strokes:
Stroke Length: 18
Spray Radius: 30
Stroke Direction: Right Diag
OK
New Raster layer above the paper.
Flood fill with #b6474f
Change the Properties to Overlay.
Lower the Opacity to about 32
Merge Down.
Apply the mask.
Resize 120%
Merge Group.

New Raster layer above the mask layer.
Select All.
Copy and paste Wire Into Selection.
Deselect.
Apply the mask.
Resize 120%
Merge Group.
Change the Properties to Burn.

Add your copyrights.

Add your name:
Color Pallet: #000000
Background: #963033
Stroke: 1
Type your name.
Give it a slight Inner Bevel:

Resize all layers 80%.
   
I’d love to see your results.
Email me!
Hugs,
Bev