Saturday, October 23, 2010

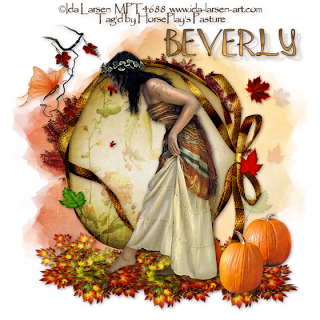
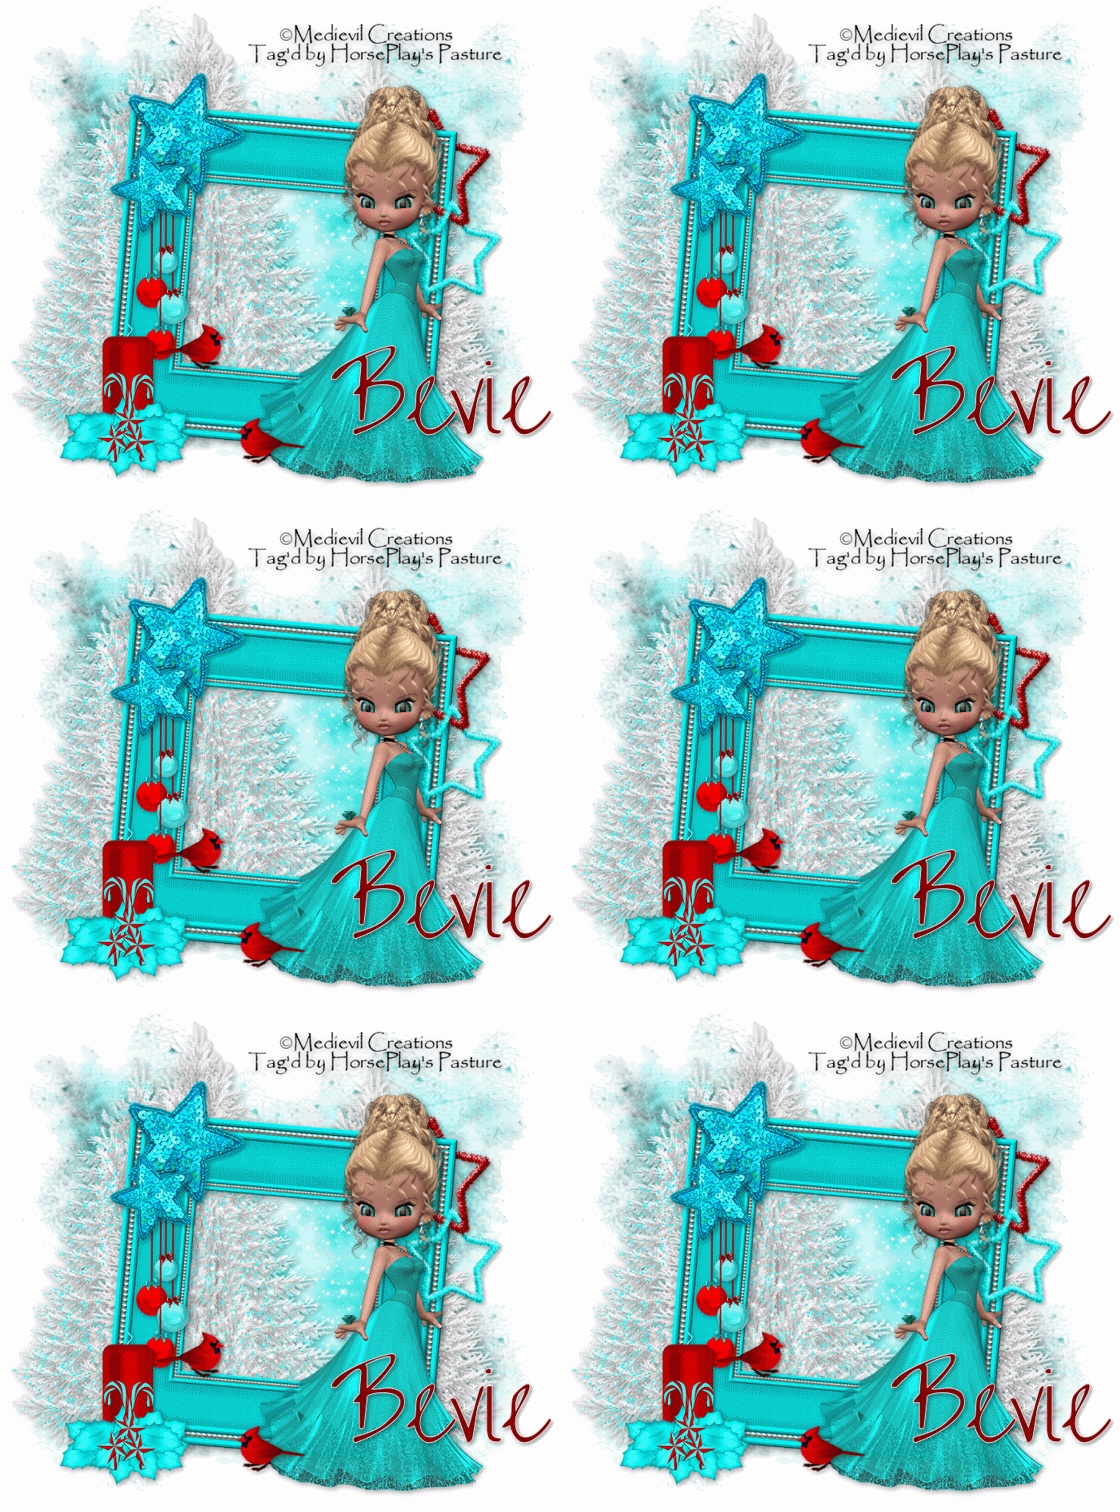
Seasons Change


Clicking on the image will allow you to enlarge for bigger view.

Supplies

1 tube of choice - I used the artwork of Ida Larsen at MPT
Font of Choice - I used Table Air Lamp here
Weescotlass mask 220 here
“Passion for the Fall” is a PTU tagger size scrap kit created by Disyas Digitals Designs and can be purchased from Lollipops n Gumdrops. You can visit her blog here.
Thank you Dilcia for a very beautiful kit!

This tutorial was written assuming you have a working knowledge of PSP.

~♥~ Let’s get started ~♥~

Open up a 700 x 700 blank canvas.
Flood fill white.

Copy and paste FR1 as a new layer.
Click inside of it with your Magic Wand.
Selections/Modify/Expand by 1.
New Raster layer below the frame.
Copy and paste a paper of choice Into Selection.
Deselect.

Copy and paste your tube as a new layer.

Copy and paste Emb 8 as a new layer.
Resize 80%
Mirror
To give it a feathered look, use your Freehand Selection Tool and draw a large circle around it. Be sure the line touches the area of the embellishment that you want feathered.
Selections/Modify/Feather
Number of Pixels:
43
OK
Selections/Invert
Tap the delete key until you have the feathered effect you like.
Deselect.

Add your embellishments. I used:
AE3 - Duplicate/Mirror/Resize 70%
AE13: Resize 70%
AE8: Resize 70%/Duplicate as many times as you like
AE9 through AE12 & AE14 - Resize 25% and 90%
B1: Resize 40%/Mirror

Highlight the white background.
New Raster layer.
Select All
Copy and paste a paper of choice Into Selection.
Deselect.
Apply the mask.
Merge Group.

Add your credits.

Add your name.

Resize all layers 80%.

I hope you enjoyed this tutorial.
I’d love to see your results and show it off in my gallery.
Email me!
Hugs,
Bev

Friday, October 22, 2010

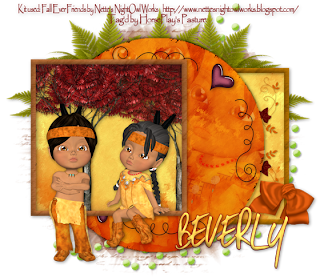
Fall Ever Friends


Clicking on the image will allow you to enlarge for bigger view.

Supplies

Font of Choice - I used Same Same But Different here
Blissfully Beth Template 175 here
Weescotlass Mask 236 here
Xerox - Porcelain
Brush Stroke - Sprayed Strokes
“Fall Ever Friends” is a PTU tagger size scrap kit created by Nette of Nette’s NightOwl Works and can be purchased from Lollipops n Gumdrops. You can visit her blog here.
Thank you Nette for a very festive kit!!

This tutorial was written assuming you have a working knowledge of PSP.

~♥~ Let’s get started ~♥~

Open up the template.
Shift + D.
Close out the original.
Delete the top 3 layers.
Image/Canvas Size
700 x 650
OK
New Raster layer.
Send to bottom.
Flood fill white.

Highlight Raster 1 layer.
Use your Magic Wand and click on it.
New Raster layer.
Copy and paste PP 10 Into Selection.
Deselect.
Delete the template layer.

Highlight Pink Square 2 layer.
Click on it with your Magic Wand.
New Raster layer.
Copy and paste Paper 18 Into Selection.
Deselect.
Delete the template layer.

Highlight White Frame 2 layer.
Click on it with your Magic Wand.
New Raster layer.
Copy and paste Paper 5 Into Selection.
Deselect.
Delete the template layer.
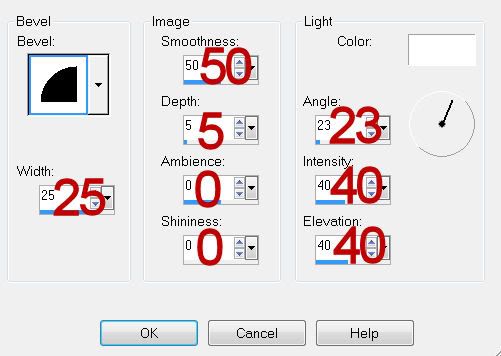
Give it a slight inner bevel:


Highlight Black Circle layer.
Click on it with your Magic Wand.
New Raster layer.
Copy and paste Paper 17 Into Selection.
Copy and paste Little Indian Boy 2 as a new layer.
Position it over the circle - see my tag for reference.
Copy and paste Little Indian Girl 5 as a new layer.
Position it over the circle - see my tag for reference.
Change the Properties of both elements to Soft Light.
Highlight the circle layer.
Click anywhere outside of it with your Magic Wand.
Highlight each of the elements and tap the delete key.
Deselect.
Delete the template layer.

To each of the elements apply Zero - Porcelain:
Default Settings.
To the Paper layer apply Brush Strokes - Sprayed Strokes:
Default Settings.
Repeat the Brush strokes effect.

Highlight Pink Square layer.
Click on it with your Magic Wand.
Copy and paste Paper 18 as a new layer.
Move into position over the square.
Selections/Invert
Tap the delete key.
Deselect.
Delete the template layer.
Apply Brush Strokes - Sprayed Strokes:
Default settings.
Repeat the Brush Strokes effect.

Copy and paste Tree as a new layer over the square layer.
Resize 60% - move toward the left side of the square.
Paste the Tree again.
Resize 50%/Mirror - move toward the right side of the square.
Highlight the square layer.
Click anywhere outside of it with your Magic Wand.
Highlight each of the tree layers and tap the delete key.

Highlight White Frame layer.
Click on it with your Magic Wand.
New Raster layer.
Copy and paste Paper 5 Into Selection.
Deselect.
Delete the template layer.
Give it the same inner bevel.

Add your embellishments. I used:
Autumn Doodle: Resize 25%/Duplicate/Flip
Bow 2: Resize 25% and 70%
Corner 4: Resize 35%/Flip/Duplicate/Mirror/Flip
Little Indian Boy 2: Resize 40%
Little Indian Girl 5: Resize 35%
Fairy Dots: Resize 65%
Fern: Resize 60%

Crop your image.

Highlight the white background.
New Raster layer.
Select All
Copy and paste Paper 2 Into Selection.
Deselect.
Adjust/Blur/Gaussian Blur:
Radius: 5
OK
Apply Brush Strokes - Sprayed Strokes:
Default Setting.
Repeat the effect.
Apply the mask.
Merge Group.

Add your credits.

Add your name.
Give it the same slight inner bevel twice.

Resize all layers 80%.

I hope you enjoyed this tutorial.
I’d love to see your results and show it off in my gallery.
Email me!
Hugs,
Bev

Thursday, October 21, 2010

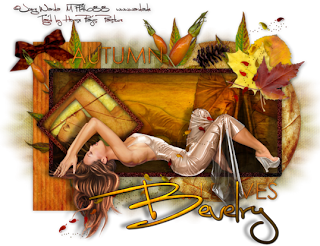
Welcoming Autumn


Clicking on the image will allow you to enlarge for bigger view.
Supplies

1 tube of your choice (laying down one will work best) - I used the artwork of Joerg Warda and can be purchased from MPT.
Font of Choice - I used Luna Bar here
Mythical’s Template which can be found on Creative Misfits blog here - it’s on Sept. 26th
Weescotlass Mask 138 here
Greg’s Factory Output Vol. II - Pool Shadow
“Welcome Autumn” is a PTU tagger size scrap kit created by Kesha of KnC Scraps and can be purchased from her store Lollipops n Gumdrops. You can visit her blog here.
Kesha, this kit captures autumn for sure! Thank you!

This tutorial was written assuming you have a working knowledge of PSP.

~♥~ Let’s get started ~♥~

Open up the template.
Shift + D.
Close out the original.
Delete the top 2 layers.
Image/Canvas Size
700 x 600
OK
Flood fill the background layer white.

Highlight Raster 1 layer.
Use your Magic Wand and click on it.
New Raster layer.
Copy and paste PP 10 Into Selection.
Deselect.
Delete the template layer.

Highlight Raster 2 layer.
Click on it with your Magic Wand.
New Raster layer.
Copy and paste PP5 Into Selection.
Deselect.
Delete the template layer.

Highlight Raster 3 layer.
Click on it with your Magic Wand.
New Raster layer.
Copy and paste PP 7 Into Selection.
Deselect.
Delete the template layer.
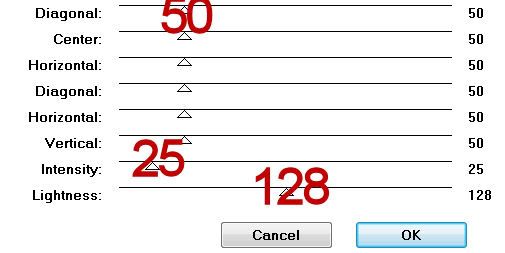
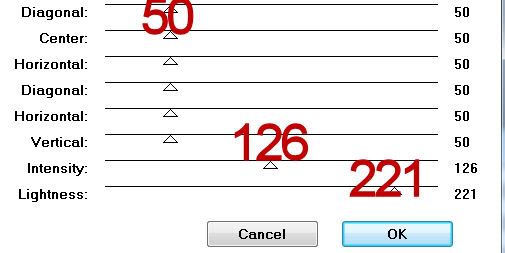
We’ll come back to apply the tube a bit later. For now apply Greg’s Factory Output Vol. II - Pool Shadow:


Highlight Raster 4 layer.
Click on it with your Magic Wand.
New Raster layer.
Copy and paste PP 1 Into Selection.
Adjust/Add Remove Noise/Add Noise:
Monochrome and Gaussian checked
Noise: 50%
OK
Deselect.
Delete the template layer.

Repeat the above step with Raster 7.

Highlight Raster 5 layer.
Select All/Float/Defloat
Copy and paste Paper 7 Into Selection.
Apply Greg’s Factory Output Vol. II - Pool Shadow:

Deselect.
Delete the template layer.

Highlight Raster 6 layer.
Click on it with your Magic Wand.
New Raster layer.
Copy and paste PP 8 Into Selection.
Deselect.
Delete the template layer.

Copy and paste your tube as a new layer.
Move it into the exact position where you want it.
Duplicate/Resize a bit larger.
Move the duplicate layer just above the diamond paper in your layers pallet.
Duplicate
Move this tube just above the rectangle paper in your layers pallet.
Highlight the rectangle paper.
Click anywhere outside of it with your Magic Wand.
Highlight the tube layer just above the rectangle paper.
Tap the delete key.
Deselect.
Highlight the diamond paper.
Click anywhere outside of it with your Magic Wand.
Highlight the tube layer just above the paper.
Tap the delete key.
Deselect.
Change the Properties of both tube layers to Multiply.

Add your embellishments. I used:
Bow 1: Resize 25% and 80%/Free rotate left 10 degrees
Leaf 3: Resize 30%
Leaf 2: Resize 30%
Leaf 1: Resize 30%
Branch 2: Resize 30%
Element 4: Resize 40%
Element 4 again: Resize 25%/Flip/Mirror
Pinecone: 25% and 70%
Leaves 1: Resize 40%


Highlight the white background.
New Raster layer.
Select All
Copy and paste a paper of choice Into Selection.
Deselect.
Apply the mask.
Merge Group.
Move to the left of your canvas.
Duplicate/Mirror
If the middle is too dark then use your Eraser Tool and erase the overlap.

Add your credits.

Add your name.
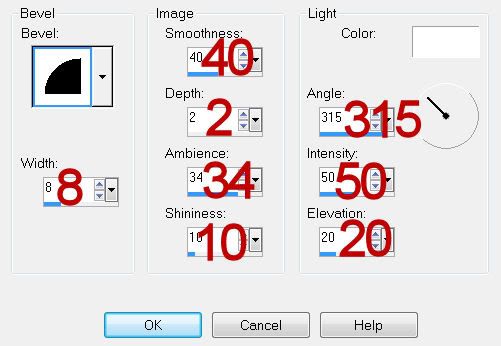
Give it a slight inner bevel.

Apply the Pool Shadow effect and toy with the Lightness bar to get the affect you like.

Resize all layers 80%.

I hope you enjoyed this tutorial.
I’d love to see your results and show it off in my gallery.
Email me!
Hugs,
Bev


Wednesday, October 20, 2010

Magical Event


Supplies

Font of Choice - I used RoseDiFont here
Monti Circular mask here
Snow which I’ve supplied here
Animation Shop
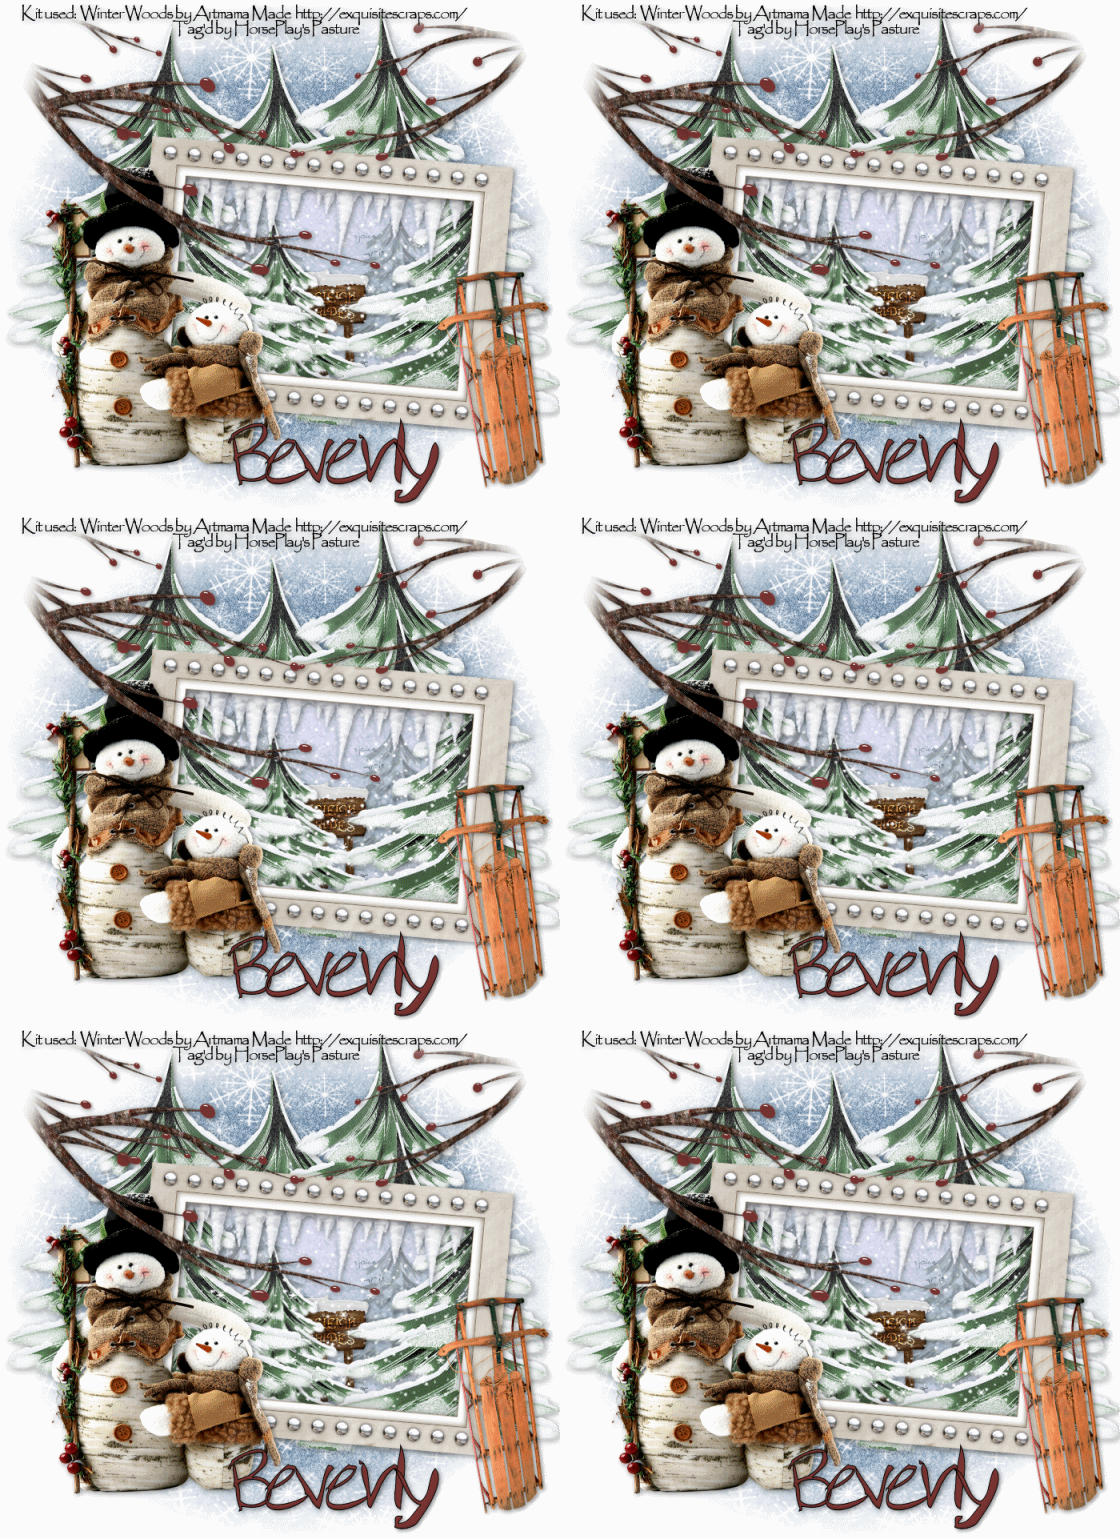
“Winter Woods” is a PTU tagger size scrap kit created by Artmama Made and can be purchased from her store here. You can visit her blog here.
Thank you Artmama for a truly beautiful wintry kit. Makes me feel like I want to live up north again in the cold…hehehe

This tutorial was written assuming you have a working knowledge of PSP.

~♥~ Let’s get started ~♥~

Open up a 700 x 700 blank canvas.
Flood fill white.

Copy and paste Embellie 01 as a new layer.
Resize 70%
Free rotate right 5 degrees.
Click inside of it with your Magic Wand.
Selections/Modify/Expand by 5.
Copy and paste Paper 1 as a new layer below the frame.
Selections/Invert
Tap the delete key.
Deselect for now.

Copy and paste Embellie 9 as a new layer below the frame.
Move the tree to the right side of the frame - (don’t worry about any of the embellishments that overhang the frame right now. We’ll take care of that in a bit.)
Duplicate the tree/Mirror/position at the other side of the frame.
Duplicate/Mirror/Resize 70%/position near the left tree.
Paste the tree again - resize 50%/Duplicate - move both of these trees into position and change the Properties of both of these trees to Multiply and lower the Opacity to about 42.

Copy and paste Embellie 41 as a new layer.
Resize 30%
Move into position - see my tag for reference.

Copy and paste Embellie 40 as a new layer just below the frame.
Resize 70%
Free rotate right 5 degrees.
Move into position - see my tag for reference.

Highlight the paper layer.
Click anywhere outside of the paper with your Magic Wand.
Highlight each element layer and tap the delete key.
Deselect.

Open up the animated snow that I’ve supplied.
Highlight Frame 1
Copy
Make your working canvas active.
In your layers pallet highlight the element that’s just below the icicle element.
Paste the snow layer - rename Snow 1
Make the animated snow layers active.
Highlight Frame 2
Copy
Make your working canvas active.
Paste - it should be just above Snow 1 layer. Rename this layer Snow 2.
Repeat until you have all 10 frames pasted onto your working canvas.

Highlight the paper layer.
Click anywhere outside of it with your Magic Wand.
Highlight each of the snow layers and tap the delete key.
Deselect.

Close out all snowflake layers accept for Snowflake 1 layer.

Add your embellishments. I used:
Embellie 7: Resize 70%/Free rotate right 5 degrees/Duplicate
Embellie 9
Embellie 19
Embellie 32: Resize 60%
Choose any of the snowflake embellishments - Resize 25%

Embellie 25: Duplicate/Mirror/Resize 70%/Duplicate/Mirror
After you’ve gotten all branch layers moved into position Merge Visible all of them.
Select All/Modify/Feather
Number of Pixels:
53
OK
Selections/Invert
Tap the delete key until you have a nice feathered effect.

Crop your tag.

Highlight the white background.
New Raster layer.
Select All
Copy and paste a paper of choice Into Selection.
Deselect.
Apply the mask.
Merge Group.

Add your credits.
If you didn’t use a tube that requires credit then the kit designer would sure appreciate credit on the tag - but is not required.

Add your name.

Resize all layers 80%.

Be sure Snowflake 1 layer is open and all the rest are closed.
Copy Merge.

~Time to Animate~

Open up Animation Shop
Edit/Paste/As New Animation

Go back into PSP.
Close out Snow 1.
Open up Snow 2.
Copy Merge.

Carry into AS
Edit/Paste/After Current Frame.

Back into PSP.
Close out Snow 2.
Open up Snow 3.
Copy Merge.

Carry into AS.
Edit/Paste/After Current Frame.

Continue copying the snow layers one at a time, carrying and pasting them into AS.
Once you’ve done this to all 10 snow layers view your image.
If you’re happy with it then save.

I hope you enjoyed this tutorial.
I’d love to see your results and show it off in my gallery.
Email me!
Hugs,
Bev

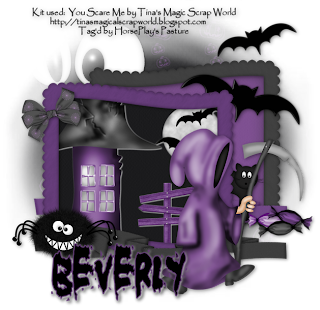
You Scare Me


Clicking on the image will allow you to enlarge for bigger view.

Supplies

Font of Choice - I used Grunt Reaper
Mask here
“You Scare Me” is a FTU tagger size scrap kit created by Tina’s Magical Scrap World and can be downloaded from her blog here. Please leave a thank you when downloading as it’s a small gesture for hard work given feely.
Thank you Tina for an adorable spook kit! Eek!

This tutorial was written assuming you have a working knowledge of PSP.

~♥~ Let’s get started ~♥~

Open up a 700 x 700 blank canvas.
Flood fill white.

Copy and paste Scalloped Frame 2 as a new layer.
Resize 70%
Mirror

Copy and paste Scalloped Frame 1 as a new layer.
Resize 70%

Move both frame into position - see my tag for reference.

Highlight Frame 2 layer.
Click inside of it with your Magic Wand.
Selections/Modify/Expand by 4.
New Raster layer below the frame.
Copy and paste a paper of choice Into Selection.
Deselect.

Highlight Frame 1 layer.
Click inside of it with your Magic Wand.
Selections/Modify/Expand by 4.
New Raster layer below the frame.
Copy and paste a black paper of choice Into Selection.
Deselect for now.
Copy and paste Witches House 1 as a new layer below the frame.
Resize 65% - Move into position - give it a drop shadow using the color white.
Copy and paste Moon with Bats 1 as a new layer below the frame.
Resize 25% - Move into position - give it a drop shadow using the color white.
Copy and paste Sign 1 as a new layer below the frame.
Resize 25% - Move into position - give it a drop shadow using the color white.
Highlight the black paper layer.
Click anywhere outside of it with your Magic Wand.
Highlight each of the element layers and tap the delete key.
Deselect.

Add your embellishments. I used:
Bats: 50%
Funny Spider 2: Resize 60%
Grim Reaper 1: Resize 60%
Bonbon 1: Resize 25%
Bonbon 2: Resize 25%/Free rotate right 15 degrees
Bonbon 3: Resize 25%/Free rotate left 5 degrees
Black Cat 1: Resize 30%/Mirror
Folded Ribbon 3 & 4: Resize 80%
Bow 1: Resize 30%

Crop your tag.

Highlight the white background.
New Raster layer.
Select All
Copy and paste a paper of choice Into Selection.
Deselect.
Copy and paste Goggly Eyes 1 as a new layer - resize 70% and move into position so they’re peeking above the frame.
Merge down with the paper.
Apply the mask.
Merge Group.

Add your credits.
If you didn’t use a tube that requires credit then the kit designer would sure appreciate credit on the tag - but is not required.

Add your name.
Give it a drop shadow in white.
Repeat the drop shadow in black.

Resize all layers 90%.

I hope you enjoyed this tutorial.
I’d love to see your results and show it off in my gallery.
Email me!
Hugs,
Bev

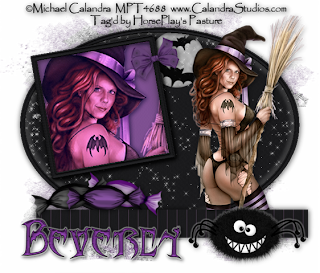
On Hallow's Eve


Clicking on the image will allow you to enlarge for bigger view.

Supplies

1 tube of your choice - I used the artwork of Michael Calandra and can be purchased from MPT.
Font of Choice - I used Bats & Dragons
Scrap Rebellion Template 24 here
Becky Mask 36 here
Xenofex 2 - Constellation
“You Scare Me” is a FTU tagger size scrap kit created by Tina’s Magical Scrap World and can be downloaded from her blog here. Please leave a thank you when downloading as it’s a small gesture for hard work given feely.
Thank you Tina for an adorable spook kit! Eek!

This tutorial was written assuming you have a working knowledge of PSP.

~♥~ Let’s get started ~♥~

Open up the template.
Shift + D.
Close out the original.
Delete the top 4 layers and Tag Backing layer.

Highlight Oval layer.
Use your Magic Wand and click on it.
New Raster layer.
Copy and paste Paper 34 Into Selection.
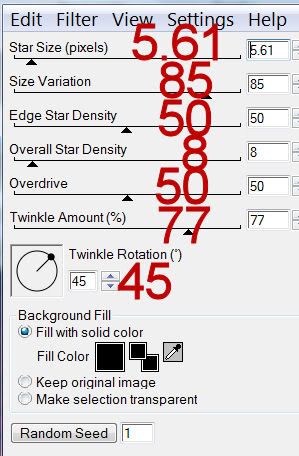
Apply Xenofex 2 - Constellation:


DO NOT DESELECT.
Selections/Invert
Apply Eyecandy 4000 - Gradient Glow:


Color Tab:
White
OK
Deselect.
Delete the template layer.

Highlight Frame 1 layer.
Click on it with your Magic Wand.
New Raster layer.
Copy and paste the same paper Into Selection.
Deselect.
Delete the template layer.
Give it a slight inner bevel:


Highlight Square layer.
Click on it with your Magic Wand.
New Raster layer.
Copy and paste Paper 32 Into Selection.
Copy and paste your tube as a new layer below the frame.
Selections/Invert
Tap the delete key.
Deselect.
Delete the template layer.
Change the Properties to Overlay.

Highlight Frame 2 layer.
Click on it with your Magic Wand.
New Raster layer.
Copy and paste Paper 34 Into Selection.
Deselect.
Delete the template layer.
Give it the same Inner bevel.

To Drop Shadow the square so it’ll stand out a little bit from the black background:

Give it a very heavy drop shadow on it’s own layer.
Duplicate the drop shadow layer.
Merge down.
Highlight the frame layer.
Click inside the frame with your Magic Wand.
Highlight the merged drop shadow layer
Tap the delete key.
Deselect.
Use your Eraser tool and erase the drop shadow that’s on the outside of the frame but only the part that you can see on the white background.
Highlight the frame layer.
Now you can highlight your frame and give whatever shadow you choose.

Highlight Rectanglet layer.
Click on it with your Magic Wand.
New Raster layer.
Copy and paste Paper 1 Into Selection.
Deselect.
Delete the template layer.

Copy and paste your tube as a new layer.

Add your embellishments. I used:
Bow 2: Resize 25%
Moon with Bats 1: Resize 25%
Funny Spider 2: Resize 60%
Bonbon 3: Resize 45%/Free rotate left 15 degrees
Bonbon 1: Resize 45%/Free rotate right 15 degrees
Bonbon 2: Resize 45%

Highlight the white background.
New Raster layer.
Select All
Copy and paste a paper of choice Into Selection.
Deselect.
Apply the mask.
Merge Group.

Add your credits.

Add your name.
Give the same slight inner bevel.
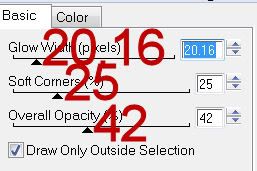
Apply Eyecandy 4000 - Gradient Glow:
Just change the glow width to 3.00
OK
Apply it once more.

Resize all layers 85%.

I hope you enjoyed this tutorial.
I’d love to see your results and show it off in my gallery.
Email me!
Hugs,
Bev

Tuesday, October 19, 2010

Winter's Beginning


Supplies

Font of Choice - I Over the Rainbow here
Gem’s Mask 161 here
Snow which I supply here
Mura Meister - Cloud
Animation Shop
“Totally Tiffany” is a PTU tagger size scrap kit created by Kissed by Pixie and can be downloaded from her store here. You can visit her blog here.
Thank you Pixie for such a beautiful kit. A real breath of fresh air!

This tutorial was written assuming you have a working knowledge of PSP.

~♥~ Let’s get started ~♥~

Open up a 700 x 700 transparent blank canvas.
Flood fill white.

Copy and paste Frame 5 as a new layer.
Resize 85%
Click inside of it with your Magic Wand.
Selections/Modify/Expand by 6.
New Raster layer below the frame.
Copy and paste 6 Into Selection.
DO NOT DESELECT.
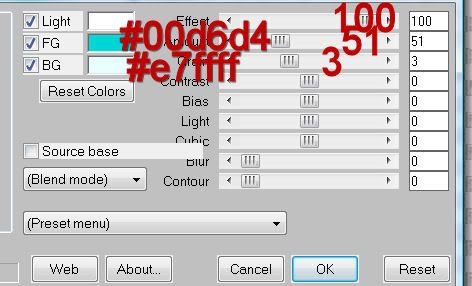
Apply Mura Meister - Cloud:


DO NOT DESELECT YET.
Copy and paste Tree 2 as a new layer below the frame.
Move into position - see my tag for reference.
Selections/Invert
Tap the delete key.
Deselect for now.

Open up the snow animation that I’ve supplied.
Highlight Frame 1
Copy
Make your working canvas active.
Paste just above the cloud paper layer - rename Snow 1
Make the animated snow layers active.
Highlight Frame 2
Copy
Make your working canvas active.
Paste - it should be just above Snow 1 layer. Rename this layer Snow 2.
Repeat until you have all 10 frames pasted onto your working canvas.

Once you’ve done that, highlight your Frame layer.
Click inside of it with your Magic Wand.
Selections/Modify/Expand by 6.
Selections/Invert
Highlight each of the snow layers and tap the delete key.
Deselect.
Only keep Snow 1 layer open, close all the other snow layers.

Add your embellishments. I used:
Tree 2
Tree 1 - Resize 70%
Tree 1 again - Mirror
Sequin Star - Resize 35%/Duplciate/Mirror/Resize 70%
Cardinal: Resize 25% and 70%/Duplicate/Mirror
Dangle Bulbs 5
Candle: Resize 45%
Tinsel Star 2: Resize 50%
Tinsel Star 1: Resize 40%
Tiffanie 1

Crop your image.

Highlight the white background.
New Raster layer.
Select All
Copy and paste a paper of choice Into Selection.
Deselect.
Apply the mask.
Merge Group.

Add your credits.

Add your name.

Resize all layers 80%.

Copy Merge

~Time to Animate~

Open up Animation Shop
Edit/Paste/As New Animation

Go back into PSP.
Close out Snow 1.
Open up Snow 2.
Copy Merge.

Carry into AS
Edit/Paste/After Current Frame.

Back into PSP.
Close out Snow 2.
Open up Snow 3.
Copy Merge.

Carry into AS.
Edit/Paste/After Current Frame.

Continue copying the snow layers one at a time, carrying and pasting them into AS.
Once you’ve done this to all 10 snow layers view your image.
If you’re happy with it then save.

I hope you enjoyed this tutorial.
I’d love to see your results and show it off in my gallery.
Email me!
Hugs,
Bev

Sunday, October 17, 2010

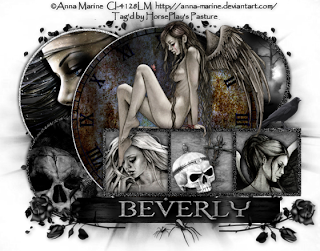
Underworld


Clicking on the image will allow you to enlarge to bigger view.

Supplies

4 tubes of your choice - I used the artwork of Anna Marine and can be purchased from CILM.
Font of Choice - I used Fire of Ysgard Wide here
Divine Intentionz Template 346 here
Gem Mask 71 here
Greg’s Factory Output Vol. II - Pool Shadow
“Underworld” is a PTU tagger size scrap kit created by Heart of Essence and can be purchased from Lollipops n Gumdrops. You can visit her blog here.
Thank you HE for a stunning kit!

This tutorial was written assuming you have a working knowledge of PSP.

~♥~ Let’s get started ~♥~

Open up the template.
Shift + D.
Close out the original.
Delete the top 2 layers.
Resize all layers 90%
Image/Canvas Size
700 x 550
OK
Open up the background layer.
Flood fill white.

Highlight Circle Left layer.
Use your Magic Wand and click on it.
New Raster layer.
Copy and paste Paper 1 Into Selection.
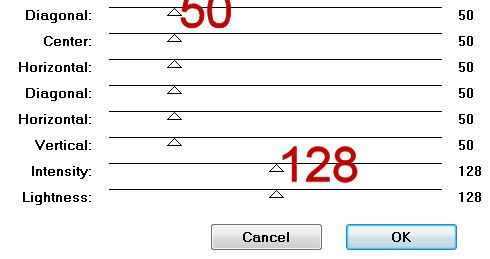
Apply Greg’s Factory Output Vol. II - Pool Shadow:

Copy and paste one of your tubes as a new layer.
Move into position over the circle.
Selections/Invert
Tap the delete key.
Deselect.
Delete the template layer.
Change the Properties to Soft Light.
Duplicate
Change the Properties to Overlay

Highlight Small Circle Left layer.
Click on it with your Magic Wand.
New Raster layer.
Copy and paste Paper 5 Into Selection.
Adjust/Add Remove Noise/Add Noise:
Monochrome and Gaussian checked.
Noise: 88%
OK
Deselect.
Delete the template layer.

Highlight Small Circle 2 Left layer.
Click on it with your Magic Wand.
New Raster layer.
Copy and paste Paper 12 Into Selection.
Apply the Pool Shadow effect (same settings as before) 3 times
Copy and paste Element 14 as a new layer.
Resize 60%
Selections/Invert
Tap the delete key.
Deselect.
Change the Properties to Hard Light.
Delete the template layer.

Highlight Small Circle 1 Right layer.
Click on it with your Magic Wand.
New Raster layer.
Copy and paste Paper 5 Into Selection.
Apply the same Noise effect.
Deselect.
Delete the template layer.

Highlight Small Circle 2 Right layer.
Click on it with your Magic Wand.
New Raster layer.
Copy and paste Paper 15 Into Selection.
Apply the Pool Shadow Effect (same settings as before) 2 times.
Deselect.
Delete the template layer.

Highlight Glittered Circle Large layer.
Apply the Noise effect.

Higlight Glittered Circle left layer.
Apply the same Noise effect.

Highlight Circle Large layer.
Click on it with your Magic Wand.
New Raster layer.
Copy and paste Paper 13 Into Selection.
Apply the Pool Shadow Effect - same settings.
New Raster layer.
Copy and paste Element 19 Into Selection.
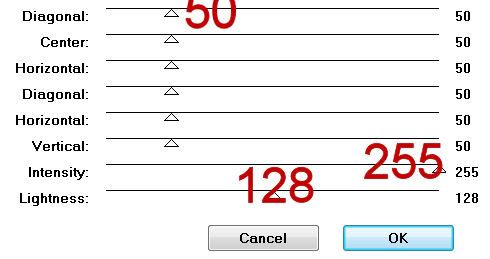
Apply Pool Shadow Effect:

Deselect.
Delete the template layer.

Highlight Frame Background layer.
Click on each of the squares.
New Raster layer.
Copy and paste Paper 11 Into Selection.
Deselect.
Delete the template layer.

Highlight Frame layer.
Click on it with your Magic Wand.
New Raster layer.
Copy and paste Paper 5 Into Selection.
Apply the same Noise effect.
Deselect.
Delete the template layer.

Copy and paste one of your tubes as a new layer.
Move into position beneath the left square of the frame.
Highlight the frame layer.
Click inside that square with your Magic Wand.
Selections/Modify/Expand by 2.
Selections/Invert
Highlight the tube layer.
Tap the delete key.
Deselect.
Change the Properties to Hard Light.
Duplicate
Change the Properties to Multiply.

Repeat the above step with the far right square.

Highlight Rectangle layer.
Click on it with your Magic Wand.
New Raster layer.
Copy and paste Paper 2 Into Selection.
Apply the Pool Shadow effect - same settings as before.
Deselect.
Delete the template layer.

Copy and paste your main tube as a new layer.

Add your embellishments. I used:
33: Resize 25% and 80%/Free rotate right 15 degrees
12: Resize 50%/Mirror/Free rotate left 15 degrees
40: Resize 40%/Free rotate left 85 degrees
9: Resize 25% and 60%
49: Resize 80%/Duplciate/Mirror
11: Resize 25% and 25%/Duplicate/Resize 50%

Highlight the white background.
New Raster layer.
Select All
Copy and paste a paper of choice Into Selection.
Deselect.
Apply the mask.
Merge Group.

Add your credits.

Add your name.
I used Paper 11 for both foreground and background.
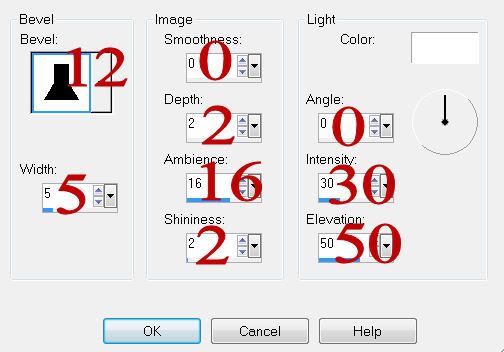
Give it a slight inner bevel:

Resize all layers 80%.

I hope you enjoyed this tutorial.
I’d love to see your results and show it off in my gallery.
Email me!
Hugs,
Bev