Saturday, January 23, 2010

Monarch Beauty

Clicking on the image will enlarge to full view.

Supplies
1 tube of choice - I used the gorgeous artwork of Joan Palaez here
Font of choice - I used Aracnoide here.
Weescotlass Mask 138 here
DSB Flux - Bright Noise - Optional
Xenofex 1: Shower Door - Optional
“Nostalgia” is a PTU scrap kit created by Kat of KatNKDA and can be purchased at her store NK Art Shop. You can visit her blog here.
Thank you Kat for another breathtakingly beautiful kit!

This tutorial was written assuming you have a working knowledge of PSP.

~♥~ Let’s get started ~♥~

Open up a 700 X 700 blank canvas.
Flood fill white.
Copy and Paste Element 12 as a new layer.
Resize 60%
Use your FreeHand Selection Tool and outline each frame.

New Raster layer below the frame.
Copy and paste a paper of choice Into Selection.
Deselect.

Copy and paste Element 39 as a new layer.
Resize 40%
Free rotate left 20 degrees.
Position at the top of the frames.
Duplicate/Flip
Position at the bottom of the frames.

Copy and paste Element 4 as a new layer.
Resize 25%
Position at the top right corner of the right frame.
Duplicate/Mirror.

Copy and paste Element 5 as a new layer.
Resize 25%
Free rotate left 90 degrees.
Position at the bottom right corner of the right frame.

Copy and paste your tube as a new layer.

Copy and paste Element 37 as a new layer.
Resize 95%

Copy and paste Element 18 as a new layer.
Resize 60%.
Duplicate/Mirror
Overlap the largest boards of each layer.
Merge Down.
In your layers pallet move the merged fence layer just above your white background.
Highlight your white background.
New Raster Layer.
Select All.
Copy and paste a paper of choice Into Selection.
I flipped paper 5 and patsed it Into Selection.
Deselect
Then applied Xenofex 1: Shower Door:


Merge Visible the merged fence layer and the paper layer.
Apply the mask.
Use your Pick Tool and pull the sides out slightly.
Merge Group.

Add your copyrights.

Add your name.
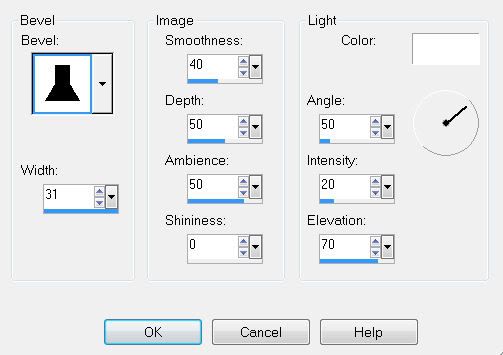
Give it a slight inner bevel:

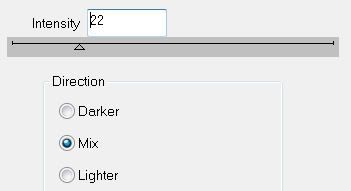
Apply DSB Flux - Bright Noise:
Resize all layers 80%.
I hope you enjoyed this tutorial.
I’d love to see your results.
Email me!
Hugs,
Bev

Friday, January 22, 2010

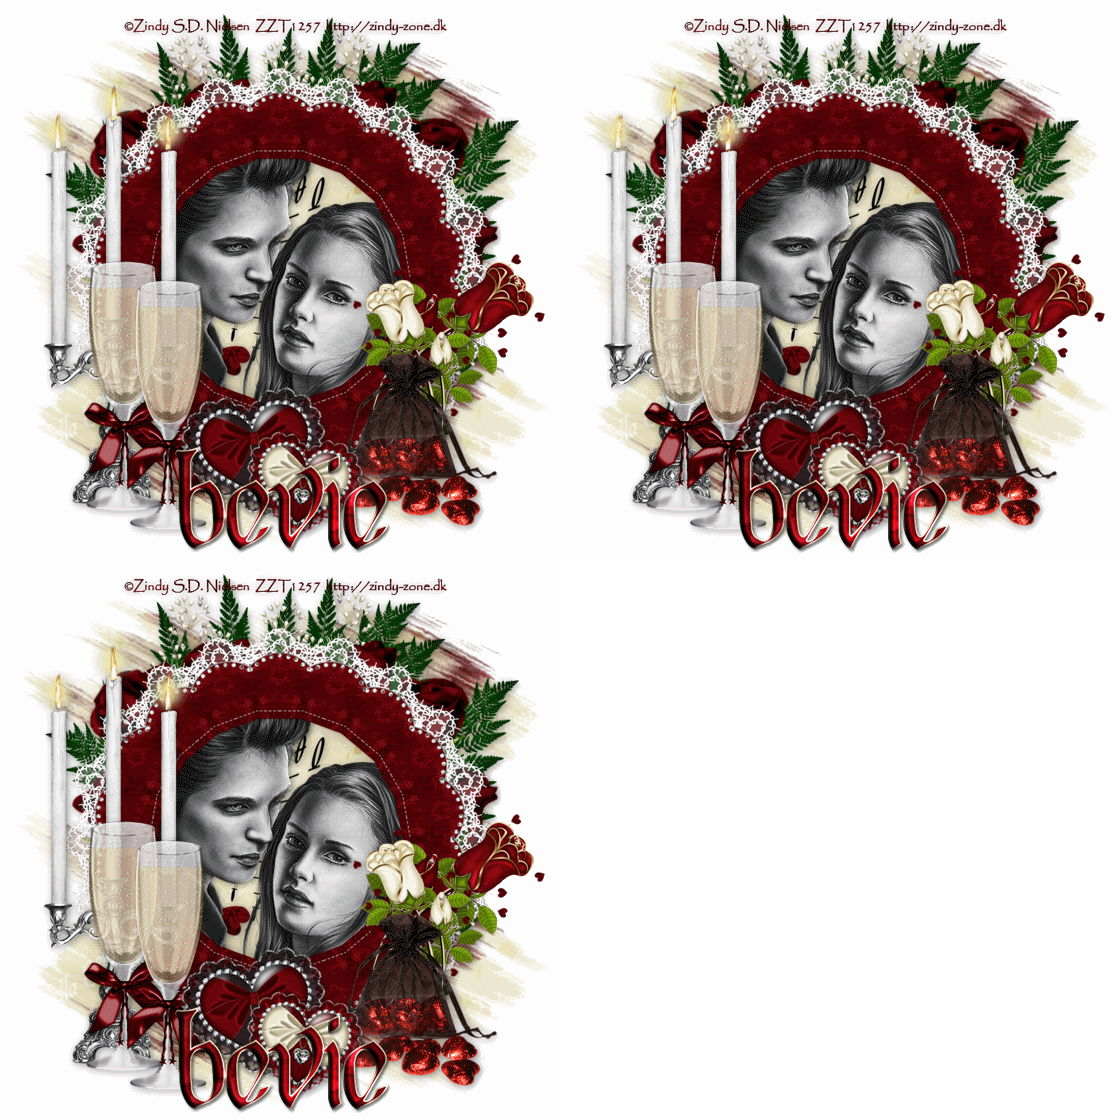
Bella Mia Valentina


Supplies
1 tube of choice - I used the gorgeous artwork of Zindy S.D. Nielsen here
Font of choice - I used Black Heart Inertia here.
Kreations Mask 71 here
Eyecandy 5: Nature - Fire
Greg’s Factory Output Vol. II - Pool Shadow
Animation Shop
“Bella Mia Valentino” is a PTU tagger size scrap kit created by Stina of Designed by Stina and can be purchased at Aussie Scrap Designs. You can visit Stina’s blog here.
Thank you Stina for a stunning kit!

This tutorial was written assuming you have a working knowledge of PSP.

~♥~ Let’s get started ~♥~

Open up a 700 X 700 blank canvas.
Flood fill white.

Copy and Paste Frame 11 as a new layer.
Resize 65%
Use your Magic Wand and click inside of it.
Selections/Modify/Expand by 6.
New Rater layer below the frame.
Copy and paste a paper of choice Into Selection.
DO NOT DESELECT.

Copy and paste Love Notes 1 below the frame.
Tap the delete key.
DO NOT DESELECT.

Copy and paste your tube below the frame.
Tap the delete key.
Deselect.

Close out your white background.
Merge Visible.
Reopen your white background.

Copy and paste Rose Bouquet behind the merged layer.
Erase the bottom part of the bouquet that sticks out from the bottom of the frame.

Add your embellishments. I used:
Ruffled Heart 3: Resize 25%. Free rotate left 10 degrees
Ruffled Heart 2: Resize 20%. Free rotate right 10 degrees
Glass 1: Resize 40%
Roses 4: Resize 30%
Roses 3: Resize 25%. Free rotate right 20 degrees
Chocolate Bag: Resize 40%
Candles 1: Resize 70%

Highlight your white background.
New Raster layer.
Seletct All.
Copy and paste a dark paper of your choice Into Selection.
Deselect.
Apply the mask.
Merge Group.

Repeat the above step accept use a light color paper.
Duplicate.
Move the mask copy below the dark colored mask.
Move the top mask up just a little and the bottom mask down just a little.
See the mask on my tag for reference.

Add your copyrights.

Add your name - Stroke set at 1.5
Select All/Float/Defloat
Selections/Invert
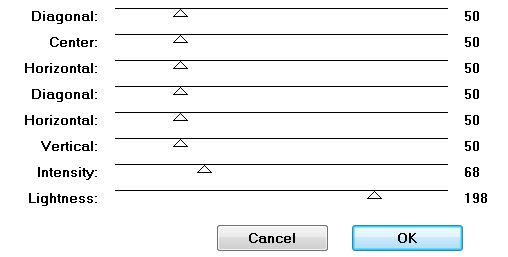
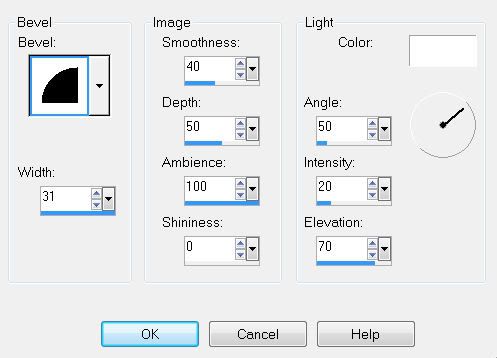
Give it a slight inner bevel:

DO NOT DESELECT
Apply Greg’s Factory Output Vol. II - Pool Shadow:


Resize all layers 80%.

If you’re not going to animate then save your tag.

If you are going to animate then duplicate Candles 1 layer twice for a total of 3. Rename them Candles 1, 2, and 3.

Highlight Candle 1.
Using your Freehand Selection tool, outline the flames of all the candles.
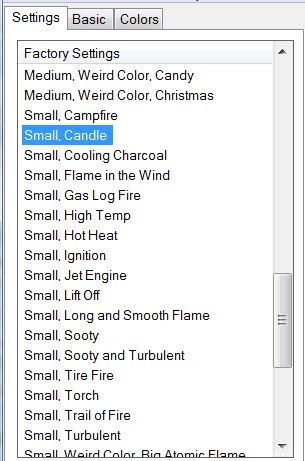
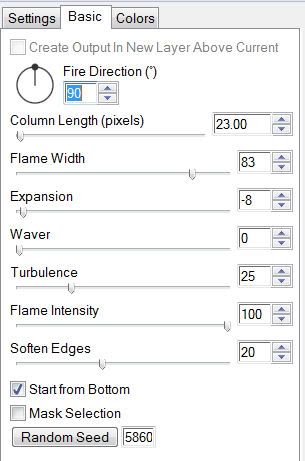
Apply Eyecandy 5: Nature - Fire
Settings Tab:


Basic Tab:


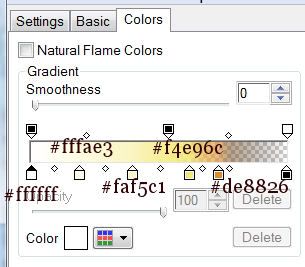
Colors Tab:


Highlight Candle 2 layer and apply the same effect as above accept hit the random seed button once.

Highlight Candle 3 layer and apply the same effect as above accept hit the random seed button once.

Close out Candle layers 2 & 3.
Copy Merge.

~Time to Animate~

Open up Animation Shop.
Edit/Paste/As New Animation.

Back into PSP.
Close out Candle 1 layer.
Open up Candle 2 layer.
Copy Merge.

Carry into AS.
Edit/Paste/After Current Frame.

Back into PSP.
Close out Candle 2 layer.
Open up Candle 3 layer.
Copy Merge.

Carry into AS.
Edit/Paste/After Current Frame.

Ctrl + A to highlight all frames.
Animation/Frame Properties
Change the display time to 25.

View your animation.
If you’re happy with it then save.

I hope you enjoyed this tutorial.
I’d love to see your results.
Email me!
Hugs,
Bev

Wednesday, January 20, 2010

In the Moment

Clicking on the image will enlarge to full view.

Supplies
1 tube of choice - I used the Beautiful artwork of Jay Trembly here
Font of choice - I used Bambino here
Monti Circular Mask here
“In the Moment” is a PTU tagger size scrap kit created by Jane of JT’s Designs and can be purchased at Butterfly Blush Designs. You can visit her blog here.
Jane, thank you so much for a most beautiful and delicate kit!

This tutorial was written assuming you have a working knowledge of PSP.

~♥~ Let’s get started ~♥~

Open up a 700 X 700 blank canvas.
Flood fill white.

Copy and paste Wood Frame as a new layer.
Resize 60%
Use your Magic Wand and click inside the frame.
Selections/Modify/Expand by 10.
New Raster layer below the frame.
Copy and paste a paper or use a gradient of choice Into Selection.
Deselect.

Close out your white canvas.
Merge Visible.
Reopen your white canvas.
Free rotate the merged frame 5 degrees to the right.

Add your embellishments. I used:
Frame Wrap 3: Resize 60% Free rotate right 5 degrees
Bougainville 2: Resize 70%. Free rotate right 5 degrees
Bougainville 2 again: Resize 40%. Free rotate right 5 degrees.
Bougainville 1: Resize 60%
Bougainville 1 again: Resize 40%. Free rotate right 5 degrees
Flower Doodle 1: Resize 70%. Duplicate/Mirror
Hummingbird 2: Resize 40%
Heart 1: Resize 40%
Heart 2: Resize 35%
Blue Candle: Resize 70%

Copy and paste your tube as a new layer.

Highlight your white background.
New Raster layer.
Seletct All.
Copy and paste a paper of your choice Into Selection.
Deselect.
Apply the mask.
Merge Group.

Highlight the very top layer.
Copy and paste Curtain 1 as a new layer.
Move it to the left on your canvas.
See mine for reference.
Apply the mask.
Merge Group.

Add your copyrights.

Add your name.
Give it a slight inner bevel:

Resize all layers 80%.

I hope you enjoyed this tutorial.
I’d love to see your results.
Email me!
Hugs,
Bev

Tuesday, January 19, 2010

Mint Chocolate?!

Clicking on the image will enlarge to full view.

Supplies
3 tubes of choice - I used the awesome artwork of Dean Yeagle here
Font of choice - I used Angelina here.
Artmama’s Studio Mask 2 here - her masks are gorgeous!!
Designs by Ali Template 158 here
“Mint Choc Chip” is a PTU tagger size scrap kit created by Nikki of Creative Intentionz and can be purchased at Twilight Scraps. You can visit her blog here.
Nikki, this is such a yummy kit! Thank you!

This tutorial was written assuming you have a working knowledge of PSP.

~♥~ Let’s get started ~♥~

Open up the template.
Delete the credit layer.
Resize all layers 85%
Image/Canvas Size
700 X 650
New Raster layer.
Send to bottom.
Flood fill white.

Highlight Raster 1 layer.
Select All/Float/Defloat
New Raster layer.
Copy and paste a paper of choice Into Selection (or flood fill with a gradient of your choice and apply a texture of your choice)
DO NOT DESELECT.

Copy and paste your tube as a new layer.
Position it exactly where you want it.
Duplicate/Resize (to your choice) much larger.
Move it behind the smaller tube and exact it into the position you want.
Selections/Invert
Tap the delete key on both tube layers.
Deselect.
Change the opacity of the tube you enlarged to Soft Light.
Delete the template layer.

Repeat the above step with Raster 2 & Raster 3 layers, using a different paper or gradient as well as a different tube for each layer.

Highlight Raster 8 layer.
Select All/Float/Defloat
New Raster layer.
Copy and paste a paper of choice Into Selection.
Deselect.
Delete the template layer.

Repeat the above step with Raster 4 and Raster 9.

Highlight Raster 5.
Select All/Float/Defloat
New Raster layer.
Copy and paste a paper of choice Into Selection.
Deselect.
Delete the template layer.

Repeat the above step with Raster 6.

Highlight Raster 7.
Select All/Float/Defloat
New Raster layer.
Copy and paste a paper that is the opposite color of the last one you used Into Selection.
Deselect.
Delete the template layer.

Add your embellishments. I used:
Vine Flower 2
Bow 1 & 2: Resize each 25% and 80%. Free rotate 10 degrees
Binder Clip 1: Resize 40%. Free rotate left 70 degrees
Butterfly 1 & 2: Resize each 25% Free rotate 30 degrees
Hershey Kiss: Resize 30%
Chocolate 1: Resize 40%
Mint Slice: Resize 50%
Candy Cane 1: Resize 30% Mirror/Free rotate right 70 degrees
Highlight your white background.
New Raster layer.
Seletct All.
Copy and paste a paper of your choice Into Selection.
Deselect.
Apply the mask - be sure Ivert Mask Data is checked.
Merge Group.
Add your copyrights.

Add your name.

Resize all layers 80%.

I hope you enjoyed this tutorial.
I’d love to see your results.
Email me!
Hugs,
Bev

Sweet Valentine

Clicking on the image will enlarge to full view.

Supplies
1 tube of choice - I used the awesome artwork of Keith Garvey here
Font of choice - I used Dragonfly here.
Weescotlass Mask 81 here
“Sweet Valentine” is a PTU tagger size scrap kit created by Tezza of Tezza’s Tagger Scraps and can be purchased at Butterfly Blush Designs. You can visit Tezza’s blog here.
Tezza, thank you so much for a beautiful kit!
This tutorial was written assuming you have a working knowledge of PSP.

~♥~ Let’s get started ~♥~
Open up a 700 X 700 blank canvas.
Flood fill white.
Copy and paste your tube as a new layer.
Place it in the center of your canvas.
Using your Freehand Selection Tool circle around your tube.
Selections/Modify/Feather
Number of Pixels:
43
OK
Selections/Invert
Tap the delete key until you have the feathered look you want.
Deselect.
Duplicate your tube twice for a total of 3 layers.
Copy and paste Fluffy Stitched Heart as a new layer.
Duplicate/Mirror and move both hearts into position.
See my tag for reference.
Once you have the hearts where you want them, close out all of your tubes and the bottom heart.
Highlight your top heart layer.
Use your Freehand Selection Tool and follow along the stitching on the heart.
Copy and paste a paper of choice as a new layer.
Selections/Invert
Tap the delete key.
Open up one of your tubes and move it above the paper layer.
Move the tube so the face is centered on the heart.
Tap the delete key.
Merge down.
Selections/Modify/Feather
Number of Pixels:
42
OK
Tap the delete key until you have the feathered effect you want.
Deselect.

Merge visible the feathered layer and the heart.
Close that layer out.
Repeat the above step with the bottom heart accept center the bottom portion of your tube over the heart.
Add your embellishments. I used:
Bow 2: Resize 40%
Rose Urn: Duplicate/Resize 80%. Duplicate the duplicate/Resize 80%
Bow 1: Resize 25%. Duplicate/Resize 80%. Duplicate the duplicate/Resize 80%
Balloons 1 & 2: Resize eacj 40%
Ribbon: Resize 25%

Highlight your white background.
New Raster layer.
Seletct All.
Copy and paste a paper of your choice Into Selection.
Deselect.
Apply the mask.
Merge Group.
Add your copyrights.
Add your name.
Resize all layers 80%.

I hope you enjoyed this tutorial.
I’d love to see your results.
Email me!
Hugs,
Bev

Monday, January 18, 2010

Swans Flight

Clicking on the image will enlarge to full view.

Supplies
1 tube of choice - I used the gorgeous artwork of Zindy S.D. Nielsen here
Font of choice - I used Pendulum here.
Weescotlass Mask 220 here
“Swans Flight” is a PTU tagger size scrap kit created by Dani of Darkmoon’s Dream and can be purchased at Lollipops n Gumdrops. You can visit DanI’s blog here.
Dani, this kit is so beautiful! Thank you so much!

This tutorial was written assuming you have a working knowledge of PSP.

~♥~ Let’s get started ~♥~

Open up a 700 X 700 blank canvas.
Flood fill white.

Copy and Paste Frame 5 as a new layer.
Resize 55%
Free rotate right 5 degrees.
Use your Magic Wand and click inside of it.
Selections/Modify/Expand by 6.
New Rater layer below the frame.
Copy and paste a paper of choice Into Selection.
DO NOT DESELECT.

Copy and paste your tube below the frame.
Selections/Invert
Tap the delete key.
Deselect.

Copy and paste Brad 3 as a new layer.
Resize 25% and 25%.
Place at one of the corners of the frame.
Duplicate 3 times and place each at the corners of the frame.

Close out your white canvas.
Merge Visible.
Reopen your canvas.
Add your embellishments. I used:
Branch 1: Resize 55% Place left side in front of the frame.
Branch 1: Resize 65%. Mirror. Place behind right side of frame.
Feather 3: Resize 30%
Butterfly 1: Resize 25% and 70%
Butterfly 3: Resize 25% and 60%
Plant 1: Resize 50%
Swan 2: Rsize 25% and 90%

Highlight your white background.
New Raster layer.
Seletct All.
Copy and paste a paper of your choice Into Selection.
Deselect.
Apply the mask.
Merge Group.

Add your copyrights.
Add your name.
Give it a slight inner bevel:


Resize all layers 80%
I hope you enjoyed this tutorial.
I’d love to see your results.
Email me!
Hugs,
Bev