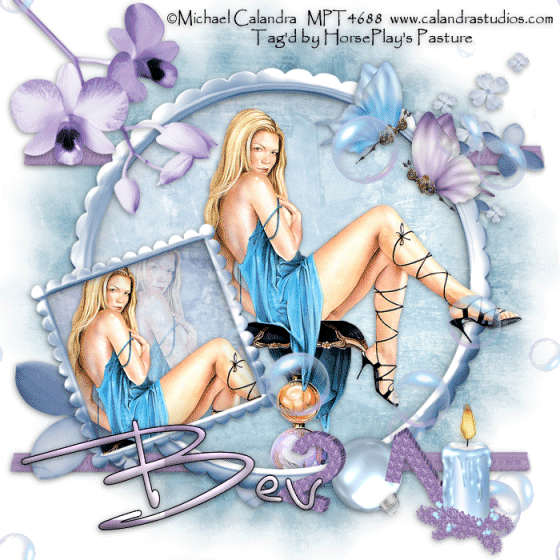
Clicking on the image will allow you to enlarge for bigger view.
Supplies
1 tube of choice and 1 close up image - I used the beautiful artwork of Bits N Bobs at Mistaken Art
Font of Choice - I used Luna Bar here
Becky Mask 36 here
This tutorial was created with WishingonaStarr’s portion of the New Beginnings store collaboration kit. This kit is available for FREE with an $8 purchase at the store.
It is available EXCLUSIVELY at Heartbeatz Creationz. You can visit Funky’s blog here.
This tutorial was written assuming you have a working knowledge of PSP.
~♥~ Let’s get started ~♥~
Open up a 700 x 700 blank canvas.
Flood fill white.
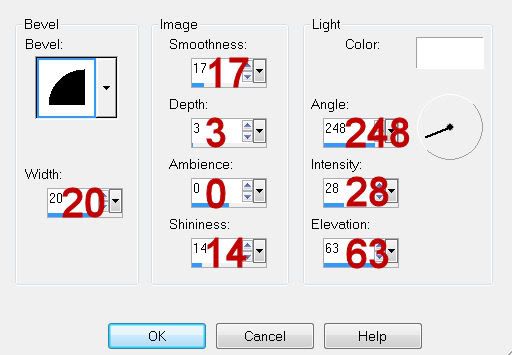
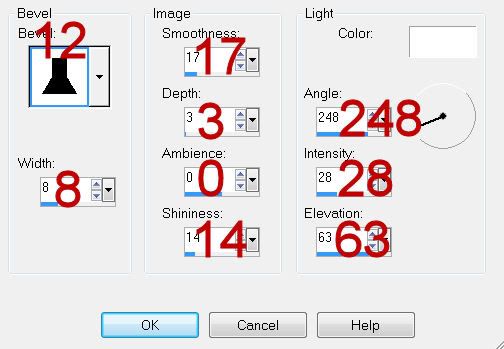
Copy and paste 23 as a new layer.
Resize 80%
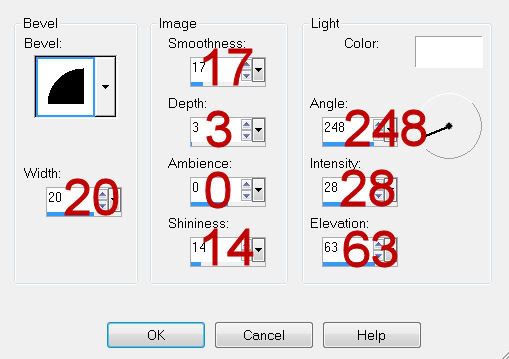
Make your Selection Tool active set on Circle.
Starting in the center of the frame pull outward to the center of the frame edge.
New Raster layer below the frame.
Flood fill with a gradient of choice.
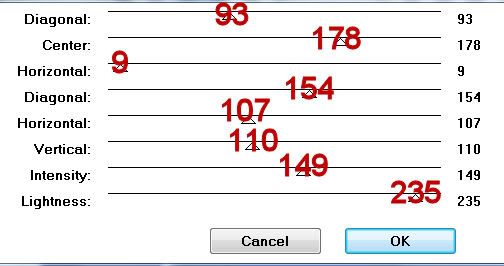
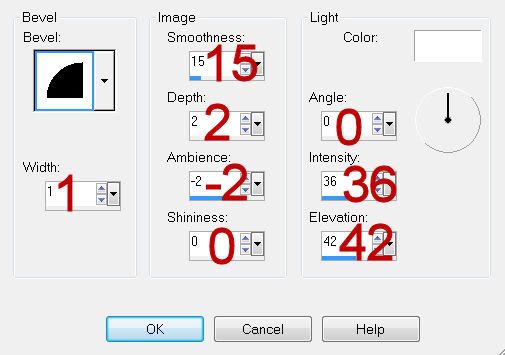
Selections/Modify/Inside Outside Feather:
Both checked
Feather amount: 43
OK
Selections/Invert
Tap your delete key until you have a nice feathered effect to the gradient layer.
Deselect.
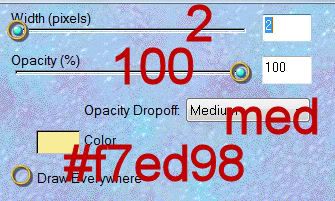
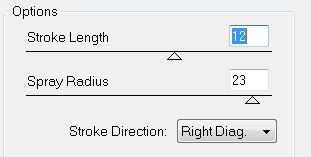
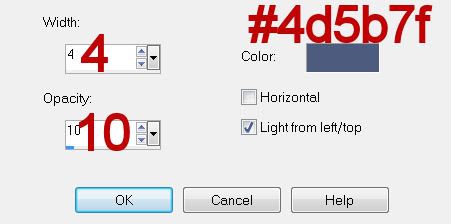
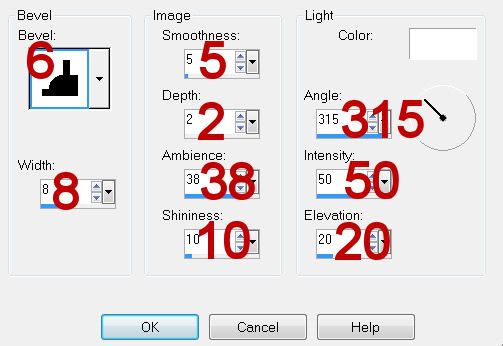
Add your embellishments. I used:
5: Resize 70%/Duplicate
4: Resize 40%/Duplicate/Mirror
12a: Resize 35%
22: Resize 25% and 70%/Free rotate right 25 degrees
12
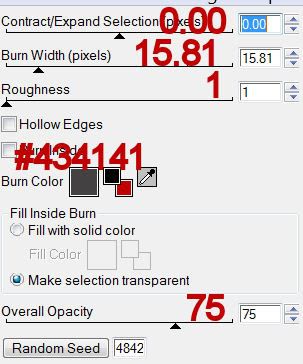
Highlight your white background.
New Raster layer.
Select All.
Copy and paste a paper of choice Into Selection.
Deselect.
Apply the mask.
Merge Group.
Add your credits.
Add your name.
Resize all layers 80%
I hope you enjoyed this tutorial.
I’d love to see your results and show it off in my gallery.
Email me!
Hugs,
Bev
Supplies
1 tube of choice and 1 close up image - I used the beautiful artwork of Bits N Bobs at Mistaken Art
Font of Choice - I used Luna Bar here
Becky Mask 36 here
This tutorial was created with WishingonaStarr’s portion of the New Beginnings store collaboration kit. This kit is available for FREE with an $8 purchase at the store.
It is available EXCLUSIVELY at Heartbeatz Creationz. You can visit Funky’s blog here.
This tutorial was written assuming you have a working knowledge of PSP.
~♥~ Let’s get started ~♥~
Open up a 700 x 700 blank canvas.
Flood fill white.
Copy and paste 23 as a new layer.
Resize 80%
Make your Selection Tool active set on Circle.
Starting in the center of the frame pull outward to the center of the frame edge.
New Raster layer below the frame.
Flood fill with a gradient of choice.
Selections/Modify/Inside Outside Feather:
Both checked
Feather amount: 43
OK
Selections/Invert
Tap your delete key until you have a nice feathered effect to the gradient layer.
Deselect.
Add your embellishments. I used:
5: Resize 70%/Duplicate
4: Resize 40%/Duplicate/Mirror
12a: Resize 35%
22: Resize 25% and 70%/Free rotate right 25 degrees
12
Highlight your white background.
New Raster layer.
Select All.
Copy and paste a paper of choice Into Selection.
Deselect.
Apply the mask.
Merge Group.
Add your credits.
Add your name.
Resize all layers 80%
I hope you enjoyed this tutorial.
I’d love to see your results and show it off in my gallery.
Email me!
Hugs,
Bev