Supplies Needed
Plug Ins used:
Mura’s Meister –
Copies & Cloud
“Spring Hop” is a tagger size scrap kit, also
available in Full size and was created by Julie of Bits n Bobs and can be
purchased from Scraps From the Heart. You can visit her designing blog here.
This tutorial was
written assuming you have working knowledge of PSP.
~♥~ Let’s get started ~♥~
Open up a 700 x 700 blank canvas.
Flood fill white.
Color Pallet:
Foreground: #a9cdea
Background: #efefef
Copy and paste SHE70 as a new layer.
Resize 50%
Make your Selection Tool active set
on Rectangle and trace along the edges of the frame.
New Raster layer below the frame.
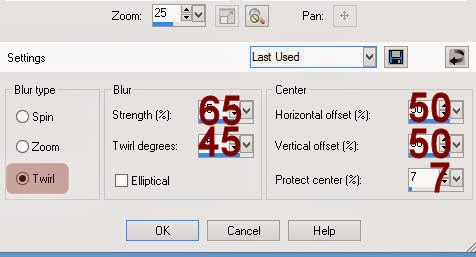
Apply Mura’s Meister – Cloud
OK
Do not deselect.
Add the following elements below the
frame – see my tag for placement:
SHE66: Resize 50%
SHE46: Resize 45%/Duplicate
Highlight each element below the
frame and tap the delete key.
Deselect.
Open up SHE24.
Make your Selection Tool active set
on Rectangle.
Section off the smallest of the
flowers at the very top.
Copy.
Paste it as a new layer on your
working canvas.
Resize 70%
Apply Mura’s Meister – Copies:
Choose Encircle.
Change the top numbers to:
Number: 25
Shift X: 40
Shift Y: 40
OK
Duplicate the ring of flowers and
move both into position – see my tag for reference.
Add your elements. I used:
SHE56: Resize 55%/Erase the part that juts out to
the side/Duplicate/Mirror/Flip
SHE10: Resize 25%
SHE62: Resize 40%
SHE63: Resize 40%/Mirror
SHE1: Resize 35%
SHE2: Resize 25%
SHE4: Resize 25%
SHE72: Resize 35%
SHE6: Duplicate
SHE50: Resize 35%
Highlight your white canvas.
New Raster layer.
Select All.
Copy and paste Paper 4 Into
Selection.
Deselect.
Adjust/Blur/Gaussian Blur:
Radius: 9
OK
Apply the Mask.
Merge Group.
Duplicate
Add your copyrights.
Add your name.
Color Pallet:
Foreground and Background: #9a795a
Stroke: 0.8
Type your name.
Adjust/Add Remove Noise/Add Noise:
Random & Monochrome checked
Noise: 18%
OK
Select All/Float/Defloat
Selections/Modify/Expand by 2.
New Raster layer below your name.
Flood fill with #feeaa1.
Merge Visible both name layers.
Crop your Image.
Be careful not to crop any of the
mask.
Resize all layers 80%.
I’d love to see your results.
Hugs,
Bev