Saturday, June 11, 2011

Diamond in the Night


Supplies

1 tube of choice - I used the artwork of Jennifer Janesko which can now be purchased from CDO. You must have a license to use.

Font of choice - I used Aquarelle here

Gem mask 71 here

“Diamonds in the Night” is a TKO Scraps tagger exclusive created by 4 talented designers: Pixie of KissedbyPix, Ann of Kc’s Scrappin Sanctuary, Kathi of KissedbyCari, and Sarah of Scraps by CWD. This kit can be purchased from TKO Scraps.
Thank you ladies for a truly beautiful kit!

This tutorial was written assuming you have a working knowledge of PSP.

~♥~ Let’s get started ~♥~

Open up a 700 x 700 blank canvas.
Flood fill white.

Make your Selection Tool active set on rectangle.
Make a rectangle approximately 475 x 350 pixels.
New Raster layer.
Copy and paste Cord 3 Into Selection.
New Raster layer.
Copy and paste Cord 2 Into Selection.
Deselect.
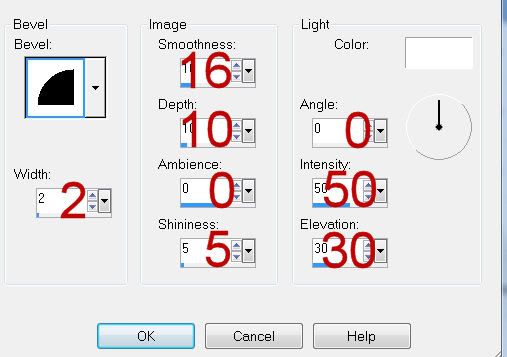
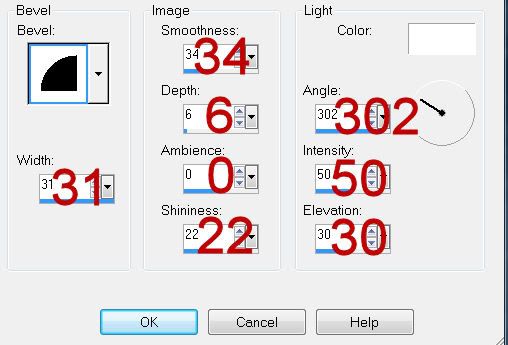
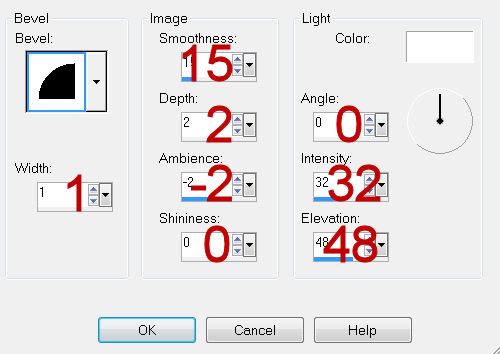
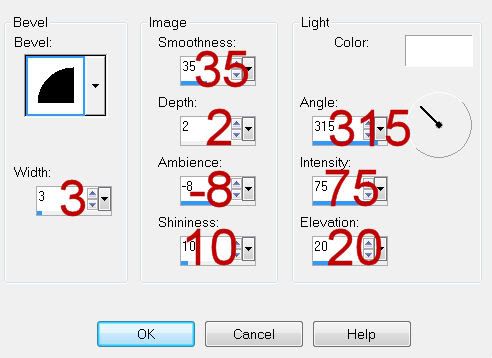
To each paper layer give it a slight Inner Bevel:

Copy and paste Diamond Frame 6 as a new layer.
Resize 65%
Rename Frame 1

Copy and paste Diamond Frame 4 as a new layer.
Resize 60%
Rename Frame 2

Copy and paste Diamond Frame 3 as a new layer.
Resize 50%
Rename Frame 3

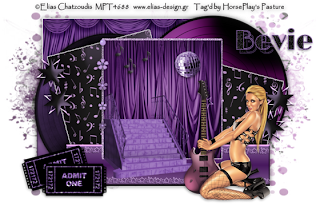
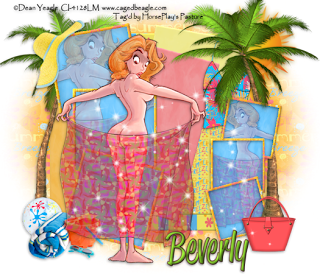
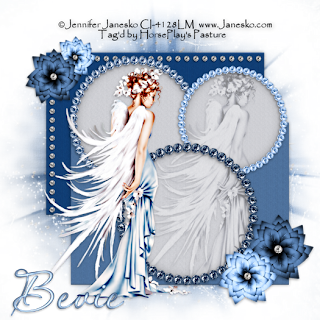
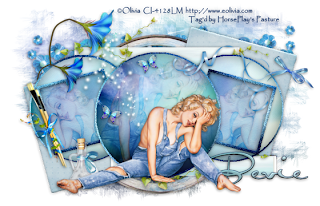
Move the papers and frames into position - see my tag for reference:
In my tag:
Frame 1 is the bottom frame,
Frame 2 is the top left frame.
Frame 3 is of course the top right frame.

To each of the frames:
Click inside with your Magic Wand.
Selections/Modify/Expand by 4.
New Raster layer below the frame.
Copy and paste Cord 4 Into Selection.
Deselect.

Copy and paste your tube as a new layer.
Position it slightly to the left of the frames.
Duplicate
Using the arrow keys on your keyboard move the tube to the right until you feel it’s where you’d like to see it once it’s below the frames.
In your layer’s pallet move it below Frame 1.
Duplicate/Move this one below Frame 3.

Highlight the paper that goes with Frame 1.
Click anywhere outside of it with your Magic Wand.
Highlight the tube just above the paper.
Tap the delete key.
Deselect.

Highlight the paper that goes with Frame 1.
Click anywhere outside of it with your Magic Wand.
Highlight the tube just above the paper.
Tap the delete key.
Deselect.

Copy and paste Diamond Line 4 as a new layer.
Resize 50%
Duplicate
Match the two diamond layers up so that it makes one long line of diamonds.
Merge Visible the diamond layers.
Duplicate/Close this layer out.
Position them over the top rectangle.
Highlight the rectangle layer.
Click anywhere outside of it with your Magic Wand.
Highlight the diamond line layer.
Tap the delete key.
Deselect.

Open up the duplicated diamond layer.
Free rotate Right 90 degrees.
Line it up along the left side of the rectangle layer.
Highlight the rectangle layer.
Click anywhere outside of it with your Magic Wand.
Highlight the diamond line layer.
Tap the delete key.
Deselect.

Copy and paste Flower 4 as a new layer.
Resize 35%
Duplicate/Resize 80%

Copy and paste Flower 5 as a new layer.
Resize 30%
Duplicate/Resize 70%

See my tag for reference of flower placement.

Highlight your white canvas.
New Raster layer.
Select All.
Copy and paste Paper 3 Into Selection.
Deselect.
Apply the mask.
Use your Pick Tool and pull each of the sides out slightly.
Merge Group.

Add your copyrights.

Add your name.
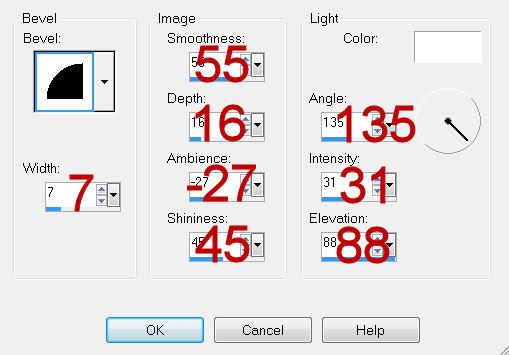
Give it a slight Inner Bevel:

Resize all layers 80%.

I hope you enjoyed this tutorial.
I’d love to see your results and show it off in my gallery.
Email me!
Hugs,
Bev

Friday, June 10, 2011

Gnomeville


Supplies

Font of choice - I used Clive Barker here

Artmama’s template 21 here

Becky mask 22 here

Eyecandy 3.1 - Glow

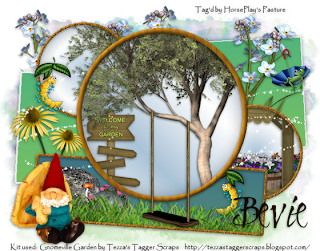
“Gnomeville Garden” is a tagger size scrap kit created by Tezza of Tezza’s Tagger Scraps and can be purchased from Butterfly Blush Designs. You can visit her blog here.

This tutorial was written assuming you have a working knowledge of PSP.

~♥~ Let’s get started ~♥~

Open the template.
Shift + D.
Close out the original.
Image/Canvas Size
700 x 550
OK
Flood fill the background layer white.
Delete the following layers:
Credits, Dots, Summer, Summer Glitter, Break Break, and Tiny Text.

Open up the ladder.
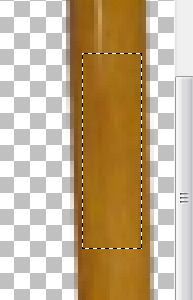
Using your Selection Tool set on rectangle, section off an area of the ladder:


In your color pallet set the foreground to Pattern and find the ladder pattern.

Make your working canvas active.
Highlight Large Circle Frame layer.
Select All/Float/Defloat
New Raster layer.
Flood fill with your ladder pattern.
Deselect.
Delete the template layer.
Give it a slight Inner Bevel:


Highlight R. Circle Frame layer.
Select All/Float/Defloat
New Raster layer.
Flood fill with your pattern.
Give it the same slight inner bevel.
Adjust/Add Remove Noise/Add Noise:
Gaussian and Monochrome checked
Noise: 43%
OK
Deselect.
Delete the template layer.

Repeat the above step with:
L. Circle Frame layer
Bot. Rec Frame layer.

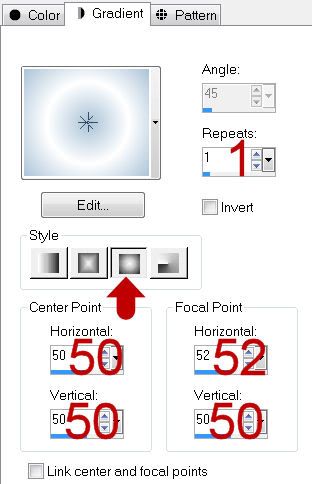
In your color Pallet:
Foreground: #aac3d7
Background: #efefef
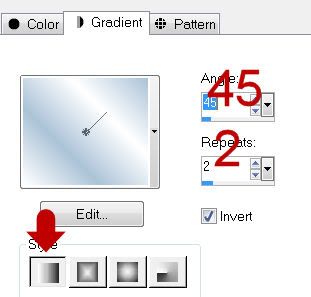
Set your gradient to match mine:


Highlight R Sm Circle layer.
Click anywhere outside of it with your Magic Wand.
Selections/Invert
New Raster layer.
Flood fill with your gradient.
Deselect.
Delete the template layer.

Highlight L Sm Circle layer.
Repeat the above step.

Change your gradient to match mine:


Highlight Lg Circle layer.
Click anywhere outside of it with your Magic Wand.
New Raster layer.
Selections/Invert
Flood fill with your gradient.
Deselect.
Delete the template layer.

Highlight L. Lg Rectangle layer.
Click anywhere outside of it with your Magic Wand.
Copy and paste Paper 16 as a new layer.
Move into the position you want.
Tap the delete key.
Deselect.
Delete the template layer.

Highlight R. lg. Rec. layer.
Repeat the above step.

Highlight Bottom Rec layer.
Click anywhere outside of it with your Magic Wand.
Copy and paste Paper 18 as a new layer.
Move into a position you like.
Tap the delete key.
Deselect.
Delete the template layer.

Copy and paste Tree as a new layer over the large circle layer.
Move it into the position - see my tag for reference.
(You’ll notice the branch on the right are covering the small left circle)
Duplicate the tree layer and close it out.
Highlight the large circle gradient layer.
Click anywhere outside of it with your Magic Wand.
Highlight the tree layer.
Tap the delete key.
Copy and paste Garden Sign 2 as a new layer just above the gradient layer.
Resize 40%
Move into position.
Tap the delete key.
Deselect.

Open up the duplicate tree layer.
In your layers pallet move this just above the R. small circle gradient layer.
Highlight the small gradient circle layer.
Click anywhere outside of it with your Magic Wand.
Highlight the tree layer.
Tap the delete key.
Deselect.

Copy and paste Garden Cart as a new layer.
Move into position over the R small circle gradient layer.
Highlight the gradient circle.
Click anywhere outside of it with your Magic Wand.
Highlight the cart layer.
Tap the delete key.
Deselect.

Copy and paste Grass 2 as a new layer.
Free rotate right 5 degrees.
Duplicate
Move these grass layers just over the bottom rectangle layer.
Highlight the rectangle layer.
Click anywhere outside of it with your Magic Wand.
Highlight each grass layer and tap the delete key.
Copy and paste Rock Garden 2 as a new layer.
Position just behind the grass.
Tap the delete key if any of it is hanging outside of the rectangle.
Deselect.

Add your embellishments. I used:
Forget Me Not bush: Duplicate
Daisy: Resize 50%/Duplciate/Mirror/Resize 70%
Gnome Statue: Resize 45%
Happy Caterpillar: Resize 30%
Happy Frog: Resize 25%
Swing: Move into position - Erase the extra rope

Highlight your white canvas.
New Raster layer.
Select All.
Copy and paste Paper 16 Into Selection.
Deselect.
Adjust/Blur/Gaussian Blur:
Radius: 5
OK
Apply the mask.
Merge Group.

Add your copyrights.

Add your name.

Resize all layers 80%.

I hope you enjoyed this tutorial.
I’d love to see your results and show it off in my gallery.
Email me!
Hugs,
Bev
Thursday, June 9, 2011

Artistic Magic


Supplies

1 tube of choice - I used the artwork of Olivia which can now be purchased from CDO. You must have a license to use.

Font of choice - I used Al Sandra here

Divine Intentionz Template 400 here

Weescotlass mask 297 here

“Artistic Magic” is a scrap kit available in full and tagger size and created by Kesha of KnC Scrapz and can be purchased from her store Lollipops n Gumdrops. You can visit her blog here.

This tutorial was written assuming you have a working knowledge of PSP.

~♥~ Let’s get started ~♥~

Open the template.
Shift + D.
Close out the original.
Resize all layers 85%
Image/Canvas Size
700 x 450
OK
Open up Background layer and flood fill white.
Delete the top 4 layers.

Highlight Center Circle 2 layer.
Click on it with your Magic Wand.
New Raster layer.
Copy and paste Wheel Into Selection.
Deselect.
Delete the template layer.

Highlight Square 1 layer.
Click on it with your Magic Wand.
New Raster layer.
Copy and paste Paper 10 Into Selection.
Deselect.
Delete the template layer.
Give it the same slight Inner Bevel:


Highlight Square 2 layer.
Repeat the above step.

Highlight Rectangle 1 layer.
Click on it with your Magic Wand.
New Raster layer.
Copy and paste Paper 5 Into Selection.
Deselect.
Delete the template layer.

Highlight Rectangle 2 layer.
Repeat the above step.

Highlight Circle Back layer.
Click on it with your Magic Wand.
New Rater layer.
Copy and paste Paper 1 Into Selection.
Adjust/Add Remove Noise/Add Noise:
Gaussian and Monochrome checked
Noise: 43%
OK
Deselect.
Delete the template layer.

Repeat the above step with the other two Circle Back layers.

Highlight Frame 1 layer.
Click on it with your Magic Wand.
New Raster layer.
Copy and paste Paper 1 Into Selection.
Give it the same slight inner bevel.
Apply the same noise effect.
Deselect.
Delete the template layer.

Highlight Frame 2 layer.
Repeat the above step.

Highlight Circle 1 layer.
Click on it with your Magic Wand.
New Raster layer.
Copy and paste Paper 7 Into Selection.
Deselect.
Delete the template layer.

Highlight Circle 2 layer.
Repeat the above step.

Highlight Frame Back layer.
Click on it with your Magic Wand.
New Raster layer.
Copy and paste Paper 9 Into Selection.
Duplicate
Change the Properties to Multiply.
Copy and paste your tube as a new layer.
Selections/Invert
Tap the delete key.
Deselect.
Delete the template layer.

Highlight the other Frame Back layer.
Repeat the above step accept mirror your tube layer.

Highlight Center Circle layer.
Click on it with your Magic Wand.
New Raster layer.
Copy and paste Paper 3 Into Selection.
Copy and paste your tube as a new layer.
Selections/Invert
Tap the delete key.
Deselect.
Delete the template layer.

Copy and paste your tube as a new layer.

Add your embellishments. I used:
Flower 1: Resize 25%
Butterfly: Resize 25% and 25%/Duplicate/Mirror
Vine: Resize 45%
Brushes: Resize 25% and 60%/Free rotate Left 25 degrees
Bow: Resize 25% and 50%
Bottle: Resize 25% and 40%
Flowers 1: Resize 40%/Duplciate
Ribbon: Resize 25%

Highlight your white canvas.
New Raster layer.
Select All.
Copy and paste Paper 3 Into Selection.
Deselect.
Apply the mask.
Merge Group.

Add your copyrights.

Add your name.
Color Pallet:
Foreground: #153162
Background: Pattern/Paper 7
Stroke: 1
Type your name.
Give it a slight Inner Bevel:


Resize all layers 80%.

I hope you enjoyed this tutorial.
I’d love to see your results and show it off in my gallery.
Email me!
Hugs,
Bev
Tequila


Supplies

1 tube of choice and 1 close up image - I used the artwork of Robert Freeman which can be purchased from CDO. You must have a license to use.

Font of choice - I used Aquarelle here

Gem mask 161 here

“Tequila” is a tagger size scrap kit created by Digicats (&dogs) and can be purchased from Butterfly Blush Designs. You can visit her blog here.

This tutorial was written assuming you have a working knowledge of PSP.

~♥~ Let’s get started ~♥~

Open up a 700 x 700 blank canvas.
Flood fill white.

Copy and paste Frame 3 as a new layer.
Resize 60%
Free rotate Left 8 degrees.
Duplicate
Mirror
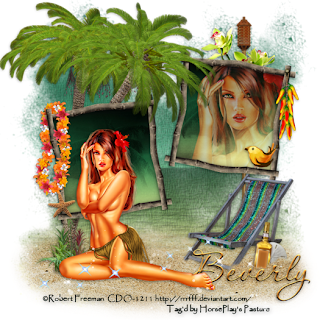
Move both frames into position - see my tag for reference.

Highlight either frame - it doesn’t matter which one right now.
Click inside of it with your Magic Wand.
Selections/Modify/Expand by 4.
New Raster layer below the frame.
Copy and paste Paper 7 Into Selection.
Deselect.

Repeat the above step with the other frame.

Highlight the paper layer that’s below the top right frame.
Use your Magic Wand and click anywhere outside of the paper.
Copy and paste your image as a new layer below the frame.
Tap the delete key.
Deselect.
Change the Properties to Screen
Lower the Opacity to about 65.

Copy and paste your tube as a new layer.

Copy and paste Palm Tree as a new layer.
Resize 70%
Mirror
Position it behind the left frame.
As you can see the length of the tree isn’t long enough, but we’ll fix that.
Make your Selection Tool active set on Rectangle.
Section off the bottom half of the tree.
Edit/Cut
Deselect.
Edit/Paste as new layer.
Move the tree trunk into position.

Add your embellishments. I used:
Lei: Resize 35%/Free rotate Left 90 degrees
Flower 1: Resize 40%
Jalapeño: Resize 40%
Torch: Resize 75%
Bird 2: Resize 25%
Deck Chair: Resize 50%/Mirror
Tequila - Gold: Resize 25% and 75%/Free rotate Right 8 degrees
Sand Dollar: Resize 25%
Starfish: Resize 30%
Sparkles

Highlight your white canvas.
New Raster layer.
Select All.
Copy and paste Paper 6 Into Selection.
Deselect.
Apply the mask.
Merge Group.

Copy and paste Sand as a new layer.
Move it into position - I moved mine so it looked as if the woman were sitting in the sand.
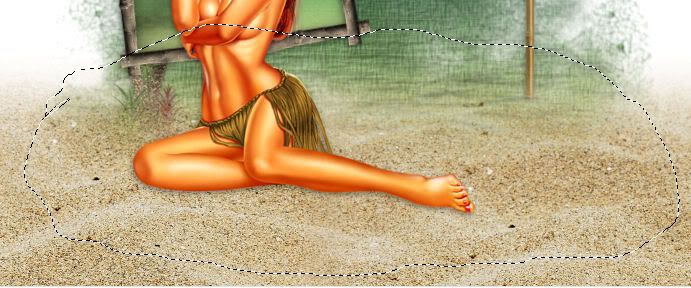
Make your Freehand Selection Tool active set on Freehand and section out the area of the sand you want to keep:

Selections/Modify/Inside Outside Feather:
Both checked
Feather: 43%
OK
Selections/Invert
Tap the delete key until you have a nice feathered effect.
Deselect.
I duplicated the sand layer and erased the areas I didn’t want to give the effect the deck chair, bottle, and sand dollar were sunk into the sand.

Add your copyrights.

Add your name.
Color Pallet:
Foreground: #fee46e
Background: #ae6a2b
Stroke: .50
Type your name.

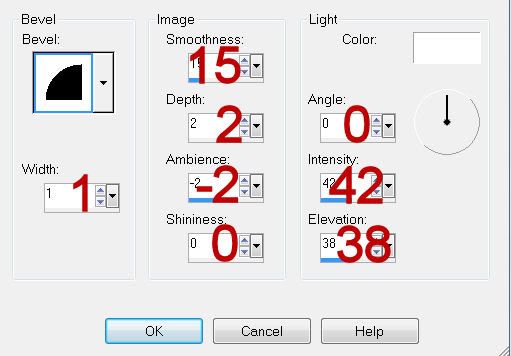
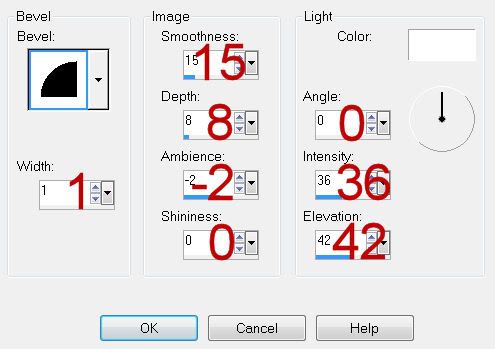
Give it a slight Inner Bevel:


Resize all layers 80%.

I hope you enjoyed this tutorial.
I’d love to see your results and show it off in my gallery.
Email me!
Hugs,
Bev
Tuesday, June 7, 2011

Rock Night


Supplies

1 tube of choice - I used the artwork of Elias Chatzoudis which can now be purchased from PSP Tubes Emporium. You must have a license to use.

Font of choice - I used Lime Light here

Divine Intentionz Template 401 here

Vix mask 431 here

Eyecandy 3.1 - Glow

“Amelia Rock Princess” is a scrap kit created by Shell of Shell’s Scraps and can be purchased from Aussie Scrap Designs. You can visit her blog here.

This tutorial was written assuming you have a working knowledge of PSP.

~♥~ Let’s get started ~♥~

Open the template.
Shift + D.
Close out the original.
Resize all layers 85%
Image/Canvas Size
700 x 450
OK
Open up Raster 1 layer and flood fill white.
Delete by Missy layer, Word Art, and Word Art Shadow layer.

Because the rectangle layers are named the same and just so you won’t become confused - we’ll be working from the bottom of the layers pallet upward to the top.

Highlight Rectangle layer. (just above the white canvas in the layers pallet)
Click on it with your Magic Wand.
New Raster layer.
Copy and paste Paper 2 Into Selection.
Deselect.
Delete the template layer.
Apply Eyecandy 3.1 - Glow:
Width: 3
Opacity: 100
Opacity Drop off: Fat
Color: White
OK

In your layers pallet:
Foreground: choose a light purple color
Background: choose a dark purple color
Set the foreground to gradient:
Style: Linear
Angle: 0
Repeat: 1
Invert checked
OK

Highlight Rectangle layer. (just above the curtain paper layer)
Click on it with your Magic Wand.
New Raster layer.
Flood fill with the gradient.
Deselect.
Delete the template layer.
Give it the same slight Inner Bevel:


Highlight Circle 1 layer.
Click on it with your Magic Wand.
New Raster layer.
Copy and paste Record 3 Into Selection.
Deselect.
Close this template layer out.

Highlight Circle 2 layer.
Click on it with your Magic Wand.
New Raster layer.
Copy and paste Record 4 Into Selection.
Deselect.
Delete the template layer.

Highlight Square 1 layer.
Click on it with your Magic Wand.
New Raster layer.
Copy and paste Paper 10 Into Selection.
Deselect.
Delete the template layer.
Apply the same Glow effect.

Highlight Copy of Square 1 layer.
Click on it with your Magic Wand.
New Raster layer.
Make Paper 10 active
Mirror/Flip/Copy
Make your working canvas active.
Paste it Into Selection.
Deselect.
Delete the template layer.
Apply the same Glow effect.

Highlight Rectangle layer (just above the last paper you pasted)
Click on it with your Magic Wand.
New Raster layer.
In your layers pallet uncheck “invert” on the gradient.
Flood fill with the gradient.
Deselect.
Delete the template layer.
Give it the same Inner Bevel.

Highlight Square 2 Back layer.
Click on it with your Magic Wand.
New Raster layer.
Flood fill with a light purple shade.
Adjust/Add Remove Noise/Add Noise:
Monochrome and Gaussian checked
Noise: 43%
OK
Deselect.

Highlight Square 2 layer.
Click on it with your Magic Wand.
New Raster layer.
Copy and paste Paper 1 Into Selection.
Deselect.

Copy and paste Star 2 as a new layer.
Resize 25% and 50%
Duplicate 4 times for a total of 5.
Line them up to make a straight line across of stars.
Merge them all visible.
Center them over the long rectangle that’s at the bottom of your canvas - see my tag for reference.
Highlight the rectangle layer.
Click anywhere outside of it with your Magic Wand.
Highlight the merged star line.
Tap the delete key.
Deselect.

Copy and paste your tube as a new layer.

Add your embellishments. I used:
Disco Ball 4: Resize 25% and 50%
Musical Notes 7: Resize 25% and 30%
Stairs 1: Resize 25%
Star 3: Resize 25% and 40%/Duplicate/Flip/Duplicate and Mirror both stars
Star 4: Resize 25% and 35%/Duplicate/Flip/Duplicate and Mirror both stars
Ticket: Resize 25% and 75%/Duplicate/Free rotate Left 15 degrees

Highlight your white canvas.
New Raster layer.
Select All.
Copy and paste Paper 3 Into Selection.
Deselect.
Apply the mask.
Use your Pick Tool to pull the sides out.
Merge Group.

Add your copyrights.

Add your name.
Color Pallet:
Foreground: Light Purple color
Background: Black
Stroke: 1

Type your Name.
Convert to Raster layer.
Select All/Float/Defloat
Selections/Modify/Contract by 1
Apply the same noise effect.
Deselect.

Duplicate your name and move it slight to the right and down.
Move it below the original name layer.
Highlight the template layer you pasted the record into.
Click anywhere outside of it with your Magic Wand.
Highlight the duplicated name layer.
Tap the delete key.
Deselect.
Lower the Opacity to about 53 or so.

Resize all layers 80%.

I hope you enjoyed this tutorial.
I’d love to see your results and show it off in my gallery.
Email me!
Hugs,
Bev
Monday, June 6, 2011

Summer Breeze


Supplies

1 tube of choice - I used the artwork of Dean Yeagle which can now be purchased from CDO. You must have a license to use.

Font of choice - I used Reklame here. Add the free font to your cart and check out.

Divine Intentionz Template 402 here

My mask 1 here

“Summer Breeze” is a tagger size scrap kit created by Rieka Rafita and can be purchased from Twilight Scraps. You can visit her blog here.

This tutorial was written assuming you have a working knowledge of PSP.

~♥~ Let’s get started ~♥~

Open the template.
Shift + D.
Close out the original.
Resize all layers 85%
Image/Canvas Size
700 x 600
OK
Open up Raster 1 layer and flood fill white.
Delete the credit layer.

Highlight Rectangle Shape layer.
Click on it with your Magic Wand.
New Raster layer.
Copy and paste Paper 11 Into Selection.
Deselect.
Delete the template layer.
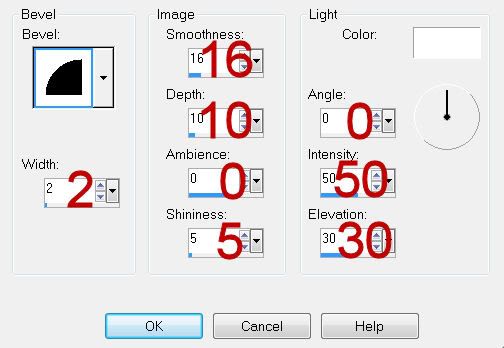
Give it a slight Inner Bevel:


Highlight Rectangle Shape 2 layer.
Click on it with your Magic Wand.
New Raster layer.
Copy and paste Paper 8 Into Selection.
Deselect.
Delete the template layer.
Give it the same slight Inner Bevel.

Highlight Rectangle layer.
Click on it with your Magic Wand.
New Raster layer.
Copy and paste Paper 7 Into Selection.
Deselect.
Delete the template layer.
Give it the same slight Inner Bevel.

Highlight Square layer.
Click on it with your Magic Wand.
New Raster layer.
Copy and paste Paper 3 Into Selection.
Deselect.
Delete the template layer.
Give it the same slight Inner Bevel.

Highlight Rectangle Shape 3 layer.
Click on it with your Magic Wand.
New Raster layer.
Copy and paste Paper 6 Into Selection.
Deselect.
Delete the template layer.
Give it the same slight Inner Bevel.

Highlight Frame Back layer.
Click on it with your Magic Wand.
New Raster layer.
Copy and paste Paper 5 Into Selection.
Deselect.
Delete the template layer.

Highlight Frame Back 2 layer.
Repeat the above the step.

Highlight Frame layer.
Click on it with your Magic Wand.
New Raster layer.
Copy and paste Paper 4 Into Selection.
Deselect.
Delete the template layer.
Give it a slight Inner Bevel:


Highlight Frame 2 layer.
Repeat the above step.

Copy and paste your tube as a new layer.
Move into position before the large frames on the left.
Duplicate/Move beneath the frames.
Highlight the paper layer.
Click anywhere outside of it with your Magic Wand.
Highlight the tube layer just above the paper layer.
Tap the delete key.
Deselect.
Lower the Opacity to about 40.

Highlight the original tube layer.
Duplicate/Mirror
Resize this tube so that it fits nicely beneath the small frames on the right side of your canvas.
Highlight the paper layer.
Click anywhere outside of it with your Magic Wand.
Highlight the tube layer.
Tap the delete key.
Deselect.
Lower the Opacity to about 40.

Copy and paste Hat as a new layer.
Resize 40%
Mirror
Free rotate Left 30 degrees
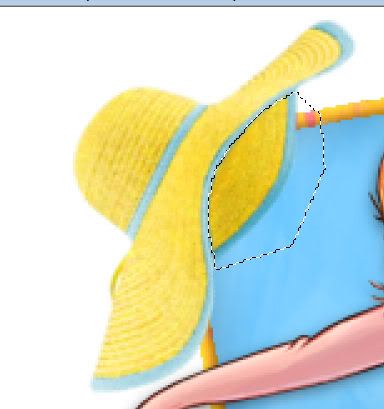
Use your Freehand Selection Tool and section around this part of the hat:

Tap the delete key.
Deselect.
Position it so that it looks like it’s hung on the corner of the large frame.

Open up Bikini element.
Use your Freehand Selection Tool to section off the top part of the bikini.
Copy
Paste it as a new layer.
Resize 60%
Mirror
Position it so that it looks like it’s hung on the corner of one of the rectangles.

Add your embellishments. I used:
Palm Tree: Resize 80%/Position behind the left frames.
Palm tree again: Resize 85%/Mirror/Position behind the right frames.
Sun: Resize 40%
Bag: Resize 25%
Towel: Resize 35%
Beach Ball: Resize 25% and 805
Sparkle

Highlight your white canvas.
New Raster layer.
Select All.
Copy and paste Paper 4 Into Selection.
Deselect.
Apply the mask.
Resize 105%
Merge Group.

Add your copyrights.

Add your name.
Give it the same slight Inner Bevel you gave to the frames.

Resize all layers 80%.

I hope you enjoyed this tutorial.
I’d love to see your results and show it off in my gallery.
Email me!
Hugs,
Bev
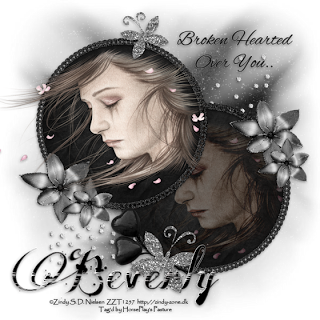
Broken Hearted


Supplies

1 tube of choice - I used the artwork of Zindy S.D. Nielsen which can be purchased from her store here. You must have a license to use.

Font of choice - I used Many Weatz here

Amy & Leah’s Mask 2 here

“Broken” is a tagger size scrap kit created by Laura of Laura’s Designz and can be purchased from Twilight Scraps. You can visit her blog here.

This tutorial was written assuming you have a working knowledge of PSP.

~♥~ Let’s get started ~♥~

Open a 700 x 700 blank canvas.
Flood fill white.

Copy and paste 15 as a new layer.
Resize 60%
Duplicate
Move both frames into position - see my tag for reference.
Use your Magic Wand and click inside the top frame.
Selections/Modify/Expand by 2.
New Raster layer below the frame.
Copy and paste Paper 2 Into Selection.
Deselect.

Repeat the above step with the bottom frame.

If you’re using the same tube as I did, copy and paste it as a new layer in front of the top frame.
If you’re using a different tube:
Copy and paste your tube as a new layer below the frame.
Highlight the paper layer.
Click anywhere outside of it with your Magic Wand.
Highlight the tube layer.
Tap the delete key.
Deselect.

Duplicate the tube layer/Move beneath the bottom frame.
Highlight the paper layer.
Click anywhere outside of it with your Magic Wand.
Highlight the tube layer.
Tap the delete key.
Deselect.
Change the Properties to Hard Light.
Lower the Opacity to about 38.

Add your embellishments. I used:
14: Resize 40%/Duplicate/Resize 70%/Flip
Duplicate both flower layers.
67: Resize 45%
45: Resize 30%/Flip/Duplicate/Resize 70%/Mirror
6: Resize 30%/Mrror
16: Resize 70%

Highlight your white canvas.
New Raster layer.
Select All.
Copy and paste Paper 8 Into Selection.
Deselect.
Apply the mask.
Merge Group.

Add your copyrights.

Add your name.
Color Pallet:
Foreground: Gradient/Metal Steal
Angle: 66
Repeat 2
Invert checked
Background: #000000
Type out your name.
Give it a slight Inner Bevel:


Resize all layers 80%.

I hope you enjoyed this tutorial.
I’d love to see your results and show it off in my gallery.
Email me!
Hugs,
Bev