Saturday, May 26, 2012

Primitive at Heart

Supplies

1 tube of choice – I used the wonderful artwork of Suzanne Woolcott which can be purchased from here.  You must have a license to use.

Font of choice - I used Perdition here

Weescotklass Mask 297 here

Designz by Baby Dragon Domestic Violence Aware template here.
You can find it under Monday, May 14, 2012

“Primitive at Heart” is a tagger size scrap kit created by Julie of Whispy’s D’zines and can be purchased from Lollipops n Gumdrops.  You can visit her blog here.

This tutorial was written assuming you have a working knowledge of PSP.

~~ Lets get started ~~

Open up the template.
Shift + D.
Close out the original.
Resize all layers 80%
Image/Canvas Size:
700 x 700
OK
Highlight Raster 1 layer.
New Raster layer.
Flood fill white.
Delete Raster 10, 9, 2, and 1.

Color Pallet:
Foreground: #404040
Background: #521212

Highlight Raster 8 layer.
Make your Color Replacer tool active.
Zoom in on the layer and double right click your mouse.

Highlight Raster 5.
Repeat the above step.

Color Pallet:
Change the background to: #000000

Highlight Raster 6 layer.
Repeat the step above step.

Highlight Raster 4 layer.
Click on it with your Magic Wand.
New Raster layer.
Copy and paste Paper 9 Into Selection.
Deselect.
Delete the template layer.

Highlight Raster 7 layer.
Click on it with your Magic Wand.
New Raster layer.
Copy and paste El43 Into Selection.
Deselect.
Delete the template layer.

Highlight Copy of Raster 7 layer.
Select All/Float/Defloat.
New Raster layer.
Copy and paste Paper 2 Into Selection.
Deselect.
Delete the template layer.
Adjust/Add Remove Noise/Add Noise:
Gaussian and Monochrome checked
Noise: 58%
OK

Highlight Copy of Raster 3 layer.
Repeat the above step.

Highlight Raster 3 layer.
Click on it with your Magic Wand.
New Raster layer.
Copy and paste Paper 7 Into Selection.
Copy and paste your tube as a new layer above the paper.
Selections/Invert
Tap the delete key.
Deselect.
Delete the template layer.
Change the Properties to Soft Light.

Copy and paste your tube as a new layer.
Position in front of the rectangle – see my tag for reference.

Add your elements.  I used:
31:  Resize 80%
9:  Resize 25%
2:  Resize 20%
20:  Resize 25%
33: Resize 25% and 70/Free rotate Left 15 degrees
34: Resize 25% and 70/Free rotate Right 15 degrees
30:  Resize 50%/Duplicate 2x’s
24:  Resize 15%/Duplicate/Resize 70%/Duplicate/Resize 70%
  
Highlight your white background.
New Raster layer.
Select All.
Copy and paste Paper 3 Into Selection.
Deselect.
Apply the mask.
Merge Group.

Add your credits.

Add your name.
Resize all layers 80%.

I’d love to see your results.
Email me!
Hugs,
Bev

Tuesday, May 22, 2012

Vintage Sands

Supplies

1 tube of choice – I used the beautiful artwork of Gennadiy Koufay which can be purchased from CDO.  You must have a license to use.

Font of choice - I used Jellyka Delicious Cake here

Weescotklass Mask 208 here

Plug Ins used:
DSB Flux – Bright Noise

“Vintage Sands” is a FTU tagger size scrap kit created by Barbie of A Cowgirls Creations and can be downloaded here.  You can visit her blog here.
Thank you Barbie for such a beautiful freebie!!

This tutorial was written assuming you have a working knowledge of PSP.

~~ Lets get started ~~

Open up a 700 x 700 blank canvas.
Flood fill white.

New Raster layer.
Make your Selection Tool active set on Rectangle.
Create a rectangle approximately 575 x 300 pixels.
Copy and paste Paper 4 Into Selection.
Selections/Modify/Contract by 2.
New Raster layer.
Copy and paste Paper 3 Into Selection.
Duplicate
Adjust/Blur/Gaussian blur:
Radius: 10
OK
Merge Down.
Apply DSB Flux – Bright Noise:
Intensity: 43
Mix checked
OK
Selections/Modify/Contract by 7.
New Raster layer.
Copy and paste Paper 1 Into Selection.
Deselect.

New Raster layer.
Make your Selection Tool active set on Circle.
Make an circle approximately 425 pixels – it’s alright if it’s not centered on your canvas.  We’ll fix that soon.
Copy and paste Paper 4 Into Selection.
Deselect and center on your canvas over the rectangle layers.
Use your Magic Wand and click anywhere outside of the circle.
Selections/Invert
Selections/Modify/Contract by 2.
New Raster layer.
Copy and paste Paper 3 Into Selection.
Duplicate
Adjust/Blur/Gaussian Blur:
Use same settings.
Merge down.
Apply DSB Flux – Bright Noise:
Use same settings
OK
Selections/Modify/Contract by 7.
New Raster layer.
Copy and paste Paper 1 Into Selection.
Copy and paste Paper 6 as a new layer.
Resize 75%
Selections/Invert
Tap the delete key.
Deselect.
Change the Properties to Luminance (Legacy)

Copy and paste your tube as a new layer.
Effects/Photo Effects/Time Machine:
Intensity: 43
Photo Edge Unchecked.
OK

Add your elements.  I used:
Light House: Resize 50%
Flower 2:  Resize 35%/Flip
Rocks:  Resize 50%/Duplicate/Mirror
Grass:  (Apply the same Photo Effect to this element) Resize 85%/Duplicate/Mirror
Bead Scatter:  Resize 70%/Duplicate
Bird:  Resize 25% and 70%
Sand:  Position behind the rocks on the left side.  Duplicate/position behind rocks on the right side. Duplicate and position behind your tube. Duplicate and move above your tube in your layers pallet.  Use your Eraser Tool and erase the sand where you don’t want it on your tube.
  
Highlight your white background.
New Raster layer.
Select All.
Copy and paste Paper 3 Into Selection.
Deselect.
Apply the mask.
Merge Group.

Crop your image.

Add your credits.

Add your name.
Foreground and Background: #231a13
Type your name.
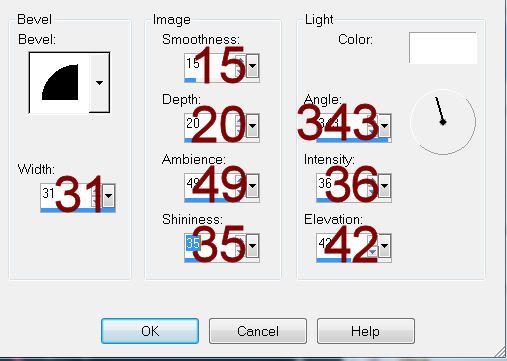
Give it a slight Inner Bevel:

Resize all layers 80%.

I’d love to see your results.
Email me!
Hugs,
Bev