Saturday, September 10, 2022

Dragon Lullaby


Supplies Needed 

1 tube of choice – I used the wonderful artwork of David Hoffrichter which can be purchased from Digital Art Heaven here

Font of choice – I used Charissa here

Weescotlass Creations Mask 116 here

Plug-Ins used:
Xenofex – Burnt Edges

Download Snaggables here

“Glorious Fall” is a PTU Tagger Size scrap kit designed by Tagcatz Design and can be purchased from The Digital Scrapbook Shop here

This tutorial was written assuming you have a working knowledge of PSP.  

~~ Let’s get started ~~

Open up a 700 x 700 blank canvas.
Flood fill with #ffffff

New Raster layer.
Select All.
Copy and paste Paper 10 Into Selection.
Deselect.

Copy and paste your tube as a new layer.
If you’re using the same one as I did, Resize 70%
Position not quite to the bottom but near the bottom of canvas.

Add the following elements.  This is your tag, feel free to add or take away elements as you like.  See my tag for reference for placement.

El 9:  Duplicate/Resize 40%    
El 11:  Duplicate
El 8:  Resize 60%/Duplicate
El 50:  Resize 25% (its peeking out from behind a tree)
El 44:  Resize 50%/Duplicate 2x’s
El 93:  Resize 60%
El 48:  Resize 20%
El 31:  Resize 15%
El 23:  Resize 50%
El 16:  Resize 50%
El 71:  Resize 45%/Duplicate 2x’s/Mirror one of them
El 4:  Resize 65%
El 22:  Resize 55%
El 74:  Resize 40%
El 83:  Resize 40%/Duplicate as many times as you like. I placed some over the grass and changed the Blend Mode to Overlay.

Once you have all elements and tube in place, close out the white background layer.
Highlight any element layer and Merge Visible.
Apply Xenofex 2:  Burnt Edges
Use Default settings accept change the burn color to #952f00
OK

Open up the white background.
Resize merged layer 75%

Highlight the white background layer.
Select All.
New Raster Layer.
Copy and paste Paper 6 Into Selection.
New Raster Layer.
Copy and paste Paper 7 Into Selection.
Deselect.

To each paper layer apply Xenofex 2:  Burnt Edges –
Use Same settings. 

Free Rotate Paper 7 Left 4 degrees.
Free Rotate Paper 8 Right 4 degrees.
Move all pages into position so that the top left corners of all layers match up (accept background layer.)

Add the following elements: Use your Pick tool to turn elements this way and that.  Use your creativity and duplicate elements as you see fit.  Use my tag for reference/ideas.

El 38:  Resize 50%
El 83
El 80:  Cut out the leaves you don’t want, paste and use them somewhere
El 82:  Flip/Mirror
El 68:  Resize 40%
El 25:  Mirror
El 79:  Resize 40%
El 63:  Resize 35%
El 61:  Resize 20%
El 62:  Resize 20%
El 59:  Resize 15%

Highlight the white background layer.
New Raster Layer.
Select All.
Copy and paste Paper 10 Into Selection.
Deselect.
Apply the mask.
Merge Group.

Add your copyrights.
Add your name.
Color Pallet:
Foreground and Background: #000000
Type your name
Convert to Raster Layer.

I hope you enjoyed this tutorial.   
I’d love to see your results.
Email me!
Hugs,
Bev


Tuesday, September 6, 2022

Just Add Water


Supplies Needed 

1 tube of choice – I used the adorable artwork of Marta Sarmiento which can be purchased from Digital Art Heaven here

Font of choice – I used Caneletter Sans here 

Becky Mask here

My Template 163
here

Plugs Ins used:
Mura’s Meister – Copies

Animation Shop 

Download Snaggables here

“American Honey” is a FTU Tagger Size scrap kit designed by me, Bev of HorsePlay’s Pasture Designs and can be downloaded here

This tutorial was written assuming you have a working knowledge of PSP.  

~~ Let’s get started ~~ 

Open up the template.
Shift + D.
Close out the original.
Image/Canvas Size:
700 x 700
OK
Highlight the background layer.
Flood fill white.
Delete the credit layer. 

Highlight Raster 1 template layer.
Select All/Float/Defloat
New Raster Layer.
Copy and paste Paper 9 Into Selection.
Deselect.
Delete the template layer.
Give the paper a slight Inner Bevel:


Highlight Raster 2 template layer.

Copy and paste El 25 as a new layer.
Free rotate Left 90 degrees.
Resize 70%
Move into position over the template layer.
Use your Magic Wand and click anywhere inside the frame.
Selections/Modify/Expand by 4.
OK
New Raster layer below the frame.
Copy and paste Paper 14 Into Selection.
Deselect.
Delete the template layer.

 Highlight Raster 3 template layer.
Copy and paste El 26 as a new layer.
Free rotate Left 90 degrees.
Resize 70%
Move into position over the template layer.
Use your Magic Wand and click anywhere inside the frame.
Selections/Modify/Expand by 4.
OK
New Raster layer below the frame.
Copy and paste Paper 12 Into Selection.
Deselect.
Delete the template layer. 

Highlight Raster 4 template layer.
Select All/Float/Defloat
Copy and paste El 54 as a new layer over the template.
Right click on the element in your layers pallet and choose “Promote Section to Layer”.
Give it the same slight Inner Bevel.
Deselect.
Delete the template layer.

Open up the element layer and move it over Raster 6 template layer.
Make your Pick Tool active and slant the element so it covers the template.
Highlight the template layer and click on it with your Magic Wand.
Highlight the element layer in your layers pallet and right click on it.  Choose “Promote Section to Layer”.
Give it the same slight Inner Bevel.
Delete the original element layer.
Deselect.
Delete the template layer. 

Highlight Raster 5 template layer.
Select All/Float/Defloat
Copy and paste El 28 as a new layer.
Resize 80%
Move into exact position over the template layer.  Look very carefully to be sure it’s over the template and that you cannot see any of the template at all.
Highlight the template layer.
Select All/Float/Defloat
Copy and paste Paper 14 as a new layer.
Move into a position you like.
Right click on it in your layers pallet and choose “Promote Section to Layer” from the sub menu.
Deselect.
DO NOT delete the template layer.
DO NOT give the frame a drop shadow yet. 

It was easier for me to position elements within the frame AFTER I got my tube in place.  If you’d rather add your elements first then by all means skip to that part now and then come back to this part. 

Copy and paste your tube as a new layer below the frame.
If you’re using the same tube as I did, Resize 55%.  It should fit perfectly.

 Copy and paste El 43 as a new layer above the frame – see my tag for reference.
To make it look as if it’s growing out of the frame, duplicate the element.
Move the duplicated layer below the frame in your layers pallet.
Highlight the frame layer.
Select All/Float/Defloat
Highlight the element layers that is above the frame.
Use your Eraser Tool to erase the entire tree limb and flowers except where it overlaps the frame at the top and right sides.
Tada!  Now you have a limb growing out of the frame!

Add elements within the frame.  I used the following – see my tag for reference: (don’t worry about what overhangs.  We’ll clean it up in a bit)
El 61: Duplicate/Mirror
El 62:  Resize 45%/Duplicate/Resize 70%
El 53:  Resize 45%/Duplicate

Highlight the template layer.
Click anywhere outside of it with your Magic Wand.
Highlight each element that overhangs the frame and tap the delete key.
Deselect.

DO NOT delete the template layer.

Add your elements.  I used: (see tag for placement reference)
El 46:  Resize 50%
El 77
El 4:  Resize 25%
El 72:  Resize 85/5
El 70
El 15 and 16:  Resize 30%
El 59:  Resize 70%/Duplicate/Free rotate 10 degrees
El 11:  Resize 65%/Duplicate/Resize 65%

Highlight the white background layer.
New Raster Layer.
Select All.
Copy and paste Paper 1 Into Selection.
Deselect.
Apply the mask.
Merge Group.
Resize 110% 

Let’s make some rain!

Create a new Raster Layer just below the frame.
Make your Paint Brush active, set on the Round shape, and set the foreground color to #ffffff.
Set the brush size to 6 – feel free to adjust the size.  You can even make one dot bigger or smaller than the other.  It’s your tag, do what you want!!
Make 2 small dots on your canvas about ¼” to ½” apart.
Apply Mura’s Meister – Copies set on Wallpaper.
Use Default settings accept change “Number” to 50.
OK
You should now have lots of little dots all over.
Adjust/Blur/Motion Blur:
Angle: 206
Strength: 40%
OK
Duplicate the rain layer.
Merge Down.
Duplicate the merged layer 2x for a total of 3 rain layers.
Rename each layer:
Rain 1
Rain 2
Rain 3
Move one of the layers slightly down and to the right.
Move the third layer down and to the left just a little.
So long as no two layers are in the same exact position then your rain should turn out just fine!
Remember that template layer I warned not to delete?  Highlight it and click anywhere outside of it with your Magic Wand.
Highlight each rain layer and tap the delete key.
Deselect.
Close out Rain layers 2 & 3.

Add your copyrights.

Add your name.
Color Pallet:
Foreground: #662c01 
Background: #9e312d
Set the stroke to 1.5
Type your name.
Convert to Raster Layer.
Give a slight Inner Bevel:

OK

 ~Time to Animate~ 

Edit/Copy Special/Copy Merged
Carry Into Animation Shop
Edit/Past as New Animation 

Back in PSP.
Close out Rain 1.
Open up Rain 2.
Copy Merged 

Carry Into AS
Edit/Paste/After Current Frame. 

Close out Rain 2.
Open up Rain 3.
Copy Merged 

Carry Into AS
Edit/Paste/After Current Frame. 

View your animation by clicking on the View Animation button at the top – second icon in from the right.

If you like it then save.

I hope you enjoyed this tutorial.   
I’d love to see your results.
Email me!
Hugs,
Bev


Sunday, September 4, 2022

Watcher at the Window


Supplies Needed 

1 tube of choice – I used the awesome artwork of Sarah Pauline which can be purchased from Digital Art Heaven here

Font of choice – I used Estrella here

Monti Circular Mask here

My Template 267
here

Plug-Ins used:
Brush Strokes – Crosshatch

Download Snaggables here

“Dragon’s Den” is a PTU Tagger Size scrap kit designed by Tagcatz Design and can be purchased from The Digital Scrapbook Shop here

This tutorial was written assuming you have a working knowledge of PSP.  

~~ Let’s get started ~~

Open up the template.
Shift + D.
Close out the original.
Image/Canvas Size:
650 x 650
OK
Highlight the background layer.
Flood fill white.
Delete the credit layer.

Highlight Layer 1.
Select All/Float/Defloat
New Raster Layer.
Copy and paste Paper 6 Into Selection.
Deselect.
Delete the template layer. 

Repeat the above step with Layers 2, 3, and 4.

Highlight Layer 5.
Select All/Float/Defloat.
New Raster layer.
Flood fill with #447eb3
Deselect.
Adjust/Add Remove Noise/Add Noise:
Gaussian and Monochrome checked
Noise: 60%
OK
Deselect.
Delete the template layer. 

Repeat the above step with Layers 11 and 13. 

Highlight Layer 15.
Select All/Float/Defloat
New Raster layer.
Flood fill with the same color.
Apply the same noise effect accept change the noise to 40%.
Deselect.
Delete the template layer. 

Highlight Layer 8.
Select All/Float/Defloat.
New Raster layer.
Flood fill with #b7c89a.
Apply the same noise effect.
Deselect.
Delete the template layer. 

Highlight Layer 6.
Select All/Float/Defloat
New Raster layer.
Copy and paste Paper 5 Into Selection.
Deselect.
Delete the template layer. 

Highlight Layer 9.
Select All/Float/Defloat
New Raster layer.
Open up Paper 4.
Free Rotate the paper to the right 90 degrees.
Copy.
Make your working canvas active.
Paste Into Selection.
Click the lock icon at the top of the layers menu to lock this layer.
Apply Brush Strokes – Crosshatch:
Stroke Length: 35
Sharpness: 6
Strength: 2
OK
Click the lock icon again to unlock the layer.
Deselect.
Delete the template layer. 

Make the paper from the kit active.
Mirror
Copy
Make your working canvas active.
Highlight Layer 7.
Select All/Float/Defloat
New Raster layer.
Paste the paper Into Selection.
Lock the layer.
Apply the same Crosshatch effect.
Unlock the layer.
Deselect.
Delete the template layer.

Highlight Layer 12.
Select All/Float/Defloat
New Raster layer.

Copy and paste Paper 5 Into Selection.
Deselect.
DO NOT delete the template layer (yet). 

Create a new 500 x 500 blank canvas.
Flood will white.
Copy and paste Element 36 as a new layer.
Copy and paste as new layers the following elements:
El 1:  Resize 30%
El 22:  Resize 20%/Duplicate
El 19:  Resize 35%
Move each element into position – see my tag for reference.  It’s OK if some of them overhang the side of the globe.
Give each element a drop shadow, but NOT the globe.
Once everything is in place highlight the globe layer.
Click outside of it with your Magic Wand.
Make your Eraser Tool active.
Highlight in your layers pallet any element that overhangs the glass globe and erase what you don’t want.
Deselect.
Lower the Opacity of each element (except for the globe) to about 50%.
Close out the white canvas layer.
Merge Visible.
Copy. 

Make your tag your working canvas and paste as a new layer.
Resize 60%.

Copy and paste your tube as a new layer.
If you’re using the same tube as I did, Resize 80%.
Move into position over the paper that belongs to template Layer 12.
Change the Blend Mode to Soft Light.
Duplicate the glass globe element you made, change the Blend Mode to Soft light as well and move into position next to your tube – see my tag for reference.
Highlight the template layer.
Select All/Float/Defloat
Selections/Invert
Highlight the template layer and globe layer and tap the delete key on each one.
Deselect.

Copy and paste your tube as a new layer.  If you used the same tube as I did, Resize 60%.
Move both the tube and glass globe into position – see my tag for reference. 

Add your elements.  I used: (see tag for placement reference)
El 47:  Resize 70%/Mirror
El 49
El 48:  Resize 90%/Use Pick Tool to flatten a little
El 22:  Resize 50%
El 6:  Duplicate/Mirror/Move into place. Erase edges that you don’t want seen
El 17:  Resize 45%
El 20:  Resize 80%/Duplicate/Mirror
El 50:  Resize 36%/Duplicate/Resize 70%/Duplicate/Mirror

Highlight the white background layer.
New Raster Layer.
Select All.
Copy and paste Paper 1 Into Selection.
Deselect.
Apply the mask.
Merge Group.
Resize 110%

Add your copyrights.

Add your name.

Color Pallet:
Foreground: #000000
 Background: #bdcb5e
Set the stroke to 1.5
Type your name.
 Convert to Raster Layer.
Give a slight Inner Bevel:


Apply Noise, using same settings accept change the Noise to 60%.
OK

I hope you enjoyed this tutorial.   
I’d love to see your results.
Email me!
Hugs,
Bev


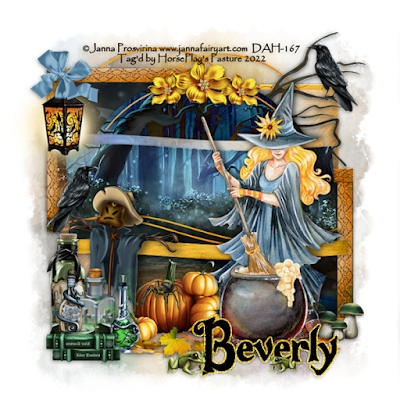
Witches Brew


Supplies Needed 

1 tube of choice – I used the awesome artwork of Janna Prosvirina which can be purchased from Digital Art Heaven here

Font of choice – I used HalloWitchZ here 

Becky Mask here

My Template 215
here

Plug-Ins used:
Brush Strokes – Sprayed Strokes

Snaggables available here

“Witches Brew” is an Exclusive PTU Tagger Size scrap kit designed by Moonshine Dezinez and can be purchased from Digital Art Heaven here

This tutorial was written assuming you have a working knowledge of PSP. 

~~ Let’s get started ~~

Open up the template.
Shift + D.
Close out the original.
Image/Canvas Size:
700 x 700
OK
Highlight the background layer.
Flood fill white.
Delete template layers 8 and 12.

Highlight Template Layer 1.
Select All/Float/Defloat
New Raster layer.
Copy and paste Paper 3 Into Selection.
Deselect.
Delete the template layer. 

Repeat the above step with:
Template Layers 2, 3, 4, 14, and 18

Highlight Template Layer 5.
Select All/Float/Defloat
Copy and paste Paper 6 as a new layer just above the template layer.
Right Click on the paper in your layers pallet and choose “Promote Section to Layer” from the sub menu.
Deselect.
Delete the template layer. 

Move the Original paper just above Template Layer 9 and repeat the above step.

Highlight Template Layer 6.
Select All/Float/Defloat
New Raster Layer above the template layer.
Copy and paste Paper 9 Into Selection.
Apply Brush Strokes – Sprayed Strokes:
Stroke Length: 16
Spray Radius: 19
OK
Deselect.
Delete the template layer. 

Repeat the above step with Template Layer 10. 

Highlight Template Layer 7.
Select All/Float/Defloat
New Raster Layer.
Copy and paste Paper 4 Into Selection.
New Raster Layer.
Copy and paste Paper 3 Into Selection and change the Blend Mode to Luminance.
New Raster layer.
Copy and paste Frame 2 Into Selection
Deselect.
Delete the template layer.

Repeat the above steps with Template Layer 11.

Highlight Template Layer 13.
Select All/Float/Defloat
Copy and paste Paper 4 Into Selection.
Copy and paste Paper 2 as a new layer and move into a position you like.
Right click on it in your layers pallet and choose “Promote Section to Layer”
Change the Blend Mode to “Difference”.
Delete the original paper layer.
Deselect.
Delete the template layer.

Highlight Template Layer 15.
Select All/Float/Defloat
New Raster Layer
Copy and paste Paper 9 Into Selection.
Deselect.
Delete the template layer. 

Highlight Template Layer 16.
Select All/Float/Defloat
Copy and paste Paper 2 as a new layer.
Resize 50%
Move into a position you like.
Right Click on it in your layers pallet and choose “Promote Section to Layer” from the sub menu.
Deselect.
Delete the template layer.
Delete the original paper layer. 

Highlight Template Layer 17.
Select All/Float/Defloat
New Raster Layer.
Copy and paste Paper 6 Into Selection.
Deselect.
Delete the template layer.

Copy and paste your tube as a new layer and move into position – see my tag for reference.
If you’re using the tube as I did, I used the Witch Only layer and Resize 60% 

Add your elements.  I used: (see tag for placement reference)
El 55:  Resize 50%
El 45:  Resize 15%/Duplicate/Mirror
El 16:  Resize 15%/Duplicate/Resize 70%/Duplicate
El 14:  Resize 25%
El 17:  Resize 15%
El 33:  Resize 35%
El 5:  Resize 10%
El 11:  Resize 15%
El 12:  Resize 25%
El 37:  Resize 15%
El 25:  Resize 60%
El 38:  Resize 20%
El 38:  Resize 20%
El 10:  Resize 70%
El 7:  Resize 25%/Duplicate/Mirror/Resize 70%

Add your copyrights.

Close out the white background layer and the two little frogs – (you’ll use those to decorate your name)
Merge Visible all layers.
Duplicate and move below the merged layer.
Adjust/Blur/Gaussian Blur:
Radius: 15
OK
Image/Resize:
115%
Be sure “Resize all layers” is NOT clicked.
OK
Reopen the white canvas layer.
Apply the mask to the blurred layer.
Merge Group.

Add your name.
Color Pallet:
Foreground and Background: #000000
Set the stroke to 1.0
Type your name.
 Convert to Raster Layer.
Select All/Float/Defloat
Selections/Modify/Expand by 2.
OK
Flood fill with #ebc934
Adjust/Add Remove Noise/Add Noise:
Gaussian and Monochrome checked
Noise: 60%
OK
Deselect.

Highlight the black name layer.
Merge Down.

Use the frogs to place at each end of your name – see my tag for reference. 

I hope you enjoyed this tutorial.   
I’d love to see your results.
Email me!
Hugs,
Bev