Clicking on the image will allow you to enlarge for bigger view.
Supplies
Font of Choice - I used Dream Orphans here
Gem Mask 143 here
My Template 90 here
DSB Flux - Bright Noise
Greg’s Factory Output Vol. II - Pool Shadow
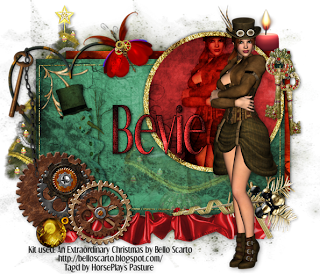
“An Extraordinary Christmas” is a PTU tagger size scrap kit created by Jay of Bello Scarto and can be purchased from her store Heartbeatz Creationz. You can visit her blog here.
Thank you Jay for one extraordinary kit!
This tutorial was written assuming you have a working knowledge of PSP.
~♥~ Let’s get started ~♥~
Open up the template.
Shift + D.
Close out the original.
Delete the following layers:
Credit, Circle 2, Circle 2 back, Circle 1, and Circle 1 back.
Image/Canvas size:
700 x 700
Flood fill the background layer white.
Highlight Rectangle 1 layer.
Click on it with your Magic Wand.
New Raster layer.
Copy and paste Paper 14 Into Selection.
Deselect.
Delete the template layer.
Highlight Rectangle 2 layer.
Click on it with your Magic Wand.
New Raster layer.
Copy and paste Paper 2 Into Selection.
Deselect.
Delete the template layer.
Highlight Stitching layer.
Select All/Float/Defloat
New Raster layer.
Open Element 29.
Use your Selection Tool set on Rectangle and section out the entire center of the element.
In your Color Pallet change it to Pattern and look for the section of the element.
Set the scale size to whatever you like.
Make your working canvas active.
Flood fill the stitching.
Adjust/Add Remove Noise/Add Noise:
Uniform and Monochrome checked
Noise: 75%
OK
Deselect.
Delete the template layer.
Highlight Circle 3 Back layer.
Click on it with your Magic Wand.
New Raster layer.
Flood fill with the pattern you used for the stitching.
Apply the same noise effect.
Deselect.
Delete the template layer.
Highlight Circle 3 back layer.
Click on it with your Magic Wand.
New Raster layer.
Copy and paste Paper 8 Into Selection.
Deselect.
Delete the template layer.
Copy and paste Element 70 as a new layer.
Resize 75%
Move her into position near the circle - see my tag for reference.
Duplicate/Move it slightly to the left.
Move it beneath the original element layer in your layers pallet.
Highlight the red circle.
Click anywhere outside of it with your Magic Wand.
Highlight the element layer just above it.
Tap the delete key.
Deselect.
Change the Properties to Soft Light.
Duplicate.
Copy and paste Element 50 as a new layer.
Resize 65%
Position at the bottom left corner of the green rectangle.
Change the Properties to Multiply.
Do not give it a drop shadow yet.
Copy and paste Element 61 as a new layer.
Resize 25%
Position at the bottom right corner of the green rectangle.
Duplicate/Mirror/Flip
Position at the top left corner.
You don’t want to see it through the snowman so highlight the snowman layer and click anywhere outside of it with your Magic Wand.
Highlight the corner gold element and erase all that can be seen through the snowman.
Deselect.
Now you can give the snowman a drop shadow.
Copy and paste Element 47 as a new layer just above the green rectangle layer.
Resize 75%
Move into position - see my tag for reference.
Lower the Opacity to about 32 or so.
Highlight the green rectangle layer.
Click anywhere outside of it with your Magic Wand.
Highlight the tree layer.
Tap the delete key.
Deselect.
Add your embellishments. I used:
Element 9: Resize 60%/Free rotate Left 4 degrees
Element 47: Resize 75%
Element 46
Element 11: Resize 30%/Free rotate left 30 degrees
Element 28: Resize 30%/Free rotate right 10 degrees/Duplicate/Mirror
Element 58: Resize 40%/Duplciate/Mirror
Element 34: Resize 50%
Element 35: Resize 40%
Element 30: Resize 40%
Element 1: Resize 25%/Free rotate right 40 degrees
Highlight your white background.
Select All
Copy and paste a paper of choice Into Selection.
Deselect.
Apply the mask
Merge Group.
Add your credits.
Add your name.
Color Pallet:
Foreground: Black
Background: Pattern/Paper 8
Stroke: 1
Type your name.
Convert to Raster layer.
Select All/Float/Defloat
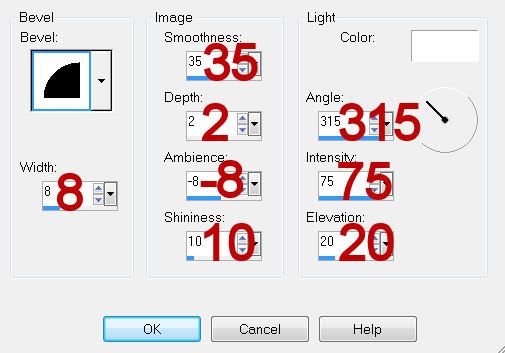
Give it a slight inner bevel:
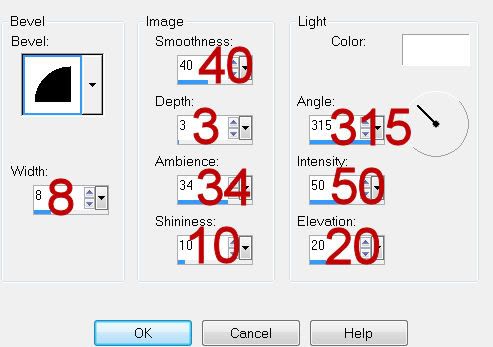
Apply DSB Flux - Bright Noise:
Intensity: 28
Mix checked.
OK
Apply Greg’s Factory Output Vol. II - Pool Shadow:
Default Settings
Deselect.
Resize 85%
I hope you enjoyed this tutorial.
I’d love to see your results and show it off in my gallery.
Email me!
Hugs,
Bev
Supplies
Font of Choice - I used Dream Orphans here
Gem Mask 143 here
My Template 90 here
DSB Flux - Bright Noise
Greg’s Factory Output Vol. II - Pool Shadow
“An Extraordinary Christmas” is a PTU tagger size scrap kit created by Jay of Bello Scarto and can be purchased from her store Heartbeatz Creationz. You can visit her blog here.
Thank you Jay for one extraordinary kit!
This tutorial was written assuming you have a working knowledge of PSP.
~♥~ Let’s get started ~♥~
Open up the template.
Shift + D.
Close out the original.
Delete the following layers:
Credit, Circle 2, Circle 2 back, Circle 1, and Circle 1 back.
Image/Canvas size:
700 x 700
Flood fill the background layer white.
Highlight Rectangle 1 layer.
Click on it with your Magic Wand.
New Raster layer.
Copy and paste Paper 14 Into Selection.
Deselect.
Delete the template layer.
Highlight Rectangle 2 layer.
Click on it with your Magic Wand.
New Raster layer.
Copy and paste Paper 2 Into Selection.
Deselect.
Delete the template layer.
Highlight Stitching layer.
Select All/Float/Defloat
New Raster layer.
Open Element 29.
Use your Selection Tool set on Rectangle and section out the entire center of the element.
In your Color Pallet change it to Pattern and look for the section of the element.
Set the scale size to whatever you like.
Make your working canvas active.
Flood fill the stitching.
Adjust/Add Remove Noise/Add Noise:
Uniform and Monochrome checked
Noise: 75%
OK
Deselect.
Delete the template layer.
Highlight Circle 3 Back layer.
Click on it with your Magic Wand.
New Raster layer.
Flood fill with the pattern you used for the stitching.
Apply the same noise effect.
Deselect.
Delete the template layer.
Highlight Circle 3 back layer.
Click on it with your Magic Wand.
New Raster layer.
Copy and paste Paper 8 Into Selection.
Deselect.
Delete the template layer.
Copy and paste Element 70 as a new layer.
Resize 75%
Move her into position near the circle - see my tag for reference.
Duplicate/Move it slightly to the left.
Move it beneath the original element layer in your layers pallet.
Highlight the red circle.
Click anywhere outside of it with your Magic Wand.
Highlight the element layer just above it.
Tap the delete key.
Deselect.
Change the Properties to Soft Light.
Duplicate.
Copy and paste Element 50 as a new layer.
Resize 65%
Position at the bottom left corner of the green rectangle.
Change the Properties to Multiply.
Do not give it a drop shadow yet.
Copy and paste Element 61 as a new layer.
Resize 25%
Position at the bottom right corner of the green rectangle.
Duplicate/Mirror/Flip
Position at the top left corner.
You don’t want to see it through the snowman so highlight the snowman layer and click anywhere outside of it with your Magic Wand.
Highlight the corner gold element and erase all that can be seen through the snowman.
Deselect.
Now you can give the snowman a drop shadow.
Copy and paste Element 47 as a new layer just above the green rectangle layer.
Resize 75%
Move into position - see my tag for reference.
Lower the Opacity to about 32 or so.
Highlight the green rectangle layer.
Click anywhere outside of it with your Magic Wand.
Highlight the tree layer.
Tap the delete key.
Deselect.
Add your embellishments. I used:
Element 9: Resize 60%/Free rotate Left 4 degrees
Element 47: Resize 75%
Element 46
Element 11: Resize 30%/Free rotate left 30 degrees
Element 28: Resize 30%/Free rotate right 10 degrees/Duplicate/Mirror
Element 58: Resize 40%/Duplciate/Mirror
Element 34: Resize 50%
Element 35: Resize 40%
Element 30: Resize 40%
Element 1: Resize 25%/Free rotate right 40 degrees
Highlight your white background.
Select All
Copy and paste a paper of choice Into Selection.
Deselect.
Apply the mask
Merge Group.
Add your credits.
Add your name.
Color Pallet:
Foreground: Black
Background: Pattern/Paper 8
Stroke: 1
Type your name.
Convert to Raster layer.
Select All/Float/Defloat
Give it a slight inner bevel:

Apply DSB Flux - Bright Noise:
Intensity: 28
Mix checked.
OK
Apply Greg’s Factory Output Vol. II - Pool Shadow:
Default Settings
Deselect.
Resize 85%
I hope you enjoyed this tutorial.
I’d love to see your results and show it off in my gallery.
Email me!
Hugs,
Bev

