Supplies
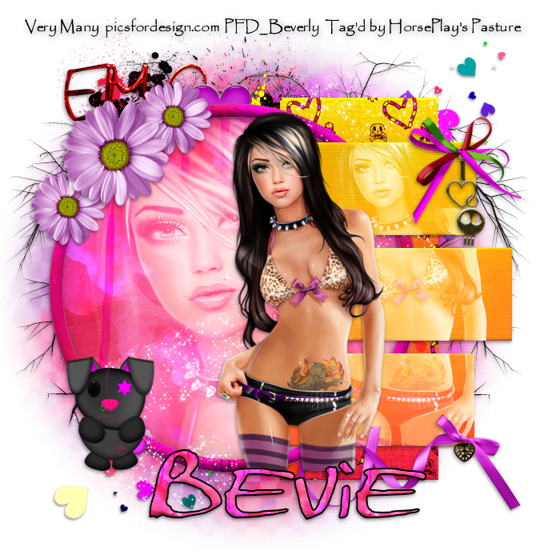
1 tube of choice - I used the artwork of VeryMany which can be purchased from Pics for Design. You must have a license to use.
Font of choice - I used Marker Script here
Collab Tempz by Creative Scraps by Crys and Stef’s Tutorials here
Weescotlass Mask 208 here
“Emolicious” is a tagger size scrap kit created byCindy of Scrappin with Lil Ole Me and can be purchased from Butterfly Blush Designs. You can visit her blog here.
Thank you Cindy for a truly awesome kit! I don’t know where you’ve been hiding out with all your wonderful kits but I’m thrilled to have found you!
This tutorial was written assuming you have a working knowledge of PSP.
~♥~ Let’s get started ~♥~
Open up Temp 1.
Shift + D
Close out the original.
Resize all 85%
Image/Canvas Size
700 x 700
Ok
New Raster layer
Send to bottom.
Flood Fill white.
Delete the following layers:
Top 3 layers and Small Rectangle layer.
Highlight Big Rectangle layer.
Click anywhere outside of it with your Magic Wand.
Copy and paste Paper 26 as a new layer.
Resize 60%
Move into position.
Tap the delete key.
Deselect.
Delete the template layer.
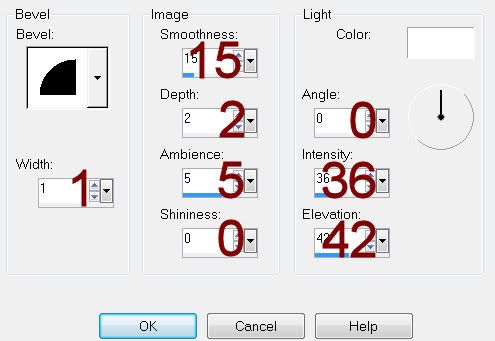
Give it a slight Inner Bevel:

Highlight Circle layer.
Click anywhere outside of it with your Magic Wand.
Copy and paste Paper 27 as a new layer.
Resize 70%
Move into position.
Tap the delete key.
Copy and paste your close up image as a new layer above the paper.
Tap the delete key.
Deselect.
Delete the template layer.
Highlight Circle Frame layer.
Select All/Float/Defloat
New Raster layer.
Copy and paste Paper 34 Into Selection.
Deselect.
Delete the template layer.
Give it a slight Inner Bevel:

Highlight Rectangle 3 layer.
Merge Down.
Merge Down again.
All 3 rectangles should now be on the same layer.
Use your Magic Wand and click anywhere outside of the rectangles.
Copy and paste Paper 28 as a new layer.
Resize 70%
Copy and paste your tube as a new layer.
Move into position over the rectangles.
Tap the delete key.
Deselect.
Change the Properties to Screen
Copy and paste your tube as a new layer.
Move into position in front of the circle.
Add your embellishments. I used:
Daisy: Resize 25%/Duplciate/Flip/Resize 70%/Duplicate
Bow 6: Resize 25%
Gold Charm: Resize 25% and 80%
Ribbon 3: Resize 25%/Mirror
Emo Bunny: Resize 25% and 70%
Tree: Duplicate/Mirror/Erase the trunk of each tree
Hearts: Resize 70%
Word Art 2: Resize 40%
Highlight your white canvas.
New Raster layer.
Select All.
Copy and paste Paper 32 Into Selection.
Deselect.
Apply the mask.
Resize 105%
Merge Group.
Center it a bit more.
Add your copyrights.
Add your name:
Color Pallet:
Foreground: Black
Background: Pattern/Paper 27
Angle: 0
Scale: 37
Stroke: 2
Type your name.
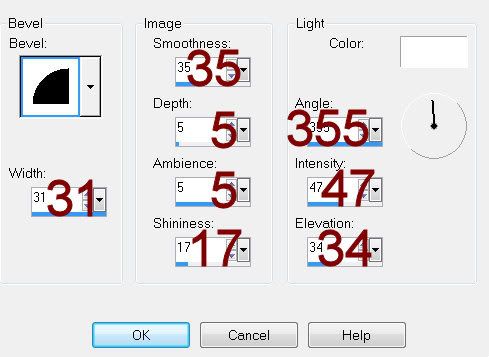
Give it the same Inner Bevel you did for the round frame.
Resize all layers 80%.
I hope you enjoyed this tutorial.
I’d love to see your results and show it off in my gallery.
Email me!
Hugs,
Bev

No comments:
Post a Comment