Saturday, January 9, 2010

Make Believe Land


Supplies
1 tube of choice - I used the fabulous artwork of Cris de Lara at My PSP Tubes
Font of choice - I used JI-Pelter here.
Weescotlass mask 249 here
Scapity Scrap and More Template 40 here
Twinks which I’ve supplied here
DSB Flux - Bright Noise
Animation Shop
“Pretty and Playful” is a PTU tagger size scrap kit created by Terry of Treasure’s by Terry and can be purchased exclusively at MPT. You can visit Terry’s blog here.
Thank you Terry for such a beautiful kit!

This tutorial was written assuming you have a working knowledge of PSP.

~♥~ Let’s get started ~♥~

Open up the template.
Image/Canvas Size
700 X 700
OK
Highlight the background layer and flood fill white.

Highlight Big Circle layer.
Select All/Float/Defloat
New Raster Layer.
Copy and paste a paper of choice Into Selection.
Deselect.
Delete the template layer.

Highlight Border Big Circle layer.
Select All/Float/Defloat
New Raster Layer.
Copy and paste a paper of choice Into Selection.
Deselect.
Delete the template layer.

Highlight Small Circle layer.
Select All/Float/Defloat
New Raster Layer.
Copy and paste a paper of choice Into Selection.
Deselect.
Delete the template layer.

Highlight Border Smaller Circle.
Repeat the same as you did for Border Large Circle layer.

Highlight Big Rectangle layer.
Select All/Float/Defloat
New Raster Layer.
Copy and paste a paper of choice Into Selection.
Deselect.
Delete the template layer.

Repeat the above step with Square layer and Line Square layer.

Merge Visible Top, Mid, and Bottom Rectangle layer.
Select All/Float/Defloat
New Raster Layer.
Flood fill with a gradient of choice.
Deselect.
Delete the template layer.

Merge Visible Border Top, Border Mid, and Border Bottom Rectangle layers.
Arrange them so they’re over the rectangle layers in your layers pallet.
Select All/Float/Defloat
New Raster Layer.
Copy and paste a paper of choice Into Selection.
Deselect.
Delete the template layer.

Highlight Long Dotted Line layer.
Merge down.
New Raster layer above the merged dotted layer.
Flood fill with a dark color that will match your tag.
Highlight the merged dotted layer.
Select All/Float/Defloat
Highlight the flood fill layer.
Selections/Invert
Tap the delete key.
Deselect.
Delete the template layer.

Highlight the 3 merged rectangle layer.
Select All/Float/Defloat
Copy and paste your tube as a new layer.
Position it over the rectangles - resizing the tube to your liking.
Selections/Invert
Tap the delete key.
Deselect.
Delete the template layer.
Change the Properties to Multiply.

Add your embellishments. I used:
Flower Tree 2
Bow 2: Resize 50%
Bead String 1: Resize 70% Free rotate left 90 degrees.
Butterfly 3: Resize 40% Free rotate right 25 degrees
Butterfly 4: Resize 40% Free rotate left 25 degrees
Cat 1: Resize 45%
Basket 1: Resize 40%

Copy and paste your tube as a new layer.

Highlight your white canvas.
New Raster layer.
Select All.
Copy and paste a paper of choice as a new layer.
Deselect.
Copy and paste Torn paper of your choice. Position so that the torn part of the paper is in the center of your canvas.
Use your Pick Tool and pull the side out so that there are no gaps on the sides of the paper.
Merge visible the two paper layers.
Apply the mask.
Resize 125%
Merge Group.

Highlight the Basket layer.
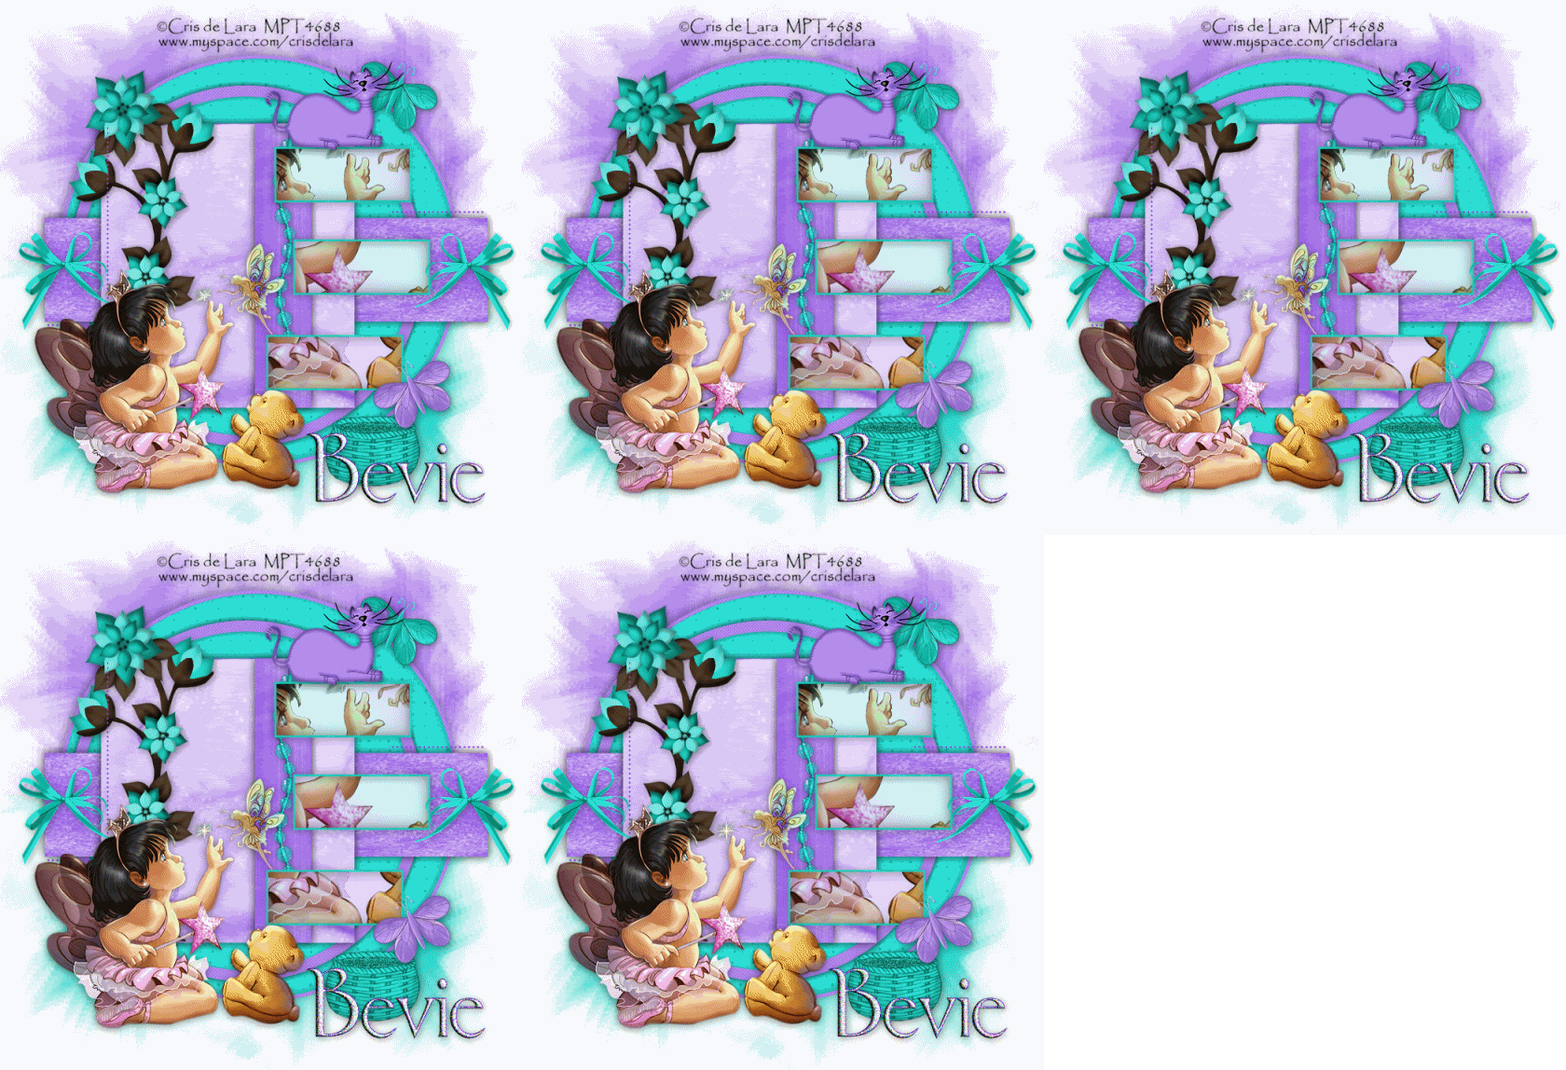
Duplicate 4 times for a total of 5 layers.
Rename them Basket 1, 2, 3, 4, and 5.

Highlight Basket one.
Use your Freehand Selection Tool and outline the inside portion of the basket.
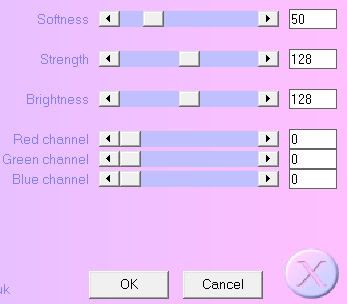
Apply the DSB Flux - Bright Noise:
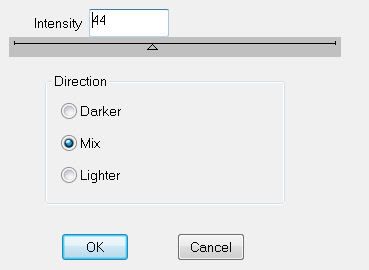

Highlight Basket layer 2.
Apply Bright Noise again accept hit the mix button twice.

Highlight Basket layer 3.
Apply Bright Noise again accept hit the mix button 3 times.

Highlight Basket layer 4.
Apply Bright Noise again accept hit the mix button 4 times.

Highlight Basket layer 5.
Apply Bright Noise again accept hit the mix button 5 times.

Close all the basket layers out accept Basket layer 1.

Add your copyrights.

Add your name.
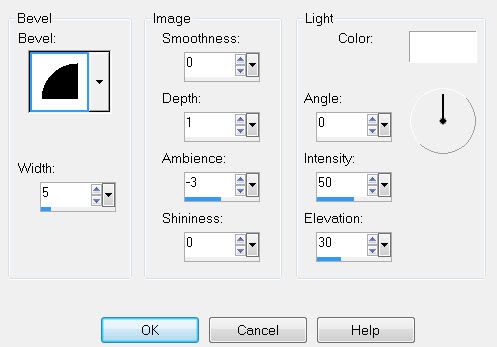
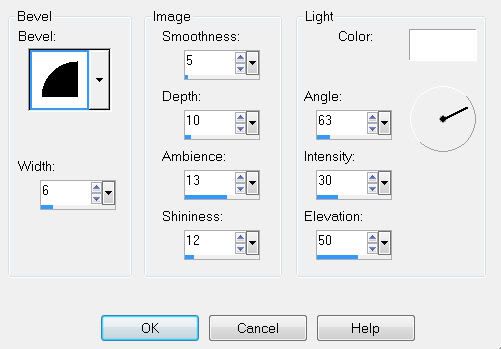
Give it a slight inner bevel:
Duplicate your name 4 times for a total of 5 name layers.
Rename them Name 1, 2, 3, 4, and 5.

Highlight Name 1 layer.
Adjust/Add Remove Noise/Add Noise
Random Checked
Noise: 33%
OK

Highlight Name 2 layer.
Apply the noise effect again accept change the Noise to 43%

Highlight Name 3 layer.
Apply the noise effect again accept change the Noise to 53%

Highlight Name 4 layer.
Apply the noise effect again accept change the Noise to 63%

Highlight Name 5 layer.
Apply the noise effect again accept change the Noise to 73%

Close out all your name layers accept Name layer 1.
That one should be left open.
Copy Merge

~Now we’re ready to animate~

Carry Into Animation Shop.
Edit/Paste/As New Animation.

Back into PSP.
Close out Name 1 and open up Name 2.
Close out Basket 1 and open up Basket 2.
Copy Merge.

Carry into AS.
Edit/Paste/After Current Frame.

Back into PSP.
Close out Name 2 and open up Name 3.
Close out Basket 2 and open up Basket 3.
Copy Merge.

Carry into AS.
Edit/Paste/After Current Frame.

Back into PSP.
Close out Name 3 and open up Name 4.
Close out Basket 3 and open up Basket 4.
Copy Merge.

Carry into AS.
Edit/Paste/After Current Frame.

Back into PSP.
Close out Name 4 and open up Name 5.
Close out Basket 4 and open up Basket 5.
Copy Merge.

Carry into AS.
Edit/Paste/After Current Frame.

If you want to use the twinks that I provided then open them up.
Ctrl + A to highlight all the frames.
Edit/Copy.
Highlight your tag frames.
Ctrl + A to highlight all the frames.
Ctrl + E and paste the twinks wherever you choose.
Animation/Frame Properties
Change the display time to 20.
OK.

View your animation.
If you’re happy then resize:
Animation/Resize Animation
Percentage of Original checked.
80
OK.

Save your tag.

I hope you enjoyed this tutorial.
I’d love to see your results.
Email me!
Hugs,
Bev

Image of a Rose

Clicking on the image will enlarge to full view.

Supplies
2 tubes of choice - I used the wonderful artwork of Jennifer Janesko which you can purchase here.
Font of choice - I used Papyrus which you can find here - check your PC to see if it came with it. Mine did.
Tracy’s Template #46 here . Look on the side bar under “Tracy’s Bulk Templates”
Weescotlass Mask 297 here
“Hearts and Roses” is a PTU tagger size scrap kit created by Terry of Treasure’s by Terry and can be purchased exclusively at MPT. You can visit Terry’s blog here.
Thank you Terry for such a beautiful kit!

This tutorial was written assuming you have a working knowledge of PSP.

~♥~ Let’s get started ~♥~

Open up the template.
Image/Canvas size
700 X 600
Delete the credit layer.

New Raster layer.
Send to bottom.
Flood fill white.
In your layers pallet move Rectangle 2 layer so that it‘s just above Rectangle 1 layer.
Merge Down.
Select All/Float/Defloat
Copy and paste Paper 18 as a new layer.
Resize 75%.
Selections/Invert
Tap the delete key.
Deselect.
Delete the template layer.

In the layers pallet move Dotted Line 1 layer just above the merged rectangle layer.
Highlight Dotted Line 2 layer.
Merge Down.
New Rater layer above the merged dotted line layer.
Flood fill with a dark color from the paper you used.
Highlight the merged dotted line layer.
Select All/Float/Defloat
Selections/Invert
Tap the delete key.
Deselect.
Delete the template layer.

Highlight Circle layer.
Select All/Float/Defloat
New Raster layer.
Copy and paste Paper 1 Into Selection.
Selections/Modify/Contract by 7.
Tap the delete key.
Selections/ Modify/Expand by 2.
New Raster layer below the new circle frame you just made.
Flood fill with a gradient of your choice.
Copy and paste your tube above the gradient layer.
Resize as needed.
Selections/Invert
Tap the delete key.
Deselect.
Delete the template layer.

Highlight the Dotted Circle layer.
Repeat the same steps you used for the dotted line accept flood fill with the gradient you just used.
Highlight Frame 1 layer.
Select All/Float/Defloat
New Rater layer.
Copy and paste Paper 1 Into Selection.
Deselect.
Delete the template layer.
Repeat the above step with Frame 2 layer.

Highlight Square layer.
Select All/Float/Defloat
Flood fill with the same gradient you’ve been using.
Deselect.
Repeat the above step with Square 2 layer.
Copy and paste your tube as a new layer.
Position in front of the two framed squares.

Add your embellishments. I used:
Flower 6
Flower 5 - Duplicate/Mirror
Bow 4: Resize 50%
Flower 4: Resize 90% - position behind the circle. Duplicate/Mirror/Flip
Butterfly 4: Resize 70%
Highlight your white background.
New Raster layer.
Select All.
Copy and paste a paper of choice Into Selection.
Deselect
Apply the mask.
Merge Group.
Add your copyrights.
Add your name.
Give it a slight inner bevel:


Resize all layers 85%.

I hope you enjoyed this tutorial.
I’d love to see your results.
Email me!
Hugs,
Bev

Friday, January 8, 2010

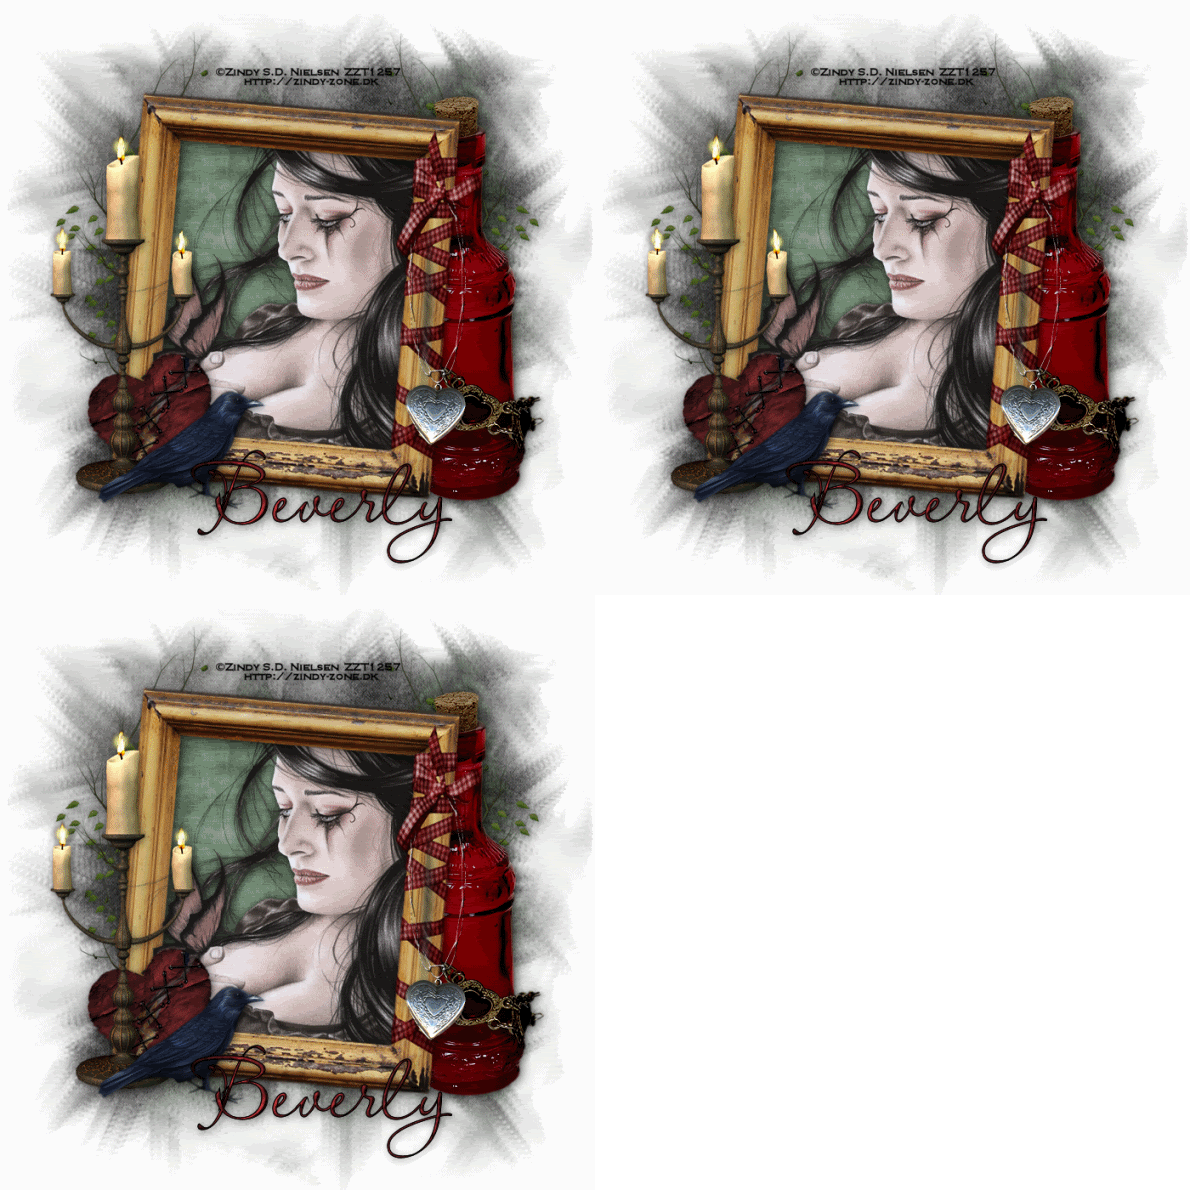
Somber Moments


Supplies
1 tube of choice - I used the beautiful artwork of Zindy S.D. Nielsen which you can purchase here.
Font of choice - I used LavishlyYoursROB
Weescotlass mask 249 here
Eyecandy 5: Nature - Fire
Animation Shop
“Blood Moon Volturi” is a PTU tagger size scrap kit created by Jessica of Gothic Inspirations and can be purchased at Scraps With Attitude.
Jessica, thank you for another wicked scrap kit!

This tutorial was written assuming you have a working knowledge of PSP.

~♥~ Let’s get started ~♥~

Open up a 700 X 700 blank canvas.
Flood fill white.

Copy and Paste Frame 7 as a new layer.
Resize 70%
Free rotate right 5 degrees.
Click inside with your Magic Wand.
Selections/Modify/Expand by 6.
New Raster layer below the frame.
Copy and paste a paper of choice Into Selection.
DO NOT DESELECT

Copy and paste your tube below the frame.
Resize as needed.Selections/Invert
Tap the delete key.
Deselect.

Close out your white background and Merge Visible.
Reopen your white background and close out your merged layer.

Now we’re going to make the layer for your mask.

Highlight your white background.
New Raster layer.
Copy and paste a paper of choice Into Selection.
Deselect.

Copy and paste Moon as a new layer.
Position in the top left corner.

Copy and paste Tree 1 as a new layer.
Position near the right side of your tag - centered vertically.
Duplicate - position it near the center and lower.

Close out your white background.
Merge Visible.
Apply the mask.
Resize 120%.
Merge Group.

Reopen all layers.

Add your embellishments. I used:
Tree 3: Resize 70% Duplicate/Mirror
Bottle: Resize 75%
Heart: Resize 30. Free rotate left 20 degrees
Necklace: Resize 50%. Use Eraser tool and erase a bit to give the effect as if it’s tied into the ribbon.
Candle 2: Resize 80%
Crow: Resize 35%

Highlight the candle layer.
Duplicate twice for a total of 3 candle layers.
Rename then Candle 1, 2, and 3.
Highlight Candle 1 layer.
Using your Freehand Selection tool outline each of the flames.
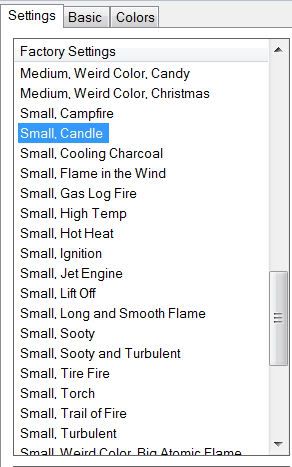
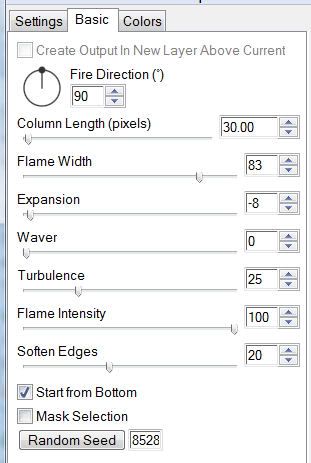
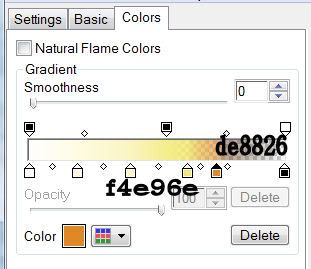
Apply Eyecandy 5: Nature - Fire and use these settings:

On the Settings tab:


On the Basic Tab:

On the Colors Tab:


Click OK.

Highlight Candle 2 layer.
Apply the fire effect again accept hit the random seed button once.

Repeat the above step with candle 3 layer.

Close out Candle 2 and 3 layers.

Add your copyrights.

Add your name.
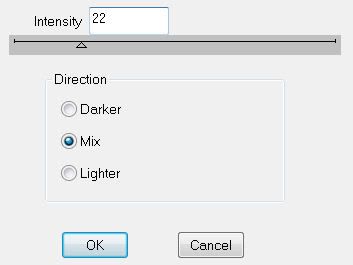
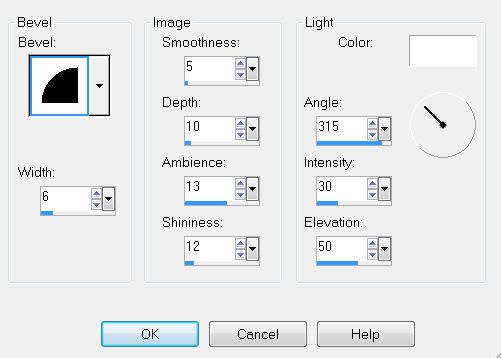
Give it a slight inner bevel:

Copy Merge

~Now it’s time to Animate~

Open up Animation Shop.
Edit/Paste as New Animation.

Back into PSP.
Close out Candle 1 layer.
Open up Candle 2 layer.
Copy Merge.

Carry into AS.
Edit/Paste/After Current Frame.

Back into PSP.
Close out Candle 2 layer.
Open up Candle 3 layer.
Copy Merge.

Carry Into AS.
Edit/Paste After Current Frame.

Ctrl + A to highlight all frames.
Animation/Frame Properties
Change the number to 25.

View your animation.
If you’re happy then resize your frames.
Animation/Resize Animation.
Percentage of Original checked.
Change numbers to 85
OK

Now you can save your animation.

I hope you enjoyed this tutorial.
I’d love to see your results.
Email me!
Hugs,
Bev
Thursday, January 7, 2010

Just Being Me

Clicking on the image will enlarge to full view.

Supplies
4 tubes of choice - I used the wonderful artwork of PinUpToons which you can purchase here.
Font of choice - I used Curly Cue here
Tracy’s Template #12 here at Freebies Friends Scraps and More. They are my new found goldmine for tutting fun! Look on the side bar under “Tracy’s Bulk Templates”
Creative Desires Mask here. I have no idea who’s mask this is. If you know will you please email me so that I can give proper credit? Thank you.
DSB Flux Bright Noise
Xerox - Porcelain
“Midnight Masquerade” is a PTU tagger size scrap kit created by Krissy of Crimson Butterfly Scrapz and can be purchased at Lollipops n Gumdrops. You can visit Krissy’s blog here.
Thank you Krissy for sharing such a beautiful kit! Your talent is amazing!

This tutorial was written assuming you have a working knowledge of PSP.

~♥~ Let’s get started ~♥~

Open up the template.
Image/Canvas size
600 X 600
Delete the credit layer.
New Raster layer.
Send to bottom.
Flood fill white.
Highlight Circle 2 layer.
Select All/Float/Defloat.
New Raster layer.
Flood fill with a gradient of choice.
Deselect.
Apply DSB Flux - Bright Noise:


Keep the circle layer highlighted.
Select All/Float/Defloat
Copy and paste your tube as a new layer over the circle.
Selections/Invert
Tap the delete key.
Deselect.
Apply Xerox - Porcelain:

Delete the template layer.

Highlight Square 1.
Select All/Float/Defloat
New Raster layer.
Flood fill with the same gradient accent click on “Invert” in the gradient box.
Copy and paste another tube as a new layer above the box.
Resize as needed.
Selections/Invert
Tap the delete key.
Deselect.
Apply Xerox - Porcelain with the same settings as before.
Delete the template layer.

Repeat the above step with Square 2 and Square 3 layers.

Add your embellishments. I used:
Goth Doodle: Use your Eraser tool and erase the center of it.
Flower 1: Use your Target Tool and colorize to match your tubes. Resize 40%. Duplicate and resize 80%.
Feather 1: Resize 50%. Duplicate/Mirror
Feather 2: Resize 40%. Duplicate/Mirror
Cross: Resize 25%. Free rotate left 25 degrees
Key: Resize 35% Free rotate left 10 degrees. Dulplicate/Mirror/Resize 80%.

Highlight your white background.
New Raster layer.
Select All.
Copy and paste a paper of choice Into Selection.
Deselect
(Or you can flood fill with a color of choice)
Apply the mask.
Merge Group.

Add your copyrights.

Add your name.
Give it a slight inner bevel:


I hope you enjoyed this tutorial.
I’d love to see your results.
Email me!
Hugs,
Bev
Monday, January 4, 2010

Bliss

Clicking on the image will enlarge to full view.

Supplies
1 tube of choice - I used the fabulous artwork of Zindy S.D. Nielsen here
Font of choice - I used Annabelle here.
Monti Circular mask here
“From This Moment” is a PTU tagger size scrap kit created by Jay of Bello Scarto and can be purchased at Twilight Scraps. You can visit her blog here.
Thank you so much Jay for this elegantly beautiful kit!
This tutorial was written assuming you have a working knowledge of PSP.

~♥~ Let’s get started ~♥~

Open up a 700 X 700 blank canvas.
Flood fill white.

Copy and Paste Element 29 as a new layer.
Resize 70%
Use your Magic Wand and click inside of it.
Selections/Modify/Expand by 6
New Raster layer below the frame.
Copy and paste a paper of choice Into Selection.
DO NOT DESELECT.

Copy and paste your tube as a new layer below the frame.
Resize as needed.
Selections/Invert
Tap the delete key.
Selections/Modify/Feather
Number of Pixels:
43
OK
Selections/Invert
Tap the delete key until you have a nice feathered look to your tube.
Deselect.
Close out your white background and merge visible.
Free rotate left 5 degrees.
Now close the merged frame layer out.

We’re going to make the layer for the mask.
New Raster layer just above your white background.
Select All.
Copy and paste a paper of choice Into Selection.
Deselect.
Copy and paste Element 36 as a new layer.
Position near the top left of your paper.

Copy and paste Element 22 as a new layer.
Position near the bottom right of your paper.

Copy and paste Element 10 as a new layer.
Recolor to your liking.
Resize 70%
Position above the car.
(If you like, you can turn the merged layer back on and move the elements around to get them into the position you‘d like. You can see my tag for reference.)

Merge visible the car, cake, and hearts.
Lower the Opacity to 44.
Merge down so that the paper and elements are on one layer.
Apply the mask.
Merge Group.

Re-open the merged frame layer.

Add your embellishments. I used:
Element 13: Resize 80%
Element 12
Element 9: Resize 50%
Element 18: Resize 80%
Element 26: Resize 80%
Element 37: Resize 60%

Type the words
“From this Moment”
Give them a slight inner bevel:


Add your copyrights.

Add your name.
Give it the same inner bevel.
You can add some Noise to your name if you like.

Resize all layers 85%.

I hope you enjoyed this tutorial.
I’d love to see your results.
Email me!
Hugs,
Bev