

Supplies Needed
1 tube of choice – I used the wonderful artwork of Verymany which can be purchased from Pics For Design. You must have a license to use.
Font of choice – I
used Before the Rain here
Jwy Mask here
"Raspberry Roses Mini Kit" is a full size scrap kit created by Prissy of CakiePotPie Designs and can be purchased from Heartbeatz Creations. You can visit her blog here. Thank you Prissy for a really beautiful kit.
~♥~ Let’s get started ~♥~
Open up the template.
Shift + D.
Close out the original.
Delete the copyright layer.
Highlight Rectangle layer.
Click on it with your Magic Wand.
New Raster layer.
Copy and paste Paper 1 Into Selection.
Deselect.
Delete the template layer.
Highlight Rectangle Border layer.
Click on it with your Magic Wand.
New Raster layer.
Copy and paste Paper 7 Into Selection.
Deselect.
Delete the template layer.
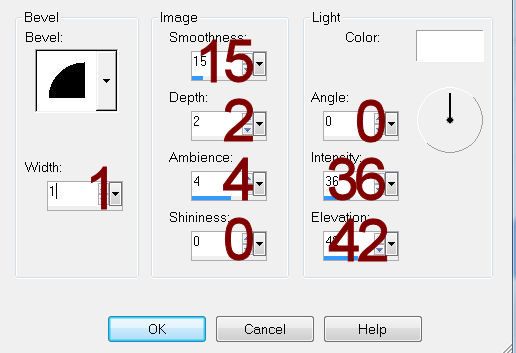
Give the paper layer a slight Inner Bevel:
Highlight Oval layer.
Click on it with your Magic Wand.
New Raster layer.
Copy and paste Paper 6 Into Selection.
Deselect.
Delete the template layer.
Color Pallet:
Foreground: #000000Background: #5b3a46
Highlight Dotted Line layer.
Make your Color Replacer Tool active.
Double right click on the dotted line.
Color Pallet:
Foreground: #404040Background: #5b3a46
Highlight Dotted Half Circle layer.
Double Right click your Color Replacer Tool on the dotted line.
Highlight Oval Border layer.
Click on it with your Magic Wand.
New Raster layer.
Copy and paste Paper 7 Into Selection.
Deselect.
Delete the template layer.
Give it the same slight Inner Bevel.
Highlight Back Circle layer.
Click on it with your Magic Wand.
New Raster layer.
Copy and paste Paper 7 Into Selection.
Deselect.
Delete the template layer.
Highlight Mid Circle layer.
Click on it with your Magic Wand.
New Raster layer.
Copy and paste Paper 2 Into Selection.
New Raster layer.
Copy and paste Clock Into Selection.
Change the Properties to Overlay.
Deselect.
Delete the template layer.
Highlight Big Heart layer.
Click on it with your Magic Wand.
New Raster layer.
Copy and paste Paper 2 Into Selection.
Copy and paste your tube as a new layer - position it over the heart paper.
Selections/Invert
Tap the delete key.
Deselect.
Delete the template layer.
Change the Properties of the tube layer to Overlay.
Highlight Big Heart Line.
Click on it with your Magic Wand.
Highlight the tube layer.
Right click on it in your layers pallet - choose Promote Section to Layer.
Move the Promoted Selection layer above the Big Heart Line template layer in your layers pallet.
Change the Properties of the promoted tube layer to Luminence (Legacy) Deselect.
Highlight Big Heart Border layer.
Click on it with your Magic Wand.
New Raster layer.
Flood fill with #d9cad3
Deselect.
Apply DSB Flux - Bright Noise:
Intensity: 42
Mix checked
OK
Delete the template layer.
Highlight Bottom Heart layer.
Click on it with your Magic Wand.
New Raster layer.
Copy and paste Paper 2 Into Selection.
Deselect.
Delete the template layer.
Give it a slight Inner Bevel:

Do Not give the heart a drop shadow yet.
Repeat the above step with Top Heart layer and Mid Heart layer.
Merge Visible all 3 hearts.
Copy and paste your tube as a new layer.
Change the Properties to Overlay.
Position the tube over the hearts.
Highlight the merged hearts layer.
Click anywhere outside of them with your Magic Wand.
Highlight the tube layer.
Tap the delete key.
Deselect.
Copy and paste Frame as a new layer.
Resize 5% and 10%
Copy and paste Button as a new layer over the frame.
Resize 5% and 40%
Center the button over the frame.
Merge Down.
Duplicate 3x's and move them into position - see my tag for reference.
Copy and paste your tube as a new layer.
Position it slightly to the right side of the clock - see my tag for reference.
Add your elements. I used:
Banner: Resize 15%/Duplicate/Flip
Ric Rac: Resize 10%/Free rotate Left 90 degrees/Duplicate/Erase what overhangs the oval frame.
Leaves: Resize 10%/Duplicate/Mirror
Banner: Resize 15%/Duplicate/Flip
Ric Rac: Resize 10%/Free rotate Left 90 degrees/Duplicate/Erase what overhangs the oval frame.
Leaves: Resize 10%/Duplicate/Mirror
Open the mask up.
Click on the Rotate Left icon:

Click on the Rotate Left icon:

Make your working canvas active.
Highlight the background layer.
Select All.
New Raster layer.
Copy and paste Paper 4 Into Selection.
Apply the mask.
Resize 110%
Tap the letter K on your keyboard to activate the Pick Tool and pull the top up and bottom down.
Merge Group.
Add your copyright.
Add your name:
Foreground and Background: #160f0d
Stroke: .25
Type your name.
Tap the letter K on your keyboard to activate the Pick Tool and slant your name slightly.
Convert to Raster layer.
Resize all layers 80%.
I’d love to see your results.
Email me!
Hugs,
Bev
