Saturday, July 3, 2010

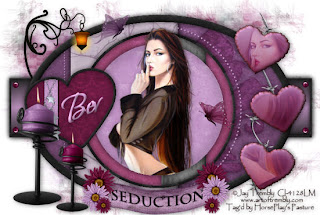
Dark Seduction


Clicking on the image will enlarge to full view.

Supplies
1 tube of choice - I used the wonderful artwork of Jay Trembly at CILM
Font of Choice - I used Bonheur Royale here
Weescotlass Mask 297 here
Scrapity Scrap and More here.
Xenofex 2: Burnt Edges
“Temptation” is a PTU tagger size scrap kit created by Jane of JT’s Designs and can be purchased at Sunflower Scraps Boutique. You can visit her blog here.
Thank you Jane for yet another beautiful kit!

This tutorial was written assuming you have a working knowledge of PSP.

~♥~ Let’s get started ~♥~

Open up the template.
Shift + D.
Close out the original.
Delete the credit layer.

Highlight Rectangle layer.
Click on it with your Magic Wand.
New Raster layer.
Flood fill with a gradient of choice.
Deselect.
Delete the template layer.

Highlight Rectangle Border layer.
Select All/Float/Defloat
New Raster layer.
Copy and paste a black paper of choice Into Selection.
Deselect.
Delete the template layer.
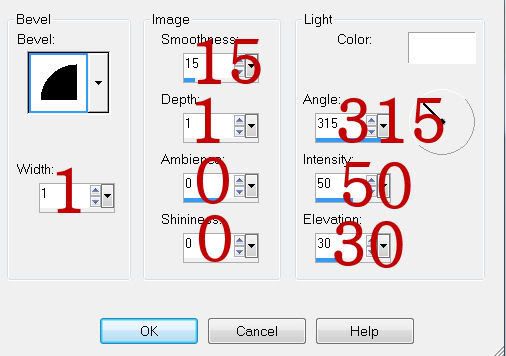
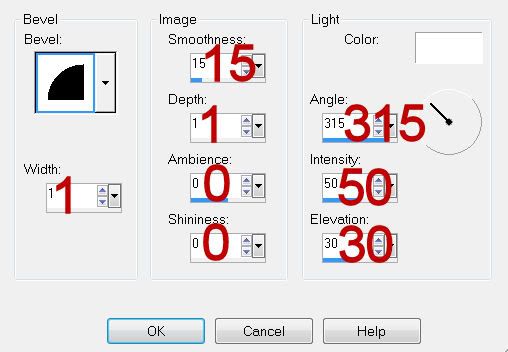
Give it a slight Inner Bevel:
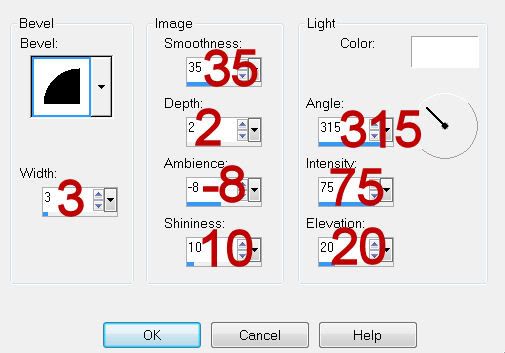

Highlight Oval Border layer.
Repeat the above step using the same paper.

Highlight Circle Border layer.
Repeat the above step using the same paper.

Highlight Big Heart Border layer.
Repeat the above step using the same paper.

Highlight Oval layer.
Click on it with your Magic Wand.
New Raster layer.
Copy and paste a paper of choice Into Selection.
Copy and paste Shape 1 as a new layer.
Position it on the right side of the oval.
Selections/Invert
Tap the delete key.
Deselect.
Change the Properties to Soft Light.
Lower the Opacity to about 71.
Merge Down.
Give it a slight Inner Bevel.
Delete the template layer.

Highlight Dotted Line layer.
Select All/Float/Defloat
New Raster layer.
Copy and paste a paper of choice Into Selection.
Deselect.
Delete the template layer.

Highlight Dotted Half Circle layer.
Repeat the above step.

Highlight Oval Block layer.
Click on it with your Magic Wand.
Copy and paste a paper of choice Into Selection.
Copy and paste Dead Tree as a new layer.
Resize 70%
Position over the oval block.
Selections/Invert
Tap the delete key.
Deselect.
Change the Properties to Soft Light.
Delete the template layer.

Highlight Back Circle layer.
Click on it with your Magic Wand.
New Raster layer.
Copy and paste a paper of choice Into Selection.
Deselect.
Delete the template layer.

Highlight Circle Block layer.
Click on it with your Magic Wand.
New Raster layer.
Copy and paste a paper of choice Into Selection.
Deselect.
Delete the template layer.

Highlight Mid Circle layer.
Click on it with your Magic Wand.
New Raster layer.
Copy and paste a paper of choice Into Selection.
Copy and paste your tube as a new layer.
Selections/Invert
Tap the delete key.
Deselect.
Delete the template layer.

Highlight Big Heart layer.
Click on it with your Magic Wand.
New Raster layer.
Copy and paste a paper of choice Into Selection.
Deselect.
Delete the template layer.

Highlight Big Heart Line layer.
Repeat the above step using a different paper.

Highlight Mid Heart layer.
Merge Down.
Merge Down again.
You should have all 3 heart templates on one layer.
Select All/Float/Defloat
Copy and paste a paper of choice Into Selection.
Deselect.
Apply Xenofex 2: Burnt Edges
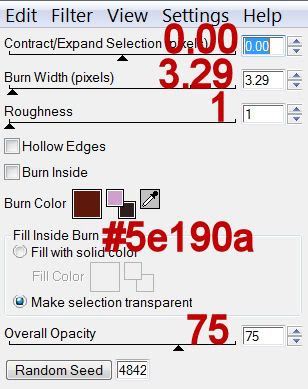

Select All/FloatDefloat
Copy and paste your tube again and position over the hearts.
Selections/Invert
Tap the delete key.
Selections/Modify/Feather
Number of Pixels:
23
OK
Tap the delete key a couple of times.
Deselect.
Delete the template layer.

Add your embellishments. I used:
Stars 1: Resize 30%
Lamp: Resize 70%
Barbed Wire: Resize 70% Free rotate right 45 degrees
Tag 4: Resize 60%
Flower 1: Resize 25% and 60%Flower 1 again: Resize 25% and 30%
Flower 2: Resize 25% and 50%
Brad 2: Resize 25% and 25%
Candle 1: Resize 60%
Candle 2: Resize 40%
Butterflies 4 & 5: Resize 25%
 
 Highlight your white background.
New Raster layer.
Select All.
Copy and paste a paper of choice Into Selection.
Deselect.
Apply the mask.
Resize 110%
Merge Group.

Add your credits.

Add your name.
Give it the same Inner Bevel.
Free rotate right 15 degrees.

Resize all layers 85%.

I hope you enjoyed this tutorial.
I’d love to see your results and show it off in my gallery.
Email me!
Hugs,
Bev

An Image of Beauty

Clicking on the image will enlarge to full view.

Supplies
1 tube of choice - I’m using the beautiful artwork of Jennifer Janesko at CILM
Font of Choice - I used Aquarelle here
Weescotlass Mask 138 here
Xerox - Porcelain
“Aurora” is a PTU tagger size scrap kit created by Melissa of WDDesignz and can be purchased at I Got Lucky Skraps. You can visit her blog here.
Thank you Melissa for a stunningly beautiful kit!

This tutorial was written assuming you have a working knowledge of PSP.

~♥~ Let’s get started ~♥~

Open up a 700 X 700 blank canvas.
Flood fill white.

Copy and paste Element 94 as a new layer.
Free rotate left 90 degrees
Resize 60%
Click inside of it with your Magic Wand.
Selections/Modify/Expand by 6.
New Raster layer below the frame.
Copy and paste a paper of choice Into Selection.
Deselect.

Close out your white canvas.
Merge Visible.
Reopen your white canvas.

Copy and paste Element 10 as a new layer.
Resize 40%
Duplicate
Paste the element again.
Resize 40% and 80%
Move all 3 circle into position - see my tag for reference.
Once you have them in the exact position you want - click inside the smaller circle with your Magic Wand.
Selections/Modify/Expand by 3.
In your layers pallet highlight the top frame.
Use your Eraser Tool and erase the part of the frame that you can see in the smaller circle.
In your layers pallet highlight the bottom frame.
Use your Eraser tool and erase the part of the frame that you can see in the smaller circle.
Deselect.

Copy and paste your tube as a new layer and position it in front of the square frame.
Duplicate/Mirror
In your layers pallet move the duplicated layer just below the merged circle frames layer.
Highlight the circle frames layer.
Click inside each one with your Magic Wand.
Selections/Modify/Expand by 3.
Highlight the tube layer that’s just below the circle frames.
Tap the delete key.
Deselect.
Change the Properties to Luminance Legacy.
Apply Xerox - Porcelain:
Default Settings.

Add your embellishments. I used:
Element 67: Resize 60%
Element 82: Resize 50% - position it over Ele 67/Merge Down/Resize/90%
Element 66: Resize 40%
Element 83: Resize 40% - position over center of Ele 66/Merge Down/Resize 90%
Elements 115 & 117: Resize
Element 71: Resize 25% and 80% Free rotate left 10%/Duplicate/Mirror
Element 91 & 92
Element 55

Highlight your white background.
New Raster layer.
Select All.
Copy and paste a paper of choice Into Selection.
Deselect.
Apply the mask.
Resize 110%
Merge Group.

Add your copyrights.

Add your name.
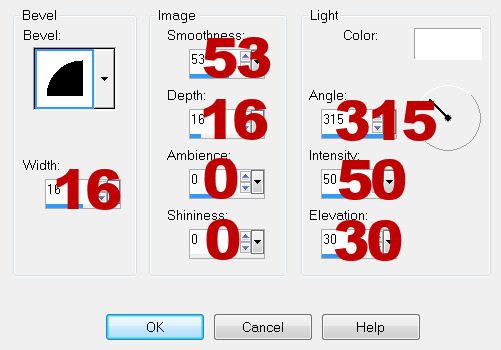
Give it a slight Inner Bevel:


Copy and paste Element 97 as a new layer to decorate your name.

Crop your Image.

Resizes all layers 85%.

I hope you enjoyed this tutorial.
I’d love to see your results and show it off in my Show Arena.
Email me!
Hugs,
Bev

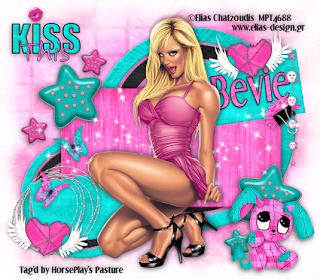
Kiss This


Clicking on the image will enlarge to full view.

Supplies
1 tube of choice - I used the wonderful artwork of Elias Chatzoudis here
Font of choice - I used Dream Orphan here
Gem’s Mask 166 here
Designs by Ali Template 187 here
“Yeah….Kiss This” is a PTU scrap kit created by Nikki of Creative Intentionz and can be purchased at her store Twilight Scraps. You can visit her blog here.
Thank you Nikki for such a fabulous kit! I always have the best time with yours.

This tutorial was written assuming you have a working knowledge of PSP.

~♥~ Let’s get started ~♥~

Open up the template.
Shift + D.
Close out the original.
Flood fill Raster 1 white.

Highlight Raster 2 layer.
Click on it with your Magic Wand.
New Raster layer.
Copy and paste a Teal colored paper of choice Into Selection.
Deselect.
Delete the template layer.
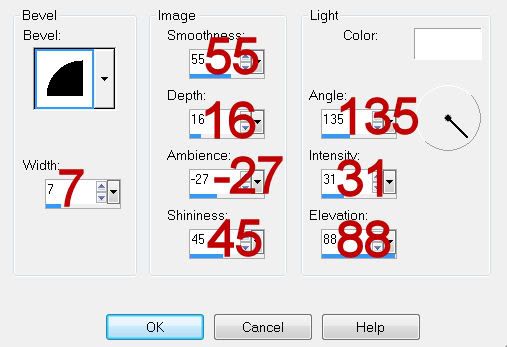
Give it an inner bevel:


Highlight Copy of Raster 2 layer.
Repeat the above step using the same paper.

Highlight Raster 3 layer.
Click on it with your Magic Wand.
New Raster layer.
Copy and paste a black colored paper of choice Into Selection.
Deselect.
Delete the template layer.
Give it the same Inner Bevel.

Highlight Copy of Raster 3 layer.
Repeat the above step using the same paper.

Highlight Raster 4 layer.
Click on it with your Magic Wand.
New Raster layer.
Copy and paste a Pink colored paper of choice Into Selection.
Deselect.
Delete the template layer.
Give it the same Inner bevel.

Highlight Raster 5 layer.
Click on it with your Magic Wand.
New Raster layer.
Copy and paste a different Teal colored paper than you’ve already used Into Selection.
Deselect.
Delete the template layer.
Give it the same Inner Bevel.

Highlight Copy of Raster 5 layer.
Repeat the above step using the same paper.

Copy and paste your tube as a new layer.

Copy and paste Brad 3 as a new layer.
Resize 60%/Duplicate
Move into position over Raster 6 and Copy of Raster 6 template layers.
Delete both template layers.

Paste Brad 3 again.
Resize 25%
Move into position over Raster 9 layer.
Delete that template layer.

Copy and paste Brad 2 as a new layer.
Resize 25%/Duplicate
Move into position over Raster layers 7 and 8.
Delete both template layers.

Paste Brad 2 again.
Resize 25% and 70%
Move into position over Raster 10 layer.
Delete that template layer.

Copy and paste Barbed Wire Heart 1 as a new layer.
Resize 50%
Free rotate left 10 degrees.
Move into position over Raster 11.
Delete that template layer.
Duplicate the heart/Mirror
Move into position over Copy of Raster 11 layer.
Delete the template layer.

Add your embellishments. I used:
Beaded Chrome: Resize 40%/Mirror
Chain 1: Resize 50%
Butterfly 1 & 2: Resize 30%
Binder Clip 1: Resize 30% Free rotate right 140 degrees
Sparkles
Word Art 1: Resize 40%

Highlight your white canvas.
New Raster layer.
Select All.
Copy and paste a paper of choice Into Selection.
Deselect.
Apply the mask.
Merge Group.

Add your copyrights.

Add your name.
Free rotate left 8 degrees
Give it the same Inner Bevel.

Resize all layers 80%.

I hope you enjoyed this tutorial.
I’d love to see your results and show it off in my gallery.
Email me!
Hugs,
Bev
Friday, July 2, 2010

Moonlight Dreams

Clicking on the image will enlarge to full view.

Supplies
1 tube of choice - I’m using the beautiful artwork of Jennifer Janesko at CILM
Font of Choice - I used Aquarelle here
Weescotlass Mask 249 here
“Moonlight Dreams” is a PTU tagger size scrap kit created by Deb of Deb’s Designs and can be purchased at Butterfly Blush Designs. You can visit her blog here.
Thank you Deb for such a romantically beautiful kit!

This tutorial was written assuming you have a working knowledge of PSP.

~♥~ Let’s get started ~♥~

Open up a 700 X 700 blank canvas.
Flood fill white.

Copy and paste Single Frame as a new layer.
Resize 80%
Click inside of it with your Magic Wand.
Selections/Modify/Expand by 6.
New Raster layer below the frame.
Copy and paste a paper of choice Into Selection.
Deselect.

Close out your white canvas.
Merge Visible.
Reopen your white canvas.

Copy and paste your tube as a new layer.

Add your embellishments. I used:
Ribbon 4: Resize 80%
Dream catcher: Resize 40%
Ribbon Star 1: Resize 80%
Ribbon Star 2: Free rotate right 25 degrees
Flower Doodle 1: Resize 80%

Highlight your white background.
New Raster layer.
Select All.
Copy and paste a paper of choice Into Selection.
Deselect.
Apply the mask.
Resize 110%
Merge Group.

Add your copyrights.

Add your name.

Crop your Image.

Resizes all layers 80%.

I hope you enjoyed this tutorial.
I’d love to see your results and show it off in my gallery.
Email me!
Hugs,
Bev
Thursday, July 1, 2010

Sweet As Candy

Clicking on the image will enlarge to full view.
I'm sorry this tutorial is no longer available
due to the designer's pc crashing.

Hugs,
Bev

Believe

Clicking on the image will enlarge to full view.

Supplies
1 tube and 1 Image of choice - I used the wonderful artwork of Rachael Tallamy at Up Your Art
Font of Choice - I used Angelo DB here
Gem Mask 164 here
Divine Intentionz Template 323 here
“Believe” is a FTU scrap kit created by Karla Scrapz and can be downloaded from here. Please leave a thank you when downloading as it’s a small gesture for hard work given freely.

This tutorial was written assuming you have a working knowledge of PSP.

~♥~ Let’s get started ~♥~

Open up the template.
Shift + D
Close out the original.
Image/Canvas Size
700 X 600
OK
Open up the background layer and flood fill white.
Delete the following layers:
Raster 1, Heart 4, Heart 3, I will steal your mans heart, Heart 2, Heart 1, and Rectangle 5.

Highlight Circle 1 layer.
Use your Magic Wand and click on it.
New Raster layer.
Copy and paste a paper of choice Into Selection.
Deselect.
Delete the template layer.

Highlight Rectangle 1 layer.
Repeat the above step using the same paper.

Highlight Rectangle 1 layer.
Repeat the above step accept use a different paper.

Highlight Rectangle 3 layer.
Repeat the above step using a different paper.

Highlight Rectangle 4 layer.
Repeat the above step using the same paper.

Highlight Circle 2 layer.
Use your Magic Wand and click on it.
New Raster layer.
Copy and paste your Image Into Selection.
Deselect.
Delete the template layer.

Copy and paste your tube as a new layer.
Move into position.

Copy and paste Believe 16 as a new layer.
Resize 25%, 25%, and 80%
Free rotate left 20 degrees.
Position it over Med Heart 2 layer.
Delete the template layer.

If you want to cover Med Heart 1 layer then duplicate your heart element and move into position.
Delete Med Heart 1 template layer.

Copy and paste Believe 6 as a new layer.
Resize 25% and 25%
In your layers pallete move it just below the circle and position it over the left side of the smaller rectangle - see my tag for reference.
Duplicate/Mirror

Add your embellishments. I used:
Believe 26 & 28: Resize 25% and 35%
Believe 29: Resize 25% and 50%
Believe 11: Resize 25%
Believe 9: Resize 25% and 45%
 
Highlight your white background.
New Raster layer.
Select All.
Copy and paste a paper of choice Into Selection.
Deselect.
Apply the mask.
Resize 110%
Merge Group.

Add your copyrights.

Add your name and give it an inner bevel:


Resize all layers 80%.

I hope you enjoyed this tutorial.
I’d love to see your results and show it off in my gallery.
Email me!
Hugs,
Bev
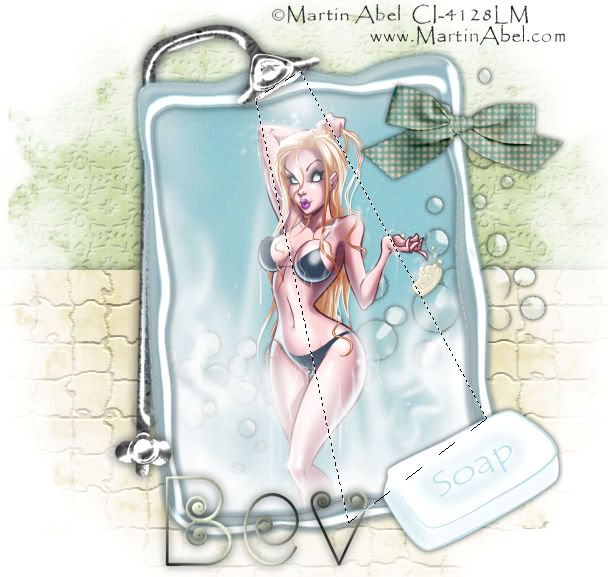
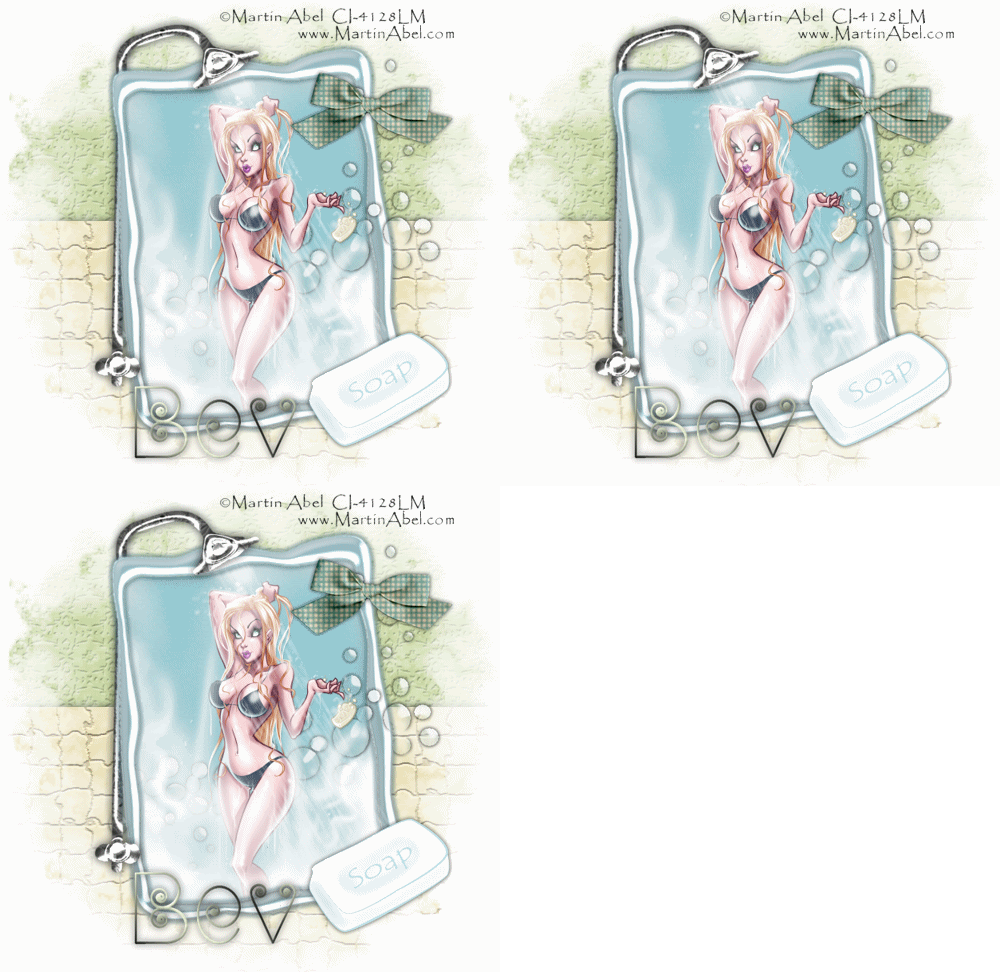
Aaaaahhhh.......


Supplies
1 tube of choice - I used the wonderful artwork of Martin Able here
Font of choice - I used Mayuge here
Gem’s Mask 21 here
“Bath Time Babies Collection” is a FTU scrap kit created by 3Dielle Spazio and can be downloaded from here.
Van Der Lee - Snowflakes - optional
Animation Shop - optional
Please leave a thank you when downloading as it‘s a small gesture for hard work given freely.

This tutorial was written assuming you have a working knowledge of PSP.

~♥~ Let’s get started ~♥~

Open up a 700 X 700 blank canvas.
Flood fill white.

Copy and paste Frame 1 as a new layer.
Resize 70%
Free rotate left 5 degrees
Use your Magic Wand and click inside of it.
Selections/Modify/Expand by 8.
New Raster layer below the frame.
Copy and paste a paper of choice Into Selection.
DO NOT DESELECT.

Copy and paste your tube below the frame.
Selections/Invert
Tap the delete key.
Deselect.

Add your embellishments. I used:
Bubbles 1: Mirror/Resize 70%
Shower Head: Resize 70%
Bow Blue: Resize 40%
Soap Blue: Resize 40%

Highlight your white canvas.
New Raster layer.
Select All.
Copy and paste a paper of choice Into Selection.
Deselect.
Copy and paste Tile Cream as a new layer.
Position so that the top of the tile is about half way up your canvas.
Merge Visible the paper and tile.
Apply the Mask.
Merge Group.

Add your copyrights.

Add your name.

Resize all layers 80%.

If you don’t want to animate then save.

***Onto the Animation***

Using your Freehand Selection Tool section out an area where you want the shower water to go.


Highlight your bar of soup.
You want to create 4 new Raster layers below the bar of soap.
Rename them Shower 1, Shower 2, Shower 3, and Shower 4.

Highlight Shower 1 layer.
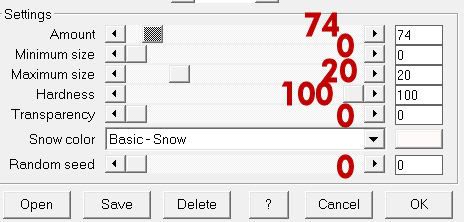
Apply Van Der Lee Snowflakes:


Highlight Shower 2 layer.
Repeat the above step accept slide the Random Seed button a bit.

Repeat the above step with Shower layers 3 & 4.

Highlight Shower 1 layer.
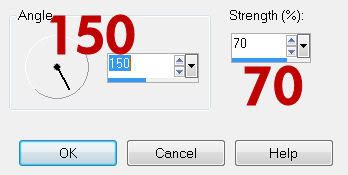
Adjust/Blur/Motion Blur


Repeat the above step with Shower 2, Shower 3, and Shower 4 layers.
Deselect.

Close out Shower 2, 3, and 4 layers.
Copy Merge.

Open up Animation Shop.
Edit/Paste as New Animation.

Back in PSP.
Close out Shower 1 layer.
Open up Shower 2 layer.
Copy Merge

Carry into AS.
Edit/Paste after Current Frame.

Back into PSP.
Close out Shower 2 layer.
Open up Shower 3 layer.
Copy Merge

Carry into AS.
Edit/Paste after Current Frame.

Back into PSP.
Close out Shower 3 layer.
Open up Shower 4 layer.
Copy Merge

Carry into AS.
Edit/Paste after Current Frame.

View your animation.
If you’re happy then save.

I hope you enjoyed this tutorial.
I’d love to see your results and show it off in my gallery.
Email me!
Hugs,
Bev


Very Girly

Clicking on the image will enlarge to full view.

Supplies
1 tube of choice - I used the wonderful artwork of Jo Lynch at CILM
Font of Choice - I Celexa here
Gem’s Mask 56 here
My Template 99 here
“Very Girly” is a FTU scrap kit created by 3Dielle and can be downloaded from here.
Please leave a thank you when downloading as it’s a small gesture for hard work given freely.

This tutorial was written assuming you have a working knowledge of PSP.

~♥~ Let’s get started ~♥~

Open up the template.
Shift + D.
Close out the original.
Delete the credit layer.

Highlight Small Rectangle 2 layer.
Merge Down.
Both small rectangles should be on one layer now.
Use your Magic Wand and click on both of them.
New Raster layer.
Copy and paste a paper of choice Into Selection.
Deselect.
Delete the template layer.
Give it an inner bevel:


Highlight Large Rectangle layer.
Click on it with your Magic Wand.
New Raster layer.
Copy and paste a paper of choice Into Selection.
Deselect.
Delete the template layer.
Give it the same inner bevel.
 
Highlight Strips layer.
Repeat the above step using a different paper.

Highlight Dotted Lines layer.
Select All/Float/Defloat
New Raster layer.
Copy and paste a paper of choice Into Selection.
Deselect.
Delete the template layer.

Copy and paste a Jewel of your choice.
Resize 25% and 30%
Adjust/Sharpness/Sharpen
Free rotate left 45 degrees
Adjust/Sharpness/Sharpen
Move it to cover the top heart on the left side of the Hearts Template layer.
Duplicate the original jewel 4 times and move them to cover each of the hearts on that same side.

Merge Visible all jewel layers.
Duplicate/Mirror
Move them into position to cover the hearts on the right side.
Delete the Hearts template layer.

Copy and paste your tube as a new layer.

Highlight your white background.
New Raster layer.
Select All.
Copy and paste a paper of choice Into Selection.
Deselect.
Apply the mask.
Resize 110%
Merge Group.
Free rotate 90 degrees
Use your Pick Tool and pull the top and bottom out slightly.

Add your copyrights.

Add your name.
Give it the same inner bevel.

Resize all layers 90%.

I hope you enjoyed this tutorial.
I’d love to see your results and show it off in my gallery.
Email me!
Hugs,
Bev

Sunflower Kisses

Clicking on the image will enlarge to full view.

Supplies
1 or 2 tubes of choice - I’m using the wonderful artwork of Cris de Lara which can purchased at MPT
Font of Choice - I’m Daly Hand
Gem’s Mask 161 here
“Sunflower Kisses” is a FTU scrap kit created by Tootypup Scraps and can be downloaded here.
Please leave a thank you when downloading as it‘s a small gesture for hard work given freely.

This tutorial was written assuming you have a working knowledge of PSP.

~♥~ Let’s get started ~♥~

Open up a 700 X 700 blank canvas.
Flood fill white.

Copy and paste Frame 6 as a new layer.
Resize 75%
Using your Selection Tool, outline the frame that’s inside the upper frame:


Tap the delete key.

Use your Magic Wand and click inside both of the frames.
Selections/Modify/Expand by 6.
New Raster layer below the frame.
Copy and paste a paper of choice Into Selection.
Deselect.

Copy and paste Bar 2 as a new layer.
Resize 50%
Using your Selection Tool, section out 4 beads on the end.
Tap the delete key.
Deselect.

Position the bar at the bottom of the top frame.
Duplicate/move to the top of the frame.
Duplicate/Free rotate 90 degrees
Position at the right side of the frame.
Duplicate/Move to the left side of the frame.
Merge Visible all 4 bar layers.

Duplicate the merged bar layer.
Move it into position over the bottom frame.
Using either your Eraser or Selection Tool - whichever is easier for you…
Section out the portion of the bar that overlaps the top frame.
Tap the delete key.
Deselect.
Merge Visible the frame and bar layers.

Copy and paste Picket Fence 2 as a new layer.
Resize 50%
Move into position inside the top frame.
Duplicate
Move below the lower frame - position it so that the end of the fence is in the middle of the frame.
Duplicate/Mirror
Overlap the ends up in the center of the frame.
Merge down.

Highlight the frame.
Click inside with your Magic Wand.
Selection/Modify/Expand by 6.
Selection/Invert
Highlight the merged picket fence layer.
Tap the delete key.
Deselect.

Copy and paste Grass 2 as a new layer below the frame.
Position it inside the top frame.
Duplicate
Position it inside the bottom frame.

Copy and paste your tube(s) as new layers.
Position them within the frames.

Copy and paste Leaf 1 as a new layer.
Move into position.
See my tag for reference.
Duplicate/Move behind the frames and let it peek out at the top of the bottom frame.

Copy and paste Petals 1 as a new layer.
Position where you like.

Highlight your white background.
New Raster layer.
Select All.
Copy and paste a paper of choice Into Selection.
Deselect.
Apply the mask.
Merge Group.

Add your copyrights.

Add your name.

Resize all layers 80%.

I hope you enjoyed this tutorial.
I’d love to see your results and show it off in my gallery.
Email me!
Hugs,
Bev

Secrets

Clicking on the image will enlarge to full view.

Supplies
1 tube of choice - I’m using the wonderful artwork of Keith Garvey at MPT
Font of Choice - I used Bonheur Royale
Gem’s Mask 114 here
My Template 84 here
“A Care Bear for You” is a PTU tagger size scrap kit created by Susan of TootyPup Scraps and can be purchased at Aussie Scrap Designs. You can visit her blog here.
Thank you Susan for an awesome kit!

This tutorial was written assuming you have a working knowledge of PSP.

~♥~ Let’s get started ~♥~

Open up my template.
Shift + D.
Close out the original.
Delete the credit layer.

Highlight Large Rectangle layer.
Click on it with your Magic Wand.
New Raster layer.
Copy and paste a paper of choice Into Selection.
Deselect.
Delete the template layer.

Highlight Small Rectangle layer.
Repeat the above step using a different paper.

Highlight Rec Dotted Lines layer.
Select All/Float/Defloat
New Raster layer.
Copy and paste a contrasting colored paper of your choice Into Selection.
Deselect.
Delete the template layer.

Highlight Split Circle layer.
Use your Magic Wand and click on both the top and bottom portions of the circle.
New Raster layer.
Copy and paste a paper of choice Into Selection.
Deselect.
Close out this template layer for now.

Copy and paste your tube as a new layer.
Position in front of the circle.
Duplicate/Resize 120%
Move the duplicate layer just above the paper layer in your layers pallet.
Move it into position - see my tag for reference.
Highlight the template layer - you don’t have to open it up.
Click on both portions with your Magic Wand.
Highlight the duplicate tube layer and tap the delete key.
Deselect.
Delete the template layer.
Change the Properties to Luminance.
Lower the Opacity to about 42.

Highlight Split Circle Dotted Lines layer.
Select All/Float/Defloat
New Raster layer.
Copy and paste a contrasting colored paper of choice Into Selection.
Deselect.
Delete the template layer.

Add your embellishments. I used:
Rose 1: Resize 45% Duplicate/Resize 80%/Mirror
Heart Deco 2: Resize 40%
String Bow 4: Resize 60% - Use your Pick Tool to pull the sides in flush with the circle’s edge
Spring time Deco 1: Resize 40%
Butterfly 1: Resize 25% and 60%

Highlight your white background.
New Raster layer.
Select All.
Copy and paste a paper of choice Into Selection.
Deselect.
Apply the mask.
Merge Group.

Add your copyrights.

To add your Name:
In your color pallet:
Foreground: Black
Background: Null
Make your Ellipse Tool active
Width: 2
Draw out a circle just a bit bigger than the round circle on your canvas.
TIP: You can always draw the circle quite a big larger.
Object/Align/Center in Canvas
Then resize your circle from there to get it the size you want.
Change the colors in your color pallet to the colors your want your name.
Choose an area of the circle where you want your name to go and move your mouse along the circle line until you see a rocking A.
Click your Mouse.
A Text box will open.
Type your name in it.
OK
In your layers pallet click on the + sign beside your name.
Close out the New Ellipse layer.
Highlight the Vector 1 layer.
Right Click and choose from the menu “Convert to Raster layer“.
 
Resizes all layers 80%.

I hope you enjoyed this tutorial.
I’d love to see your results and show it off in my gallery.
Email me!
Hugs,
Bev
Tuesday, June 29, 2010

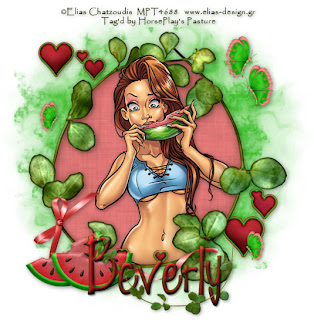
Watermelon


Clicking on the image will enlarge to full view.

Supplies
1 tube of choice - I used the wonderful artwork of Elias Chatzoudis at MPT
Font of Choice - I used Fabulous 50s here
Gem Mask 21 here
“Watermelon” is a PTU tagger size scrap kit created by Rene of Rebel Dezigns and can be purchased at Heartbeatz Creationz. You can visit her site here.
Thank you Rene for such a festive summer kit!

This tutorial was written assuming you have a working knowledge of PSP.

~♥~ Let’s get started ~♥~

Open up a 700 X 700 blank canvas.
Flood fill white.

Copy and paste 55 from the Frames folder.
Use your Magic Wand and click inside of it.
Selections/Modify/Expand by 3.
New Raster layer below the frame.
Copy and paste a paper of choice Into Selection.
Copy and paste your tube as a new layer above the paper.
Selections/Invert
Tap the delete key.
Deselect.

Add your embellishments. I used:
21: Resize 60%
7: Resize 50% - Position behind the upper left area of the frame. Erase the end heart.
7 again: Resize 60% Mirror/Position behind the bottom right area of the frame.
33: Resize 25% and 60% Duplicate as many times as you like.
Duplicate the already-resized butterfly and resize 70% - Duplicate as many times as you like.
6: Resize 30% Duplicate/Free rotate left 25 degrees
51: Resize 50%

Highlight your white background.
New Raster layer.
Select All.
Copy and paste a paper of choice Into Selection.
Deselect.
Apply the mask.
Merge Group.

Add your credits.

Add your name.
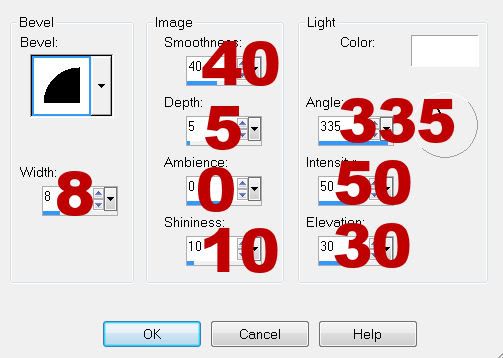
Give it a slight Inner Bevel:


Repeat the inner bevel if you’d like the color lighter on your name.

Resize all layers 80%.

I hope you enjoyed this tutorial.
I’d love to see your results and show it off in my gallery.
Email me!
Hugs,
Bev
Sunday, June 27, 2010

Surprise!

Clicking on the image will enlarge to full view.

Supplies
1 tube of choice - I used the wonderful artwork of Dean Yeagle at CILM
Font of Choice - I used Rebel Caps here
Weescotlass Mask 249 here
My Template 90 here
“Summer Sprite” is a PTU tagger size scrap kit created by Jane of JT’s Designs and can be purchased at Lollipops n Gumdrops. You can visit her blog here.
Thank you Jane for yet another beautiful kit. Your talent is amazing!

This tutorial was written assuming you have a working knowledge of PSP.

~♥~ Let’s get started ~♥~

Open up the template.
Shift + D.
Close out the original.
Delete the credit layer.
Image/Canvas Size
700 X 600
OK
Flood fill the background layer white.

Highlight Rectangle 1 layer.
Click on it with your Magic Wand.
New Raster layer.
Copy and paste Paper 1 Into Selection.
Deselect.
Delete the template layer.

Highlight Rectangle 2 layer.
Click on it with your Magic Wand.
New Raster layer.
Flood will with a gradient of choice.
(I used two colors from one of the butterflies)
Deselect.
Delete the template layer.

Highlight Stitching layer.
Select All/Float/Defloat
New Raster layer.
Flood fill with a slightly darker color than what you’re using.
Deselect.
Delete the template layer.

Copy and paste Frame 4 as a new layer.
Rename the layer Frame 1
Resize 50%
Move into position over Circle 3 layer.
Delete the following template layers:
Circle 3 and Circle 3 back.

Paste Frame 4 again.
Rename the layer Frame 2
Resize 40%
Move into position over Circle 1 layer.
Delete the following template layers:
Circle 1 and Circle 1 back.

Paste Frame 4 again.
Rename the layer Frame 3.
Resize 35%
Move into position over Circle 2 layer.
Delete the following template layers:
Circle 2 and Circle 2 back.

Highlight Frame 1 layer.
Click inside with your Magic Wand.
Selections/Modify/Expand by 6.
New Raster layer below the frame.
Flood fill with a gradient of choice changing one of the colors in the last gradient you used. I made my new gradient using the light shade of blue and an off white.
Deselect.

Repeat the above step with Frames 2 and 3.
Copy and paste your tube as a new layer.
Move it into exact position in front of all the frames.
Duplicate.
Move the duplicate below Frame 1.
Resize 120% and move slightly to the right.
Change the Properties to Soft Light.
Duplicate twice. Close the duplicate layers out.
Highlight Frame 1 layer.
Click inside with your Magic Wand.
Selections/Modify/Expand by 6.
Selections/Invert
Highlight the tube layer.
Tap the delete key.
Deselect.

Open up one of the other duplicated layers.
Move it just below Frame 2 in your layers pallet.
Highlight Frame 2 and click inside of it with your Magic Wand.
Selections/Modify/Expand by 6.
Selections/Invert
Highlight the tube layer.
Tap the delete key.
Deselect.

Move the last duplicated layer just below Frame 3.
Repeat the above step.

Add your embellishments. I used:
Branch 1: Move behind all the frames.
Branch 1 again: Resize 80%
Pansies 2: Resize 35% Duplicate/Flip/Mirror
Bubble 1: Resize 70%
Butterfly 4: Resize 40%
Butterfly 5: Resize 30%
Ribbon 3 & 4: Resize 25% and 60%
Bow 8: Resize 50%

Highlight your white background.
New Raster layer.
Select All.
Copy and paste a paper of choice Into Selection.
Deselect.
Apply the mask.
Use your Pick Tool and pull the sides out slightly.
Merge Group.

Add your credits.

Add your name.
Give it a slight Inner Bevel:


Resize all layers 80%.

I hope you enjoyed this tutorial.
I’d love to see your results and show it off in my gallery.
Email me!
Hugs,
Bev