Saturday, February 27, 2010

Beauty in Darkness

Clicking on the image will enlarge to full view.

Supplies
1 tube of choice and 2 images - I’m using Dark Spirits - the artwork of KatNKDA which you can purchase here
Font of Choice - I’m using Pendulum here
Mask - included in Kat’s art kit
“Dark Spirit” is a PTU art kit created by KatNKDA. It can be downloaded from her store NK Art Shop. You can visit Kat’s blog here.
Kat, your talent is amazing…you certainly managed to put stunning beauty into darkness!

This tutorial was written assuming you have a working knowledge of PSP.

~♥~ Let’s get started ~♥~

Open up a transparent 700 X 700 canvas.
Flood Fill white.

Copy and paste Element 11 as a new layer.
Resize 30%
Duplicate.
Free rotate one of the frames right 5 degrees and move toward the top right of your canvas.
Free rotate the other frame left 10 degrees and move toward the bottom left of your canvas.

Highlight the top frame.
Click inside with your Magic Wand.
Selections/Modify/Expand by 3.
Copy and paste Bkg 3 (from the tube folder) as a new layer.
Resize 35%
Move into position below the frame and choose what part of the image you’d like in the frame.
Selections/Invert
Tap the delete key.
Deselect.
Merge visible the frame and paper.

Repeat the above step with the lower frame.

You should now have only 3 layers in your layers pallet:
Your white background and 2 merged frame layers.

Highlight the top merged frame layer.
Resize 80%.

Highlight the bottom merged frame layer.
Resize 85%

Add your embellishments. I used:
Element 39: Resize 25%
Element 15: Resize 25%
Element 16: Resize 25% and 90%

Copy and paste your tube as a new layer.
If you purchased Kat’s cat tube resize 50%.

Highlight your white background.
New Raster layer.
Select All.
Copy and paste a paper of choice Into Selection.
Deselect.
Apply Kat’s Mask 3 - be sure “Invert Data” is checked.
Use your Pick Tool and pull the sides out slightly.
Merge Group.

Add your copyrights.

Add your name.
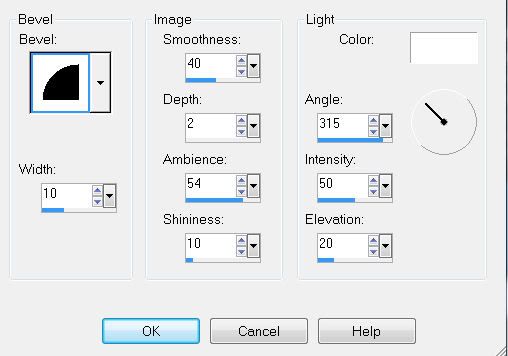
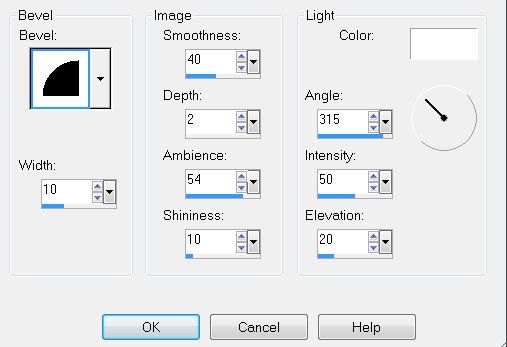
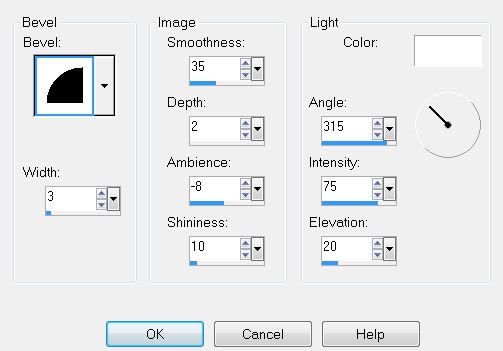
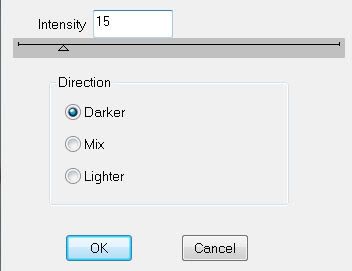
Give it a slight inner bevel:

I hope you enjoyed this tutorial.
I’d love to see your results and show it off in my gallery.
Email me!
Hugs,
Bev

Garden Secrets

Clicking on the image will enlarge to full view.

Supplies
1 tube of choice - I used to beautiful artwork of Tom Fleming here
Font of Choice - I used Future is Back here
Monti Circular Mask here
“Down at the Bottom of the Garden” is a PTU scrap kit created by Athena of Athena Designs and can be purchased at Scraps with Attitude. You can visit Athena’s blog here.
Thank you so much Athena for such a beautiful kit!

This tutorial was written assuming you have a working knowledge of PSP.

~♥~ Let’s get started ~♥~

Open up a 700 x 700 blank canvas.
Flood fill white.

Copy and paste Frame 3 as a new layer.
Click inside with your Magic Wand.
Selections/Modify/Expand by 6.
New Raster layer below the frame.
Flood fill with a gradient of choice.
Deselect.

Copy and paste your tube as a new layer.

Add your embellishments. I used:
El 38: Resize 70%
El 34: Free rotate left 40 degrees/Mirror - position behind the frame.
El 34 again: Resize 70%
El 64: Use your Selection Tool and choose different butterflies

Highlight your white background.
New Raster layer.
Select All
Copy and paste a paper of choice Into Selection.
Deselect.
Copy and paste El 17 as a new layer above the paper. Lower the Opacity to about 31
Copy and paste El 49 as a new layer above the ladder - see my tag for position.
Merge Visible the paper, ladder, and rainbow.
Apply the mask.
Merge Group.

Copy and paste El 68 as a new layer.
Move up on your canvas so that it looks like a light shining over the frame.
Move it just above your mask layer in your layers pallet.
Highlight your mask layer.
Select All/Float/Defloat
Selections/Modify/Feather
Number of Pixels:
43
OK
Selections/Invert
Highlight El 68 layer and tap your delete key until you have a nice feathered look.
Deselect.

Add your copyrights.

Add your name.
Give it an inner bevel:


Resize all layers 80%.

I hope you enjoyed this tutorial.
I’d love to see your results and show it off in my gallery.
Email me!
Hugs,
Bev

Easter's Dawn

Clicking on the image will enlarge to full view.

Supplies
Font of Choice - I used Oh Lara
Insatiable Dreams Mask 177 here
Scraps of Enchantment Template 40 here
DSB Flux - Bright Noise - Optional
“Easter‘s Dawn” is a PTU scrap kit created by Susan of Tootypup Scraps and can be purchased from Aussie Scrap Designs. You can visit Susan’s blog here.
Thank you so much Susan for this breathtakingly beautiful kit. Anyone who purchases your kit will not be disappointed!

This tutorial was written assuming you have a working knowledge of PSP.

~♥~ Let’s get started ~♥~

Open up the template.
Shift + D.
Close out the original.
Resize all layers 85%.
Image/Canvas size
700 X 600
Flood fill the background white.
Delete the following layers:
Info, Brush Top, Brush Bottom, Small Heart, Large Heart

Highlight Black Square layer.
Use your Magic Wand and click on it.
New Raster layer.
Copy and paste a paper of choice Into Seletion.
Deselect.
Delete the template layer.

Highlight Rounded Rectangle layer.
Use your Magic Wand and click on it.
New Raster layer.
Flood fill with a gradient of your choice.
DO NOT DESELECT.

Copy and paste StarShine 1 as a new layer just above the gradient layer.
Resize 40%
Move into position toward the top right corner of the rectangle.
See my tag for reference.
Selections/Invert
Tap the delete key.
DO NOT DESELECT.

Copy and paste Angel 3 as a new layer.
Resize 35%
Move into position just below the StarShine layer.
Tap the delete key.
Change the Properties to Luminance Legacy.
Deselect.
Delete the template layer.

Highlight Grey Square.
Use your Magic Wand and click on it.
New Raster layer.
Copy and paste a paper of choice Into Selection.
Deselect.
Delete the template layer.

Highlight White Frame layer.
Use your Magic Wand and click on it.
New Raster layer.
Copy and paste a paper of choice Into Selection.
Adjust/Blur/Gaussian Blur
Radius: 1
OK
Deselect.
Delete the template layer.

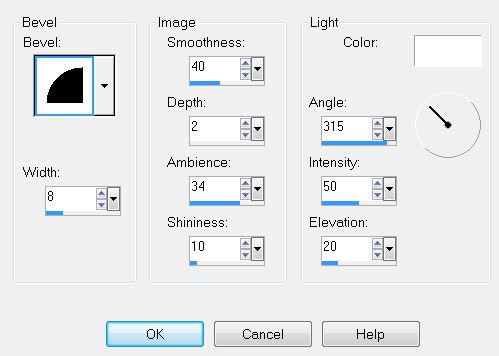
Give it a slight inner bevel:

Highlight Scallop Strip layer.
Use your Magic Wand and click on it.
New Raster layer.
Copy and paste the same paper you used for your frame Into Selection.
Aply the same Gaussian blur.
Deselect.
Delete the template layer.

Add your embellishments. I used:
Vine 1: Resize 40%
Fern 9: Resize 40%
Cross 2: Resize 30%
Dove 1: Resize 30%
Angel 3: Resize 50%
Butterfly 1: Resize 25% and 50% Free rotate 15 degrees
Butterfly 4: Resize 25% and 40% Free rotate 15 degrees

Highlight your white background.
New Raster layer.
Select All
Copy and paste a paper of choice Into Selection.
Deselect.
Apply the mask.
Merge Group.

Add your copyrights.

Add your name.
Give it the same inner bevel.
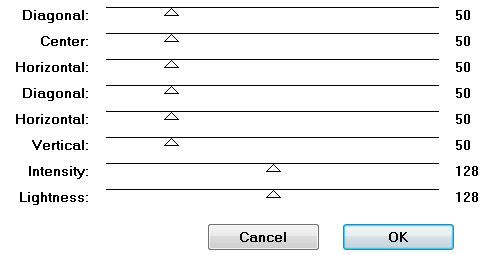
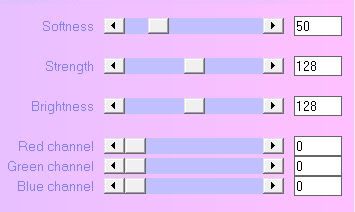
Apply DSB Flux Bright Noise:


Resize all layers 80%.

I hope you enjoyed this tutorial.
I’d love to see your results and show it off in my gallery.
Email me!
Hugs,
Bev

Friday, February 26, 2010

In Your Dreams

Clicking on the image will enlarge to full view.

Supplies
1 tube and 1 close-up of choice - I’m using the wonderful artwork of Elias Chatzoudis which you can purchase here.
Font of Choice - I used Bonheur Royale
Weescotlass Mask 249 here
“Dreams” is a FTU size scrap kit created by Heike of Fantasy Dreams Designz and can be downloaded from her blog here.
Please leave a thank you when downloading as it’s a small gesture for hard work given freely.

This tutorial was written assuming you have a working knowledge of PSP.

~♥~ Let’s get started ~♥~

Open up a 700 X 700 blank canvas.
Flood fill white.

Copy and paste Element 17 as a new layer.
Resize 85%
Use your Magic wand and click inside each circle.
Selections/Modify/Expand by 6
New Raster layer below the frame.
Copy and paste a paper of choice Into Selection.
DO NOT DESELECT.

Copy and paste your close up image as a new layer below the frame.
Selections/Invert
Tap the delete key.
Deselect.
Change the Properties to Multiply.

Copy and paste Element 22 as a new layer.
Position it near the lower part of the frame.
Highlight your frame.
Select All/Float/Defloat
Selections/Invert
Highlight Element 22 layer.
Use your eraser tool and erase any of the ribbon that’s hanging over the frame edge.
Deselect.

Copy and paste your tube as a new layer.

Add your embellishments. I used:
Element 34: Resize 85% Duplicate/Mirror
Element 55: Resize 85%
Element 72

Highlight your white background.
New Raster layer.
Select All
Copy and paste a paper of choice Into Selection.
Deselect.
Apply the mask.
Merge Group.

Add your copyrights.
Add your name.
Give it an inner bevel:

Crop your image.

Resize all layers 85%.

I hope you enjoyed this tutorial.
I’d love to see your results and show it off in my gallery.
Email me!
Hugs,
Bev
Bears n the Bees


Supplies
Font of Choice - I used Porky’s Heavy here
Weescotlass Mask 216 here
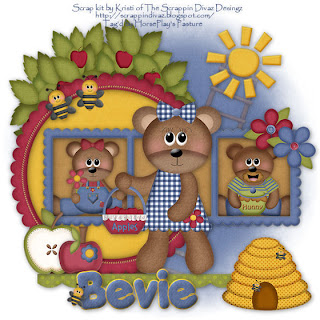
“Bears Bees and Apple Trees” is a PTU size scrap kit created by Kristi W Designs and can be purchased from Scrappin Divaz Designz. You can visit her blog here.
Monti Circular mask here
Thank you Kristi for such an adorable kit!

This tutorial was written assuming you have a working knowledge of PSP.

~♥~ Let’s get started ~♥~

Open up a 700 X 700 blank canvas.
Flood fill white.

Copy and paste Frame 1 as a new layer.
Resize 65%

Use your Magic wand and click inside of it.
Selections/Modify/Expand by 6.
New Raster layer below the frame.
Copy and paste a paper of choice Into Selection.
Deselect.

Merge Visible the frame and paper.
Position at the left side of your canvas.

Copy and paste Frame 4 as a new layer.
Resize 65%
Free rotate right 90 degrees
Use your Magic wand and click inside of each square.
Selections/Modify/Expand by 6.
New Raster layer below the frame.
Copy and paste a paper of choice Into Selection.
Deselect.

Use your Magic Wand and click inside the far left square.
Copy and paste Bear 1 as a new layer.
Resize 40%
Selections/Invert
Tap the delete key.
Deselect.

Repeat the above step with the far right square using Bear 2.

Merge Visible the frame, paper, and bears.
Position both merged layers on your canvas.
See my tag for reference.

Add your embellishments. I used:
Tree: Resize 80%
Sun: Resize 50%
Scallop 2: Resize 60% Flip
Beehive: Resize 40%
Bear 3
Apple 2: Resize 50%
Apple 1: Resize 40%
Flower 4 & 5: Resize 50%
Bee: Resize 40%

Highlight your white background.
New Raster layer.
Select All
Copy and paste a paper of choice Into Selection.
Deselect.
Copy and paste the ladder as a new layer above the paper
Free rotate right 20 degrees
Merge down.
Apply the mask.
Merge Group.

Add your copyrights.

Add your name.
Give it an inner bevel:


Resize all layers 80%.

I hope you enjoyed this tutorial.
I’d love to see your results and show it off in my gallery.
Email me!
Hugs,
Bev

Thursday, February 25, 2010

In the Wild

Clicking on the image will enlarge to full view.

Supplies
1 tube of choice - I’m using the wonderful artwork of Armando Huerta which you can purchase here.
Font of Choice - I used Papyrus which came with my pc
Weescotlass Mask 216 here
“In the Wild” is a PTU size scrap kit created by Lori of P4DSDesignz and can be purchased from Lollipops n Gumdrops. You can visit Lori’s blog here.
Thank you Lori for a wonderful kit!

This tutorial was written assuming you have a working knowledge of PSP.

~♥~ Let’s get started ~♥~

Open up a 700 X 700 blank canvas.
Flood fill white.

Copy and paste Frame 1 as a new layer.
Resize 25% and 80%
Free rotate right 10 degrees

Use your Magic wand and click inside of it.
Selections/Modify/Expand by 6.
New Raster layer below the frame.
Copy and paste a paper of choice Into Selection.
Deselect.

Copy and paste Elephant 2 as a new layer.
Resize 25% and 40%
Move below the frame and into position.
See my tag for reference.

Copy and paste Elephant 1 as a new layer.
Resize 25% and 25%
Move below the frame and into position.

Copy and paste Grass 1 as a new layer.
Resize 25% and 40%
Move behind the frame. Duplicate and arrange as you like.

Add your embellishments. I used:
Bow 1: Resize 25% and 40% Free rotate right 10 degrees
Ribbon 1: Resize 25% and 40% Flip/Free rotate right 80 degrees
Leafs 4: Resize 25% and 60%
Grass 2: Resize 40% - position behind the frame
Grass 2 again: Resize 30% - position in front of the frame
Leopard 2: Resize 30%

Copy and paste your tube as a new layer.

Highlight your white background.
New Raster layer.
Select All
Copy and paste a paper of choice Into Selection.
Deselect.
Apply the mask.
Resize 110%
Merge Group.

Add your copyrights.

Add your name.
Give it an inner bevel:


Resize all layers 80%.

I hope you enjoyed this tutorial.
I’d love to see your results and show it off in my gallery.
Email me!
Hugs,
Bev
Tuesday, February 23, 2010

Dream Lover

Clicking on the image will enlarge to full view.

Supplies
4 tubes of choice - I’m using the wonderful artwork of Elias Chatzoudis which you can purchase here.
Font of Choice - I Nemo here
Weescotlass Mask 5 here
“Dream Lover” is a FTU size scrap kit created by ©Tina Bug Creationz and can be downloaded from her blog here.
Please leave a thank you when downloading as it’s a small gesture for hard work given freely.

This tutorial was written assuming you have a working knowledge of PSP.

~♥~ Let’s get started ~♥~

This will be really quick!

Open up a 700 X 700 blank canvas.
Flood fill white.

Copy and paste Frame 4 as a new layer.
Resize 70%
Use your Magic wand and click inside each circle.
Selections/Modify/Expand by 3
New Raster layer below the frame.
Flood fill with a gradient of choice.
Deselect.

Use your Magic wand and click inside one of the circles.
Copy and paste a tube below the frame.
Duplicate.
Move the bottom tube up just a bit and change the properties to Soft Light.
Selections/Invert
Highlight each tube layer and tap the delete key.
Deselect.

Repeat the above step with the remaining 2 circles - using a different tube in each circle.

Close out your white background.
Merge Visible.
Reopen your background.

Copy and paste your last tube as a new layer and move into position to either side of the frames.

Copy and paste Seq as a new layer.
Position behind the merged layer.

Copy and paste Bow 6 as a new layer.
Resize 25% and 50%
Adjust/Brightness and Contrast/Brightness and Contrast
Brightness: 10
Contrast: -15
OK
Duplicate the bow twice and place each bow on each frame.

Copy and paste Glitter Element 1 as a new layer.
Resize 40%

Highlight your white background.
New Raster layer.
Select All
Copy and paste a paper of choice Into Selection.
Deselect.
Apply the mask.
Merge Group.

Add your copyrights.

Add your name.
Give it an inner bevel:


Resize all layers 80%.

I hope you enjoyed this tutorial.
I’d love to see your results and show it off in my gallery.
Email me!
Hugs,
Bev
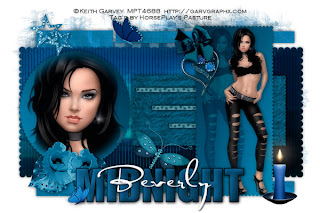
Midnight


Clicking on the image will enlarge to full view.

Supplies
1 tube of choice and 1 close-up Image - I’m using the awesome artwork of Keith Garvey which you can purchase here.
Font of Choice - I used Al Sandra here and Impact which came with my pc
Weescotlass Mask 297 here
Scraps of Enchantment Template 28 here : Scroll down the blog and look in the right column for Template and Word Art Links.
Greg’s Factory Output Vol. II - Pool Shadow
Tramage: Tow the Line here
Xero: Porcelain
“Midnight Hour” is a FTU size scrap kit created by ©Tina Bug Creations and can be downloaded from her blog here.
Please leave a thank you when downloading as it’s a small gesture for hard work given freely.

This tutorial was written assuming you have a working knowledge of PSP.

~♥~ Let’s get started ~♥~

Open up the template.
Image/Canvas size
750 X 500.
Highlight the background layer and flood fill white.
Delete the info layer.

Highlight Light Grey Rectangle layer.
Select All/Float/Defloat
New Raster layer.
Copy and paste Paper 15 Into Selection.
Deselect.
Delete the template layer.

Highlight Black Scalloped Rectangle.
Select All/Float/Defloat
New Raster layer.
Copy and paste Paper 20 Into Selection.
Deselect.
Duplicate
Adjust/Blur/Gaussian Blur
15
Ok
Apply Tramages: Tow the Line


Apply Greg’s Factory Output Vol. II - Pool Shadow

Highlight Black Scalloped Rectangle layer again.
Select All/Float/Defloat
Selections/Invert
Highlight the paper layer you just added all the filters to.
Tap the delete key.
Deselect.
Change the Properties to Soft Light.
Delete the template layer.

Highlight Thin Rectangle 2 layer.
Merge Down.
It should be on the same layer now with Thing Rectangle 1.
Select All/Float/Defloat
Copy and paste Paper 15 as a new layer.
Selections/Invert
Tap the delete key.
Deselect.

Highlight Small White Scallop layer.
Select All/Float/Defloat
Copy and paste Paper 17 as a new layer.
Resize 50%
Selections/Invert
Tap the delete key.
Deselect.

Highlight Gray Scallop layer.
Select All/Float/Defloat
New Raster layer.
Mirror Paper 17 - Copy and paste Into Selection.
Deselect.

Copy and paste your tube as a new layer over the rectangle.
Position it to the left side of it.
See my tag for reference.
Duplicate and move to the right side.
Apply Xerox - Porcelain:

Highlight the tube that’s on the left and change the Properties to Soft Light. Lower the Opacity to 51.

Highlight Circle Scallop.
Select All/Float/Defloat
New Raster layer.
Highlight Paper 7 again and hit the Undo button so that the paper isn’t mirrored any more.
Copy and paste Into Selection.
DO NOT DESELECT.

Copy and paste your close-up image as a new layer.
Position it over the circle.
Selections/Modify/Feather
Number of Pixels: 35
OK
Selections/Invert
Tap the delete key until you have a nice feathered effect.
Deselect.
Apply the same Porcelain effect as before.

Add your embellishments. I used:
Border 2: Resize 40% Duplicate 2 times
Bow 1: Resize 25% and 60% Free rotate left 30 degrees
Gem Heart 3: Resize 50%
Leaf 4: Resize 25% and 70%
Flower 2: Resize 25% and 70% Mirror.
Flower 2 again: Resize 25% and 60%
Bling 4: Resize 30% Duplicate/Resize 80%
Dragonfly 1: Resize 25% Free rotate right 30 degrees
Butterfly 3: Resize 25% and 50%
Candle 1: Resize 25% and 30%
Butterfly 1: Resize 25% and 30%

Using the Impact Font Type out the word “Midnight”.
Give it a slight inner bevel:

Highlight your white background.
New Raster layer.
Select All
Copy and paste a paper of choice Into Selection.
Deselect.
Apply the mask.
Merge Group.

Add your copyrights.

Add your name using AL Sandra font.
Give it the same inner bevel.

Resize all layers 80%.

I hope you enjoyed this tutorial.
I’d love to see your results and show it off in my gallery.
Email me!
Hugs,
Bev

Sunday, February 21, 2010

Got it Going On

Clicking on the image will enlarge to full view.

Supplies
1 tube of choice - I’m using the wonderful artwork of PinUpToons which you can purchase here.
Font of Choice - I used TS Curly
Becky Mask 22 here
Scraps of Enchantment Template 13 here
“Round N Round” is a PTU full size tagger size scrap kit created by Kimberly of Kimberly Schlehahn Designs and can be purchased from Kreative Kreations Korner.
Thank you so much for this amazing kit, Kimberly!

This tutorial was written assuming you have a working knowledge of PSP.

~♥~ Let’s get started ~♥~

Open up the template.
Shift + D.
Close out the original.
Delete the following layers:
Info, Brush Top, Brush Bottom, and Blur Circle.

Highlight Large Rectangle layer.
Select All/Float/Defloat
Copy and paste Paper 4 as a new layer.
Resize 25% and 55%
Selections/Invert
Tap the delete key.
Deselect.
Delete the template layer.

Highlight the Scalloped Edge layer.
Select All/Float/Defloat
New Raster layer.
Copy and paste Paper 3 Into Selection.
Deselect.
Delete the template layer.

Highlight Rectangle 1 layer.
Select All/Float/Defloat
New Raster layer.
Copy and paste Paper 1 Into Selection.
Deselect.
Delete the template layer.

Highlight Rectangle 2 layer.
Repeat the above step.
Highlight Circle layer.
Select All/Float/Defloat
New Raster layer.
Copy and paste Paper 7 Into Selection.
Deselect.
Delete the template layer.

Highlight Center Square layer.
Select All/Float/Defloat
New Raster layer.
Copy and paste Paper 5 Into Selection.
Deselect.
Delete the template layer.

Repeat the above step with Small Square Left and Small Square right layers.

Highlight Rectangle Dots layer.
Select All/Float/Defloat
New Raster layer.
Copy and paste Paper 3 Into Selection.
Deselect.
Delete the template layer.

Copy and paste your tube as a new layer.

Add your embellishments. I used:
Doodle: Resize 25% and 25%
Bow 1: Resize 25% and 50%
Curly ribbon 3: Resize 25%, 70%, & 95%
Paper Flower 1: Resize 25% and 25%
Paper Flower 3: resize 25% and 25%
Gem 2: Resize 25% and 30%
Gem 5: Resize 25% and 30%
Twine: Resize 25% and 50%
Curly Ribbon 1: Resize 25% and 35%. Lower the Opacity to about 48. Duplicate/Resize 50%
Buttons 1, 2, & 3: Resize 25% and 30%

Highlight your white background.
Select All.
Copy and paste a paper of choice Into Selection.
Deselect.
Copy and paste Wire as a new layer just above the paper.
Resize 25%
Merge Down.
Apply the mask.
Merge Group.

Add your copyrights.

Add your name.
Give it a slight inner bevel:


Resize all layers 80%.

I hope you enjoyed this tutorial.
I’d love to see your results and show it off in my gallery.
Email me!
Hugs,
Bev

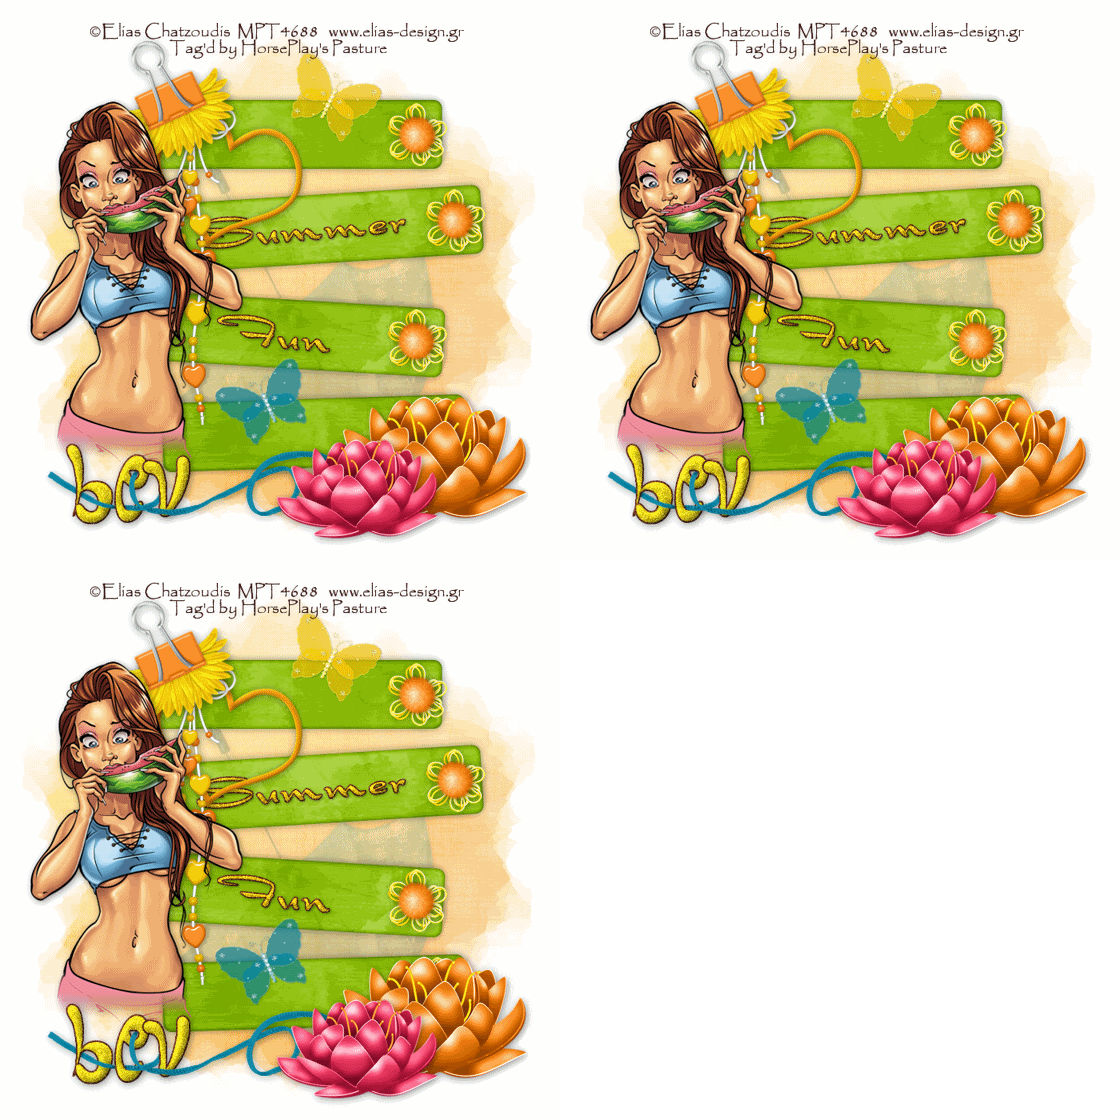
Summer Fun


Supplies
1 tube of choice - I’m using the wonderful artwork of Elias Chatzoudis which you can purchase here.
Font of Choice - I used Dragonfly here and Fruitopia here
Weescotlass Mask 220 here
DSB Flux - Bright Noise
Animation Shop
“Chipper” is a PTU tagger size scrap kit created by Jane of JT’s Designs and can be purchased from Kreative Kreations Korner. You can visit her blog here.
Thank you Jane for such a fun kit! It really makes me want summer here NOW!

This tutorial was written assuming you have a working knowledge of PSP.

~♥~ Let’s get started ~♥~

Open up a 700 X 700 blank canvas.
Flood fill white.

Copy and paste Journal 2 as a new layer.

Copy and paste Poof 2 as a new layer.
Resize 25% and 80%
Position at the end of the top rung.
Copy and paste String Flower 6 as a new layer.
Resize 25%
Position behind the Poof.
Merge visible the Poof and String Flower.
Duplicate 3 times.
Position each at the end of each rung.

Copy and paste Clip 2 as a new layer.
Resize 40%
Free rotate left 25 degrees.
Position on the top rung.

Copy and paste Heart Beads 1 as a new layer.
Resize 50%
Position behind the clip.

Copy and paste Heart Frame 4 as a new layer.
Resize 25%
Free rotate right 25 degrees
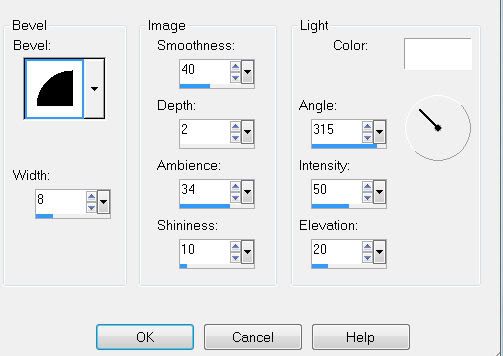
Give it a slight inner bevel:


Move into position behind the clip.

Copy and paste your tube as a new layer.

Copy and paste Butterfly 6 as a new layer.
Resize 25% and 70%
Free rotate right 25 degrees.

Repeat the above step with Butterfly 4.

Copy and paste Lilly 2 as a new layer.
Resize 50%

Copy and paste Lilly 1 as a new layer.
Resize 50% and 80%

Copy and paste String Swirl 3 as a new layer.
Resize 40%

Highlight your white background.
Select All.
Copy and paste a paper of choice Into Selection.
Deselect.
Apply the mask.
Merge Group.

Copy and paste Umbrella 3 as a new layer.
Resize 130%
Free rotate left 30 degrees
Position just over the mask.

Add your copyrights.

Add your name.
Give it the same inner bevel.
Duplicate twice for a total of 3 layers.
Rename Name 1, 2, and 3.
Highlight Name 1.
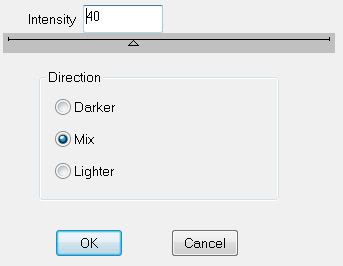
Apply DSB Flux - Bright Noise:


Highlight Name 2.
Apply Bright Noise again accept hit the mix button twice.

Highlight Name 3.
Apply Bright Noise again accept hit the mix button 3 times.

Close out Name 2 & 3 layers.
Keep Name 1 layer open.

Using the Dragonfly font, type out the words on separate layers:
Summer
Fun
Merge Visible.
Give it the same inner bevel.
Duplicate twice for a total of 3 days.
Rename SF 1, 2, and 3.

Highlight SF 1.
Apply Bright Noise - same settings.

Highlight SF 2.
Apply Bright Noise - same settings accept hit the mix button twice.

Highlight SF 3.
Apply Bright Noise - same settings accept hit the mix button 3 times.

Close out SF 2 & 3.

Resize all layers 80%.

Copy Merge.

~Time to Animate~

Open up AS.
Edit/Paste/As New Animation

Back in PSP.
Close out SF 1 and Name 1.
Open up SF2 and Name 2.
Copy Merge.

Carry into AS.
Edit/Paste/After current Frame.

Back into PSP.
Close out SF 2 and Name 2.
Open up SF 3 and Name 3.
Copy Merge.

Carry into AS.
Edit/Paste/After Current Frame.

View your animation.
If you’re happy then save.

I hope you enjoyed this tutorial.
I’d love to see your results and show it off in my gallery.
Email me!
Hugs,
Bev