Friday, March 22, 2013

A Fairy's Passion


Supplies

1 tube of choice – I used the wonderful artwork of Rachel Anderson which can be purchased from CDO.  You must have a license to use.

Font of choice –  I used Recorda here

Weescotlass Mask 208 here

My Template 153 here

Plug Ins used:
Eyecandy 3.1 - Glow

“Mums Purple Passion” is tagger size scrap kit created by Krissy of Krissy’s Scraps can be purchased from her store ExquisiteScraps.  You can visit her designing blog here.  Thank you Krissy for a really beautiful kit.

~~ Lets get started ~~

Open up the template.
Shift + D.
Close out the original.
Image/Canvas Size:
700 x 700
OK
Highlight Raster 1 layer.
Flood fill white.
Delete the credit layer, Raster 4, and Raster 5 layer.

Highlight Raster 2 layer.
Click on it with your Magic Wand.
New Raster layer.
Copy and paste Paper 7 Into Selection.
Deselect.
Delete the template layer.
Apply Eyecandy 3.1 – Glow to the paper layer:
Width: 3
Opacity: 100
Opacity Drop Off: Fat
Color: White
OK

Repeat the above step with Raster 8.

Highlight Raster 7 layer.
Click on it with your Magic Wand.
New Raster layer.
Copy and paste Paper 7 Into Selection.
Copy and paste your tube as a new layer over the paper layer.
Change the Properties to Soft Light.
Selections/Invert
Tap the delete key.
Deselect.
Delete the template layer.
Apply Eyecandy 3.1 Glow to the paper layer –
Use same settings.

Open up Paper 10.
Use your Selection Tool and section off the area of the paper just above the stripes.
Copy.

Highlight Raster 3 layer.
Click on it with your Magic Wand.
New Raster layer.
Paste the Paper Into Selection.
Deselect.
Apply the same Glow Effect.

Highlight Raster 6 layer.
Click anywhere outside of it with your Magic Wand.
Copy and paste Paper 6 as a new layer.
Move into a position you like.
Tap the delete key.
Deselect.
Delete the template layer.
Apply the same Glow Effect.

Copy and paste Stitched Sequin 2 as a new layer.
Free rotate Left 90 degrees
Move into a position you like over Raster 10 layer.
Using your Selection Tool set on Rectangle, section out the element that is just over the template – see my tag for reference.
Selections/Invert
Tap the delete key.
Deselect.
Delete the template layer.
Duplicate
Move into position over Raster 11 layer.
Delete the template layer.

Copy and paste Gem 1 as a new layer.
Free rotate Left 90 degrees
Resize 15%
Copy
Delete the element.

Highlight Raster 8 layer.
Click on the oval on the left.
New Raster layer.
Paste the gem Into Selection.
Deselect.
Duplicate the gem 3 times and move them into position over the remaining 3 gem template layer.
Delete Raster 8 and 9.

Copy and paste your tube as a new layer.

Add your elements.  I used:
Clipped Flower 1:  Resize 40%/Free rotate Left 35 degrees
Heart 1:  Resize 40%/Free rotate Right 65 degrees/Duplicate/Resize 70%/Free rotate Right 35 degrees
Butterfly 3:  Resize 20%/Free rotate Left 30 degrees
Lace Strip 4:  Erase what you don’t want
Angora Cat 1:  Resize 50%
Realistic Bloom 1:  Resize 30%/Duplicate
Realistic Bloom 1 again:  Resize 30% and 70%/Duplicate 3x’s
Painted Flower 1:  Resize 15%/Duplicate 4x’s
Sparkles 1:  Resize 60%

New Raster layer at the top of your layer.
Make your Picture Tube Tool active.
Choose the flair – it can be found under the Artistic Category.
Click your mouse just over the extended palm of the tube.  If you don’t like the flair you can always undo and click your mouse again.  Do that until you find a flair you like.
Make your Mover Tool active and move the flair into the exact position you like.

Crop your image.

Highlight your white background.
New Raster layer.
Select All.
Copy and paste Paper 2 Into Selection.
Deselect.
Apply the mask.
Use your Pick Tool to pull the sides out slightly.
Merge Group.

Add your credits.

Add your name:
Foreground: #16141f
Background: #29145a
Stroke: 1.5
Type your name.
Convert to Raster layer.
Effects/Edge Effects/Enhance
Enhance again.
Duplicate
Change the Properties to Multiply.
Merge Down.

Resize all layers 80%.

I’d love to see your results.
Email me!
Hugs,
Bev

Thursday, March 21, 2013

The Dark Manor

Supplies

1 tube of choice – I used the beautiful artwork of Anna Marine which can be purchased from CDO.  You must have a license to use.

Font of choice –  I used Pieces of Eight here

Weescotlass Mask 236 here

Plug Ins used:
Greg’s Factory Output Vol. II – Pool Shadow
Eyecandy 3.1 – Glow

“The Dark Manor” is a tagger size scrap kit created by Jessica of Gothic Inspirations and can be purchased from her store here.  Thank you Jessica for another fantastic kit.

~~ Lets get started ~~

Open up a 700 x 700  blank canvas.
Flood fill white.

Copy and paste Frame 7 as a new layer.
Resize 50%
Free rotate Left 7 degrees
Duplicate
Mirror
Move both frames into position – see my tag for reference.

Highlight the top frame.
Click inside of it with your Magic Wand.
Selections/Modify/Expand by 4.
New Raster layer below the frame.
Copy and paste Paper 11 Into Selection.
Apply Greg’s Factory Output Vol. II – Pool Shadow:
Use default settings accept move the intensity bar to 150
OK
Deselect.
Apply the Pool Shadow effect again accept move the Intensity bar to 225.
OK

Add the following elements below the top frame – see my tag for placement.
Don’t worry about what overhangs the frames.  We’ll clean that up in a bit.
Moon:  Resize 25%
Manor:  Resize 70%
Werewolf:  Resize 40%

Highlight the paper layer.
Click anywhere outside of it with your Magic Wand.
Highlight each element and tap the delete key.
Deselect.

Highlight the bottom frame.
Click inside of it with your Magic Wand.
Selections/Modify/Expand by 4.
New Raster layer below the frame.
Copy and paste Paper 8 Into Selection.
Deselect for now.
Add the following elements below the frame layer – see my tag for placement.
Don’t worry about what overhangs the frame.  We’ll clean that up in a bit.
Fence
Cloud 2:  Resize 25%/Duplicate
Tree :  Resize 80%
Tall Grass:  Resize 30%
If you used a tube you want inside the frame, go ahead a copy and paste that as a new layer.

Highlight the paper layer.
Click anywhere outside of it with your Magic Wand.
Highlight each element layer and tap the delete key.
Deselect.

If you used the tube I did, or you want your tube on the outside of the lower frame go ahead and copy and paste that now as a new layer.


Add your elements.  I used:
Roses 1:  Resize 40%/Free rotate Left 7 degrees/Duplicate/Mirror
SilverWCrystal:  Resize 40%
Gargoyle:  Resize 80%
Gargoyle 1:  Resize 45%
Crow:  Resize 50%
Grass:  Resize 90%/Use your Pick Tool to squash the top down a little
Tall Grass:  Resize 35%
Tall Grass again:  Resize 25%
Spider:  Resize 25%/Duplicate/Mirror/Resize 70%/Duplicate/Resize 70%

Highlight your white background.
New Raster layer.
Select All.
Copy and paste Paper 7 Into Selection.
Deselect.
Apply the mask.
Merge Group.

Add your credits.

Add your name.
Foreground: #000000
Background: #342a2a
Stroke: 1.5
Type your name.
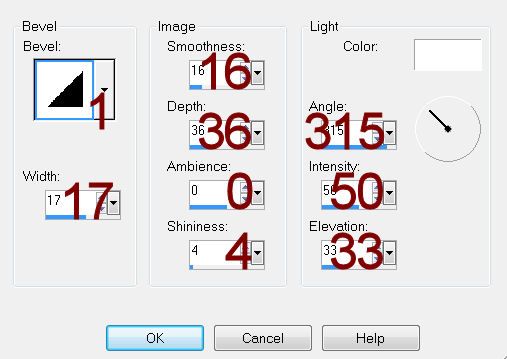
Give it a slight Inner Bevel:


 photo LoveDontLiveHereInnerBevel_zps921620f1.jpg


Apply Eyecandy 3.1 - Glow:
Width: 3
Opacity: 100%
Opacity DropOff: Fat
Color:#f4e2f2

Resize all layers 80%.

I’d love to see your results.
Email me!
Hugs,
Bev
 

Wednesday, March 20, 2013

How Does Your Garden Grow


Supplies

Font of choice –  I used Baby Kruffy here

Weescotlass Mask 208 here

My Template 152 here

Plug Ins used:
Brush Strokes – Sprayed Strokes

“Elegant Spring” is a tagger size scrap kit (also available in full size) created by Becky of Becky’s Creations and can be purchased from TKO Scraps. You can visit her designing blog here.
Thank you Becky for an incredibly wonderful spring kit!
 
~~ Lets get started ~~

Open up the template.
Shift + D.
Close out the original.
Delete the top 3 layers.

Highlight Raster 2 layer.
Click on it with your Magic Wand.
New Raster layer.
Copy and paste Paper 4 Into Selection.
Deselect.
Delete the template layer.
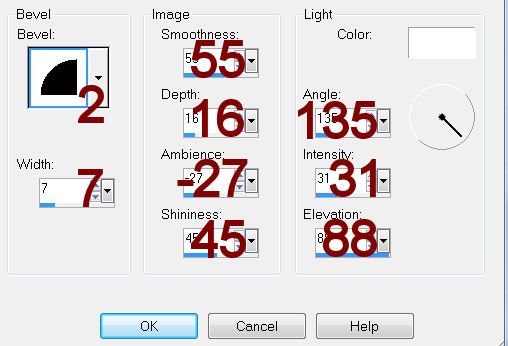
Give the paper layer a slight Inner Bevel:
 photo redinnerbevel_zps089a307c.jpg

Highlight Raster 3 layer.
Click on it with your Magic Wand.
New Raster layer.
Copy and paste Paper 8 Into Selection.
Deselect.
Delete the template layer.
Give the paper the same slight Inner Bevel.

Highlight Raster 4 layer.
Click on it with your Magic Wand.
New Raster layer.
Copy and paste Paper 4 Into Selection.
Lock the layer by clicking on the lock icon at the top of your layers pallet.
Apply Brush Strokes – Sprayed Strokes:
Stroke Length: 10
Spray Radius: 22
Stroke Direction – Right Diag
OK
Deselect.
Delete the template layer.
Give the paper the same slight Inner Bevel.

Highlight Raster 5 layer.
Click on it with your Magic Wand.
New Raster layer.
Copy and paste Frame Into Selection.
Deselect.
Delete the template layer.

Highlight Raster 6 layer.
Repeat the above step.

Highlight Raster 7 layer.
Click on it with your Magic Wand.
New Raster layer.
Copy and paste Paper 10 Into Selection.
Deselect
Copy and paste Flower Girl as a new layer.
Resize 55%
Mirror
Change the Properties to Soft Light.
Move into position over the paper layer – see my tag for reference.
Highlight Raster 7 layer.
Click anywhere outside of it with your Magic Wand.
Highlight the Flower Girl layer and tap the delete key.
Deselect.
Delete the template layer.

Highlight Raster 8 layer.
Click on it with your Magic Wand.
New Raster layer.
Copy and paste Paper 10 Into Selection.
Copy and paste Owl as a new layer.
Resize 30%
Change the Properties to Soft Light.
Move into position – see my tag for reference.
Selections/Invert
Tap the delete key.
Deselect.
Delete the template layer.
Duplicate the Owl layer.
Change the Properties to Normal.
Resize 70%
Move into position – see my tag for reference.

Add your elements.  I used:
Stitches:  Resize 50%/Duplicate/Erase what overhangs the edges of the paper
Stitches 2:  Resize 50%/Free rotate Right 83 degrees/Duplicate/Erase what overhangs the paper
Bow 6:  Resize 15%/Duplicate
Apple Tree:  Resize 60%
Flower Girl:  Resize 40%/Mirror
Daisy 3:  Resize 15%/Duplicate
Daisy 2:  Resize 15%/Duplicate/Duplicate/Resize 70%/Duplicate

Highlight your white canvas.
New Raster layer.
Select All.
Copy and paste Paper 1 Into Selection.
Deselect.
Apply the mask.
Resize 115%
Merge Group.

Add your credits.

Add your name:
Foreground: #250906
Background: #386002
Stroke: 2
Type your name.
Convert to Raster layer.
Select All/Float/Defloat
Selections/Modify/Contract by 2
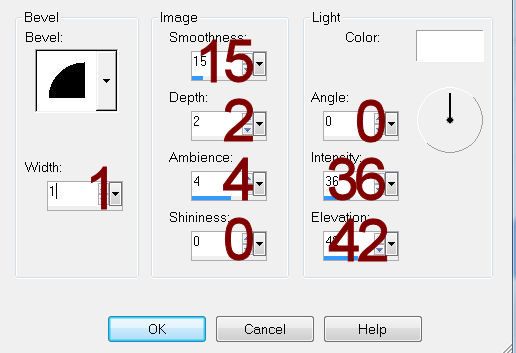
Give it a slight Inner Bevel:
 photo NameInnerBevel-1_zpse507dee6.jpg

Deselect.

Resize all layers 80%.

I’d love to see your results.
Email me!
Hugs,
Bev