Saturday, October 31, 2009

Into Autumn

Clicking on the image will enlarge to full view.

Supplies
Font of choice - I used FairydustB here
Weescotlass Mask 84 here
Scrapity Scrap and More Template 6 here
“Falling into Autumn” is a PTU tagger size scrap kit created by Funky Fever Designs and can be purchased at Butterfly Blush Designs. You can visit her blog here.
Funky this is an amazing kit!
Thank you so very much!
This tutorial was written assuming you have a working knowledge of PSP.

~♥~ Let’s get started ~♥~

Open up the template.
Shift + D.
Close out the original.
Delete the credit layer.
Image/Canvas Size
650 x 450
Flood fill Raster 1 white.

Highlight Raster 3 layer.
Select All/Float/Defloat
New Raster layer.
Copy and paste a paper of choice Into Selection.
Deselect.
Delete the template layer.
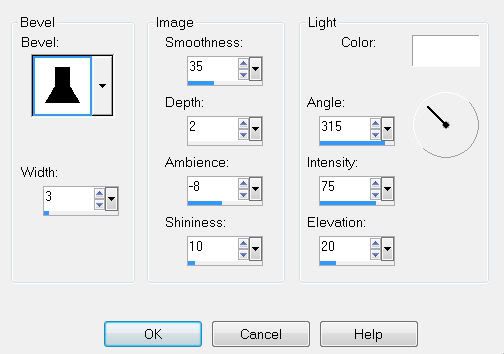
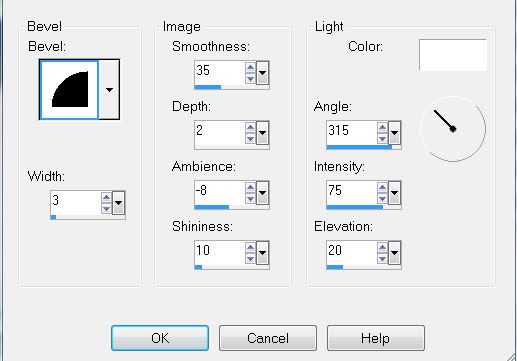
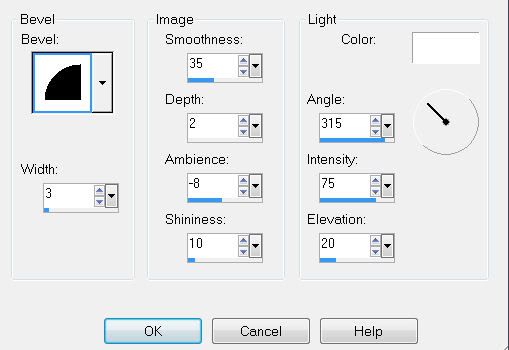
Give it an inner bevel:


Repeat the above step with Raster 5 layer, Copy of Vector 1 layer, and the other Copy of Vector 1 layer.

Highlight Raster 2 layer.
Select All/Float/Defloat
Copy and paste a paper of choice as a new layer.
Resize 70%
Selections/Invert
Tap the delete key.
Deselect.
Delete the template layer.

Repeat the above step with Raster layers 6 & 7, using a different paper for each layer.
 
Add your embellishments. I used:
Tree: Duplicate/Mirror
Crawler: Resize 50%
Greenery: Resize 30%
Autumn Tree: Resize 80%
Long bow: Resize 40%/Mirror
Flower: Resize 25%
Mushroom: Resize 25% and 80%
Butter Fly: Resize 25% and 70%
Leaves 1 & 2: Resize 10%
Leaves: Resize 25%
Fairy: Resize 80%

Highlight your white canvas.
New Raster Layer.
Select All.
Copy and paste a paper of choice Into Selection.
Deselect.
Apply the mask.
Merge Group.

Add your copyrights.
Add your name.
Give it the same inner bevel.

I hope you enjoyed this tutorial.
I’d love to see your results.
Email me!
Hugs,
Bev


The Great Outdoors

Clicking on the tag will enlarge to full view.

Supplies
1 tube of choice - I used to beautiful artwork of Jennifer Janesko here
Font of choice - I used Big Daddy Condensed here
Weescotlass Mask 297 here
jbs2Designs Template 45 here
Alien Skin Xenofex 2 - Burnt Edges
“The Great Outdoors” is a PTU tagger size scrap kit created by Stitchy Angel Creationz and can be purchased at Twilight Scraps. You can visit her blog here.
Stitchy, I soooo loved this kit!
Thank you so very much!

This tutorial was written assuming you have a working knowledge of PSP.
~♥~ Let’s get started ~♥~

Open up the template.
Shift + D.
Close out the original.
Delete the credit and brush layer.
Resize all layers 120%
New Rater layer.
Send to bottom.
Image/Canvas Size
600 x 600
Flood fill white.
Highlight Rectangle layer..
Select All/Float/Defloat
New Raster layer.
Copy and paste a paper of choice Into Selection.
Deselect.
Delete the template layer.
Give it an inner bevel:


Highlight Ribbon 1 layer.
Select All/Float/Defloat
Copy and paste a paper of choice as a new layer.
Resize 70%
Selections/Invert
Tap the delete key.
Deselect.
Delete the template layer.
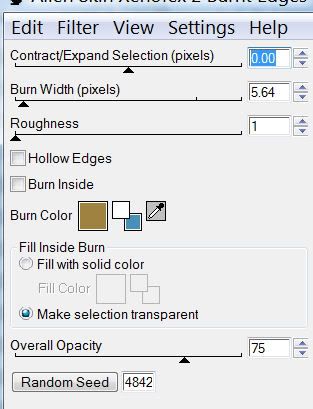
Apply Xenofex 2 - Burnt Edges


Repeat the above step with Ribbon 2 layer accept use a different paper.

Highlight Circle layer.
Select All/Float/Defloat
Copy and paste a paper of choice.
Selections/Invert
Tap the delete key.
Deselect.
Delete the template layer.
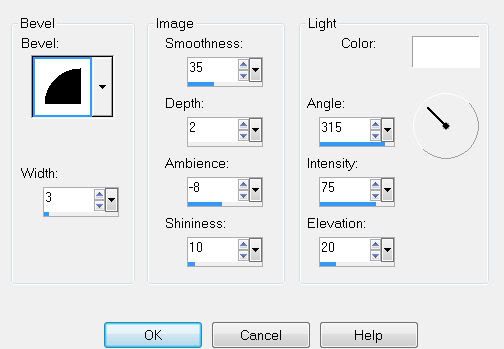
Give it an inner bevel:


Highlight the Diamond layer.
Select All/Float/Defloat
New Raster layer.
Copy and paste a paper of choice Into Selection.
Copy and paste your tube as a new layer.
(If your tube overhangs the diamond simply Invert and tap the delete key)
Deselect.
Delete the template layer.
Merge Visible the tube and diamond layer.
Give it the same inner bevel you just used.

Add your embellishments. I used:
Orange Clip: Resize 25% and 80%. Flip/Free rotate left 45 degrees
Butterfly: Resize 25%
Doodle 1: Resize 70%
Doodle 2: Resize 50%. Duplicate. Resize 80%/Mirror
Jar Bugs: Resize 25%

Crop your image but leave ample room around your tag.

Highlight your white canvas.
New Raster Layer.
Select All.
Copy and paste a paper of choice Into Selection.
Deselect.
Apply the mask.
Merge Group.

Add your copyrights.

Add your name.
Give it the very first bevel you used in this tutorial.

I hope you enjoyed this tutorial.
I’d love to see your results.
Email me!
Hugs,
Bev

Friday, October 30, 2009

Winter Chill

Clicking on the image will enlarge to full view.

Supplies
2 tubes of choice - I used to wonderful artwork of PinUpToons here
Font of choice - I used Santa’s Sleigh here
Weescotlass Mask 209 here
Blissfully Beth Template 71 here
“Spilled Glitter” is a PTU tagger size scrap kit created by Brooke of Butterfly Blush Designs can be purchased at her store Butterfly Blush Designs. You can visit her blog here.
Such an amazing kit, Brooke!!
I fell in love with it!!

This tutorial was written assuming you have a working knowledge of PSP.

~♥~ Let’s get started ~♥~
Open up the template.
Shift + D.
Close out the original.
Delete the credit layer.
Highlight Ruffle 1 layer..
Select All/Float/Defloat
Copy and paste a paper of choice as a new layer.
Selections/Invert
Tap the delete key.
Deselect.
Delete the template layer.

Repeat the above step with Copy of Ruffle 1 layer.
Highlight Vert Strip layer.
Select All/Float/Defloat
Copy and paste a paper of choice as a new layer.
(I selected a small portion of a paper, set my foreground to pattern. Made a new raster layer and flood filled it with the pattern).
Selections/Invert
Tap the delete key.
Deselect.
Delete the template layer.
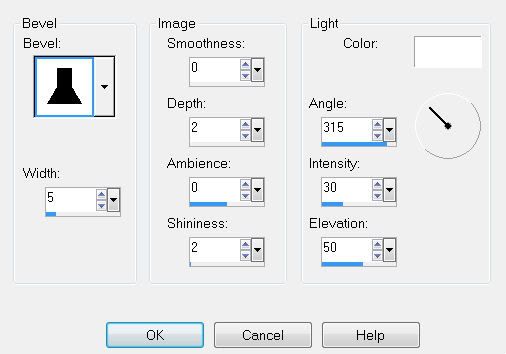
Give it a slight inner bevel:


Repeat the above step with the other Vert Strip layer.

Highlight Large Circle bg layer.
Select All/Float/Defloat
New Raster layer.
Flood fill with a gradient of choice.
Copy and paste your tube as a new layer.
Selections/Invert
Tap the delete key.
Deselect.
Delete the template layer.

Repeat the above step with White Circle layer.

Highlight Lg Gray Frame Circle layer.
Select All/Float/Defloat
New Raster layer.
Copy and paste a paper of choice Into Selection.
(I made a new raster layer and flood filled with the same pattern I used before)
Tap the delete key.
Deselect.
Delete the template layer.
Give it the same slight inner bevel.

Repeat the above step with Dk Gray Circle layer.

Highlight Word Art layer.
Select All/Float/Defloat
New Raster layer.
Flood fill with color #4790ba
Deselect.
Delete the template layer.
Give it the same inner bevel.
 
Add your embellishments. I used:
Ribbon Eyelet 4: Resize 35% Free rotate right 40 degrees
Double Bow 4: Resize 50% Free rotate left 20 degrees
Flower String 2: Resize 20%. Duplicate. Zoom in for better view and erase the very tip of the string (staple and teeny tiny flower). Move it down and match it up with the other flower string to create just one string. Merge Down.
Folded Ribbon 2: Resize 30%. Flip.
Dragonfly 1: Resize 50%
Dragonfly 2: Resize 40%

Highlight your white canvas.
New Raster Layer.
Select All.
Copy and paste a paper of choice Into Selection.
Deselect.
Apply the mask.
Merge Group.
Adjust/Add Remove Noise/Add Noise
Uniform and Monochrome checked
Noise: 39%

Add your copyrights.

Add your name.
Give it the same inner bevel.
Apply the same Noise.

Crop your image.

I hope you enjoyed this tutorial.
I’d love to see your results.
Email me!
Hugs,
Bev

Thursday, October 29, 2009

Autumn Fairy

Clicking on the image enlarges to full view.

Supplies
1 tube of choice - I used to wonderful artwork of Renee Biertempfel here
Font of choice - I used Felt Tip here
Weescotlass Mask 81 here
Missy Template 180 here
“Autumn is Great” is a PTU tagger size scrap kit created by Wilma of Wilma4Ever can be purchased at Nuthouse Scraps. You can visit her blog here.
Thank you so much for a wonderful kit, Wilma!

This tutorial was written assuming you have a working knowledge of PSP.

~♥~ Let’s get started ~♥~

Open up the template.
Shift + D.
Close out the original.
Delete the credit layer.
Canvas Size
700 x 700
Flood fill the background layer white.

Highlight Circle layer.
Select All/Float/Defloat
New Raster layer.
Copy and paste a dark colored paper of choice Into Selection.
Selections/Modify/Contract by 8
Tap the delete key.
Selections/Modify/Expand by 2
New Raster layer below the “new frame” you just made.
Copy and paste a paper of choice Into Selection.
Deselect.
Delete the template layer.

Highlight Thin Rectangle layer.
Select All/Float/Defloat
Copy and paste a paper of choice as a new layer.
Selections/Invert
Tap the delete key.
Deselect.
Delete the template layer.
Give it a slight inner bevel:


Highlight Thin Rectangle 2 layer.
Select All/Float/Defloat
New Raster layer.
Copy and paste a paper of choice Into Selection.
Tap the delete key.
Deselect.
Delete the template layer.
Give it the same slight inner bevel.

Highlight Thin Rectangle 3 layer.
Select All/Float/Defloat
New Raster layer.
Copy and paste a paper of choice Into Selection.
Tap the delete key.
Deselect.
(I used my Target Tool and changed the color of the paper to a color that matches my tube.)
Delete the template layer.
Give it the same slight inner bevel.

Highlight Circle Background.
Select All/Float/Defloat
Copy and paste a paper of choice as a new layer.
Selections/Invert
Tap the delete key.
Deselect.
Delete the template layer.

Highlight Circle 1 layer.
Select All/Float/Defloat
New Raster layer.
Copy and paste a paper of choice Into Selection.
Tap the delete key.
Deselect.
Delete the template layer.
Give it the same slight inner bevel

Repeat the above step with Circle 2.

Add you tube as a new layer.

Add your embellishments. I used:
Branch 4: Resize 70%
Bridge 1
String 1: Resize 50%
Bow 2: Resize 50%
Leaf 7: Resize 40%
Leaf 3: Resize 40% Free rotate left 40 degrees
Leaf 2: Resize 40% Free rotate left 40 degrees
Branch 3: Resize 35%
Leaf 6: Resize 35%

Highlight your white canvas.
New Raster Layer.
Select All.
Copy and paste a paper of choice Into Selection.
Deselect.
Apply the mask.
Merge Group.

Add your copyrights.

Add your name.
Give it an inner bevel.

Resize all layers 80%.

I hope you enjoyed this tutorial.
I’d love to see your results.
Email me!
Hugs,
Bev


Wedded Bliss

Clicking on the image will enlarge to full view.

Supplies
Font of choice - I used Willegha here
Weescotlass Mask 241 here
Dezigns by Ali Template 57 here
Mura Meister - Copies
“Wedded Bliss” is a PTU tagger size scrap kit created by Julie of Bits ’n Bobs and can be purchased at AMI. You can visit her blog here.
Thank you so much for a beautiful kit, Julie!

This tutorial was written assuming you have a working knowledge of PSP.

~♥~ Let’s get started ~♥~

Open up the template.
Shift + D.
Close out the original.
Delete the credit and bracket layer.
Canvas size 700 x 700
New Raster layer.
Flood fill white and send to bottom.
Highlight Back shape layer.
Select All/Float/Defloat
New Raster layer.
Copy and paste a paper of choice Into Selection.
Deselect.
Delete the template layer.
Highlight Middle Shape layer.
Select All/Float/Defloat
New Raster layer.
Copy and paste a paper of choice Into Selection.
Deselect.
Delete the template layer.

Highlight Shape Frame.
Select All/Float/Defloat
New Raster layer.
Copy and paste a paper of choice Into Selection.
Deselect.
Delete the template layer.
Give it a slight inner bevel:

Copy and paste Element 26 as a new layer.
Resize 70%
Apply Mura Meister - Copies

Add your embellishments. I used:
Element 45
Element 33: Resize 40%
Element 54: Resize 80%

Highlight your white canvas.
New Raster Layer.
Select All.
Copy and paste a paper of choice Into Selection.
Deselect.
Apply the mask.
Merge Group.

Add your copyrights.

Add your name.
Give it the same inner bevel.

Resize all layers 80%.

I hope you enjoyed this tutorial.
I’d love to see your results.
Email me!
Hugs,
Bev

Wedding Day

Clicking on the image will enlarge to full view.

Supplies
1 tube of choice - I used to wonderful artwork of Archie Dickens here
Font of choice - I used Pavane here
and Annabelle here
Weescotlass Mask 297 here
My Template 18 here
“Wedding Day” is a PTU tagger size scrap kit created by Julie of Bits ’n Bobs and can be purchased at AMI. You can visit her blog here.
Thank you so much for a beautiful kit, Julie!

This tutorial was written assuming you have a working knowledge of PSP.

~♥~ Let’s get started ~♥~

Open up the template.
Shift + D.
Close out the original.
Delete the following layers -
Merged
Instructions for Frame
Flower

Highlight Back 1 layer.
Select All/Float/Defloat
New Raster layer.
Copy and paste a paper of choice Into Selection.
Deselect.
Delete the template layer.

Repeat the above step with Back 2 and Back 3 layers.

Highlight Frame Back layer.
Select All/Float/Defloat
New Raster layer.
Flood fill with a gradient of choice.
Deselect.
Delete the template layer.
Highlight Frame layer.
Select All/Float/Defloat
Copy and paste a light colored paper of choice as a new layer.
(I used Paper 1)
Selections/Invert
Tap the delete key.
Change the Properties to Overlay.
Copy and paste a dark colored paper of choice as a new layer.
(I used Paper 7)
Tap the delete key.
Change the Properties to Overlay.
Delete the template layer.

Using the Annabelle font, type out the words
“Love is the enchanted dawn of every heart” or whatever saying you like.
Center the words on the left side of your canvas.
See mine for reference.

Copy and paste Element 1 & 2 as a new layers behind the words.
Lower the Opacity of both to around 77 or so.

Copy and paste Element 52 as a new layer.
Position at the bottom of the frame.

Copy and paste Element 31 as a new layer.
Resize 50%.
Position at the side of the frame.

Element 50.
Resize 50%
Position at the top and center of the tag.
Erase the inside part of the clip.

Add you tube as a new layer.

Highlight your white canvas.
New Raster Layer.
Select All.
Copy and paste a paper of choice Into Selection.
Deselect.
Apply the mask.
Merge Group.

Add your copyrights.

Add your name.
Give it an inner bevel


Resize all layers 95%.

I hope you enjoyed this tutorial.
I’d love to see your results.
Email me!
Hugs,
Bev

Monday, October 26, 2009

Feathery Hugs & Butterfly Kisses


Supplies
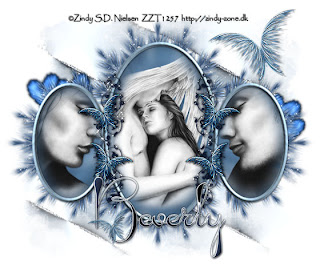
3 tubes of choice - although I used 1 tube and 1 image - the beautiful artwork of Zindy S. D. Nielsen here
Font of choice - I used Pendulum here
Becky Mask 22 here
“Feathery Hugs and Butterfly Kisses” is a PTU tagger size scrap kit created by Krissy of Crimson Butterfly Scrapz and can be purchased at Lollipops n Gumdrops. You can visit her blog here.
Krissy, thank you so much for such a stunning kit!!

This tutorial was written assuming you have a working knowledge of PSP.

~♥~ Let’s get started ~♥~

Open up a 700 x 700 transparent image.
Flood fill white.
Copy and paste Frame 2 as a new layer.
Use your Magic Wand and click inside of each frame.
Selections/Modify/Expand by 6
New Raster Layer below the frame.
Copy and Paste a paper of choice Into Selection.
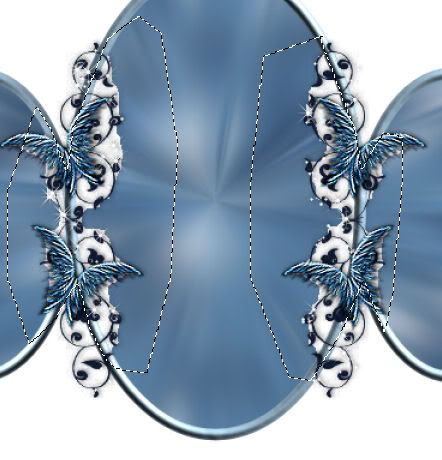
The area around the butterflies still needs the paper behind it, so use your Freehand Selection Tool and outline the area that still needs paper behind it.


New Raster layer below the paper.
Copy and paste your paper as a new layer.
Selections/Invert
Tap the delete key.
Deselect.

Use your Freehand Selection Tool and outline the center oval.
Copy and paste your tube as a new layer below the frame.
Selections/Invert
Tap the delete key.
Selections/Modify/Feather
Number of Pixels: 43
OK
Tap the delete key until you get the feathered look you want to your image.
Deselect.

Repeat the above step with each of the smaller ovals using different tubes or your image.

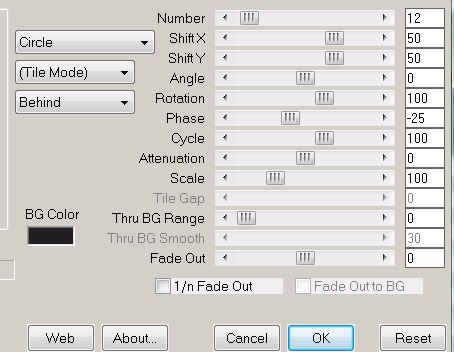
Copy and paste Feather Spray 1 as a new layer.
Position it behind the center frame at the top.
Duplicate/Flip
Position at the bottom of the frame.
Duplicate/Image Free Rotate right 90 degrees.
Position at the left side of the smaller over.
Duplicate/Mirror.

Copy and paste Heart 1 as a new layer.
Resize 70%
Duplicate/Resize 80%

Flutterby 1
Resize 50%

Crop your image but be sure to leave a generous amount of room at the top and bottom.
Highlight your white canvas.
New Raster Layer.
Select All.
Copy and paste a paper of choice Into Selection.
Deselect.
Apply the mask.
Merge Group.

Add your copyrights.

Add your name.

Resize all layers 80%.

I hope you enjoyed this tutorial.
I’d love to see your results.
Email me!
Hugs,
Bev

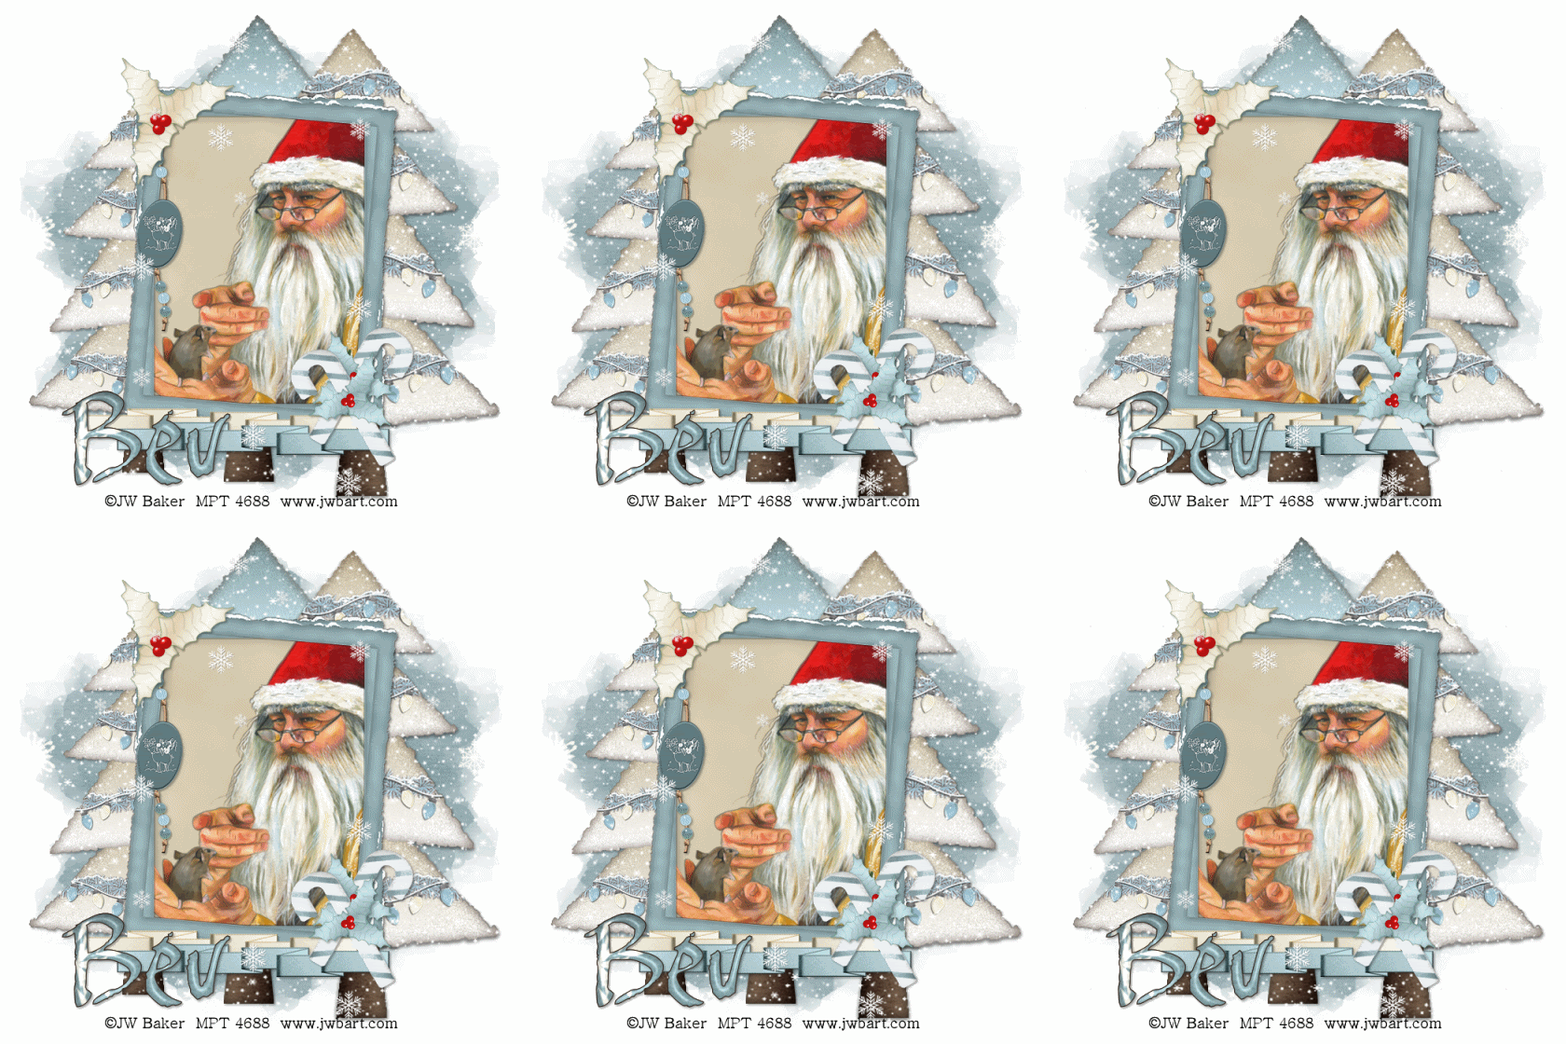
Winter Wonderland


Supplies
1 tube of choice - I used the beautiful artwork of JW Baker which can be purchased here.
Font of Choice - I used Baka here
Weescotlass Mask 220 here
Snow - which I’ve supplied here at Box.net
or dl from RapidShare here
If you know who this snow belong to can you please email me so that I can give proper credit? Thanks!
Animation Shop
“Blue Christmas” is a FTU scrap kit created by Horsin’ ‘Round with Scraps which is myself. You can download the kit here. When downloading please leave a simple thank you - it would mean the world to me.

This tutorial was written assuming you have a working knowledge of PSP.

~♥~ Let’s get started ~♥~

Open up a 700 X 700 transparent image.
Flood fill white.
Copy and paste Frame 1 as a new layer.
Resize 85%
Use your Magic Wand and click inside of it.
Copy and paste a paper of choice as a new layer below the frame.
Selections/Invert
Tap the delete key.
DO NOT DESELECT.

Copy and paste you tube below the frame.
Tap the delete key.
Deselect.

Copy and paste Tree 5 as a new layer.
It’s alright to leave it over the frame for now - we’re going to decorate it...

Copy and paste Garland 2 as a new layer.
Resize 70%.
Position across the bottom section of the tree.
Duplicate/Mirror
Move it to the section above.
Duplicate the bottom garland and move to the 3rd section.
Duplicate the second section and move to the top section of the tree.
Yes, the garland is hanging over the sides of the tree…lol We’ll come back to that.

Copy and paste String Lights 2 as a new layer.
Resize 40%.
Duplicate and mirror in the same manner as you did for the garland.
It’s up to you if you want the lights above or below the garland.

Highlight the Tree layer.
Select All/Float/Defloat
Now highlight each of the garland and light string layers and tap the delete key.

You can add any other embellishments you want to the tree.
Once you’re done decorating merge visible the tree and all its decorations.
Position it behind the frame.
See mine for reference.
Duplicate/Mirror
Resize 120%

Copy and paste Tree 6 as a new layer.
Resize 120% and position behind the frame also.

Add your embellishments:
Beaded String - Resize 50%
Holly 2 - Resize 40%
Candy Cane 1: Resize 65%
Ribbon 1 & 2: Resize 70%
Snowflakes - I chose one, duplicated and resized different sizes

Highlight your white background.
New Raster layer.
Select All
Copy and paste a paper of choice Into Selections.
Deselect.
Apply the mask.
Merge Group.

Add your Copyrights.

Add your name.

Close out all your layers.
Reopen the mask and tree layers.
Merge Visible.
Reopen all your layers.
Close out the background layer and the new merged layer you just created.
Merge all the remaining layers.
Reopen all layers.
You should now only have 3 of them…
White background.
The background of tree.
Your Frame and elements.

Open up the Snow that I’ve supplied.
Highlight Frame 1
Copy
Highlight your working canvas.
Highlight the merged tree layer.
Paste the snow as a new layer.
Rename Snow 1

Make the snow layers active again.
Highlight Frame 2
Copy
Highlight your working canvas.
Paste as a new layer just above Snow 1
Rename this new layer Snow 2.

Repeat the above step with the remaining snow layers.
Take your time and concentrate so you don’t lose track of which layers you’re copying and pasting….I’m advising from experience:S lol
Once you’ve copied and pasted all the snow layers onto your working image then it’s time to animate.

***********
Close out all snow layers accept for Snow 1.
Copy Merge
Carry into Animation Shop.
Edit/Paste/As New Animation.

Back into PSP.
Close out Snow 1 and open up Snow 2.
Copy Merge.
Carry into AS.
Edit/Paste/After Current Frame.

Back into PSP.
Close out Snow 2 and open up Snow 3.
Copy Merge.
Carry into AS.
Edit/Paste/After Current Frame.

Back into PSP.
Close out Snow 3 and open up Snow 4.
Copy Merge.
Carry into AS.
Edit/Paste/After Current Frame.

Back into PSP.
Close out Snow 4 and open up Snow 5.
Copy Merge.
Carry into AS.
Edit/Paste/After Current Frame.

Back into PSP.
Close out Snow 5 and open up Snow 6.
Copy Merge.
Carry into AS.
Edit/Paste/After Current Frame.

Back into PSP.
Close out Snow 6 and open up Snow 7.
Copy Merge.
Carry into AS.
Edit/Paste/After Current Frame.

Back into PSP.
Close out Snow 7 and open up Snow 8.
Copy Merge.
Carry into AS.
Edit/Paste/After Current Frame.

Back into PSP.
Close out Snow 8 and open up Snow 9.
Copy Merge.
Carry into AS.
Edit/Paste/After Current Frame.

Back into PSP.
Close out Snow 9 and open up Snow 10.
Copy Merge.
Carry into AS.
Edit/Paste/After Current Frame.

View your animation.
Admire the snow!
If you’re happy then save.

I hope you enjoyed this tutorial.
I’d love to see your results.
Email me!
Hugs,
Bev


Black Cat

Clicking on the image will enlarge to full view.

Supplies
1 tube of choice - I’m using the beautiful artwork of KatNKDA here
Weescotlass Mask 249 here
“Black Cat” is a PTU full size scrap kit created by Kat of KatNKDA and can be purchased at her store NK Art Shop. You can visit her blog here.
Kat…never a disappointment with your talent!
Thank you!!

Note: If you purchase the bundle kit, the tube is included.

This tutorial was written assuming you have a working knowledge of PSP.

~♥~ Let’s get started ~♥~

Open up a 700 x 700 transparent image.
Flood fill white.
Copy and paste Element 19 as a new layer.
Resize 30%
Use your Selection Tool and outline the square opening.
Selections/Modify/Expand by 6.
New Raster layer below the frame.
Flood fill with a gradient of your choice.
DO NOT DESELECT.

Copy and paste the cat tube as a new layer below the frame.
Resize 50%
Selections/Invert
Tap the delete key.
Deselect.
Change the Properties to Overlay.

Add your embellishments. I used:
Element 28: Resize 25% and 50%
Element 6: Resize 25%
Element 2: Resize 35%
Element 13: Resize 25% and 50%
Element 42: Resize 25% and 50% - Free rotate right 20 degrees/Duplicate/Free rotate right 20 degrees.
Element 43: Resize 25% and 80%
Element 40: Resize 25% and 40%
Copy and paste the Cat tube as a new layer.
Resize 30%

Highlight your white canvas.
New Raster Layer.
Select All.
Copy and paste a paper of choice Into Selection.
Deselect.
Apply the mask.
Merge Group.
Resize 120%

Copy and paste Element 5 as a new layer.
Resize 50%
Free rotate right 45 degrees.
Add your copyrights.

Add your name.
I used the Alpha
Resize 25%

Resize all layers 80%.

I hope you enjoyed this tutorial.
I’d love to see your results.
Email me!
Hugs,
Bev

Sunday, October 25, 2009

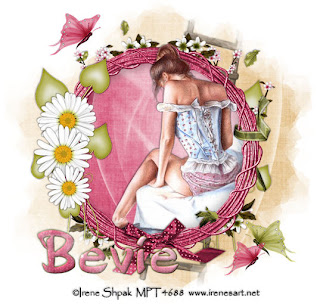
All Woman All Natural


Supplies
1 tube of choice - I’m using the beautiful artwork of Irene Shpak here
Font of Choice - I used Polo-SemiScript here
Weescotlass Mask 220 here
“Oh So Natural” is a PTU tagger size scrap kit created by Nikki of Creative Intentionz and can be purchased at her store Twilight Scraps. You can visit her blog here.
Thank you Nikki for such a beautiful kit!

This tutorial was written assuming you have a working knowledge of PSP.

~♥~ Let’s get started ~♥~
Open up a 700 x 700 transparent image.
Flood fill white.
Copy and paste Frame 2 as a new layer.
Resize 80%
Use your Magic Wand and click inside of it.
Selections/Modify/Expand by 6
Copy and paste a paper of choice below the frame.
Selections/Invert
Tap the delete key.
Deselect.

Copy and paste your tube as a new layer.

Add your embellishments. I used:
Blossom 1: Resize 70%
Use your Freehand Selection Tool and cut the small thick bunch of flowers off of Blossom 2.
Ribbon 1: Resize 35%
Bow Ribbon 2: Resize 40%
Heart Grass: Resize 60%
Daisy 1: Resize 60%
Daisy 2: Resize 60%. Duplicate/Resize 80%
Leaves: choose various ones
Butterfly 1: 40% Duplicate/Resize 80%
Butterfly 2: Resize 40%

Highlight your white canvas.
New Raster Layer.
Select All.
Copy and paste a paper of choice Into Selection.
Deselect.
Copy and paste the Ladder as a new layer.
Free rotate right 10 degrees.
Lower the opacity to 89
Merge down.
Apply the mask.
Merge Group.

Add your copyrights.

Add your name.
Give it a slight inner bevel:

Copy and paste Fog as a new layer and position it so that some of it is over your name.

Resize all layers 80%.

I hope you enjoyed this tutorial.
I’d love to see your results.
Email me!
Hugs,
Bev