Supplies
1 tube of choice – I used the amazing artwork of VeryMany which can be
purchased from Pics for Design. You must have
a license to use.
Font of choice - I used Simply Glamorous here
Divine Intentioinz template 295 here
Monti Circular mark here
Plugs Ins:
Eyecandy 3.1 – Glow
“Emo Rock” is a tagger size scrap
kit created by Niqui of Niqui’s Deisgns and can be purchased from Inspirations of Scrap Friends. You can visit her
blog here.
Thank you Niqui for an awesome kit.
This tutorial was written assuming you have a working knowledge of PSP.
~♥~ Let’s get started ~♥~
Open up the template.
Shift + D.
Close out the Original.
Delete the top 3 layers.
Highlight Large Rectangle layer.
Click on it with your Magic Wand.
New Raster layer.
Flood fill with #ff0d91.
Deselect.
Delete the template layer.
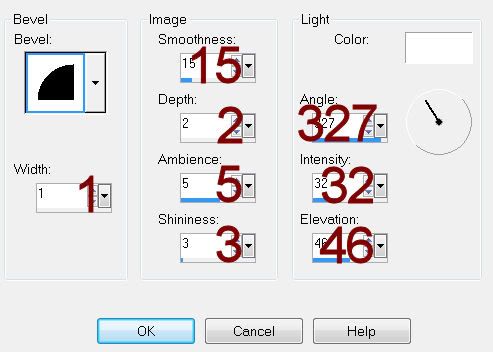
Give it a slight Inner Bevel.
Highlight Circle layer.
Click anywhere outside of it with your Magic Wand.
Copy and paste Diamonds as a new layer.
Resize 80%
Selections/Invert
Tap the delete key.
Deselect.
Color Pallet:
Foreground: #f894d6
Background: #ffffff
Set to Gradient –
Style: Sunburst
Invert checked
Highlight Small Circle 1 layer.
Click on it with your Magic Wand.
New Raster layer.
Flood fill with the gradient.
Deselect.
Delete the template layer.
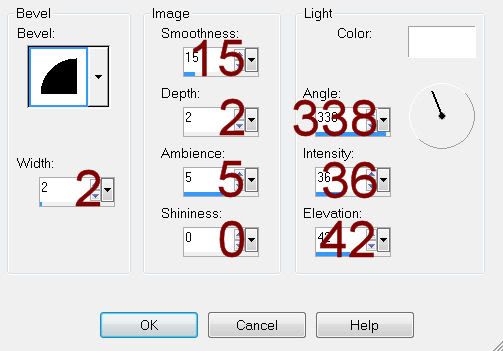
Apply Eyecandy 3.1 – Glow:
Width: 3
Opacity: 100
Opacity Drop off: Fat
Color: White
OK
Color Pallet:
Change the gradient –
Style: Linear
Angle: 66
Highlight Oval Edge Rectangle layer.
Click on it with your Magic Wand.
New Raster layer.
Flood fill with the gradient.
Copy and paste your tube as a new layer.
Move into position over the rectangle.
Selections/Invert
Tap the delete key.
Deselect.
Delete the template layer.
Apply Eyecandy 3.1 – Glow:
Use same settings
Highlight Rectangle 1 layer.
Click anywhere outside of it with your Magic Wand.
Selections/Invert
New Raster layer.
Flood fill with #000000
Adjust/Add Remove Noise/Add Noise:
Random and Monochrome checked
Noise: 68
OK
Deselect.
Delete the template layer.
Color Pallet:
Change the gradient settings:
Angle: 66
Repeat: 1
Invert unchecked
Highlight Rectangle 2 layer.
Click on it with your Magic Wand.
New Raster layer.
Flood fill with the gradient.
Deselect.
Delete the template layer.
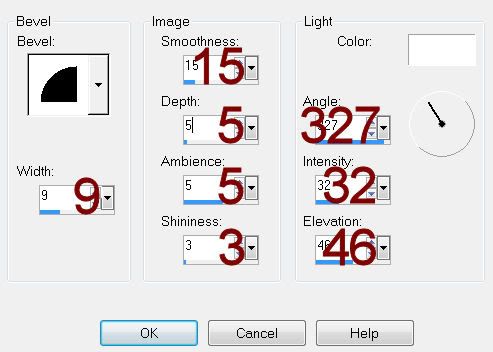
Give it the same Glow effect.
Color Pallet:
Foreground: #ff0d91
Background: #f894d6
Keep settings the same.
Highlight Rectangle 2 layer.
Click on it with your Magic Wand.
New Raster layer.
Flood fill with the gradient.
Deselect.
Delete the template layer.
Add your elements. I used:
Glitter
Bow 1: Resize 70%/Flip/Free
Rotate Right 90 degrees
Heart 1: Resize 35%/Mirror/Free
Rotate Right 10 degrees
Heart: Resize 35%/Duplicate
Sparkles: Resize 40%
Highlight your white canvas.
New Raster layer.
Select All.
Copy and paste Paper 18 Into Selection.
Deselect.
Adjust/Blur/Gaussian Blur:
Radius: 15
OK
Apply the mask.
Merge Group.
Add your name.
Apply Eyecandy 3.1 Glow:
Same Settings