
Supplies
1 tube of choice – I used the adorable artwork of Lucia Stewart which
can be purchased from PSP TubeStop. You must have a license to use.
Font of choice - I used LD Gregarious – a pay font
Plug Ins used:
Eyecandy 5 – Nature: Smoke
Animation Shop
“Feels Like Today” is a tagger size scrap kit created by Kara of Sweet Cravings Scraps and
can be purchased from Exquisite Scraps. You can visit
her blog here.
Thank you Kara for a really adorable kit!
This tutorial was written assuming you have a working knowledge of PSP.
~♥~ Let’s get started ~♥~
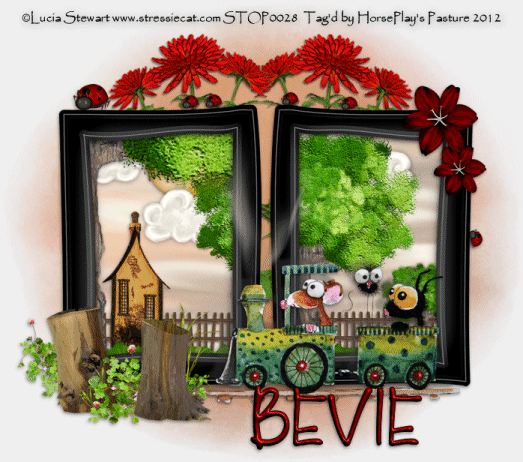
Open up a 700 x 700 blank canvas.
Flood fill white.
Copy and paste Frame 3 as a new layer.
Resize 50%
Free rotate Left 90 degrees.
Position on left side of canvas.
Duplicate/Mirror
Move both frames into exact position – see my tag for reference.
Close out your white background.
Merge Visible.
Reopen your white background.
Use your Magic Wand and click inside of each frame.
Selections/Modify/Expand by 4.
New Raster layer below the frame.
Copy and paste Paper 16 Into Selection.
Deselect for now.
Add the following elements below the frame – see my tag for reference
of placement. Don’t worry about what
overhangs the frames. We’ll clean that
up in a bit. –
Tree
Tree again: Resize 50%
Tree again: Resize 20%
Fence 1: Resize 15%/Duplicate 4x’s
and match the ends to create one long fence.
Merge Visible all fence layers.
Cloud 1: Resize 20%/Duplicate as
many times as you like
Sunny Moon: Resize 25%
Fantasy House: Resize 25%
Grass
Highlight the paper layer.
Click anywhere outside of it with your Magic Wand.
Highlight each elements that overhangs the frames and tap the delete
key.
Deselect.
Add the rest of your elements. I
used:
Flower 2: Duplicate/Mirror/Erase
the stem that stick out at the bottom of the frames.
Tree Stumps: Resize 50%
Flower 6: Resize 20%/Duplicate/Resize
70%
Ladybug 4: Resize
10%/Duplicate/Resize 50%/Duplicate as many times as you like. Free rotate one of the bugs Right 90 degrees.
Copy and paste your tube as a new layer.
If you’re using the same tube as me, use “Train with Rails” layer,
resize 60%
Crop your image.
Highlight your white background.
New Raster layer.
Select All.
Copy and paste Paper 17 Into Selection.
Deselect.
Apply the mask.
Merge Group.
Add your credits.
Add your name.
Foreground: #000000
Background: #800000
Stroke: 1
Type your name.
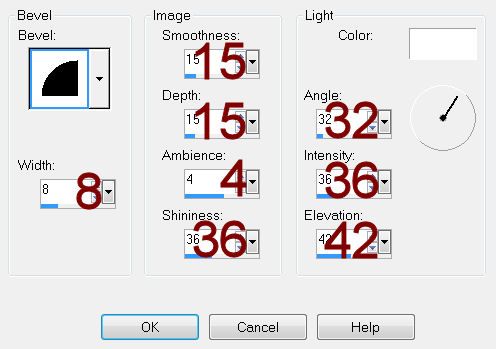
Give it a slight Inner Bevel:
Resize all layers 80%.
If you don’t want to animate then save your tag.
If you don’t want to animate:
Highlight the tube layer.
Duplicate 3x’s for a total of 4.
Rename them Train 1, 2, 3, and 4.
Highlight Train 1 layer.
Use your Freehand Selection Tool set on Freehand and section off the
area where you would like the smoke to come out of the smoke stack.
Apply Eyecandy 5: Nature – Smoke:
Settings Tab:
Choose Small Smokestack
Basic Tab:

Color and Lighting Tab:
Leave default settings alone
OK
Close out Train 1 layer.
Open up Train 2 layer.
Apply the same smoke effect accept hit the Random Seed button once.
Close out Train 2 layer.
Open up Train 3 layer.
Repeat the above step.
Close out Train 3 layer.
Open up Train 4 layer.
Repeat the above step.
Deselect.
Close out Train 4 layer.
Reopen Train 1 layer.
Copy Merge
~Time to Animate~
Open up Animation Shop.
Edit/Paste as New Animation.
Back in PSP.
Close out Train 1 layer.
Open up Train 2 layer.
Copy Merge.
Carry into AS
Edit/Paste/After current Frame.
Back in PSP.
Close out Train 2 layer.
Open up Train 3 layer.
Copy Merge.
Carry into AS
Edit/Paste/After current Frame.
Back in PSP.
Close out Train 3 layer.
Open up Train 4 layer.
Copy Merge.
Carry into AS
Edit/Paste/After current Frame.
Control + A to highlight all frames.
Animation/Frame Properties:
Display Time: 25
OK
View your animation.
If you’re happy:
Animation/Resize Animation:
Percentage of Original checked
Width x Height: 75
OK
Save your animation.
