Supplies
1 tube of choice – I used the beautiful artwork of Sue Rundle-Hughes
which can be purchased from PSP TubeStop. You must have a license to use.
Font of choice – I used Inspiration here
Plugs Ins used:
Eyecandy 3.1 - Glow
Xero - Porcelain
“Summer’s End – Magical!” is a tagger size scrap kit created by me, Bev
of HorsePlay’s Pasture Designs and can be purchased from either of your favorite stores – Lollipops n Gumdrops or Butterfly Blush Designs. You can
visit my designing blog here.
~♥~ Let’s get started ~♥~
Open up the template.
Shift + D.
Close out the original.
Delete the credit layer.
Highlight Square 1 layer.
Click on it with your Magic Wand.
New Raster layer.
Copy and paste Paper 1 Into Selection.
Deselect.
Delete the template layer.
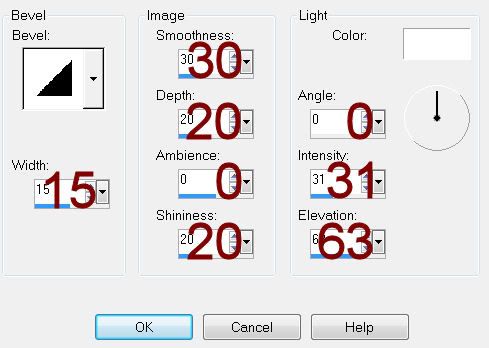
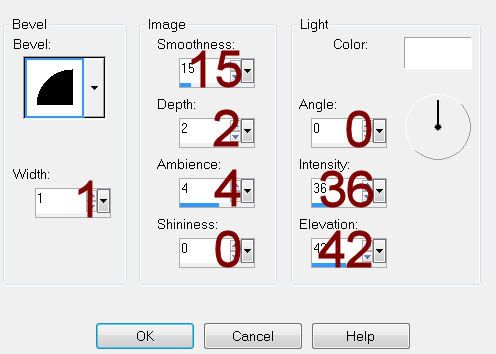
Give it a slight Inner bevel:
Highlight Squre 2 layer.
Click on it with your Magic Wand.
New Raster layer.
Copy and paste Paper 5 Into Selection.
Deselect.
Give it the same slight Inner Bevel.
Copy and paste Element 7 as a new layer.
Resize 85%
Free Rotate Right 10 degrees – position at the top of the paper.
Duplicate – position at the bottom of the paper.
Merge Visible both element layers.
Highlight the template layer.
Click anywhere outside of it with your Magic Wand.
Highlight the merged element layer.
Tap the delete key.
Deselect.
Delete the template layer.
Highlight Circle layer.
Click on it with your Magic Wand.
New Raster layer.
Copy and paste Paper 3 Into Selection.
Deselect.
Delete the template layer.
Highlight the paper layer.
Apply Eyecandy 3.1 – Glow:
Width: 3
Opacity: 100
Opacity Drop Off: Fat
Color: #a21a1e
Highlight Bottom Diamond layer.
Merge Down.
Both Diamonds should be on the same layer.
Click on both diamonds with your Magic Wand.
New Raster layer.
Copy and paste Paper 9 Into Selection.
Copy and paste your tube as a new layer over the diamonds. I resized mine so it was a bit larger.
Selections/Invert
Tap the delete key.
Change the Properties to Multiply.
Deselect.
Delete the template layer.
To the tube layer apply Xero – Porcelain:
Use Default settings accept lower the blue channel button to 0.
Highlight Strip layer.
Use your Target Tool and change the color to #546327.
Copy and paste your tube as a new layer.
Position in front of the circle paper layer.
Add your elements. I used:
14: Resize 45%/Duplicate/Mirror/Flip
8: Resize 60%
21: Resize 25%
6: Resize 25%
22: Resize 25%
38: Resize 40%
11: Resize 30%/Duplicate 3x’s
Highlight your white background.
New Raster layer.
Select All.
Copy and paste Paper 1 Into Selection.
Deselect.
Apply the mask.
Resize 105%
Merge Group.
Add your credits.
Add your name.
Resize all layers 80%.