Saturday, February 20, 2010

Guess Who's on His Way

Clicking on the image will take you to the tutorial.

Supplies
1 tube of choice - I’m using the wonderful artwork of Elias Chatzoudis which you can purchase here.
Font of Choice - I used Nashville here and SwingSet BB here
Weescotlass Mask 138 here
“Endless Love” is a PTU tagger size scrap kit created by Jen of C.C. Creationz and can be purchased from her store Scrappin‘ Dollars.
Thank you Jen for this beautiful kit that sent my mojo into action right off!

This tutorial was written assuming you have a working knowledge of PSP.

~♥~ Let’s get started ~♥~

Open up a 700 X 700 blank canvas.
Flood fill white.

Copy and paste Frame 1 as a new layer.
Use your Magic Wand and click inside of each frame.
Selections/Modify/Expand by 6.
New Raster layer below the frame.
Copy and paste a paper of choice Into Selection.
Deselect.

Copy and paste your tube as a new layer.

Add your embellishments. I used:
Sunflower 1: Resize 40%
Sunflower 2: Resize 35%
Single Rose 1
Single Rose 3
Heart 4: Resize 50% Free rotate left 15 degrees. Duplicate/Mirror/Resize 80%
 
Using the Nashville font type out the words “Hippity Hoppity” and position over the top of the frame.
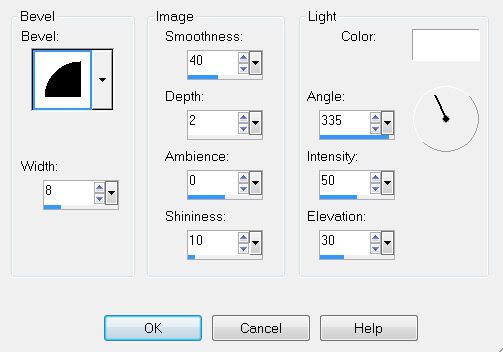
Give it a slight inner bevel:

Type out “Look who‘s on his way“ and position at the bottom.
Apply the same inner bevel.

Crop your image.

Highlight your white background.
Select All.
Copy and paste a paper of choice Into Selection.
Deselect.
Apply the mask.
Merge Group.

Add your copyrights.

Add your name using the SwingSet font.
Give it the same inner bevel.

Resize all layers 80%
I hope you enjoyed this tutorial.
I’d love to see your results and show it off in my gallery.
Email me!
Hugs,
Bev

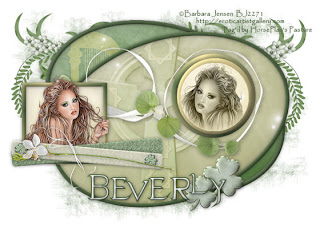
Irish Beauty

Clicking on the image will enlarge to full view.

Supplies
1 tube of choice - I’m using the beautiful artwork of Barbara Jensen which can purchase here
Font of Choice - I’m using Evanescence Series here
Weescotlass Mask 297 here
Scraps of Enchantment Template 112 here
“Irish Mist” is a PTU full size kit created by Cari of Kissed by Cari and can be purchased at TKO Scraps. You can visit Cari’s blog here.
Thank you so much for this softly created Irish kit, Cari. It is truly beautiful.

This tutorial was written assuming you have a working knowledge of PSP.

~♥~ Let’s get started ~♥~

Open up the template.
Delete TOU layer.
Image/Canvas Size
700 X 500
New Raster layer.
Send to bottom.
Flood Fill white.

Highlight BlkOval layer.
Select All/Float/Defloat
Copy and paste Paper 6 as a new layer.
Resize 25% and 65%
Selections/Invert
Tap the delete key.
DO NOT DESELECT.

Copy and paste Harp as a new layer above the paper.
Resize 35% and move into position.
See my tag for reference.
Tap the delete key.
Change the Properties to Soft Light.
Deselect.
Delete the template layer.

Highlight GreOvalFrame Layer.
Select All/Float/Defloat
New Raster layer.
Flood fill with a dark matching color.
Deselect.
Delete the template layer.
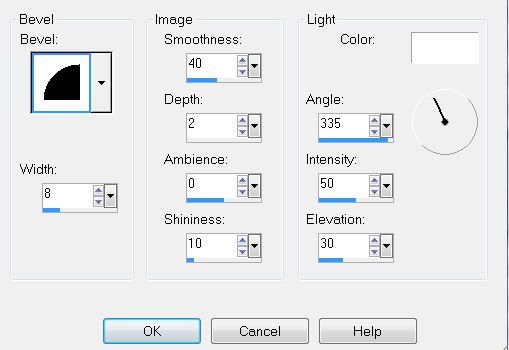
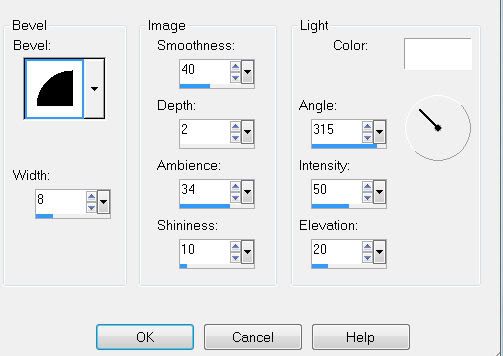
Give it a slight inner bevel:

Highlight WhiteOval layer.
Select All/Float/Defloat
Copy and paste Paper 7 as a new layer.
Resize 25% and 65%
Selections/Invert
Tap the delete key.
DO NOT DESELECT.

Copy and paste Celtic Cross 2 as a new layer above the paper.
Resize 25% and move into position.
See my tag for reference.
Tap the delete key.
Change the Properties to Soft Light.
Deselect.
Delete the template layer.

Highlight BlkOvalFrame layer.
Repeat the same steps as you did for the GreOvalFrame.

Highlight Black Square layer.
Select All/Float/Defloat
Copy and paste Paper 8 as a new layer.
Resize 25% and 30%
Selections/Invert
Tap the delete key.
DO NOT DESELECT.

Copy and paste your tube as a new layer below the frame.
Tap the delete key.
Deselect.
Delete the template layer.

Highlight SquareGreyFrame layer.
Select All/Float/Defloat
New Raster layer.
Flood fill with a gradient that will match your tag.
Deselect.
Delete the template layer.
Give it the same inner bevel.

Highlight Black Circle layer.
Select All/Float/Defloat
New Raster layer.
Flood fill with the same gradient you just used.
Give the same inner bevel.
Deselect.
Delete the template layer.

Highlight DarkGreyCircle layer.
Select All/Float/Defloat
New Raster layer.
Flood fill with the dark color you used for the oval frames.
Give the same inner bevel.
Deselect.
Delete the template layer.

Highlight LightGreyCircle layer.
Select All/Float/Defloat
Copy and paste Paper 8 again as a new layer.
Resize 25% and 25%
Selections/Invert
Tap the delete key.
DO NOT DESELECT.
Apply the same inner bevel.
Copy and paste your tube again as a new layer over the paper.
Resize so that it’s slightly larger than your other one.
Position over the circle.
Selections/Invert
Selections/Modify/Feather
Number of Pixels:
35
OK
Selections/Invert
Tap the delete key until you have a nice feathered effect to your tube.
Deselect.
Delete the template layer.
Change the Properties to Luminance Legacy.

Highlight DarkGreyStrip layer.
Select All/Float/Defloat
Copy and paste Paper 2 as anew layer.
Resize 25% and 40%
Selections/Invert
Tap the delete key.
Deselect.
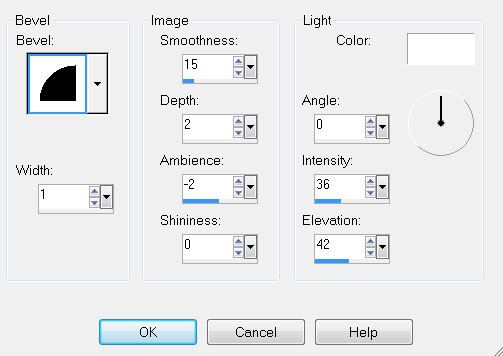
Give it a slight inner bevel:


Highlight LightGreyStrip layer.
Select All/Float/Defloat
Copy and paste Paper 3 as anew layer.
Resize 25% and 40%
Selections/Invert
Tap the delete key.
Deselect.
Give it the same slight inner bevel.

Add your embellishments. I used:
Shamrock: Resize 25%, 25%, and 25%
Flower: Resize 25% and 40% Mirror/Free rotate left 10 degrees
Cluster Frame: Resize 25% and 60%
Floral 1: Resize 25%

Copy and paste Floral 1 as a new layer again.
Resize 25%
Using your Freehand Selection Tool, zoom in on it and outline the shamrock.
Edit/Copy
Edit/Paste as new layer.
Delete the layer that you outlined the shamrock on.
Deselect.
Now that you have a cutout of the shamrock as a new layer, resize 50%
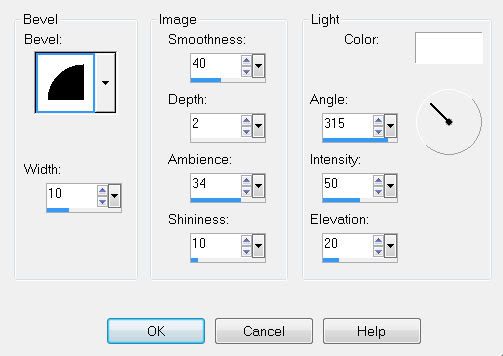
Give it a slight inner bevel:

Duplicate/Resize 80%
We’ll use the shamrocks in a bit….

Highlight your white background.
New Raster layer.
Select All.
Copy and paste a paper of choice Into Selection.
Deselect.
Apply the mask.
Merge Group.

Add your copyrights.

Add your name.
Give it the same inner bevel you used last.
Move the shamrocks into position to decorate your name.

Resize all layers 85%.

I hope you enjoyed this tutorial.
I’d love to see your results and show it off in my gallery.
Email me!
Hugs,
Bev

Friday, February 19, 2010

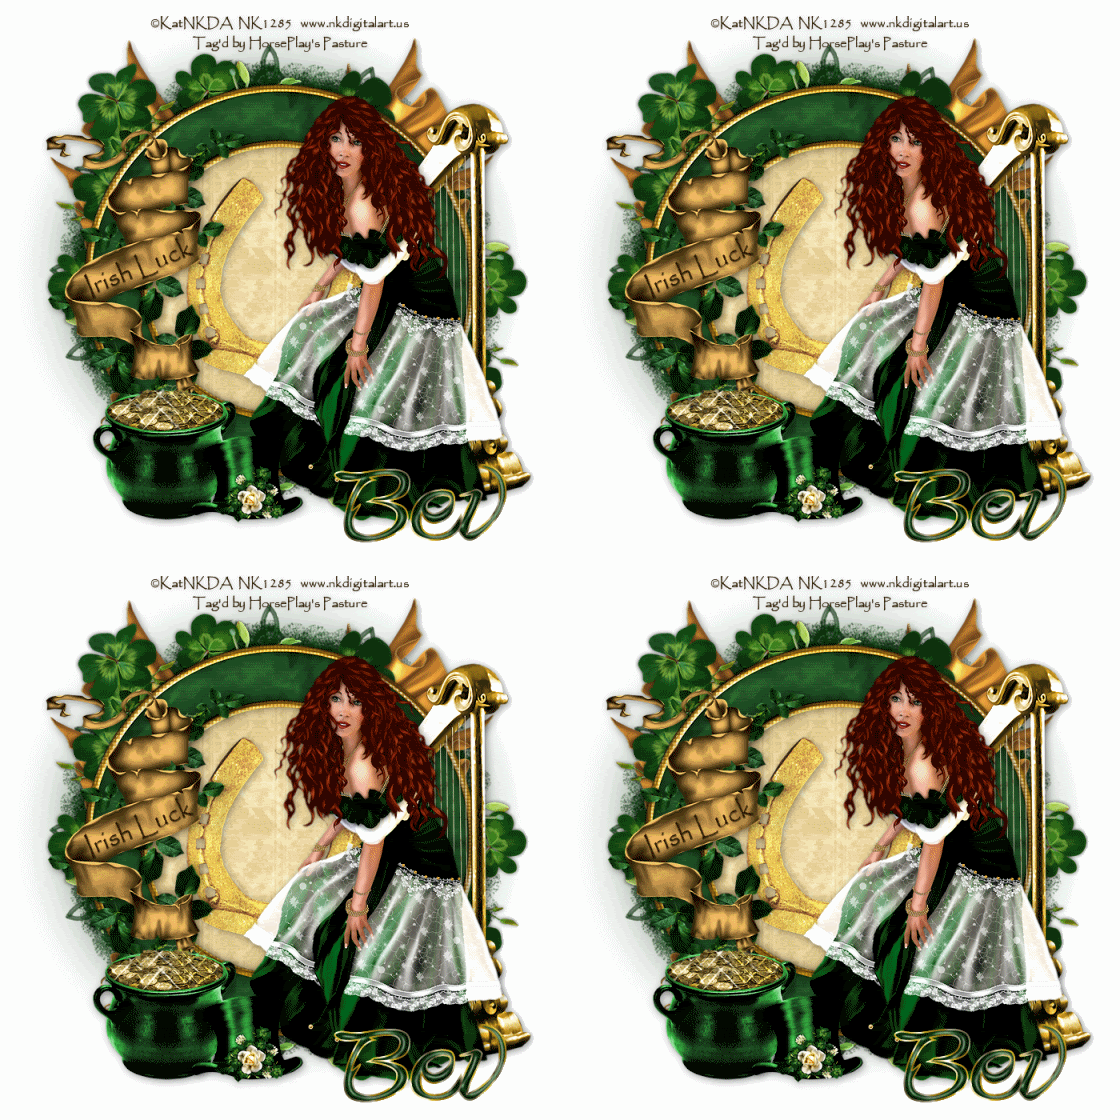
Irish Lass


Supplies
1 tube of choice - I’m using Irish Lass - the artwork of KatNKDA which you can purchase here
Font of Choice - I’m using Fmiring Campo type One here and Papyrus which came with my pc
Mask - included in Kat’s art kit
Alien Skin - Xenofex 2: Constellation
Animation Shop
“Clover” is a PTU tagger size art kit created by KatNKDA. It can be purchased from her store NK Art Shop. You can visit Kat’s blog here.
Thank you so much for a beautiful Irish kit, Kat. The only thing missing is the leprechaun…lol

This tutorial was written assuming you have a working knowledge of PSP.

~♥~ Let’s get started ~♥~

Open up a transparent 700 X 700 canvas.
Flood Fill white.

Copy and paste Element 23 as a new layer.
Resize 75%
Use your Magic Wand and click inside of it.
Selections/Modify/Expand by 6.
New Raster layer below the frame.
Copy and paste a paper of choice Into Selection.
Deselect.

Copy and paste Element 28 as a new layer.
Image Flip/Mirror
Resize 70%
Center within the frame.
Lower the Opacity to about to about 85.

Copy and paste your tube as a new layer.
If you used Kat’s Irish Lass tube, resize 55%.

Add your embellishments. I used:
Element 17: Resize 50%
Element 32: Resize 60%
Element 29: Resize 40%
Element 31: Resize 25%
Element 43: Resize 25%
Element 26
Element 10: Resize 80%

Using the Papyrus font (or whichever font you chose):
Type out the words “Irish Luck”
Free rotate left 22 degrees and position over Element 17.

Highlight your white background.
New Raster layer.
Select All.
Copy and paste a paper of choice Into Selection.
Deselect.
Apply Mask 1 - be sure “Invert Data” is checked.
Merge Group.

Add your copyrights.

Add your name.
Give it a slight inner bevel:


Highlight the Pot of Gold layer.
Duplicate 3 times for a total of 4 layers.
Rename them POG 1, 2, 3, and 4.

Highlight POG 1
Use your Freehand Selection Tool and outline the gold.
Apply Xenofex 2: Constellation:


Highlight POG 2 and apply Constellation again accept click the random seed button once.

Repeat the above step with POG 3 and 4.
Deselect.
Close out POG 2, 3, and 4 layers.
Copy Merge

~Time to Animate~

Open Animation Shop.
Edit/Paste/As New Animation.

Back in PSP.
Close out POG 1.
Open POG 2.
Copy Merge.

Carry into AS.
Edit/Paste/After Current Frame.

Back in PSP.
Close out POG 2.
Open POG 3.
Copy Merge.

Carry into AS.
Edit/Paste/After Current Frame.

Back in PSP.
Close out POG 3.
Open POG 4.
Copy Merge.

Carry into AS.
Edit/Paste/After Current Frame.

Ctrl + A to highlight all layers.
Animation/Frame Properties
Display Time: 18
OK

If you’re happy with your animation then save.

I hope you enjoyed this tutorial.
I’d love to see your results and show it off in my gallery.
Email me!
Hugs,
Bev

Thursday, February 18, 2010

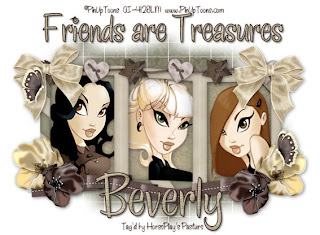
Friends are Treasures


Clicking on the image will enlarge to full view.

Supplies
3 tubes of choice - I’m using the wonderful artwork of PinUpToons which you can purchase here.
Font of Choice - I used Chicken Basket which is a pay font.
Weescotlass Mask 84 here
“Natural” is a FTU tagger size scrap kit created by Heiki of Fantasy Dreams Designs and can be downloaded from her blog here. Please leave a thank you when downloading as it’s a small gesture for hard work given freely.
Thank you so much for sharing your talent with us, Heiki.

This tutorial was written assuming you have a working knowledge of PSP.

~♥~ Let’s get started ~♥~

Open up a 700 X 700 blank canvas.
Flood fill white.

Copy and paste Element 32 as a new layer.
Resize 85%
Use your Magic Wand and click inside of each frame.
Selections/Modify/Expand by 6.
New Raster layer below the frame.
Copy and paste a paper of choice Into Selection.
Deselect.

Highlight your frame layer and click inside the first frame.
Selections/Modify/Expand by 6.
Copy and paste a tube below the frame.
Move into position.
Selections/Invert
Tap the delete key.
Deselect.

Repeat the above step with the other 2 frames.

Add your embellishments. I used:
Element 43: Resize 70%
Element 12: Resize 35%
Element 52: Resize 70%
Element 77: Resize 30% Mirror/Free rotate right 40 degrees
Element 75: Resize 25%
Element 74: Resize 25%

Type out the words “Friends are Treasures” and position over the frame.
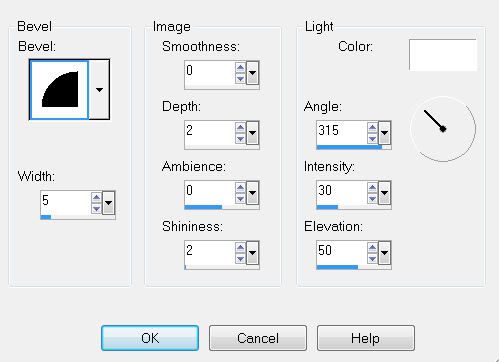
Give it a slight inner bevel:

Type your name and position it at the bottom of the frame.
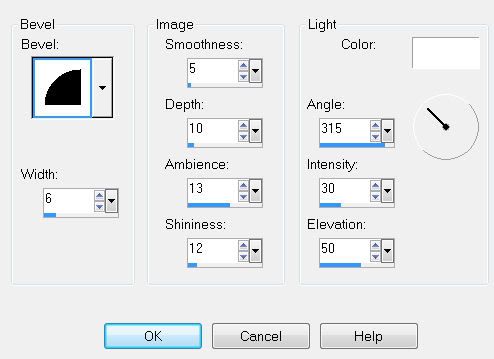
Give it the same inner bevel.

Crop your image.

Highlight your white background.
Select All.
Copy and paste a paper of choice Into Selection.
Deselect.
Apply the mask.
Merge Group.

Add your copyrights.

Resize all layers 85%.

I hope you enjoyed this tutorial.
I’d love to see your results and show it off in my gallery.
Email me!
Hugs,
Bev

Wednesday, February 17, 2010

Perfection

Clicking on the image will enlarge to full view.

Supplies
1 tube of choice - I’m using the wonderful artwork of Jennifer Janesko which you can purchase here.
Font of Choice - I used Bonheur Royale which is a pay font.
Weescotlass Mask 241 here
“Carefree” is a FTU tagger size scrap kit created by Cora's Creations and can be downloaded from Pimp‘d Desingz. Please leave a thank you when downloading as it’s a small gesture for hard work given freely.
Please visit her official Facebook blog here.
Thank you so much for sharing your talented generosity, Cora. This is truly a very pretty kit.

This tutorial was written assuming you have a working knowledge of PSP.

~♥~ Let’s get started ~♥~

Open up a 700 X 700 blank canvas.
Flood fill white
.
Copy and paste Mat 1 as a new layer.
Resize 80%
Select All/Float/Defloat
Copy and paste your tube as a new layer.
Position over the mat.
Selections/Invert
Tap the delete key.
Deselect.

Copy and paste Stitching 01 as a new layer.
Resize 80%

Copy and paste Green 05 as a new layer.
Position behind the mat.
Duplicate/Mirror/Resize 70%
Paste the Green again - this time bring it to the top in your layers pallet.
Resize 60%
Position at the right of the circle.
See my tag for reference.

Copy and paste Flower 03 as a new layer.
Move into position behind the mat.
Duplicate
Move into position.

Copy and paste Flower 04 as a new layer.
Resize 70%
Duplicate/Mirror

Copy and paste Butterfly as a new layer.
Resize 30%
Free rotate left 30 degrees

Copy and paste Wind as a new layer just above your white background.

Highlight your white background.
Select All.
Copy and paste a paper of choice Into Selection.
Deselect.
Apply the mask.
Merge Group.

Add your copyrights.

Add your name.

Resize all layers 80%

I hope you enjoyed this tutorial.
I’d love to see your results and show it off in my gallery.
Email me!
Hugs,
Bev

Give a Horse What He Needs

Clicking on the image will enlarge to full view.

Supplies
Font of Choice - I used Lavishly Yours which is a pay font.
Monti Circular Mask here
Blissfully Beth’s Template 81 here
Xenofex 2: Burnt Edges
“Wild Horses” is a PTU tagger size scrap kit created by Dianna of Digicats (and dogs) and can be purchased at Aussie Scraps. You can visit her blog here.
Thank you Dianna for a such a beautiful kit. I love the way you captured the whole theme of Native and horses...both of which I have a passionate love for.

This tutorial was written assuming you have a working knowledge of PSP.

~♥~ Let’s get started ~♥~

Open up the template.
Resize all layers 120%.
Delete the credit and word art layer.

Highlight 3 layer.
Select All/Float/Defloat
New Raster layer.
Copy and paste a paper of choice Into Selection.
Deselect.
Delete the template layer.

Apply Xenofex 2: Burnt Edges:

Repeat the above steps with 2 and 1 layers.

Highlight Black Frame layer.
Select All/Float/Defloat
New Raster layer.
Copy and paste a paper of choice Into Selection.
Deselect.
Give it a slight inner bevel:


Highlight Gray Rect Frame layer.
Select All/Float/Defloat
Copy and paste a paper of choice as a new layer - I used the top left corner of Paper 29.
Selections/Invert
Tap the delete key.
Deselect.

Copy and paste Tree 1 as a new layer.
Resize 70%
Move beneath the frame in your layers pallet.
Move into position at the left side of the rectangle.
Duplicate/Mirror
There’ll be a gap in the grass - that’s ok - you’ll duplicate one of the trees and move it so the grass of that tree covers the gap. Now use your Eraser Tool to erase all accept what you need to close that gap up.

I realize the trees are sticking out of the frame - we’ll take care of that in a bit.

Copy and paste Full Moon as a new layer.
Resize 35%
In your layers pallet, move it below the trees and move into position on your canvas.

Merge Visible all the tree layers including the grass layer that’s closing the gap and also your moon layer.
Highlight your rectangle layer.
Select All/Float/Defloat
Selections/Invert
Highlight the merged layer
Tap the delete key.
Deselect.

Copy and paste Eagle 2 as a new layer.
Resize 25% and 70%

Copy and paste Mustang 2 as a new layer.
Resize 25%

Copy and paste Mustang 1 as a new layer.
Resize 25%

Add your embellishments. I used:
Hanging Feather 4: Resize 70%
Fiber 6: Resize 40%
Butterfly 7: Resize 25% and 80% Free rotate 30 degrees left
Eagle 1

Highlight your white background.
Select All.
Copy and paste a paper of choice Into Selection.
Deselect.
Apply the mask.
Merge Group.

Copy and paste each of the horses you used in the rectangle as new layers above the mask and resize them each 120%.
Merge Visible both horses.
Apply the mask.
Merge Group.
Lower the Opacity to around 32.

If you used the poser mustangs you must credit Outlaw by Designs. The proper way to write the credit is in the TOU or you can see my tag for reference.

Write the words
“Give a horse what he needs -
He’ll give you his heart.”
Or whatever words you like and position them over the top of the rectangle.

Add your name.
Give it the same inner bevel.

Resize all layers 80%.

I hope you enjoyed this tutorial.
I’d love to see your results and show it off in my gallery.
Email me!
Hugs,
Bev

Rock and Roses

Clicking on the tag will enlarge to full view.

Supplies
2 tubes of choice - I’m using the wonderful artwork of Elias Chatzoudis which you can purchase here.
Font of Choice - I used One Miguel Shaded here
Weescotlass Mask 138 here
“Rock and Rose” is a PTU tagger size scrap kit created by Tamie of Addictive Pleasures and can be purchased at Twilght Scraps. You can visit her blog here.
Thank you Tamie for a totally wicked kit! Love it!

This tutorial was written assuming you have a working knowledge of PSP.

~♥~ Let’s get started ~♥~

Open up a 700 X 700 blank canvas.
Flood Fill white.

Copy and paste Frame 2 as a new layer.
Resize 70%
Position near the top right corner of your canvas.
Duplicate/Mirror
Position near the bottom left corner of your canvas.
Highlight the top right frame.
Click inside with your Magic Wand.
Selections/Modify/Expand by 4.
New Raster layer below the frame.
Copy and paste a paper of choice Into Selection.
Copy and paste your tube below the frame.
Selections/Invert
Tap the delete key.
Deselect.

Copy and paste Word Art 2 as a new layer.
Resize 30%
Move it below your tube layer in your layers pallet.

Highlight the bottom left frame.
Click inside with your Magic Wand.
Selections/Modify/Expand by 4.
New Raster layer below the frame.
Copy and paste the same paper as before Into Selection.
Deselect.

Copy and paste Word Art 3 as a new layer below the frame.
Resize 30%.

Copy and paste your other tube as a new layer above the frame.

Add your embellishments. I used:
Music Notes
Diamond: Resize 40%
Ribbon 2: Resize 35% Free rotate right 90 degrees
Chain: Resize 35%
Heart Hanger: Resize 50%

Highlight your white background.
Select All.
Copy and paste a paper of choice Into Selection.
Deselect.
Apply the mask.
Resize 130%
Merge Group.

Add your copyrights.

Add your name.
Give it a slight inner bevel:

Resize all layers 80%.

I hope you enjoyed this tutorial.
I’d love to see your results and show it off in my gallery.
Email me!
Hugs,
Bev
Tuesday, February 16, 2010

On Cloud 9

Clicking on the image will enlarge to full view.

Supplies
1 tube of choice - I’m using the beautiful artwork of Zindy S.D. Nielsen which you can purchase here.
Font of Choice - I used Impact which came with my pc
Scraps of Enchantment Template 114 here
Artmama Mask 1 here
Xero: Porcelain
“On Cloud Nine” is a PTU tagger size scrap kit created by Vella of Wench Designs and can be purchased at TKO Scraps. You can visit her blog here.
Thank you Vella for a beautiful kit!

This tutorial was written assuming you have a working knowledge of PSP.

~♥~ Let’s get started ~♥~

Open up the template.
New Raster layer.
Send to bottom.
Flood fill white.
Delete TOU and Heart Strip layers.

Highlight Grey Rectangle layer.
Select All/Float/Defloat
New Raster layer.
Copy and paste a paper of choice Into Selection.
Deselect.
Delete the template layer.

Highlight Pink Rectangle layer.
Select All/Float/Defloat
Copy and paste a paper of choice as a new layer.
Resize 75%
Selections/Invert
Tap the delete key.
Deselect.
Delete the template layer.

Highlight White Strip layer.
Select All/Float/Defloat
New Raster layer.
Flood fill with a dark color of your choice.
Deselect.
Delete the template layer.
Give it a texture of your choice.

Highlight Black Rectangle layer.
Select All/Float/Defloat
New Raster layer.
Flood fill with a light color of your choice.
Deselect.
Delete the template layer.
Adjust/Add Remove Noise/Add Noise
Uniform Checked
Noise: 29%
OK

Highlight Brush 1 layer.
Merge down.
Brush 1 and Brush 2 should now be on one layer together.

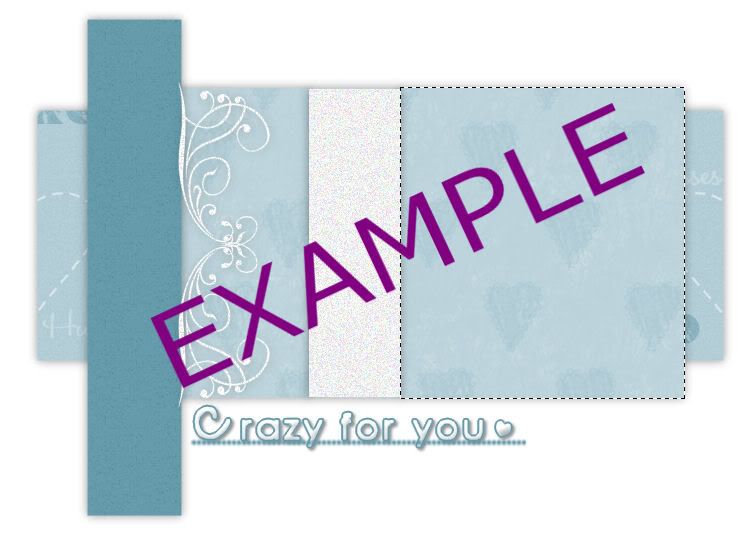
Highlight Crazy For You layer.
Select All/Float/Defloat
New Raster layer.
Flood fill with the dark color you used before
Selections/Modify/Contract by 2
Flood fill with the light color you used before
DO NOT DESELECT
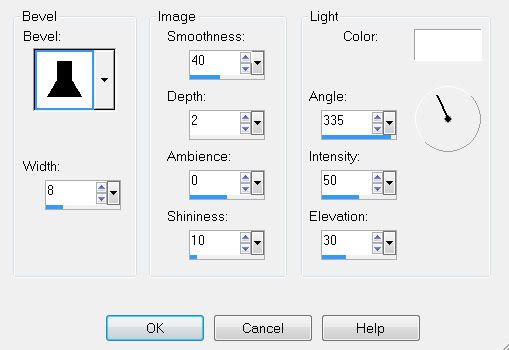
Give it a slight inner bevel:


Deselect
Delete the template layer.

Highlight Black Heart layer.
Repeat the above step.

Highlight Dotted Line layer.
Select All/Float/Defloat
New Raster layer.
Flood fill with your dark color.
Deselect.
Delete the template layer.

Now we’re going to add your tube and elements.
Using your Selection Tool -
Outline the area to the right of your light colored strip.


Center your tube over the area.
Selections/Invert
Tap the delete key.
Selections/Modify/Feather
Number of Pixels:
42
OK
Tap the delete key until you have a nice feathered look.
Deselect.
Apply Xero: Porcelain
Default Settings

Using the Impact Font - or whichever you chose to write your name -
Type out your name with your light color.
Free rotate left 90 degrees and position over your dark colored strip.
If you haven’t made your name layer into a Raster layer yet then stretch your name out if it’s a short one. If your name is already a Raster layer then use your Pick Tool to stretch it out.
Give it the same inner bevel.
Apply the same Noise.

Add your embellishments. I used:
Bow 3: Resize 80%
Bleeding Hearts 1: Resize 60%
Feather 3: Resize 40%
Feather 6: Resize 35%/Mirror
Heart Trails 5: Resize 50% Free rotate left 40 degrees
Bird 1: Resize 40%
Butterfly 4: Resize 30% Duplicate/Mirror/Resize 80%
Rose 4: Resize 55% Free rotate left 25 degrees

Highlight your white background.
Select All.
Copy and paste a paper of choice Into Selection.
Deselect.
Apply the mask.
Merge Group.

Add your copyrights.

Resize all layers 80%.

I hope you enjoyed this tutorial.
I’d love to see your results and show it off in my gallery.
Email me!
Hugs,
Bev

Monday, February 15, 2010

Janesko's Angel

Clicking on the image will enlarge to full view.

Supplies
1 tube of choice - I’m using the wonderful artwork of Jennifer Janesko which you can purchase here.
Font of Choice - I used OhLara which is a pay font
Scraps of Enchantment Template 109 here
Monti Circular Mask here
“Angel‘s Song” is a PTU tagger size scrap kit created by Gina of Gina’s Gems Scraps and can be purchased at Butterfly Blush Designs. You can visit her blog here.

This tutorial was written assuming you have a working knowledge of PSP.

~♥~ Let’s get started ~♥~

Open up the template.
Image/Canvas size 700 X 650
New Raster layer.
Send to bottom.
Flood fill white.
Delete TOU layer and Stars layer.

Highlight Circle Background layer.
Select All/Float/Defloat
New Raster layer.
Copy and paste a paper of choice Into Selection.
Deselect.
Delete the template layer.

Highlight Circle Frame layer.
Select All/Float/Defloat
New Raster layer.
Flood fill with a dark matching color.
Deselect.
Delete the template layer.
Give it a slight inner bevel:


Repeat the above step with Top and Bottom Frame layers.

Highlight Top Background layer.
Select All/Float/Defloat
Copy and paste a paper of choice as a new layer.
Resize 60%
Move into position.
Selections/Invert
Tap the delete key.
Deselect.
Delete the template layer.

Repeat the above step with Bottom Background layer.

Highlight Grey Strip layer.
Select All/Float/Defloat
New Raster layer.
Flood fill with a gradient of your choice.
Deselect.
Delete the template layer.
Give it a slight inner bevel:

Copy and paste your tube as a new layer.
Position it exactly where you’d like it on the right side of the squares.
Duplicate/Mirror
In your layers pallet move the tube below the top frame.
Duplicate the tube and move this one below the bottom frame.

Highlight the Top Background paper layer.
Select All/Float/Defloat
Selections/Invert
Highlight the tube that’s just above it.
Tap the delete key.
Deselect.
Change the Properties to Soft Light.

Highlight the Bottom Background paper layer.
Select All/Float/Defloat
Selections/Invert
Highlight the tube that’s just above it.
Tap the delete key.
Deselect.
Change the Properties to Soft Light.

Add your embellishments. I used:
Flower 2
Heart Pendant: Resize 30%
Wrap 2: Resize 30% Free rotate left 10 degrees
Blossom 1 & 2: Resize 25%
Stainless Glass Butterflies 2 & 4: Resize 25% and 70%
Music Doodle 2: Resize 50%

Highlight your white background.
Select All.
Copy and paste a paper of choice Into Selection.
Deselect.
Copy and paste the Gate as a new layer.
Resize 85%
Merge Visible the Gate and paper.
Apply the mask.
Merge Group.

Add your copyrights.

Add your name.
Give it the same inner bevel you used last.

Resize all layers 80%.

I hope you enjoyed this tutorial.
I’d love to see your results and show it off in my gallery.
Email me!
Hugs,
Bev